background image

42

IMPORTANT

PREPARE

USE

SETTING

TR
OUBLE?

EN
GL
IS

H

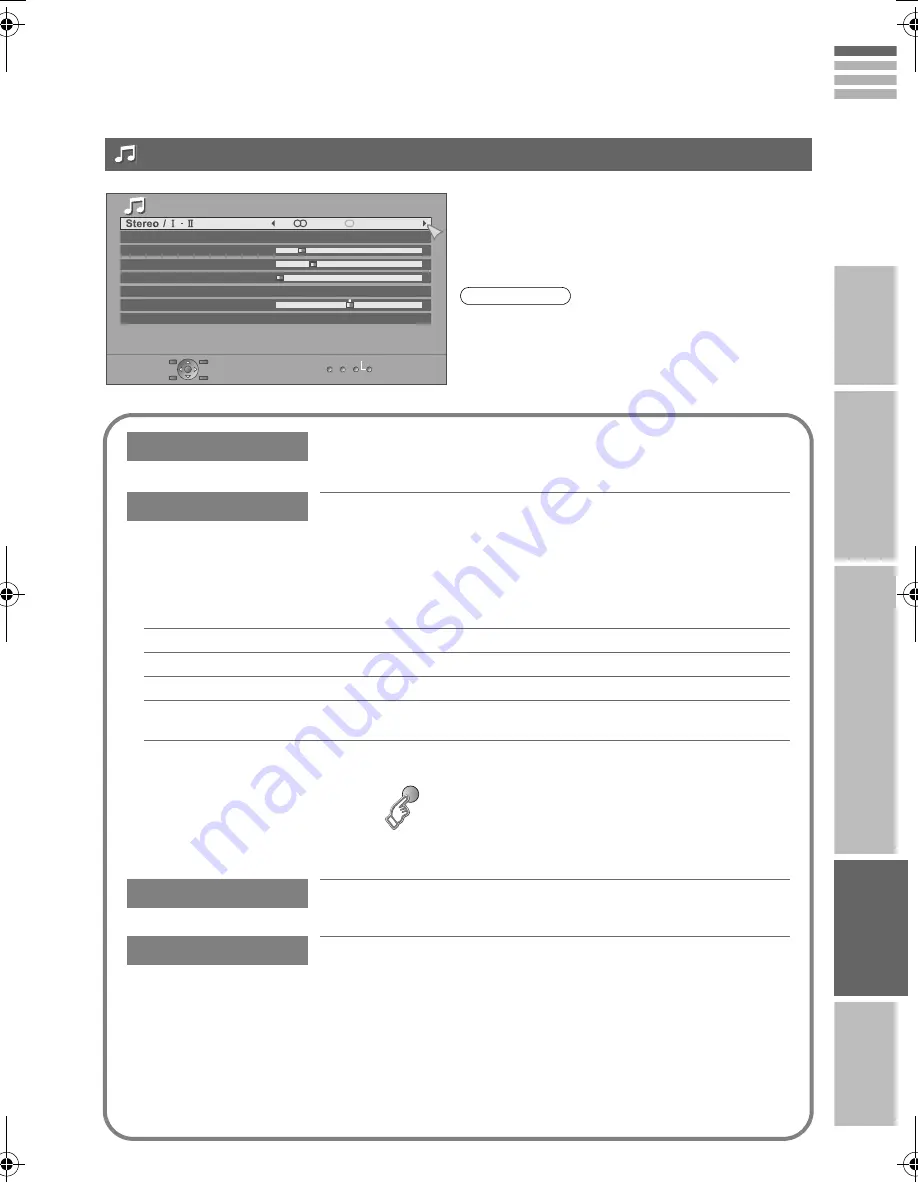
MaxxAudio improves sound performance with four sound features (MaxxBass, MaxxTreble, MaxxStereo 
and MaxxVolume).
You can select one of the four “MaxxAudio” settings. (Off, Low, Mid, High)

You can make further adjustments to the four sound features of the selected preset 
“MaxxAudio” to your liking.

Stereo/

t

·

u

Select stereo, monaural or language (analogue channels)
(

v

: Monaural / 

s

: Stereo / 

t

: SUB1 / 

u

: SUB2)

MaxxAudio

MaxxBass

Compensates low frequencies to widen the frequency band.

MaxxTreble

Compensates high frequencies to widen the frequency band.

MaxxStereo

Expands the stereo sound naturally.

MaxxVolume

Maintains a uniform sound volume even if the sound becomes loud suddenly 
(during commercial breaks etc.).

z

Adjustments made to the three sound features (MaxxBass, MaxxTreble and MaxxStereo) will be stored 
in the selected “MaxxAudio” setting.

z

To return to the default settings 

g

 (blue)

MaxxAudio is a registered trademark of Waves Audio Ltd. in the USA, Japan and other countries.

Balance

Speaker balance (Left stronger 

l

 Right stronger)

Voice Enhancer

Enhances the voice levels to make vocals or dialogues clearer 
when the volume is set to low level. (On / Off)

Sound

MaxxAudio

Low

Off

Off

Reset

MaxxBass
MaxxTreble
MaxxStereo
MaxxVolume

Balance
Voice Enhancer

z

If you connect the Headphone to the TV, “MaxxAudio” 
setting is turned to “Off”.

Note

 Sound

LT-42DP8BG.book  Page 42  Wednesday, June 6, 2007  7:25 PM

Summary of Contents for LT-32DP8BG

Page 1: ... 4820 4821 4822 LT 42DP8BG LT 37DP8BG LT 32DP8BG WIDE LCD PANEL TV 16 9 LCD TV TELEVISEUR A ECRAN LCD PANORAMIQUE TELEVISOR CON PANEL LCD PANORÁMICO INSTRUCTIONS BEDIENUNGSANLEITUNG MANUEL D INSTRUCTIONS MANUAL DE INSTRUCCIONES ENGLISH DEUTSCH FRANÇAIS CASTELLANO LCT2317 001A U ...

Page 2: ......

Page 3: ...pany of Japan Limited ist JVC Technology Centre Europe GmbH Postfach 10 05 52 61145 Friedberg Deutschland Cher e client e Cet appareil est conforme aux directives et normes européennes en vigueur concernant la compatibilité électromagnétique et à la sécurité électrique Représentant européen de la société Victor Company of Japan Limited JVC Technology Centre Europe GmbH Postfach 10 05 52 61145 Frie...

Page 4: ...other rules in your country for the treatment of old electrical and electronic equipment Benutzerinformationen zur Entsorgung alter Geräte DEUTSCH Hinweis Dieses Symbol ist nur in der Europäischen Union gültig Europäische Union Dieses Symbol zeigt an dass das elektrische bzw elektronische Gerät nicht als normaler Haushaltsabfall entsorgt werden soll Stattdessen sollte das Produkt zur fachgerechten...

Page 5: ...ites le conformément à la législation nationale ou autres règles en vigueur dans votre pays pour le traitement des appareils électriques et électroniques usagés Información para los usuarios sobre la eliminación de equipos usados CASTELLANO Atención Este símbolo sólo es válido en la Unión Europea Unión Europea Este símbolo indica que los aparatos eléctricos y electrónicos no deben desecharse junto...

Page 6: ... i f e H a p p y B i r t h d a y W i t h a l l m y l o v e t o d a y a n d a l w a y s Edit Message Board ABC Off Close T o m y l o v e l y w i f e H a p p y B i r t h d a y W i t h a l l m y l o v e t o d a y a n d a l w a y s As a small surprise on special ...

Page 7: ...1 z Using EPG 23 z Viewing teletext 25 z Watching analogue channels 27 z Watching videos DVDs 29 z Message board 31 Try the advanced features z Useful functions 33 z Operate JVC recorders and other devices 37 Just the way you like it z Customising your TV 39 When you have trouble z Troubleshooting 57 z Technical Information 61 z CH CC List 65 z Specifications 66 occasions 31 PAGE Message board Dig...

Page 8: ...unit cannot completely turn off the TV Make appropriate arrangements for bedridden people Never try to repair the TV yourself gIf the problem cannot be solved in Troubleshooting P 57 unplug the power cord and contact your retailer Make enough room for inserting and removing the power plug Place the TV as close to the outlet as possible z Even if the TV s power lamp is unlit the main power supply i...

Page 9: ...ctric shock never allow liquids to enter the unit Never listen to headphones at high volume z It may damage your hearing Hold the TV so as not to scratch the screen z Do not touch the screen when carrying the TV Do not carry the TV on your own z In order to prevent accidents ensure that the TV is carried by two or more people Never dismantle the rear panel z It may cause an electric shock Never ob...

Page 10: ...ot light up g Power Lamp P 44 Switch between TV AV devices P 30 Display on screen menu set Change channel page Volume Power On Off To headphones P 9 Eco Sensor g What is Eco Mode P 63 Check accessories WARNING Batteries shall not be exposed to excessive heat such as direct sunshine fire or the like Remote control RM C1911 AAA R03 Batteries For confirming the TV works Tidying the cables LT 37DP8BG ...

Page 11: ...us To the previous channel Change channel page Mute Channel information P 21 27 Switch digital analogue channels View teletext P 25 Volume Colour buttons Display on screen menu P 39 Change the aspect ratio P 34 Change the MaxxAudio setting P 35 Take a snapshot of the screen P 35 View in multi picture mode P 36 Display the message board Switch TV RADIO P 21 View subtitles P 33 Audio select P 34 Whe...

Page 12: ...When attaching the TV to the wall use the optional JVC wall mounting unit z Consult a qualified technician z See the included manual on mounting procedures z JVC assumes no responsibility for damage due to improper mounting z 200 mm x 200 mm mount which conforms to VESA standards Installation requirements z To avoid overheating ensure the unit has ample room AERIAL z After all the connections have...

Page 13: ... the Smart Card Consult your broadcasting company or retailer A Unplug the power cord B Insert B into A C Insert A D Plug the power cord and turn the power on E Perform necessary settings g Common Interface P 54 z Pay TV analogue channels cannot be watched AERIAL Connect a VCR DVD recorder z After all the connections have been made insert the plug into an AC outlet z Connect T V LINK compatible re...

Page 14: ...e Headphones z Audio signals received from EXT 5 and EXT 6 cannot be sent to the AUDIO OUT terminal DVD player Satellite broadcast Digital broadcast tuner VCR DVD recorder T V LINK compatible Video camera Game consoles To EXT 3 R L PC IN z Check for PC compatibility g PC signals that can be displayed P 61 z Use cable with ferrite cores and no longer than of 3 m to avoid electromagnetic disturbance...

Page 15: ... g P 62 EXT 1 Watching videos Output j Input h Composite signal Sound L R Composite signal RGB S VIDEO Sound L R EXT 2 Dubbing videos using T V LINK Output j Input h Composite signal Sound L R Composite signal RGB S VIDEO Sound L R EXT 3 Watching videos Output j Input h Composite signal S VIDEO Sound L R EXT 4 Watching DVDs Output j Input h Component signal P 66 Sound L R EXT 5 EXT 6 Connecting HD...

Page 16: ... Grundig Data Logic Metz SMARTLINK Sony Easy Link Philips To the previous screen g Exit g If the JVC logo does not appear or if you wish to make changes later gDigital channel settings Configuration P 51 Installation P 55 gAnalogue channel settings Set Up P 45 TV DTV Register digital analogue channels on TV These channels can be edited later In this manual digital terrestrial broadcasting is indic...

Page 17: ...ill appear z After completing following steps read When the TV cannot find the digital channels P 14 and try scanning digital channels again Castellano Català First Time Installation Language Setting Step 1 Please choose language Language Deutsch English Select OK Navigate Français B set A select Germany First Time Installation Country Setting Step 2 Please choose country Country Spain Select OK N...

Page 18: ...r Message Board and menus excluding the DTV menus select TV DTV 1 Register analogue channels To change the country 2 Check what was registered To edit channels g Editing analogue channels P 17 If not editing channels 3 Set T V LINK When using T V LINK z If Feature Not Available appears g P 59 When not using T V LINK Auto Program Belgium Nederland Italia France Deutschland United Kingdom Country Su...

Page 19: ...ange the direction of the indoor aerial z Is there a digital channels transmission tower nearby g Turn Attenuator to On P 46 since the radio waves are too strong z Attenuator attenuates the radio waves of analogue broadcast as well as those of digital broadcast If some noise or snow appears when watching an analogue channel please set Attenuator to Off temporarily Note z Register digital channels ...

Page 20: ... C Edit channels To the previous menu g Exit g D Finish TV DTV A select B next B next A select 1 2 3 4 5 6 7 8 9 10 RTL Television RTL2 Super RTL VOX Doku KiKa Info 3sat ZDF TERRA NOVA CNN Int VIVA Edit PR List Edit PR Exit MENU OK Select PR Select Function TV Name Delete Favourites Number Lock 14 00 05 05 2007 select Select channel Select edit function A select B next Next Editing digital channel...

Page 21: ...t PR List 14 00 05 05 2007 TV Name Delete Favourites Number Lock 1 RTL Television 2 RTL2 3 Super RTL 4 VOX 5 Doku KiKa 6 Info 3sat 7 ZDF 8 TERRA NOVA Edit PR Exit MENU OK Select PR Select Function Lock icon Release g z To enable Lock function turn the TV off and on again z To watch the locked channels the PIN code must be entered g When entering the PIN code P 47 z Enter PIN code if needed g When ...

Page 22: ...menu g Exit g D Finish z If Feature Not Available appears g P 59 z T V LINK g What is T V LINK P 11 When using T V LINK When not using T V LINK TV DTV A select B next B next A select Manual Move ID Delete Insert ARD AV PR ID Edit CH CC 01 02 CH 02 03 CH 03 04 CH 04 05 06 07 08 09 05 CH 06 CH 01 CC 02 CC 03 CC 04 CC select a channel Select channel Select edit function ID Insert Delete Manual Move N...

Page 23: ...ter the first character blue Naming a channel z Receives the broadcast signal z CH CC List g P 65 Select a CH CC Enter a number Fine System Search Fine Search AV PR ID Manual CH CC 01 02 03 CH 03 04 CH 04 05 06 07 08 09 05 CH 06 CH 01 CC 02 CC 03 CC 04 B G CC ARD 02 CH z Press the red or green button Auto search begins and the nearest frequency is imported g Repeat the previous steps until the des...

Page 24: ...r t h d a y W i t h a l l m y l o v e t o d a y a n d a l w a y s Watching TV 21 PAGE View subtitles Select audio language Change the aspect ratio Enjoy the good sound Take snapshots of the screen Watch in multi picture mode 33 PAGE Useful functions PR List RTL Television 1 RTL2 2 3 VOX 4 Doku KiKa 5 Info 3sat 6 ZDF 7 TERRA NOVA 8 CNN lnt 9 VIVA 10 Super RTL ...

Page 25: ... Watching videos DVDs 29 PAGE Picture 23 PAGE Using EPG Electronic Programme Guide 14 00 05 05 2007 05 05 06 05 07 05 08 05 09 05 10 05 11 05 12 05 14 00 15 00 Nachrichten 4 VOX 5 Doku KiKa 6 Info 3sat 7 ZDF 9 CNN lnt 14 00 Nachrichten 15 00 Golf 17 00 Nachrichten 17 15 Musik 18 00 Wetter 18 20 Nachrichten 18 50 Fußball 20 20 Nachrichten 20 30 Wetter 1 RTL Television RTL Television 2 RTL2 3 Super ...

Page 26: ...Add a new station g P 55 z Some digital channels cannot be watched on this TV g P 61 A Set to TV B Power on z Press again to turn the screen off and put the TV into standby mode C Switch to digital channels D Switch TV RADIO E Select a channel z To the previous channel g z View subtitles Select audio language g P 33 34 The green power lamp on the TV lights TV DTV Note Using EPG z Switch between di...

Page 27: ...mme More information z PR List appears You can select only from your favourite channels g Favourite Mode P 52 PR List PR List RTL Television 1 RTL2 2 3 VOX 4 Doku KiKa 5 Info 3sat 6 ZDF 7 TERRA NOVA 8 CNN lnt 9 VIVA 10 Super RTL B view A select Close PR List Enter a channel number Move up or down a channel E g 15 1 up down z You can select only from your favourite channels g Favourite Mode P 52 Th...

Page 28: ...iKa 6 Info 3sat 7 ZDF 9 CNN lnt 14 00 Nachrichten 15 00 Golf 17 00 Nachrichten 17 15 Musik 18 00 Wetter 18 20 Nachrichten 18 50 Fußball 20 20 Nachrichten 20 30 Wetter 05 05 06 05 07 05 08 05 09 05 10 05 11 05 12 05 1 RTL Television ZDF 2 RTL2 3 Super RTL 4 VOX 8 TERRA NOVA TV Radio Genre Date Channel Programme Genre icon General Movie News Entertainment Sports Children Music Culture Current Affair...

Page 29: ... 05 08 05 09 05 10 05 11 05 12 05 1 RTL Television ZDF 2 RTL2 3 Super RTL 8 TERRA NOVA Your selected genres are displayed Reserve a programme to watch and record 1 Display the timer select menu 2 Set Timer gProceed to B in Timer DTV P 49 Timer Please select timer Record Remind red B set A select Record Reserve a programme to record Remind Reserve a programme to watch Electronic Programme Guide 14 ...

Page 30: ...lect a coloured button to save your page to 3 Enter the number of the page to save 4 Save Exit g Recall your favourite page g Press the coloured button as in step 2 LIST MODE LIST MODE red green yellow blue A Switch digital analogue channels When watching TV B Enter a teletext page Move up or down a page View sub pages TV DTV TEXT TV TEXT up down to sub page TV DTV ...

Page 31: ... pages Display hidden information answers to quizzes etc REVEAL Switch briefly from teletext to TV Leave the current page open while you switch to watch TV z Useful when running a page search CANCEL To the index page Returns to page 100 or a previously designated page INDEX Enlarge the text Double the size of the displayed text SIZE ...

Page 32: ...broadcasting g Stereo t u P 42 z To completely turn off the TV unplug the power plug A Set to TV B Power on z Press again to turn the screen off and put the TV into standby mode C Switch to analogue channels D Select a channel To the previous channel g The green power lamp on the TV lights TV DTV Note Register a channel to a button FAVOURITE CHANNEL Using the number buttons up down buttons Using P...

Page 33: ...number to register it on The following Picture and Sound menu settings applied to the channel will be stored in the favourite channel as well z Picture Mode Super DigiPure Colour System P 40 41 z MaxxVolume Voice Enhancer P 42 Recall the favourite channel Check your favourite channels g Press and confirm that the channels you have registered have a beside them Delete a favourite channel g Favourit...

Page 34: ...age g PC Position P 46 z HDMI terminal setting g HDMI Setting P 46 A select B next B next A select DTV EXT Setting EXT 1 EXT 2 Dubbing EXT 4 EXT 3 TV ID List S In Arrow Select an EXT Select the arrow select select Next A Select the video source B Operate the connected device and play a video Operate JVC recorders and other devices P 37 E g For EXT 1 B watch A select EXT Mode 0 AV 1 EXT 1 2 EXT 2 3...

Page 35: ...2 EXT 2 3 EXT 3 4 EXT 4 5 HDMI1 6 HDMI2 7 PC 8 DTV To analogue channels To digital channels S In Switch to S Video input ID List Edit names of connected devices Dubbing Set up dubbing on EXT 2 Cancel this mode g Press yellow again z mark will appear at the selected EXT z The device selection display will change from E1 to S1 yellow Clear the name g Select the blank space in the list A Show the nam...

Page 36: ... B Hide the message board To hide temporarily z The message board is displayed whenever the TV is turned on To turn off z The message board is not displayed even if the TV is turned on z To display g z The message board will not be displayed the first time you turn on the TV upon purchased z If you have trouble viewing the message board with its translucent background in the Features menu change A...

Page 37: ... character in the text is not allowed The existing character will be overwritten z To input characters in a different language in the Set Up menu change the Language selection P 45 To enter the characters To move the cursor To clear or change character To clear all characters press for more than 1 second To delete a character To switch between uppercase and lowercase characters z For characters th...

Page 38: ...ly selected z When no subtitles are broadcasted No Subtitles is displayed Switch to another language Special subtitles for the hearing impaired Undefined When the subtitle s language cannot be identified z The language that can be selected depends on the broadcast SUBTITLE Subtitle Selection Off On Off On Aselect Bset Don t display Display Aselect On Bnext Subtitle Selection Off On German English ...

Page 39: ... 9 Zoom Subtitle Full Aselect Bset 16 9 Zoom Select audio language Digital channels By default the language set in Audio Language P 51 is automatically selected When not broadcast in that language another broadcast language is automatically selected Switch to another language Special audio track for the visually impaired Undefined When the audio s language cannot be identified Dolby Dolby Digital ...

Page 40: ...ls or PC mode z You cannot save or export the snapshot FREEZE Still picture Current programme Enjoy the good sound 1 2 Select the MaxxAudio setting z You can adjust the MaxxAudio settings in the Sound menu P 42 z If you connect the Headphone to the TV MaxxAudio setting is turned to Off MaxxAudio A select B set Sound MaxxAudio Low Off Off Reset MaxxBass MaxxTreble MaxxStereo MaxxVolume Balance Voic...

Page 41: ...ommercials In this case the layout of the screen in dual picture mode changes automatically according to the aspect ratio signal Select an analogue channel in 12 screen mode All registered analogue channels are displayed as still images MULTI PICTURE B set 1 2 12 Select the number of screens Selecting returns to normal viewing mode z Not available in PC mode 1 Main Sub Main Sub For wide aspect rat...

Page 42: ...rts back to code A or 1 Code A or 1 Default Code C or 3 Press and hold Press and hold Note Operate the VCR DVD recorder or HDD recorder Operate the DVD Player Operate the home theatre system VCR DVR DVD HC A Select a device z The indicator lights for 3 seconds each time the remote control is operated B Turn on the device C Operate the device z Other buttons can be used to operate the TV at any tim...

Page 43: ... subtitle g Press Mute g Press Volume g Press Select a surround mode g Press VCR HDD recorders DVD recorders Display menu Back to previous menu Display top menu Select OK Rewind Playback Fast forward Record Stop Pause Select a chapter Display menu Back to previous menu Display top menu Select OK Rewind Playback Fast forward Stop Pause Select a chapter Display menu Back to previous menu Display top...

Page 44: ...lour Hue Colour Temp Features select change adjust select Super DigiPure Auto Movie Theatre Auto Colour Management On Picture Management On Smart Picture On MPEG Noise Reduction On Colour System 4 3 Auto Aspect Features 7 9 1 5HFRUGLQJ HYLFH RZQORDG 79 When T V LINK menu appears Next Press to hide the bottom area of the menu excluding DTV menus Press again to display it z Depending on the situatio...

Page 45: ... in a dark room Bright 1 Backlight brightness Darker l Brighter Contrast Contrast Lower l Higher Bright 2 Brightness Darker l Brighter Sharp Sharpness Softer l Sharper Colour Colour Lighter l Deeper Hue Tint Reddish l Greenish NTSC only Colour Temp Colour temperature Warm Normal Cool Features g Features sub menu P 41 Picture Picture Mode Bright 1 Standard Normal Reset Contrast Bright 2 Sharp Colou...

Page 46: ...ce MPEG video noise On Off Colour System When there is no colour change the colour system PAL SECAM NTSC3 58 NTSC4 43 Main Main picture Sub Sub picture in MULTI PICTURE mode P 36 z When watching videos etc you can select Auto Automatically selects the colour system 4 3 Auto Aspect Select a default aspect ratio for Auto in Zoom P 34 Panoramic Regular 14 9 Zoom Main PAL Sub Auto Colour System Panora...

Page 47: ...tereo Expands the stereo sound naturally MaxxVolume Maintains a uniform sound volume even if the sound becomes loud suddenly during commercial breaks etc z Adjustments made to the three sound features MaxxBass MaxxTreble and MaxxStereo will be stored in the selected MaxxAudio setting z To return to the default settings g blue MaxxAudio is a registered trademark of Waves Audio Ltd in the USA Japan ...

Page 48: ...a locked channel Use the number buttons to enter the channel number When appears press and enter your ID No with the number buttons z If you forget your ID No perform step 1 again Sleep Timer 0 1 2 0 Off B set A select 0 4 0 0 C set A select a number B to the next column ARD AV PR ID CH CC 01 02 CH 02 03 CH 03 04 CH 04 05 06 07 08 09 05 CH 06 CH 01 CC 02 CC 03 CC 04 CC Child Lock select blue Lock ...

Page 49: ...XT mode Blue Back Displays a blue screen and mutes the sound when the signal is weak or absent On Off analogue channels Favourite Setting Remove a channel from the Favourite channel list analogue channels For more details g FAVOURITE CHANNEL P 27 Power Lamp Lights the power lamp P 5 while the TV is on On Off Eco Mode Automatically adjusts the picture contrast according to the brightness of your ro...

Page 50: ... for the Message Board and menus excluding DTV menus Auto Program Belgium Nederland Italia France Deutschland United Kingdom Country Suomi Norge Sverige Danmark Switzerland Ireland Start More yellow select z For the next page blue Auto Program CH 02 0 ARD AV PR ID Edit CH CC 01 02 CH 02 03 CH 03 04 CH 04 05 06 07 08 09 05 CH 06 CH 01 CC 02 CC 03 CC 04 CC Language Suomi Svenska Norsk Dansk Nederlan...

Page 51: ...r Analogue Normally set to Auto HDMI CEC If you use a HDMI CEC compatible device set this setting to On z For more details g What is HDMI CEC P 63 Attenuator Select On when digital channels are not received because of too strong radio waves On Off z Attenuator attenuates the radio waves of analogue broadcast as well as those of digital broadcast If some noise or snow appears when watching an analo...

Page 52: ...is 0000 z You can set your own PIN code g Enter PIN code P 52 䡵 When a message with option selections appears 䡵 When an information message appears This function is locked Please enter PIN code Scan completed Store services Yes No B set A select PIN code changed OK DTV Menu DTV Menu Timer Edit PR Configuration Setup Installation z If you cannot display this menu switch to digital channels Note TV ...

Page 53: ...nt VIVA Edit PR List Edit PR Exit MENU OK Select PR Select Function TV Name Delete Favourites Number Lock 14 00 05 05 2007 Select Exit MENU OK Navigate Germany Country Time Zone English Menu Language German Audio Language Subtitle Language German Teletext Language German German EPG Language Enter PIN Code Off Favourite Mode Maturity Rating Configuration 14 00 05 05 2007 Select Exit MENU Navigate P...

Page 54: ...Off On Maturity Rating Lock the recording with the maturity rating Lock Unlock Please select timer Record Remind red B set A select Record Reserve a programme to record Remind Reserve a programme to watch Record PR ZDF Start 17 15 End 18 00 Date 05 05 2007 Mode Once Audio PCM Analogue Subtitle Off Maturity Rating Lock Remind PR ZDF Start 17 15 Date 05 05 2007 Mode Once select 䡵 Select a programme ...

Page 55: ...nded to do a recording test z If you use a T V LINK incompatible device manually set the device s timer to record the external input at the same recording times set on the TV For details refer to the device s manual z The power lamp on the TV will start blinking 3 minutes before the start time green or red Then it will light during recording green or orange Timer PR 14 00 05 05 2007 Start End Date...

Page 56: ... Menu Language Select a language for on screen displays when watching digital channel including the DTV menus Audio Language Select a default language for audio 1 Subtitle Language Select a default language for subtitle 1 Teletext Language Select a default language for teletext 1 EPG Language Select the default language for programme name and programme information 1 Auto Dublin Lisbon London Amste...

Page 57: ...o if no radio channel is registered to the favourite channels Maturity Rating Set the viewing age limit This function is locked Please enter PIN code z Default is 0000 z If you forget the code input 0081 Enter new PIN code Confirmation PIN code changed OK Menu Language Audio Language Subtitle Language Teletext Language Enter PIN Code Favorite Mode Maturity Rating None Maturity Rating Age 4 Age 5 A...

Page 58: ... The Receiver Upgrade function works only when the TV is off standby z If new software is available the TV will automatically download and upgrade the tuner software z If the TV detects channels that became receivable or if the TV was not able to receive a certain channel a message about updating the PR List will be displayed when the TV is turned on g Updating the PR List P 62 Auto The search for...

Page 59: ...ed No CI Module will be displayed and this function cannot be used Press OK button to display the Conditional Access Module menu and follow the instructions on the screen z The content of the menu is different depending on the broadcasting company gFor details consult your broadcasting company z The language shown in the menu may differ from the Language set for the TV Antenna Power When using an ...

Page 60: ... Stop channel Mode Select a Mode Add Register only new channels and update the PR list The current PR list settings will not be changed No channel will be deleted Reinstall Re install all channels The current PR list settings and Timer settings will be cancelled The channels which the TV could not receive will be deleted 䡵 To update the PR list Set Scan to Automatic or Network If you want to retai...

Page 61: ...uency of the digital broadcasting It differs from the channel number displayed on the TV Factory Settings All registered digital channels are deleted and the DTV menu settings are initialised Digital channels are reregistered Mode Add Start Scan Scan completed Store services Yes No A select Start Scan B start scanning B set A select Yes ARD Network Name ZDF RTL C set A select B registered cancel s...

Page 62: ...etailer z Are connected devices too close to the TV gInsert the minimum distance between the aerial and the cause of interference until no interference Ghosting Doubling of images z Are you receiving interference from signals reflected off mountains or buildings gAdjust the direction of your aerial or change to a good quality directional aerial Digital channels g P 14 The remote control doesn t wo...

Page 63: ...etc with 625p progressive scanning change the output setting of the external device to 625i interlace scanning 30 Poor sound z Adjust the MaxxAudio setting z If receiving a poor signal in Stereo t u switch to v monaural z Change the broadcasting system using Manual 42 42 18 PC screen alignment is off z Adjust the PC Position 46 No sound from the audio component z Audio signals received from EXT 5 ...

Page 64: ... available in dual picture mode Feature Not Available appears z Is the T V LINK compatible device connected to EXT 2 z Is the SCART CABLE Fully Wired z Is the T V LINK compatible device turned on After confirming all the conditions above press OK button again ACI Error appears z Press W to start ACI again If you still receive the ACI Error after numerous tries press X to cancel ACI No Recording z ...

Page 65: ...2 Locked channels can be watched without inputting PIN code z Once the PIN code is input all the lock functions Lock and Maturity Rating are released If you want to use the lock function again turn the TV off and then turn it on again When the clock is off time z Change the Time Zone setting 51 Black or white dots appear on the screen z LCD panels use fine dots pixels to display images While more ...

Page 66: ... PC signals that can be displayed z If the signal doesn t appear check that the vertical frequency on the PC is set to 60Hz Resolution 640 x 480 VGA 1024 x 768 XGA Vertical frequency Hz 60 0 60 0 Connect DVI devices Connect a DVI device to EXT 5 HDMI using DVI HDMI conversion cable Connect analogue sound output of the DVI device to L and R terminals in EXT 4 z Set Audio in HDMI Setting to Analogue...

Page 67: ...minal z When recording a programme When Dolby is displayed in the Audio Selection menu P 34 selecting Dolby will change the Digital Audio Output setting to Dolby Digital temporarily z A message recommending you to change the Digital Audio Output setting to Dolby Digital is displayed for a few seconds If you want to record a Dolby Digital signal using timer record P 49 change Audio of the timer rec...

Page 68: ...DMI CEC enabled devices z Devices that are not enabled to HDMI CEC cannot be controlled with this TV Control the TV using the HDMI CEC enabled device z Turn the TV on and switch to the video source of the operating device z Switch to the video source of the operating device z Turn the TV off with the HDMI CEC enabled device you are viewing For operating instructions of the device refer to the devi...

Page 69: ...nd 100 Hz and half the holding time without reducing brightness or contrast By using this technology you will be able to reduce blurring or ghost images when there is rapid or complex movement across the screen By using Auto Demonstration you can display the differences between conventional LCD 50 Hz and LCD panel equipped with 100Hz Clear Motion Drive 1 To simulate Moving image of conventional LC...

Page 70: ...219 S19 CH 29 CH 229 E29 R29 CH 59 CH 259 E59 R59 CC 20 CC 220 S20 CH 30 CH 230 E30 R30 CH 60 CH 260 E60 R60 CC 21 CC 221 S21 CH 31 CH 231 E31 R31 CH 61 CH 261 E61 R61 CC 22 CC 222 S22 CH 32 CH 232 E32 R32 CH 62 CH 262 E62 R62 CC 23 CC 223 S23 CH 33 CH 233 E33 R33 CH 63 CH 263 E63 R63 CC 24 CC 224 S24 CH 34 CH 234 E34 R34 CH 64 CH 264 E64 R64 CC 25 CC 225 S25 CH 35 CH 235 E35 R35 CH 65 CH 265 E65 ...

Page 71: ...size measured diagonally 105 cm 94 cm 80 cm Dimensions W x H x D mm without stand 1030 x 719 2 x 296 1030 x 672 x 122 4 919 x 654 2 x 230 919 x 603 8 x 124 1 800 x 595 4 x 230 800 x 545 x 115 4 Weights without stand 28 5 kg 26 4 kg 20 3 kg 18 8 kg 16 6 kg 15 1 kg Accessories See Check accessories P 5 Terminals Connectors Terminal name Terminal type Signal type IN Signal type OUT Notes Input Output...

Page 72: ...0607KTH SW MU 2007 Victor Company of Japan Limited ...

Page 73: ...PANORÁMICO TV LCD WIDESCREEN NESTEKIDENÄYTÖLLÄ VARUSTETTU LAAJAKUVATELEVISIO WIDE SCREEN LCD TV BREDBILDS LCD TV INSTRUCTIONS BEDIENUNGSANLEITUNG MANUEL D INSTRUCTIONS MANUAL DE INSTRUCCIONES ISTRUZIONI KÄYTTÖOHJE INSTRUKTIONSBOG BRUKSANVISNING ENGLISH DEUTSCH FRANÇAIS CASTELLANO ITALIANO SUOMI DANSK SVENSKA LCT2284 001A U ...

Page 74: ...pany of Japan Limited ist JVC Technology Centre Europe GmbH Postfach 10 05 52 61145 Friedberg Deutschland Cher e client e Cet appareil est conforme aux directives et normes européennes en vigueur concernant la compatibilité électromagnétique et à la sécurité électrique Représentant européen de la société Victor Company of Japan Limited JVC Technology Centre Europe GmbH Postfach 10 05 52 61145 Frie...

Page 75: ...apan Limited in Euroopan edustaja on JVC Technology Centre Europe GmbH Postfach 10 05 52 61145 Friedberg Saksa Kære kunde Dette apparat er i overensstemmelse med gældende europæiske direktiver og standarder vedrørende elektromagnetisk kompatibilitet og elektrisk sikkerhed Europæisk repræsentant for Victor Company of Japan Limited er JVC Technology Centre Europe GmbH Postfach 10 05 52 61145 Friedbe...

Page 76: ... other rules in your country for the treatment of old electrical and electronic equipment Benutzerinformationen zur Entsorgung alter Geräte DEUTSCH Hinweis Dieses Symbol ist nur in der Europäischen Union gültig Europäische Union Dieses Symbol zeigt an dass das elektrische bzw elektronische Gerät nicht als normaler Haushaltsabfall entsorgt werden soll Stattdessen sollte das Produkt zur fachgerechte...

Page 77: ...ites le conformément à la législation nationale ou autres règles en vigueur dans votre pays pour le traitement des appareils électriques et électroniques usagés Información para los usuarios sobre la eliminación de equipos usados CASTELLANO Atención Este símbolo sólo es válido en la Unión Europea Unión Europea Este símbolo indica que los aparatos eléctricos y electrónicos no deben desecharse junto...

Page 78: ...r altre nazioni al di fuori dell Unione Europea Qualora si desideri smaltire questo prodotto effettuare lo smaltimento in conformità alla normativa nazionale applicabile o alle altre leggi della propria nazione relative al trattamento delle apparecchiature elettriche ed elettroniche obsolete Tietoja käyttäjille vanhojen laitteiden hävittämisestä SUOMI Huomio Tämä symboli on voimassa vain Euroopan ...

Page 79: ...ældende lovgivning eller andre regler i dit land for behandling af gammelt elektrisk og elektronisk udstyr Information till användare gällande kassering av gammal utrustning SVENSKA Tänk på Att denna symbol endast gäller inom den Europeiska gemenskapen Europeiska gemenskapen Denna symbol anger att elektrisk och elektronisk utrustning inte ska kasseras som vanligt hushållsavfall när de inte ska anv...

Page 80: ... i f e H a p p y B i r t h d a y W i t h a l l m y l o v e t o d a y a n d a l w a y s Edit Message Board ABC Off Close T o m y l o v e l y w i f e H a p p y B i r t h d a y W i t h a l l m y l o v e t o d a y a n d a l w a y s As a small surprise on special ...

Page 81: ...l devices 13 Let s try it out z Enjoy your new TV 15 z Watching TV 17 z Viewing teletext 19 z Watching videos DVDs 21 z Message board 23 Try the advanced features z Useful functions 25 z Operate JVC recorders and other devices 27 Just the way you like it z Customising your TV 29 When you have trouble z Troubleshooting 37 z Technical Information 40 z CH CC List 43 z Specifications 44 occasions 23 P...

Page 82: ...unit cannot completely turn off the TV Make appropriate arrangements for bedridden people Never try to repair the TV yourself gIf the problem cannot be solved in Troubleshooting P 37 unplug the power cord and contact your retailer Make enough room for inserting and removing the power plug Place the TV as close to the outlet as possible z Even if the TV s power lamp is unlit the main power supply i...

Page 83: ...ctric shock never allow liquids to enter the unit Never listen to headphones at high volume z It may damage your hearing Hold the TV so as not to scratch the screen z Do not touch the screen when carrying the TV Do not carry the TV on your own z In order to prevent accidents ensure that the TV is carried by two or more people Never dismantle the rear panel z It may cause an electric shock Never ob...

Page 84: ... exposed to excessive heat such as direct sunshine fire or the like TV AV MENU OK P Remote control sensor Power lamp ON Lit Blue OFF Unlit z When Power Lamp is set to Off the Power lamp will not light up g Power Lamp P 34 Switch between TV AV devices Display on screen menu set Change channel page Volume Power On Off To headphones P 13 Eco Sensor g What is Eco Mode P 41 ...

Page 85: ... P 21 Select and confirm settings in menus To the previous channel Change channel page Mute Channel information P 17 Return to TV To teletext P 19 Volume Colour buttons Display on screen menu P 29 Hold the current page Bookmark pages Reveal hidden pages Enlarge the text Switch briefly between teletext and TV To index page Change the aspect ratio P 25 Change the MaxxAudio setting P 25 Take a snapsh...

Page 86: ... When attaching the TV to the wall use the optional JVC wall mounting unit z Consult a qualified technician z See the included manual on mounting procedures z JVC assumes no responsibility for damage due to improper mounting z 200 mm x 200 mm mount which conforms to VESA standards Installation requirements z To avoid overheating ensure the unit has ample room AERIAL z After all the connections hav...

Page 87: ...42P80BU AERIAL Connect a VCR DVD recorder z After all the connections have been made insert the plug into an AC outlet z Connect T V LINK compatible recording device to EXT 2 z T V LINK g What is T V LINK P 9 VCR DVD recorder EXT 2 EXT 1 z LT 32P80BU is not equipped with cable clamp ...

Page 88: ...y registered on the device z The Direct Rec function to be used g Technical Information P 40 T V LINK variations T V LINK JVC Q LINK Panasonic Megalogic Grundig Data Logic Metz SMARTLINK Sony Easy Link Philips To the previous screen g Exit g If the JVC logo does not appear or if you wish to make changes later g Language and Auto Program P 35 ...

Page 89: ...uage Suomi Svenska Norsk Dansk Nederlands Castellano Italiano Deutsch Français English Català Türkçe Português Magyar Polski B set A select Auto Program Belgium Nederland Italia France Deutschland United Kingdom Country Suomi Norge Sverige Danmark Switzerland Ireland Start More select z For the next page g Yellow Auto Program CH 02 0 z If ACI Start appears select and start settings This will set u...

Page 90: ...ature Not Available appears g P 39 z T V LINK g What is T V LINK P 9 When using T V LINK When not using T V LINK A select B next B next A select Manual Move ID Delete Insert BBC1 AV PR ID Edit CH CC 01 02 CH 02 03 CH 03 04 CH 04 05 06 07 08 09 05 CH 06 CH 01 CC 02 CC 03 CC 04 CC select a channel Select channel Select edit function ID Insert Delete Manual Move Next 7 9 1 5HFRUGLQJ HYLFH RZQORDG 79 ...

Page 91: ...select enter the first character blue Naming a channel z Receives the broadcast signal z CH CC List g P 43 Select a CH CC Enter a number Fine System Search Fine Search AV PR ID Manual CH CC 01 02 03 CH 03 04 CH 04 05 06 07 08 09 05 CH 06 CH 01 CC 02 CC 03 CC 04 B G CC BBC1 02 CH z Press the red or green button Auto search begins and the nearest frequency is imported g Repeat the previous steps unt...

Page 92: ...ne Headphones z Audio signals received from EXT 5 and EXT 6 cannot be sent to the AUDIO OUT terminal DVD player Satellite broadcast Digital broadcast tuner VCR DVD recorder T V LINK compatible Video camera Game consoles To EXT 3 R L PC IN z Check for PC compatibility g PC signals that can be displayed P 40 z Use cable with ferrite cores and no longer than of 3 m to avoid electromagnetic disturbanc...

Page 93: ...e TV on external speakers EXT 1 Watching videos Output j Input h Composite signal Sound L R Composite signal RGB S VIDEO Sound L R EXT 2 Dubbing videos using T V LINK Output j Input h Composite signal Sound L R Composite signal RGB S VIDEO Sound L R EXT 3 Watching videos Output j Input h Composite signal S VIDEO Sound L R EXT 4 Watching DVDs Output j Input h Component signal P 44 Sound L R EXT 5 E...

Page 94: ...Change the aspect ratio Enjoy the good sound Take snapshots of the screen Watch in multi picture mode Viewing teletext Watching TV 25 PAGE 19 PAGE 17 PAGE Useful functions 1 0 1 0 PR List 09 08 07 06 05 04 03 02 01 BBC1 AV ...

Page 95: ...Audio etc Set Up settings Auto Program Language etc Features settings Sleep Timer Child Lock etc Customising your TV 29 PAGE Watching videos DVDs Message board 23 PAGE 21 PAGE Picture Edit Message Board ABC Off Close T o m y l o v e l y w i f e H a p p y B i r t h d a y W i t h a l l m y l o v e t o d a y a n d a l w a y s ...

Page 96: ...z To completely turn off the TV unplug the power plug A Set to TV B Power on z Press again to turn the screen off and put the TV into standby mode C Select a channel To the previous channel g The blue power lamp on the TV lights Note Register a channel to a button FAVOURITE CHANNEL Using the number buttons up down buttons Using PR list Channel information and clock Volume Mute ...

Page 97: ... number to register it on The following Picture and Sound menu settings applied to the channel will be stored in the favourite channel as well z Picture Mode Super DigiPure Colour System P 30 31 z MaxxVolume Voice Enhancer P 32 Recall the favourite channel Check your favourite channels g Press and confirm that the channels you have registered have a beside them Delete a favourite channel g Favouri...

Page 98: ...our favourites list 2 Select a coloured button to save your page to 3 Enter the number of the page to save 4 Save Exit g Recall your favourite page g Press the coloured button as in step 2 LIST MODE LIST MODE red green yellow blue A When watching TV B Enter a teletext page Move up or down a page View sub pages TEXT TV TEXT up down to sub page ...

Page 99: ... pages Display hidden information answers to quizzes etc REVEAL Switch briefly from teletext to TV Leave the current page open while you switch to watch TV z Useful when running a page search CANCEL To the index page Returns to page 100 or a previously designated page INDEX Enlarge the text Double the size of the displayed text SIZE ...

Page 100: ...PC image g PC Position P 36 z HDMI terminal setting g HDMI Setting P 36 A select B next B next A select EXT Setting EXT 1 EXT 2 Dubbing EXT 4 EXT 3 TV ID List S In Arrow Select an EXT Select the arrow select select Next A Select the video source B Operate the connected device and play a video Operate JVC recorders and other devices P 27 E g For EXT 1 B watch A select EXT Mode 0 AV 1 EXT 1 2 EXT 2 ...

Page 101: ...input ID List Edit names of connected devices Dubbing Set up dubbing on EXT 2 Cancel this mode g Press yellow again z mark will appear at the selected EXT z The device selection display will change from E1 to S1 yellow Clear the name g Select the blank space in the list A Show the name list B Select a name from the list blue B set A select select the dubbing source ...

Page 102: ... B Hide the message board To hide temporarily z The message board is displayed whenever the TV is turned on To turn off z The message board is not displayed even if the TV is turned on z To display g z The message board will not be displayed the first time you turn on the TV upon purchased z If you have trouble viewing the message board with its translucent background in the Features menu change A...

Page 103: ... character in the text is not allowed The existing character will be overwritten z To input characters in a different language in the Set Up menu change the Language selection P 35 To enter the characters To move the cursor To clear or change character To clear all characters press for more than 1 second To delete a character To switch between uppercase and lowercase characters z For characters th...

Page 104: ...r and Full can be selected z Using Auto g Auto in Zoom P 40 ZOOM Zoom Auto Regular Panoramic 14 9 Zoom 16 9 Zoom 16 9 Zoom Subtitle Full Aselect Bset 16 9 Zoom Enjoy the good sound 1 2 Select the MaxxAudio setting z You can adjust the MaxxAudio settings in the Sound menu P 32 z If you connect the Headphone to the TV MaxxAudio setting is turned to Off MaxxAudio A select B set Sound MaxxAudio Low Of...

Page 105: ...ing returns to normal viewing mode z Not available in PC mode 1 Select the number of screens Main Sub Main Sub For wide aspect ratio signals B watch A select a channel Main Only the selected frame has a moving picture z Not available for EXT 5 or EXT 6 input z Move up or down a page Take snapshots of the screen Cancel gPress again or change the channel z Not available when the SUB PICTURE is displ...

Page 106: ...rts back to code A or 1 Code A or 1 Default Code C or 3 Press and hold Press and hold Note Operate the VCR DVD recorder or HDD recorder Operate the DVD Player Operate the home theatre system VCR DVR DVD HC A Select a device z The indicator lights for 3 seconds each time the remote control is operated B Turn on the device C Operate the device z Other buttons can be used to operate the TV at any tim...

Page 107: ... subtitle g Press Mute g Press Volume g Press Select a surround mode g Press VCR HDD recorders DVD recorders Display menu Back to previous menu Display top menu Select OK Rewind Playback Fast forward Record Stop Pause Select a chapter Display menu Back to previous menu Display top menu Select OK Rewind Playback Fast forward Stop Pause Select a chapter Display menu Back to previous menu Display top...

Page 108: ...p Features select change adjust select Super DigiPure Auto Movie Theatre Auto Colour Management On Picture Management On Smart Picture On MPEG Noise Reduction On Colour System 4 3 Auto Aspect Features 7 9 1 5HFRUGLQJ HYLFH RZQORDG 79 When T V LINK menu appears Next Press to hide the bottom area of the menu Press again to display it z Depending on the situation video signal formats external inputs ...

Page 109: ...Soft in a dark room Bright 1 Backlight brightness Darker l Brighter Contrast Contrast Lower l Higher Bright 2 Brightness Darker l Brighter Sharp Sharpness Softer l Sharper Colour Colour Lighter l Deeper Hue Tint Reddish l Greenish NTSC only Colour Temp Colour temperature Warm Normal Cool Features g Features sub menu P 31 Picture Picture Mode Bright 1 Standard Normal Reset Contrast Bright 2 Sharp C...

Page 110: ...ce MPEG video noise On Off Colour System When there is no colour change the colour system PAL SECAM NTSC3 58 NTSC4 43 Main Main picture Sub Sub picture in MULTI PICTURE mode P 26 z When watching videos etc you can select Auto Automatically selects the colour system 4 3 Auto Aspect Select a default aspect ratio for Auto in Zoom P 25 Panoramic Regular 14 9 Zoom Main PAL Sub Auto Colour System Panora...

Page 111: ...ands the stereo sound naturally MaxxVolume Maintains a uniform sound volume even if the sound becomes loud suddenly during commercial breaks etc z Adjustments made to the three sound features MaxxBass MaxxTreble and MaxxStereo will be stored in the selected MaxxAudio setting z To return to the default settings g blue MaxxAudio is a registered trademark of Waves Audio Ltd in the USA Japan and other...

Page 112: ...channel Use the number buttons to enter the channel number When appears press and enter your ID No with the number buttons z If you forget your ID No perform step 1 again Sleep Timer 0 1 2 0 Off B set A select 0 4 0 0 C set A select a number B to the next column BBC1 AV PR ID CH CC 01 02 CH 02 03 CH 03 04 CH 04 05 06 07 08 09 05 CH 06 CH 01 CC 02 CC 03 CC 04 CC Child Lock select blue Lock Release ...

Page 113: ... is weak or absent On Off Favourite Setting Remove a channel from the Favourite channel list For more details g FAVOURITE CHANNEL P 17 Power Lamp Lights the power lamp P 5 while the TV is on On Off Eco Mode Automatically adjusts the picture contrast according to the brightness of your room On Off Demo For more details g What is Eco Mode P 41 Favourite Setting PR 01 1 PR 03 2 PR 05 3 PR 07 4 select...

Page 114: ... for the menus and Message Board Auto Program Belgium Nederland Italia France Deutschland United Kingdom Country Suomi Norge Sverige Danmark Switzerland Ireland Start More yellow select z For the next page blue Auto Program CH 02 0 BBC1 AV PR ID Edit CH CC 01 02 CH 02 03 CH 03 04 CH 04 05 06 07 08 09 05 CH 06 CH 01 CC 02 CC 03 CC 04 CC Language Suomi Svenska Norsk Dansk Nederlands Castellano Itali...

Page 115: ... If picture size is not correct in 480p 525p change this setting to 1 or 2 Normally set to Auto Audio If there is no sound change this setting to Digital or Analogue Normally set to Auto HDMI CEC If you use a HDMI CEC compatible device set this setting to On z For more details g What is HDMI CEC P 41 PC Position Adjust the position of the PC image Auto Demonstration Starts the 100Hz Clear Motion D...

Page 116: ...ed devices too close to the TV gInsert the minimum distance between the aerial and the cause of interference until no interference Ghosting Doubling of images z Are you receiving interference from signals reflected off mountains or buildings gAdjust the direction of your aerial or change to a good quality directional aerial The remote control doesn t work z Are the batteries flat z Are you more th...

Page 117: ...using an external device z If you connected S Video output device check the S In setting z If the top of the image is distorted check the video signal quality itself z If movement appears unnatural when receiving a signal from a DVD player etc with 625p progressive scanning change the output setting of the external device to 625i interlace scanning 22 Poor sound z Adjust the MaxxAudio setting z If...

Page 118: ...input signal of EXT 1 and EXT 2 are not available in dual picture mode Feature Not Available appears z Is the T V LINK compatible device connected to EXT 2 z Is the SCART CABLE Fully Wired z Is the T V LINK compatible device turned on After confirming all the conditions above press OK button again ACI Error appears z Press W to start ACI again If you still receive the ACI Error after numerous trie...

Page 119: ...e country selected during Auto Program the receivable broadcast system differs z UNITED KINGDOM Receive only PAL I z FRANCE Can receive SECAM L To receive SECAM L in countries other than France 1 Change the Country to France in Auto Program P 35 2 Press the BACK button to return to the menu and enter the channel using Insert or Manual P 12 PC signals that can be displayed z If the signal doesn t a...

Page 120: ...DMI CEC enabled devices z Devices that are not enabled to HDMI CEC cannot be controlled with this TV Control the TV using the HDMI CEC enabled device z Turn the TV on and switch to the video source of the operating device z Switch to the video source of the operating device z Turn the TV off with the HDMI CEC enabled device you are viewing For operating instructions of the device refer to the devi...

Page 121: ...ss the screen By using Auto Demonstration you can display the differences between conventional LCD 50 Hz and LCD panel equipped with 100Hz Clear Motion Drive 1 To simulate Moving image of conventional LCD the TV will display two same frames at a time The illustrations are emphasized to make clear differences between LCD panel equipped with 100Hz Clear Motion Drive and conventional LCD z Set Auto D...

Page 122: ...219 S19 CH 29 CH 229 E29 R29 CH 59 CH 259 E59 R59 CC 20 CC 220 S20 CH 30 CH 230 E30 R30 CH 60 CH 260 E60 R60 CC 21 CC 221 S21 CH 31 CH 231 E31 R31 CH 61 CH 261 E61 R61 CC 22 CC 222 S22 CH 32 CH 232 E32 R32 CH 62 CH 262 E62 R62 CC 23 CC 223 S23 CH 33 CH 233 E33 R33 CH 63 CH 263 E63 R63 CC 24 CC 224 S24 CH 34 CH 234 E34 R34 CH 64 CH 264 E64 R64 CC 25 CC 225 S25 CH 35 CH 235 E35 R35 CH 65 CH 265 E65 ...

Page 123: ... mm without stand 1030 x 719 2 x 296 1030 x 672 x 122 4 919 x 654 2 x 230 919 x 603 8 x 124 1 800 x 595 4 x 230 800 x 545 x 115 4 Weights without stand 28 kg 25 9 kg 19 9 kg 18 4 kg 16 3 kg 14 8 kg Accessories See Check accessories P 5 Terminals Connectors Terminal name Terminal type Signal type IN Signal type OUT Notes Input Output terminals EXT 1 Euroconnector x 1 SCART connector Composite video...

Reviews: