background image

18

Picture Size

The required picture format can be set by pressing 

the 

PICTURE SIZE

 button. Press 

PICTURE SIZE


until the required format is displayed.

You move through the following formats when you 

press the button: Auto, 4:3, 16:9, 14:9, Cinema, 

Real (HDMI mode only).

Auto

The picture is automatically only then shown in 

a format-filling display when a WSS-TV signal is 

received.

Note:

Auto is not available in Component mode.

Example:

If the analogue tuner receives a letterbox image with WSS 

signal then the resulting image looks like this:

illustration 1:

Letterbox image is increased

WSS:

Public broadcasters include 16:9 identification, 

the WSS signal (WideScreenSignalling), during 

transmission in order to ensure automatic 

conversion to 16:9.

Some private broadcasters do not transmit a WSS 

signal. Automatic does not recognise anything 

without WSS signal and does not automatically alter 

the picture size. Use the 

PICTURE SIZE

 button to 

set the required picture size for private channels.

Other formats

Press 

PICTURE SIZE

 until the desired size is 

reached.

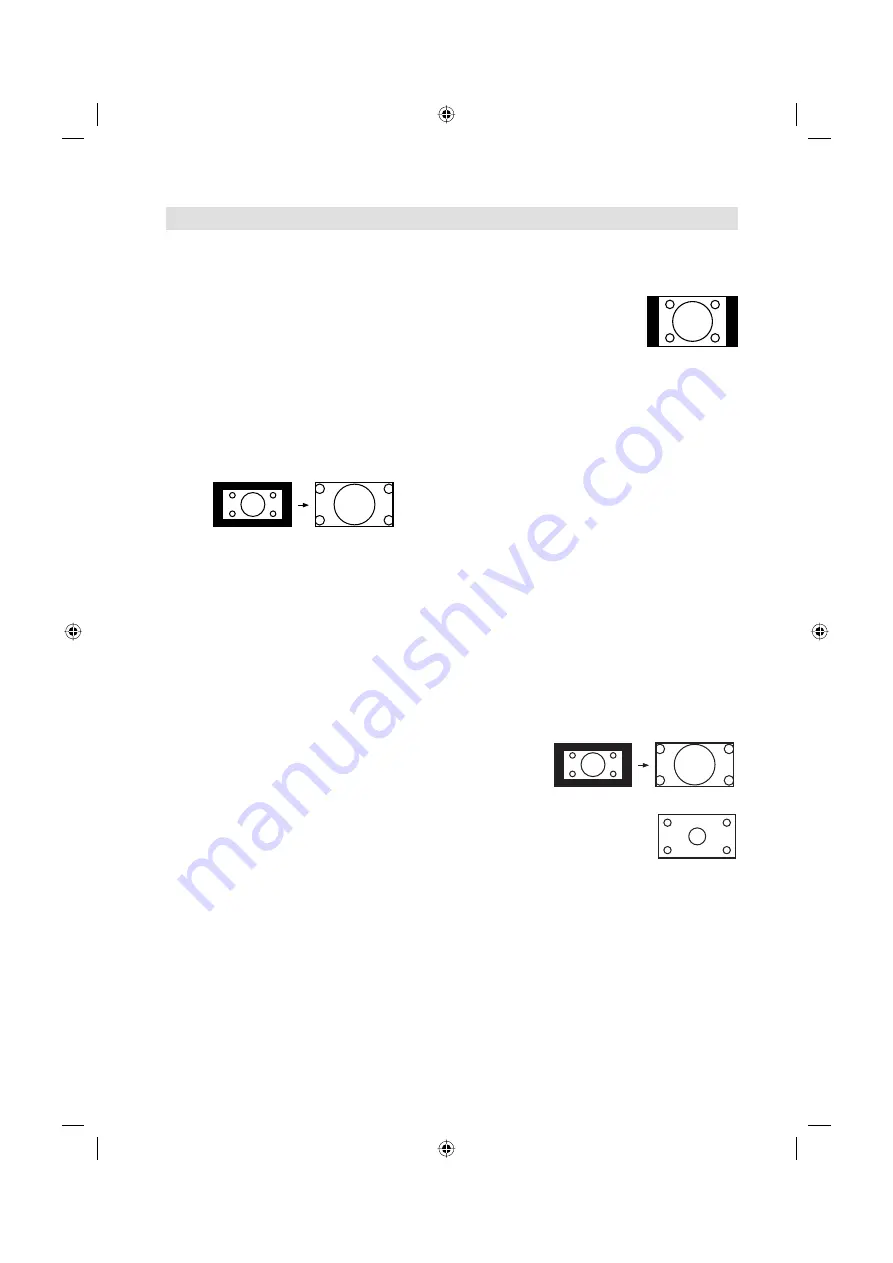
4:3

The picture is displayed in 4:3 

format with black bars to the 

right and left.

16:9

The width of the picture will be zoomed evenly.

16:9

 is particularly suitable for DVD players, DVB-T, 

DVB-C and satellite receivers, which can transmit 

and show 16:9 feature films without black bars. In 

the set-up menu of the set, adjust it to show that a 

16:9 TV set is connected.

14:9

The picture is increased somewhat but not up to the 

full screen width. Black bars remain on the right and 

left and also at the top and bottom.

Cinema

Use Cinema to increase a small 4:3 letterbox signal. 

How do you recognise whether the broadcasting 

station / the set operating is using a 4:3 letterbox 

signal that is too low? Press the 

PICTURE SIZE


button on the remote control until the 4:3 format 

appears. If the picture is surrounded by a black 

border as in the illustration, this is a 4:3 letterbox 

signal. Limited by the broadcasting station / the 

set operating, this signal is much too low for a 

16:9 HD screen. Cinema increases this picture 

that is too small as far as possible. Natural visible 

poor focus emerges, rather as if a postcard were 

being increased to poster size. This unfocused 

appearance is conditioned by input signals that are 

too low and is in no way a production fault in this TV 

set.

4:3 Letterbox picture increased to Cinema format.

Real (HDMI mode only)

All images are displayed on the 

TV screen of 16:9 ratio without 

overscanning.

Note:

In PC mode, the picture size feature is available only for 

16:9- or 4:3- format.

External receivers can automatically adjust the picture 

size via a SCART cable. Please read the instructions for 

the external receiver.

If you select Real, the image might become a horizontal 

expansion according to the signal format. 

In this case, select an appropriate aspect with 

PICTURE SIZE

Picture format

3CX0501A_EN.indd   18

3CX0501A_EN.indd   18

10/8/10   4:00:36 PM

10/8/10   4:00:36 PM

Summary of Contents for LT-22HG22J

Page 1: ...Before operating the unit please read this manual thoroughly LCD TV LT 22HG22J Operating Instructions 3CX0501A_EN indd 1 3CX0501A_EN indd 1 10 8 10 4 00 19 PM 10 8 10 4 00 19 PM ...

Page 2: ...ish Danish and Norwegian Hyperband cable DVB T Combi Tuner Electronic Progr Guide EPG for DVB T 999 Channel position memory for Digital CH and 100 Channel position memory for Analogue CH Videotext Fastext TOPtext Remote control Sleep timer COMPONENT input Headphone Jack for mini plug PC Connection VGA see page 22 HDMI connection Auto Power Off after 4 hours with no operation Equipment connected to...

Page 3: ...tion for Users on Disposal of Old Equipment and Batteries European Union These symbols indicate that the electrical and electronic equipment and the battery with this symbol should not be disposed of as general household waste at its end of life Instead the products should be handed over to the applicable collection points for the recycling of electrical and electronic equipment as well as batteri...

Page 4: ...t for advice and leave the installation work to experts Incomplete installation work can cause you injuries Taking fall prevention measures If these measures are not taken the unit can fall and you could be injured Contact the shop where you purchased the unit to obtain full details of the measures When a TV stand is used Ensure the unit is fully on the stand and placed in the centre Do not leave ...

Page 5: ... own safety read following instruction carefully before attempting to connect this unit to the mains supply GREEN YELLOW Earth ifthereisearthcable FUSE BROWN Live BLUE Neutral MAINS AC OPERATION The wires in the mains lead are coloured in accordance with the following code As the colours of the wires in the mains lead of this appliance may not correspond with the coloured markings identifying the ...

Page 6: ...ED BY YOUR WARRANTY Never leave your TV on for long periods of time while it is displaying the following formats or images Fixed Images such as stock tickers video game patterns TV station logos and websites SpecialFormatsthatdonotusetheentirescreen Forexample viewingletterboxstyle 16 9 mediaonanormal 4 3 display Black bars at top and bottom of screen or viewing normal style 4 3 media on a widescr...

Page 7: ... off you may power on To power on press power button 1x and release For confirmation standby LED will change to blue 5 TV AV PC ENTER button Select input mode Press TV AV PC ENTER Then press to select input source Then press In Menu Using as ENTER button 6 MENU button To display the menu screen 7 buttons Press to change to a higher numbered channel set into memory Press to change to a lower number...

Page 8: ... Activate menu 11 In menu return 1 step exit menu Cursor buttons Memorize Channel List 13 Turn the sound on off 14 Display the subtitle Volume Still picture Hold the text page 14 14 Switches between the present channel and the last selected channel Sub Page selection 14 14 Change the TV channel or Teletext page up or down 13 Teletext ON Text mix OFF 14 Reveal quiz page answers 14 Teletext enlargem...

Page 9: ...ch as sunshine fire or the like 1 Open the battery compartment 2 Install the batteries as shown below ensuring the correct polarity 3 Close the battery compartment The remote control handset will not work properly in the following cases a If bright sunlight directly beams onto the unit front b If an obstacle is placed between the unit and the handset Z Z Z Z Z Z c If the batteries have not been in...

Page 10: ...NE jack Plug headphones with a mini plug 3 5 mm into this jack H PC INPUT PC See P 22 I PC DVI AUDIO input See P 22 23 J SCART socket AV1 For the connection of SCART cables See P 24 25 AV1 Transmits RGB S Video and CVBS in and CVBS tuner out K Power supply Connect the supplied power cable to an AC 220 240V 50Hz mains power supply only do not attempt to connect it to any other type of supply Never ...

Page 11: ...plete 6 When the tuning for Digital TV channels is completed you will be asked if you want to proceed to autotuning for Analogue TV channels If you wish to start autotune Analogue TV channels connect your Analogue cable TV antenna and press ENTER Note If you do not wish to carry out the autotuning for Analogue TV channels press MENU to exit the menu Auto Installation Setup 6 Start Auto Tune Analog...

Page 12: ...MNO PQR STU TCM VWXYZ FRATV1 Del Skip Swap 0671 0672 0673 0674 0679 0800 Channel Channel Manager 1 Lock red button Red mark will appear Lock is available only when Child Lock is On See page16 2 Del green button Green mark will appear 3 Skip yellow button Yellow mark will appear 4 Rename ENTER button You can change the name of a channel on the cursor screen with ENTER and Red Green Yellow buttons 5...

Page 13: ...ge You can also select the audio format Stereo Left or Right by pressing of or Press then press or to select DTV Subtitle Then press or to select the Subtitle language Then press ENTER Note Some DVB broadcasts may not provide subtitle language service To cancel the Audio Subtitle language menu press RETURN Manual Station search Digital Manual Search Return Return Enter Enter Menu Exit Move Channel...

Page 14: ...l be cut off The muting can be released by pressing again or or Still picture Press FREEZE to make a still picture To cancel the still picture press FREEZE again Note The still picture function is not available for 1080p 50Hz 60Hz input mode During still picture mode PICTURE SIZE feature is not available If you press PICTURE SIZE still picture mode will be canceled If you performed the still pictu...

Page 15: ...ssion frequency This is possible through compression in accordance with the MPEG standard which is similar to digital data storage on a DVD The data rate of DVB T is just a lot lower at present the max video bit rate is approx 4Mbps and the max audio bit rate is at 256kbps Visible interference e g blocky picture can result at extremely low data rates despite there being excellent reception quality...

Page 16: ... BBC TWO AXN HBO MTV BBC NEWS Star Movies Daily Prev Day Next Day Sun 12 31 Sun Mon Tue Wed Thu Fri Sat Sun 13 02 13 03 13 03 13 04 13 04 13 05 13 05 14 10 14 10 15 00 15 00 16 45 16 45 17 00 672_BBC TWO_SMPTE Color Bar_0101_0002 672_BBC TWO_SMPTE Color Bar_0101_0002 672_BBC TWO_SMPTE Color Bar_0101_0002 672_BBC TWO_SMPTE Color Bar_0101_0002 672_BBC TWO_SMPTE Color Bar_0101_0002 672_BBC TWO_SMPTE ...

Page 17: ...re format and the resolution received For example the Super Cinemascope format can be received in all resolutions even in the HD resolution1080ix1920 For HDTV reception too an HDTV set may display black bars at the top and bottom 4 3 picture 1 1 on 16 9 screen 4 3 picture zoomed on 16 9 screen Picture size and resolution Digital Cable receiver with HDMI output required Best picture quality is achi...

Page 18: ...just it to show that a 16 9 TV set is connected 14 9 The picture is increased somewhat but not up to the full screen width Black bars remain on the right and left and also at the top and bottom Cinema Use Cinema to increase a small 4 3 letterbox signal How do you recognise whether the broadcasting station the set operating is using a 4 3 letterbox signal that is too low Press the PICTURE SIZE butt...

Page 19: ...terbox format or a noisy analogue cable TV signal This feature can slightly reduce interferences caused by the faulty input signal This option is not available in DTV Component1080i p HDMI1080i p and DVI mode Off Low Middle High Reset Select Reset to reset Picture options to the factory preset values Sound Sound Mode You can change the sound mode setting If you select User you can change the setti...

Page 20: ... can be set here Analogue Teletext Lang See page 14 Clock Date The date time is displayed that is recognized on this unit You can not adjust the date time manually Time Time Zone If the time displayed on the Channel Information differs from the actual time adjust the time offset until the correct time zone is shown Normally this would be done by selecting Auto DST If DST is set to On time is displ...

Page 21: ...Mode See page 23 Blue Back You can set the TV to automatically change to a blue screen and mute the sound if the signal is weak or absent This option is not available for DTV PC and Radio mode On Off Reset TV Setting Press to enter the Reset TV Setting screen Press to select OK then press ENTER Reset the TV function will now begin and this unit will automatically turn off Software Upgrade This opt...

Page 22: ...lly as per the input PC video signal When PC input mode was selected and a PC signal was input Auto Adjust will be performed automatically H Position To adjust the horizontal placing of the image V Position To adjust the vertical placing of the image Phase Eliminates the horizontal PHASE interfering lines Clock Eliminates the vertical CLOCK interfering lines Example Adjust the H Position 1 During ...

Page 23: ... Mode Blue Back Reset TV Setting Software Upgrade Version Picture Sound Channel Feature Setup Never Auto Auto Auto PC Video Setup 2 Then press or to select the desired mode Then press Auto Auto factory setting can remain in this mode Change not necessary PC PC for PC if desired Video Video for Video if desired 3 Press MENU to exit the menu Note Please notice the operating manual for the HDMI devic...

Page 24: ...ll be inferior and parts of the picture might be missing This is not a fault of this TV set In case you need help to make this adjustment with your satellite receiver DVD player please consult the related instructions or contact the supplier or maker of those apparatus for support Please use the satellite s remote control handset to select Teletext or desired TV station Generally it is not possibl...

Page 25: ... PAL 576i 1080i or NTSC 480i 1080i and progressive signals PAL 576p 720p or NTSC 480p 720p DVD player 3 Connecting an audio system You can supply the TV sound to the stereo equipment A with the SCART socket Use a special SCART cable for the connection which sold at the accessory shop please consult your hi fi instructions for details If you have a surround sound amplifier decoder B with a coaxial ...

Page 26: ...ubscribe No colour or picture black AV input set to Auto 21 The LCD panel is a very high technology product giving you fine picture details Occasionally a few nonactive pixels may appear on the screen as a fixed point of blue green or red Please note that this does not affect the performance of your product System Analogue PAL B G D K I SECAM B G D K SECAM L L Digital DVB T for UK Video Colour Sys...

Page 27: ...BER READY Information on software license The following open source software component is included in this product Posix Compatibility Layer Portions of this software is CYGPKG_POSIX Copyright 1990 1999 The Regents of the University of California All rights reserved MIPS HAL Portions of this software is CYGPKG_HAL_MIPS Copyright 1992 The Regents of the University of California All rights reserved ...

Page 28: ...J3CX0501B SH10 12 P 2010 Victor Company of Japan Limited 1110TMH OR OR 3CX0501B_EN indd 28 3CX0501B_EN indd 28 11 9 10 3 12 59 PM 11 9 10 3 12 59 PM ...

Reviews: