background image

ENGLISH

19

iPod/iPhone

iPod/iPhone

 Operation  buttons

[   ]

Displays the other operation button 
window.
•  To hide the window, press [   ].

[   ]

Displays the audio/video track menu. 
(See the right column.)

[FNC 

J

]

Displays the pop-up short-cut menu. 
(Page 9)
•  To close the menu, press [

K

].

[

S

] [

T

]

•  Selects a track. (Press)
•  Reverse/forward search. (Hold)

[

I

/

W

]

Starts/pauses playback.

 ]

 Selects repeat playback mode.

• 

 SONGS

: Functions the same as 

Repeat One.

• 

 ALL

: Functions the same as 

Repeat All.

 ]

*

Selects random playback mode.


• 

 SONGS

: Functions the same as 

Shuffle Songs.

• 

 ALBUMS

: Functions the same as 

Shuffle Albums.

[MODE]

Changes the settings for iPod/iPhone 
playback on the 

<Mode>

 screen. 

(Page 18)

 ]

Displays the 

<iPod Settings>

 screen. 

(Page 17)

•  To display all available operation buttons, press 

[   ] to display the other operation button 
window.

*

  To cancel random mode, press the button repeatedly until the 

indicator disappears.


R

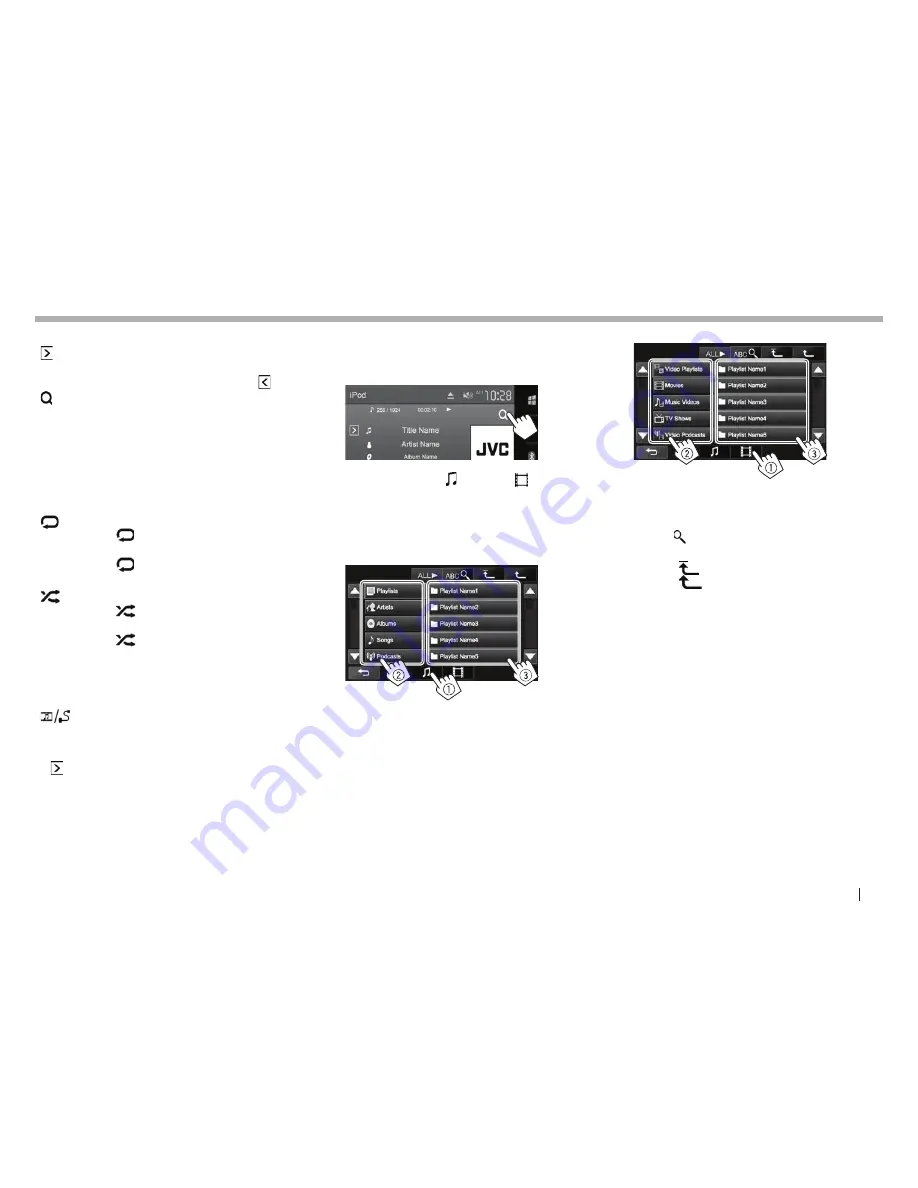
  Selecting an audio/video track from the 
menu

1

  Display the menu screen.

2

  Select the menu (  : audio or 

 : video) 

(

1

), a category (

2

), then a desired item 

(

3

).

•  Select an item in each layer until you reach 

and select the desired track.

Audio menu:

Video menu:

•  You can change the page to display more 

items by pressing [

J

]/[

K

].

•  To list the items in alphabetical order, press 

[ABC 

 ]

, then select the first character.

• Press 

[ALL 

I

]

 to play all songs/videos.

• Press [ 

 ] to return to the top layer.

• Press [ 

 ] to return to the upper layer.

•  Available categories differ depending on the type 

of your iPod/iPhone.

2016̲KW-V̲Mid̲K.indb   19

2015/12/10   18:05

Summary of Contents for KW-V620BT

Page 1: ...TION MANUAL KW V620BT This instruction manual is used to describe models listed below Model availability and features functions may differ depending on the country and sales area Region 1 DVD Region Code 1 area Region 4 DVD Region Code 4 area 2016 KW V Mid K indb 1 2015 12 10 18 05 ...

Page 2: ... To prevent accidents and damage DO NOT install any unit or wire any cable in a location where it may obstruct the steering wheel and gearshift lever operations it may obstruct the operation of safety devices such as air bags it may obstruct visibility DO NOT operate the unit while driving If you need to operate the unit while driving be sure to look around carefully The driver must not watch the ...

Page 3: ...ce The term IC before the certification registration number only signifies that the Industry Canada technical specification were met CAUTION This equipment complies with FCC IC radiation exposure limits set forth for an uncontrolled environment and meets the FCC radio frequency RF Exposure Guidelines in Supplement C to OET65 and RSS 102 of the IC radio frequency RF Exposure rules This equipment ha...

Page 4: ...r view camera User Customize Page 51 Change the display design Demonstration Page 55 Activate or deactivate the display demonstration 2 Finish the procedure The Home screen is displayed AV Off is selected initially Select the playback source Page 8 Calendar Clock settings 1 Display the Home screen On the monitor panel 2 Display the Settings screen 3 Display the Calendar Setting screen 4 Select the...

Page 5: ...n Switches the screen between the current source and the App screen from the connected iPod touch iPhone Android Press Page 20 Turns off the screen Hold See the right column Turns on the screen Hold See the right column 6 Volume button Adjusts the audio volume See the right column 7 Monitor panel 8 Screen touch panel Common operations RTurning on the power RTurning off the power Hold RAdjusting th...

Page 6: ...g on the selected source 2 1 3 Common operating buttons 1 Displays the other operation button window 2 Pops up closes the short cut menu Page 9 3 Source buttons Changes the playback source Page 8 The source buttons shown on the Home screen are displayed Page 7 Gesture control on the source control screen You can also control playback by moving your finger on the touch panel as follows for some sou...

Page 7: ... the right column 5 button Displays all playback sources and items Page 8 Settings screen Changes the detailed settings Page 54 3 4 2 1 Common operating buttons 1 Selects the menu category 2 Changes the page 3 Returns to the previous screen 4 Displays the current source control screen RTouch screen operations 1 3 2 4 1 Displays the video control menu while playing a video 2 Displays the source con...

Page 8: ...input terminal Page 36 BT Audio Plays a Bluetooth audio player Page 44 Phone Switches to the phone control screen Page 41 PANDORA Switches to the Pandora broadcast Page 21 iHeartRadio Switches to the iHeartRadio broadcast Page 23 SiriusXM Switches to the SiriusXM radio broadcast Page 29 Maestro Switches to the source connected via ADS adapter Page 36 AV Off Turns off the AV source Page 6 Camera Sw...

Page 9: ...e pop up short cut menu 1 Display the pop up short cut menu On the source control screen You can also display the pop up short cut menu by pressing B on the monitor panel while the source control screen is displayed 2 Select an item to jump to Displays the phone control screen Page 41 Activates the voice dialing Page 43 Displays the Equalizer screen Page 48 Displays the picture adjustment screen P...

Page 10: ...ce control screen When removing a disc pull it horizontally You can eject a disc when playing another AV source If the ejected disc is not removed within 60 seconds the disc is automatically inserted again into the loading slot to protect it from dust Playback operations When the operation buttons are not displayed on the screen touch the area shown on the illustration To change settings for video...

Page 11: ...n the screen differs depending on the type of disc file being played back 1 Media type 2 Track file information Touching the text scrolls it if not all of the text is shown 3 Current playback item information folder no file no track no 4 Playing time 5 Playback status 6 DISC IN indicator 7 Audio format 8 Playback modes Page 13 9 Jacket picture Shown while playing if the file has tag data that incl...

Page 12: ...s differ depending on the type of disc file being played back Displays the picture size selection screen Page 50 Selects the aspect ratio Page 50 Displays the picture adjustment screen Page 49 Selects the audio type For DVD VR Selects the audio channel ST stereo L left R right Selects the subtitle type Selects the view angle Switches to the direct disc menu mode Touch the target item to select To ...

Page 13: ... other operation button window by pressing Available playback modes differ depending on the type of disc file being played back You cannot activate the repeat mode and the random mode at the same time Each time you press the button the playback mode changes The corresponding indicator lights up Available items differ depending on the type of disc file being played back CHAPTER Repeats current chap...

Page 14: ...mark OFF Select this to hide the angle mark Screen Ratio Select the monitor type to watch a wide screen picture on the external monitor 16 9 Initial 4 3 LB 4 3 PS Parental Level Set the parental lock See the right column CD Read Select the files to play on a disc containing music files You cannot change the setting when a disc is inserted 1 Initial Automatically distinguishes between audio file di...

Page 15: ...if the file has tag data that includes the jacket picture 6 Audio format 7 Playback modes See the right column Operation buttons Available buttons on the screen and operations differ depending on the type of file being played back Displays the other operation button window To hide the window press Displays the list selection screen Page 16 FNC J Displays the pop up short cut menu Page 9 To close t...

Page 16: ...rst character Press to return to the root folder Press to return to the upper layer If you want to play all tracks in the folder press I on the right of the desired folder On the Category List Folder List screen You can switch the file type to list Press to list audio files to list video files or to list still picture files From the Category List screen Select the category 1 then the item in the s...

Page 17: ... pin connector models You cannot watch video with a Bluetooth connection RSelecting the iPod iPhone device to play and connection method When connecting the iPod iPhone device for the first time the setup screen for connection etc appears Follow the procedure on the setup screen to configure the settings 1 Display the iPod Settings screen On the Home screen If Enter for iPod Setup cannot be select...

Page 18: ...d iPhone playback When the source is iPod 1 Display the Mode screen 2 Audiobooks Select the speed of audio books Wide Screen ON Select this to display video compatible with wide screen display in wide screen OFF Select this to deactivate You cannot change the setting when iPod iPhone is connected Playback operations When the operation buttons are not displayed on the screen touch the area shown on...

Page 19: ... Page 18 Displays the iPod Settings screen Page 17 To display all available operation buttons press to display the other operation button window To cancel random mode press the button repeatedly until the indicator disappears RSelecting an audio video track from the menu 1 Display the menu screen 2 Select the menu audio or video 1 a category 2 then a desired item 3 Select an item in each layer unt...

Page 20: ...ps as the source Page 8 When a caution message is displayed operate by following the message ROperation buttons on the source control screen Displays the other operation button window To hide the window press FNC J Displays the pop up short cut menu Page 9 To close the menu press K S T Selects an audio video file I W Starts pauses playback Displays the APP Settings screen Page 46 To display all av...

Page 21: ...buttons on the source control screen 1 3 4 2 Playback information 1 Track information Touching the text scrolls it if not all of the text is shown 2 Playing time 3 Playback status 4 Picture data Operation buttons Displays the other operation button window To hide the window press Displays the list selection screen Page 22 FNC J Displays the pop up short cut menu Page 9 To close the menu press K Th...

Page 22: ... with a cable Use KS U59 KS U62 optional accessory or a USB 2 0 cable accessory of the iPod iPhone When connecting via Bluetooth the following profiles must be supported SPP Serial Port Profile A2DP Advanced Audio Distribution Profile Android Visit Google play and search for Pandora to install Bluetooth must be built in and the following profiles must be supported SPP Serial Port Profile A2DP Adva...

Page 23: ...Android device through Bluetooth Page 37 For iPod touch iPhone Connect iPod touch iPhone Page 17 2 Select the device to use and connection method on the APP Settings screen Page 46 3 Select iHeartRadio as the source Page 8 The iHeartRadio application is started Playback operations You can operate iHeartRadio using the remote controller Only playing pausing and skipping are available RIndications a...

Page 24: ...tion buttons press to display the other operation button window 1 Appears only for the live station screen 2 Appears only for the custom station and custom talk station screen 3 Appears only for the live station and custom station screen 4 Appears only for the custom station screen The current setting is displayed RSelecting the variety level for your custom station You can adjust the amount of le...

Page 25: ...oth the following profiles must be supported SPP Serial Port Profile A2DP Advanced Audio Distribution Profile Android Visit Google play and search for iHeartRadio for Auto to install Bluetooth must be built in and the following profiles must be supported SPP Serial Port Profile A2DP Advanced Audio Distribution Profile NOTE Ensure you are logged in to your smartphone application If you do not have ...

Page 26: ...press FM Selects the FM band AM Selects the AM band P1 P6 Selects a stored station Press Stores the current station Hold FNC J Displays the pop up short cut menu Page 9 To close the menu press K PTY Enters PTY search mode Page 28 SSM Presets stations automatically Hold Page 27 S T Searches for a station Auto search Press Manual search Hold MODE Changes the settings for tuner reception on the Mode ...

Page 27: ...using in North Central South America FM AM intervals are set to 200 kHz 10 kHz SA Select this when using in South American countries where the FM interval is 50 kHz The AM interval is set to 10 kHz Europe Select this when using in any other areas FM AM intervals are set to 50 kHz 9 kHz The initial setting is US for KW V620BT Region 1 and SA for KW V620BT Region 4 Presetting stations RStoring stati...

Page 28: ...ay more items by pressing J K PTY Search starts If there is a station broadcasting a program of the same PTY code as you have selected that station is tuned in RActivating deactivating TI Standby Reception The unit is in standby to switch to Traffic Announcement TA if available The TP indicator lights up in white If the TP indicator is lit in gray tune into another station providing RBDS signals T...

Page 29: ...XM Connect Vehicle Tuner starts updating all the SiriusXM channels Listening to the SiriusXM Satellite Radio RIndications and buttons on the source control screen 2 3 4 7 1 6 8 5 SiriusXM Satellite Radio reception information 1 Band 2 Preset no 3 Channel number 4 Information for the buffered data and the replay mode Page 31 5 Text information Touching the text scrolls it if not all of the text is ...

Page 30: ...n in the following order Channel Artist Song Title Content Info Presetting channels RStoring channels in the memory You can preset 6 channels for each band 1 Tune in to a channel you want to preset Page 29 2 Select a preset number Hold The channel selected in step 1 is stored RSelecting a preset channel 1 Display the Preset List screen You can also select a preset channel by pressing P1 P6 2 Selec...

Page 31: ...the playback press I W To skip the current track segment press S T Pressing S within 2 seconds of the beginning of the current track segment returns to the previous track Pressing S after 2 seconds or more of the track have been replayed returns to the beginning of the current track segment To rewind fast forward press and hold S T To return to the live position SmartFavorites User stored channels...

Page 32: ...ent song content press SCAN To exit scanning press and hold SCAN Setting reception restrictions RSetting the parental control You can limit access to SiriusXM channels such as those with mature content Setting Changing the parental code The initial setting is 0000 Changing the code does not change the Parental Control Parental Lock Channel settings 1 Display the Mode screen See the far left column...

Page 33: ... parental code The Parental Lock Channel screen is displayed 4 Select a category 1 and then a channel 2 You can change the page to display more items by pressing J K A check mark appears beside the selected channel Repeat this step if you want to set the lock on multiple channels To deactivate the parental lock for all locked channels Select All Clear for Parental Lock Channel on the SiriusXM Mode...

Page 34: ...anging the AV IN name You can change the AV IN name displayed on the AV IN source control screen 1 Display the Mode screen 2 Select an AV IN name This setting does not affect the source name displayed on the Home screen Using the rear view camera To connect a rear view camera see page 63 To use a rear view camera a REVERSE lead connection is required Page 61 RSettings for the rear view camera 1 Di...

Page 35: ...elect OFF for Parking Guidelines Adjusting the parking guidelines Adjust the parking guidelines according to the size of the car parking space and so on Install the rear view camera in the appropriate position according to the instructions supplied with the rear view camera When adjusting the parking guidelines make sure to use the parking brake to prevent the car from moving 1 Display the Display...

Page 36: ...playback on your smartphone Using an external monitor Rear Source You can enjoy the rear source playback on an external monitor connected to the AV OUT VIDEO and AV OUT AUDIO terminals while listening to any source RDisplaying rear source images on the external monitor 1 Display the Rear Source screen On the Home screen 2 Select the rear source To close the Rear Source screen press While activatin...

Page 37: ...ooth device to the unit for the first time pair the unit and the device Pairing allows Bluetooth devices to communicate with each other The pairing method differs depending on the Bluetooth version of the device For devices with Bluetooth 2 1 You can pair the device and the unit using SSP Secure Simple Pairing which only requires confirmation For devices with Bluetooth 2 0 You need to enter a PIN ...

Page 38: ...for the unit Car Multimedia from your Bluetooth device 4 Select the unit Car Multimedia on your Bluetooth device If a PIN code is required enter 0000 initial When pairing is complete the device is listed on the Paired Device List To use the paired device connect the device on the Paired Device List Page 39 Pairing a Bluetooth device from this unit using a PIN code for Bluetooth 2 0 1 Display the B...

Page 39: ...onnect Ready A connection can be established Disconnected No connection is established Press Change for APP Setup to display the APP Settings screen to configure settings for applications of iPod iPhone Android Page 46 When a Bluetooth mobile phone is connected the signal strength and battery level are displayed when the information is acquired from the device RDeleting a registered Bluetooth devi...

Page 40: ...lls earpiece microphone While talking You can adjust the volume level between 0 to 15 initial 3 Use the monitor panel to adjust the call earpiece volume Page 5 RSwitching between handsfree mode and phone mode While talking Each time you press the button the talking method is switched The selected mode handsfree mode phone mode is highlighted RAdjusting the noise reduction echo cancel level While t...

Page 41: ...ghted RMaking a call 1 Display the phone control screen On the Home screen You can also display the phone control screen by selecting on the pop up short cut menu Page 9 2 Select a method to make a call 2 3 1 4 Press K J to change the page You can display the Bluetooth Setup screen by pressing 1 From the phone book call lists 2 Direct number entry 3 From the preset list To preset see page 43 4 Voi...

Page 42: ...he A to Z search in the phone book When the phone book list is displayed you can search by initial 1 2 Select the initial Press to cancel the A to Z search 3 Select a phone number from the list To display other phone numbers When the phone book list is displayed you can switch between phone numbers if several phone numbers are registered for the same person 1 Switch the phone number The phone numb...

Page 43: ...e dialing by pressing on the pop up short cut menu Page 9 or holding HOME on the monitor panel 2 Say the name of the person you want to call If the unit cannot find the target the following screen appears Press Start then say the name again To cancel voice dialing Press Cancel RPresetting phone numbers You can preset up to 5 phone numbers 1 Display the phone control screen Page 41 2 Enter the numb...

Page 44: ...To close the menu press K 2 Displays the track menu See the right column S T Selects a track Press Reverse forward search 1 Hold I Starts playback W Pauses playback Selects random playback mode 3 Selects repeat playback mode 3 DeviceList Displays the Paired Device List screen Page 39 To display all available operation buttons press to display the other operation button window 1 Available only for ...

Page 45: ...turned on OFF Cancels Bluetooth HF Audio Select the speakers used for Bluetooth both phone and audio player Front Front speakers only All Initial All speakers Auto Response ON The unit answers the incoming calls automatically after 5 seconds OFF Initial The unit does not answer the calls automatically Answer the calls manually Auto Pairing ON Initial Establishes pairing automatically with the conn...

Page 46: ...luetooth connection see page 37 For wired connection see page 63 For iPod touch iPhone Connect iPod touch iPhone with a cable via Bluetooth or both with a cable and via Bluetooth Page 17 1 Display the APP Setup screen On the Home screen If Enter for APP Setup cannot be selected turn off the AV source Page 6 2 Display the APP Settings screen 3 Check the current device status then press Change If yo...

Page 47: ...cted using HDMI cable KS U60 optional accessory and KS U62 optional accessory through a Lightning Digital AV adapter accessory of the iPod iPhone Bluetooth Select this when the iPod iPhone is connected via Bluetooth When selecting USB AV IN or USB 1 Wire go to step 7 6 When selecting HDMI Bluetooth or Bluetooth as the connection method the paired device list appears Select the target device You ca...

Page 48: ... sound mode See the left column 2 Adjust the level of each band 1 then select the subwoofer level 2 The adjustments are stored and User is activated To finish the procedure press Storing your own adjustments Adjusting the sound precisely 1 Select a sound mode See the left column 2 Display the adjustment screen 3 Select a band 4 Adjust the sound Reset Changes the level of each band to 0 FREQ Select...

Page 49: ...frequency Not selectable when FREQ is set to Through Adjustment for video playback RAdjusting the picture You can adjust the picture quality 1 Display the picture adjustment screen On the source control screen You can also display the picture adjustment screen by pressing on the pop up short cut menu Page 9 2 Select dimmer on or dimmer off 3 Adjust the picture Bright Adjusts the brightness 15 to 1...

Page 50: ...fication The aspect ratio is automatically selected to match the video source While DivX is played back with Screen Ratio set to 16 9 Page 14 the aspect ratio may not set correctly RZooming the picture You can zoom the picture Full Zoom1 to Zoom3 Zooming is available only when discs are played back When the aspect ratio is set to Just the picture is zoomed with the aspect ratio of the Full setting...

Page 51: ...ted background design select ON for SideBar Illumination Link To set the panel color manually select OFF When the Home screen design is changed source icon designs are also changed To change the panel color Display the panel color selection screen 1 select the dimmer setting dimmer on or dimmer off 2 then select the panel color 3 You cannot select the panel color when SideBar Illumination Link is ...

Page 52: ...ection 2 You can change the page to display more items by pressing J K Press to return to the root folder Press to return to the upper layer 5 Confirm the selection The existing image is replaced with the new one Press No to return to the previous screen Customizing the Home screen You can arrange the items to display on the Home screen 1 Select an item to replace On the Home screen Press and hold...

Page 53: ...rized settings Memory Memorizes the current settings Delete Deletes the memorized settings A confirmation message appears Press Yes RAdjusting the touch position You can adjust the touch position on the touch panel if the position touched and the operation performed do not match 1 Display the Touch Panel Adjust screen On the Home screen Press K repeatedly to change the page on the System menu scre...

Page 54: ...m Version Updates the system Bluetooth Version Updates the Bluetooth application It may take a while If the update has been completed successfully Update Completed appears Reset the unit To finish the procedure press Do not disconnect the USB device while updating If the update has failed turn the power off and then on and retry the update Even if you have turned off the power during the update yo...

Page 55: ...on when you turn on the headlights The ILLUMI lead connection is required Page 61 ON Activates dimmer OFF Cancels User Customize Change the display design Home screen design background and panel color Page 51 OSD Clock ON Displays the clock while a video source is played back OFF Initial Cancels Demonstration ON Initial Activates the demonstration on the screen OFF Cancels Scroll Auto Scrolls the ...

Page 56: ...other general operations Page 45 Beep ON Initial Activates the key touch tone OFF Cancels SETUP Memory Memorize recall or clear the settings you have made Page 53 Maestro Setup 1 Show information about and change the settings for using the ADS adapter Touch Panel Adjust Adjust the touch positions of the buttons on the screen Page 53 Initialize Initialize all settings you have made Hold Enter to in...

Page 57: ...lowed contact physician immediately Do not leave the battery near fire or under direct sunlight A fire explosion or excessive heat generation may result Do not set the remote control in hot places such as on the dashboard Danger of explosion if Lithium battery is incorrectly replaced Replace only with the same or equivalent type Before using the remote controller Aim the remote controller directly...

Page 58: ...ratio setting operate on the touch panel Page 50 ENT Confirms selection DIRECT Enters direct search mode See the right column CLR Erases the misentry Only for KW V620BT Region 1 RSearching for an item directly Tuner frequency 1 Press DIRECT to enter the search mode 2 Press number buttons to enter a frequency To erase a misentry press CLR clear 3 Press ENT to confirm the entry To exit the search mo...

Page 59: ...t then replace the old fuse with one with the same rating Insulate unconnected wires with vinyl tape or other similar material To prevent a short circuit do not remove the caps on the ends of the unconnected wires or the terminals Connect the speaker wires correctly to the terminals to which they correspond The unit may be damaged or fail to work if you share the wires or ground them to any metal ...

Page 60: ...the unit is installed securely in place If the unit is unstable it may malfunction e g the sound may skip 7 Reconnect the battery 8 Press the reset button 9 Configure Initial Setup Page 4 Installing the unit RInstalling the unit only for KW V620BT Region 4 Bend the tabs of the mounting sleeve with a screwdriver or similar utensil and attach it in place RInstalling the unit using the mounting brack...

Page 61: ... light control switch To car chassis Purple with white stripe Reverse sensor wire Light green Parking sensor wire Connect SiriusXM Connect Vehicle Tuner commercially available 1 Page 63 3 1 White ª White with black stripe To front speaker left Gray ª Gray with black stripe To front speaker right Green ª Green with black stripe To rear speaker left Purple ª Purple with black stripe To rear speaker ...

Page 62: ... accessory of the iPod iPhone KS U62 optional accessory KS U62 optional accessory KS U60 optional accessory HDMI MHL cable 8 9 When connecting to the HDMI MHL connector fix the HDMI MHL cable using the fixture 8 and screw 9 0 8 m 1 8 m 1 0 m 0 8 m iPod iPhone 30 pin connector models commercially available KS U59 optional accessory USB 2 0 cable accessory of the iPod iPhone 0 8 m 1 8 m 1 0 m 2016 K...

Page 63: ...w camera input Yellow 3 Audio Video input AV IN1 Connect the following type of 4 pole mini plug 1 24 3 1 Left audio 2 Right audio 3 Ground 4 Composite video 4 iDatalink input for connecting ADS adapter commercially available 1 5 HDMI MHL input 6 Subwoofer preout monaural output 2 Subwoofer left output White Subwoofer right output Red 7 Rear preout 2 Audio left output White Audio right output Red 8...

Page 64: ...7 Removing the unit Only for KW V620BT Region 4 RRemoving the trim plate 1 Engage the catch pins on the extraction key 4 and remove the two locks on the lower part Lower the frame and pull it forward 4 2 Remove from the upper two catches The frame can be removed from the top side in the same manner RRemoving the unit 1 Remove the trim plate See the left column 2 Insert the two extraction keys 4 th...

Page 65: ...ray thinner benzine etc to clean discs RTo play new discs New discs may have some rough spots around the inner and outer edges If such a disc is used this unit may reject the disc To remove these rough spots rub the edges with a pencil or ball point pen etc More information RFile playback Playing DivX files for discs only This unit can play back DivX files with the extension code divx div or avi r...

Page 66: ...ws Media Audio WMA AAC files copy protected with DRM AAC files encoded using any other application than iTunes AAC files copy protected with FairPlay except those stored on an iPod Files which have data such as AIFF ATRAC3 etc This unit can display jacket pictures that meet the conditions below Picture size 32 x 32 to 1 232 x 672 resolution Data size less than 650 KB File type JPEG PNG BMP RDisc p...

Page 67: ... has been backed up to avoid losing the data Notes on using a USB device This unit may not play back files in a USB device properly when using a USB extension cable USB devices equipped with special functions such as data security functions cannot be used with the unit Do not use a USB device with 2 or more partitions Depending on the shape of the USB devices and connection ports some USB devices ...

Page 68: ...swati AR Arabic HI Hindi MO Moldavian ST Sesotho AS Assamese HR Croatian MR Marathi SU Sundanese AY Aymara HU Hungarian MS Malay MAY SW Swahili AZ Azerbaijani HY Armenian MT Maltese TA Tamil BA Bashkir IA Interlingua MY Burmese TE Telugu BE Byelorussian IE Interlingue NA Nauru TG Tajik BG Bulgarian IK Inupiak NE Nepali TH Thai BH Bihari IN Indonesian NO Norwegian TI Tigrinya BI Bislama IS Icelandi...

Page 69: ...bile phone does not have a voice recognition system No Data No phone book data is contained in the connected Bluetooth phone Initialize Error The unit has failed to initialize the Bluetooth module Try the operation again Dial Error Dialing has failed Try the operation again Hung Up Error The call has not ended yet Park your car and use the connected mobile phone to end the call Pick Up Error The u...

Page 70: ...M Chan Unavailable appears on the screen for about 2 seconds then returns to the previous channel The selected channel is no longer available Select another channel or continue listening to the previous channel SXM Ch Unsubscribed The selected channel is not part of your current subscription plan Call 1 866 635 2349 to subscribe SXM Subscription Updated Press Enter to Continue Your subscription ha...

Page 71: ...hen connect it again Select another source then reselect iPod The iPod iPhone does not turn on or does not work Check the connecting cable and its connection Update the firmware version Charge the battery Reset the iPod iPhone Sound is distorted Deactivate the equalizer either on this unit or the iPod iPhone A lot of noise is generated Turn off uncheck VoiceOver on the iPod iPhone For details visi...

Page 72: ...e PIN code of the device is not indicated in its instructions try 0000 or 1234 Turn off then turn on the Bluetooth device Echo or noise occurs Adjust the microphone unit position Adjust the echo volume or noise reduction volume Page 40 The unit does not respond when you try to copy the phone book to the unit You may have tried to copy the same entries as stored to the unit Specifications RMonitor ...

Page 73: ...um Communication Range Line of sight approx 10 m 32 8 ft Audio Codec SBC MP3 AAC Profile HFP Hands Free Profile 1 6 A2DP Advanced Audio Distribution Profile 1 2 AVRCP Audio Video Remote Control Profile 1 4 GAP Generic Access Profile PBAP Phone Book Access Profile 1 0 SDP Service Discovery Profile SPP Serial Port Profile 1 1 HID Human Interface Device Profile RFM tuner section Frequency Range With ...

Page 74: ...from Dolby Laboratories Dolby and the double D symbol are trademarks of Dolby Laboratories DVD Logo is a trademark of DVD Format Logo Licensing Corporation registered in the US Japan and other countries The AAC logo is a trademark of Dolby Laboratories Microsoft and Windows Media are either registered trademarks or trademarks of Microsoft Corporation in the United States and or other countries Mad...

Page 75: ...by iHeartMedia Inc All uses are authorized under license BlackBerry RIM Research In Motion and related trademarks names and logos are the property of Research In Motion Limited and are registered and or used in the U S and countries around the world Used under license from Research In Motion Limited libFLAC Copyright C 2000 2001 2002 2003 2004 2005 2006 2007 2008 2009 Josh Coalson Redistribution a...

Page 76: ...1215EHHMDWJEIN 2016 KW V Mid K indb 1 2015 12 10 18 05 JVC ...

Page 77: ...qualifies for in home service the service representative will requireclear access totheproduct If youhave any questions concerningyourJVC Product please contactour Customer Care Centerat 800 252 5722 WHAT IS NOT COVERED This limited warrantyprovidedby JVC does not cover 1 Productswhich have been subject toabuse accident alteration modification tampering negligence misuse faulty installation lackol...

Page 78: ...antieexpressesuivante pour tout nouveau produit JVC distribueau Canada par JVCet vendu par un detaillant JVCautorise JVC vous garantit que ce produit est degage sous utilisation et entretien normal detout defaut materiel et defabrication sous reservedes modalites et conditions suivantes 1 Pour obtenir un service degarantie a LesproduitsJVC necessitant un service doit iHrepresentee avec Iaprevue d ...

Reviews: