background image

Settings

Settings

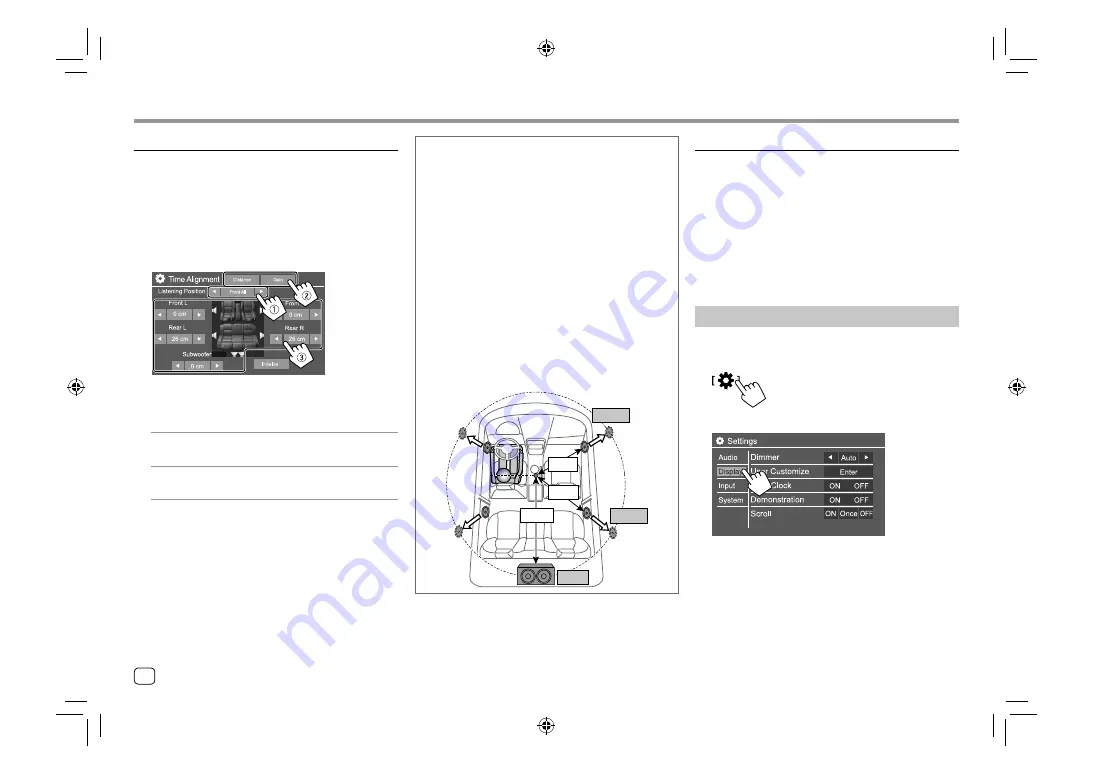
<Time Alignment>

Make fine adjustments to the delay time of the speaker 
output to create a more suitable environment for your 
car.

Select the listening position (

1

), select 

[Distance] or [Gain](

2

) to make an 

adjustment, then adjust each speaker setting 
(

3

).

1

 Select from 

<All>

<Front L>

<Front R>

 or 

<Front All>

*.

2

  Select an item to adjust.

[Distance]

Adjusts the digital time alignment 
value.

[Gain]

Adjusts the output volume of the 
selected speaker.

3

  To determine the adjustment value, see the 

following “Determining the value for <Position 
DTA> adjustment”.

To initialize the setting value:

 Touch 

[Initialize]

.

*  <Front All> is selectable only when <X'over Network> is set to 

[2way].

 Determining the value for <Position DTA> 
adjustment

If you specify the distance from the center of the 
currently set listening position to every speaker, the 
delay time will be automatically computed and set.

1

  Determine the center of the currently set 

listening position as the reference point.

2

  Measure the distances from the reference point 

to the speakers.

3

  Calculate the differences between the distance of 

the furthest speaker and other speakers. 

4

  Set the DTA value calculated in step 

3

 for 

individual speakers.

5

  Adjust gain for individual speakers.

E.g. When 

<Front All>

 is selected as the listening 

position

+90 cm

60 cm

80 cm

+70 cm

150 cm

+0 cm

<Volume Offset>

Adjust and store the auto-adjustment volume level for 
each source. If the source is a disc, the adjustment is 
stored for each of the following categories:
• DVD/VCD
• CD
• DivX/MPEG1/MPEG2/MP3/WMA/WAV/AAC/FLAC
The volume level will automatically increase or 
decrease when you change the source.
• 

–15

 to 

+6

 (Initial: 

00

)

 Display  settings

Display the <Display> screen.

On the Home screen, touch as follows:

Then, on the 

<Settings>

 screen, touch 

[Display]

.

E.g. Display settings screen for 

KW-V440BT

34

ENGLISH

00_KW-V2018ST_M_ENG.indb   34

00_KW-V2018ST_M_ENG.indb   34

17/6/2017   7:35:51 AM

17/6/2017   7:35:51 AM

Summary of Contents for KW-V340BT

Page 1: ...KW V440BTM Region 2 DVD Region Code 2 Area MONITOR WITH DVD RECEIVER INSTRUCTION MANUAL This instruction manual is used to describe models listed above Model availability and features functions may differ depending on the country and sales area B5A 2150 00 M M2 X A9 ENGLISH 00_KW V2018ST_M_ENG indb 1 00_KW V2018ST_M_ENG indb 1 17 6 2017 7 35 42 AM 17 6 2017 7 35 42 AM ...

Page 2: ...e unit To care for the monitor The monitor built into this unit has been produced with high precision but it may have some ineffective dots This is inevitable and is not considered defective Do not expose the monitor to direct sunlight Do not operate the touch panel using a ball point pen or similar tool with a sharp tip Touch the keys on the touch panel with your finger directly if you are wearin...

Page 3: ...53 EU Declaration of Conformity with regard to the RoHS Directive 2011 65 EU Manufacturer JVC KENWOOD Corporation 3 12 Moriya cho Kanagawa ku Yokohama shi Kanagawa 221 0022 Japan EU Representative JVCKENWOOD Deutschland GmbH Konrad Adenauer Allee 1 11 61118 Bad Vilbel GERMANY English Hereby JVCKENWOOD declares that the radio equipment KW V340BTM KW V440BTM is in compliance with Directive 2014 53 E...

Page 4: ...f the power 3 Turning off the AV source 4 Turning off the screen 4 Adjusting the volume 4 Attenuating the sound 4 Getting Started 4 Initial settings 4 Clock settings 5 Various Screens and Operations 6 Home screen 6 Source control screen 7 List setting screen 9 Disc 10 Video 11 USB 13 Android 15 iPod iPhone 16 Tuner 17 Pandora 20 Spotify 22 Other External Components 24 AV IN 24 Rear view camera 24 ...

Page 5: ... Home screen Hold Activates the voice dialing 5 button Press Displays the current source control screen For KW V340BT Region 3 KW V340BTM Region 2 pressing switches the screen between the current source control screen and navigation screen For details see page 38 Hold Turns off on the screen 6 Volume buttons 7 Monitor panel 8 Screen touch panel Basic Operations Basic Operations How to reset your u...

Page 6: ...e AV source On the source option selection screen touch as follows Turning off the screen KW V340BT KW V340BTM Hold The button illumination also lights off when you turn off the screen To turn on the screen Press and hold on the monitor panel or touch the screen Basic Operations Basic Operations For KW V440BT KW V440BTM See Using the pop up short cut menu on page 8 Adjusting the volume KW V340BT K...

Page 7: ... French German Italian Dutch Russian Portuguese are available If another language has been selected the text language for external monitors will be set to English GUI Language Local the language selected above English Initial 2 Selects the language used for displaying operation keys and menu items Please Power Off appears when the setting is changed Turn off the power then turn on to enable the ch...

Page 8: ...navigation screen Phone Displays the phone control screen AV Off Turns off the AV source Home 3 Displays the Home screen Setup 3 Displays the Setting screen Power Off 3 Turns off the power Camera Switches to the camera connected to the rear view camera input Now Playing 3 Displays the source currently played back 1 Only for KW V340BT Region 4 2 Only for KW V340BT Region 3 KW V340BTM Region 2 KW V4...

Page 9: ...yback source 7 Displays hides other available operation keys 8 Operation keys 9 IN indicator lights up while a disc is inserted p Track file song video information Touching H scrolls the text if not all of the text is shown q Playback mode indicator Repeat Random w File type indicator e Picture artwork shown if the file contains the information See Common operation keys on source control screen on...

Page 10: ...ideo file Hold Reverses forwards search Hold Plays in slow motion while paused for video playback IW Starts pauses playback Selects random playback mode About playback mode Available playback mode differs depending on the source disc type connected device etc You cannot activate repeat playback mode and random playback mode at the same time To cancel the playback mode touch repeatedly until the in...

Page 11: ... the areas performs the following actions 1 Displays the video control menu while playing a video 2 While playing a video Displays the source control screen While playing an audio file Displays the playback operation keys 3 Goes to the previous chapter track 4 Goes to the next chapter track Not available for video from an external component AV IN List setting screen Below are the common operation ...

Page 12: ...ot to protect it from dust Playback operations Audio playback information and key operation For playback information see Source control screen on page 7 For key operations on the touch panel see Common operation keys on source control screen on page 8 If a disc does not have a disc menu all tracks on it will be played repeatedly until you change the source or eject the disc For playable disc types...

Page 13: ...creen picture on the external monitor 16 9 Initial 4 3 LB 4 3 PS File Type 2 Select the playback file type when a disc contains different types of files Audio Plays back audio files Still image Plays back still picture files Video Plays back video files Audio Video Initial Plays back audio files and video files 1 For list of language codes see page 48 2 For playable file types see page 46 If the d...

Page 14: ...ch to adjust the other items Bright Adjusts the brightness 15 to 15 Contrast Adjusts the contrast 10 to 10 Black Adjusts the blackness 10 to 10 Color Adjusts the color 10 to 10 Tint Adjusts the tint 10 to 10 Sharpness Adjusts the sharpness 2 to 2 Selects the audio type Selects the subtitle type Selects the view angle 1 When is set to Just or Auto the picture is zoomed with the aspect ratio of the ...

Page 15: ... On the rear panel USB device commercially available The source changes to USB and playback starts All tracks in the USB device will be played repeatedly until you change the source or disconnect the USB device Touching the operation keys performs the following actions 1 Refer to Video playback except VCD on page 12 2 MENU Displays the disc menu Selects the audio channel ST stereo L left R right D...

Page 16: ...ce such as a mobile phone Playback operations Playback information and key operation For playback information see Source control screen on page 7 For key operations on the touch panel see Common operation keys on source control screen on page 8 Selecting the file type to play You can specify the file type to play E g USB source control screen for KW V440BT Select the file type as follows Audio Pla...

Page 17: ...ices with OS 4 1 and above may not fully support Android Open Accessory AOA 2 0 If the Android device supports both mass storage class device and AOA 2 0 this unit always plays back via AOA 2 0 as priority Android commercially available On the rear panel USB cable commercially available Start playback 1 Turn on JVC Music Play on your Android device 2 Select Android as the source Playback operation...

Page 18: ...l see Common operation keys on source control screen on page 8 Additional keys operations Touching the operation keys performs the following actions Switches the device on Smartphone Setup screen Page 38 Selecting an audio file from the menu 1 Display the audio menu On the source control screen touch as follows Settings for Android playback 1 Display the Android MODE screen On the source control s...

Page 19: ... of the text is shown Touching Radio Text switches the information between Radio Text Radio Text Plus and PTY code 4 Displays the preset stations window Page 19 5 P1 P5 Touch Selects a preset station Hold Presets the current station 6 NEWS indicator 7 AF indicator 8 TI indicator 9 Operation keys p ST MONO indicator The ST indicator lights up when receiving an FM stereo broadcast with sufficient si...

Page 20: ... for each band Automatic presetting SSM Strong station Sequential Memory for FM only On the source control screen touch as follows Hold The local stations with the strongest signals are found and stored automatically Manual presetting 1 Tune in to a station you want to preset 2 Select a preset number to store into Hold E g Tuner source control screen for KW V440BT The station selected in step 1 is...

Page 21: ...s to another station broadcasting the same program The AF indicator lights up OFF Initial Deactivates the function The RDS indicator lights up when the Network Tracking Reception is activated and an FM Radio Data System station is found NEWS 00min to 90min Activates New Standby Reception by selecting the period of time to disable the interruption The NEWS indicator lights up OFF Initial Deactivate...

Page 22: ...he most recent version For iPhone iPod touch Search for Pandora in the Apple iTunes App Store to find and install the most recent version Connecting the device For Android devices Pair the Android device with this unit via Bluetooth Page 26 For iPhone iPod touch Via USB input terminal Connect iPhone iPod touch with the cable Page 16 For Lightning models Use KS U62 optional accessory For 30 pin con...

Page 23: ...list selection screen On the source control screen touch as follows 2 Select the list type Station List Genre List Pandora Station List Selects from the station names Genre List Selects from the genres 3 Select a station from the list On the station list Shuffle By Date By Name Station Name Station Name Station Name Station Name Station Name Pandora To play all the songs in the registered stations...

Page 24: ...ng profiles must be supported SPP Serial Port Profile A2DP Advanced Audio Distribution Profile Establish an Internet connection using LTE 3G EDGE or WiFi Ensure you are logged in to your smartphone application If you do not have an Spotify account you can create one for free from your smartphone or at www spotify com Install the latest version of the Spotify application on your smartphone For Andr...

Page 25: ...and skips to the next track 1 Registers the current track as a favorite 2 3 Activates deactivates shuffle playback mode 2 Repeats all tracks cancels the repeat playback 2 3 Repeats the current track cancels the repeat playback Creates a new station Switches the device on Smartphone Setup screen Page 38 7 Displays the Spotify menu screen 3 Selects a track Starts I pauses W playback Saves the curren...

Page 26: ...ew camera a reverse lead REVERSE connection is required Page 45 Using the rear view camera For rear camera settings see Rear Camera on page 37 To display the rear view camera screen The rear view screen is displayed by shifting the gear to the reverse R position when Rear Camera Interruption is set to ON Page 37 A caution message appears on the screen To remove the caution message touch the screen...

Page 27: ... TV screen For settings see TV Tuner Control on page 38 1 Select AV IN as the source 2 Turn on the TV tuner box To change the channels Touch CH J or CH K External navigation unit Only for KW V340BT Region 3 KW V340BTM Region 2 KW V440BT Region 3 except for Indonesian models KW V440BTM Region 2 You can connect an external navigation unit commercially available to the NAV input terminal so that you ...

Page 28: ... be connected without cables and communicate with each other Note While driving do not perform complicated operations such as dialing numbers using the phone book etc When you perform these operations stop your car in a safe place Some Bluetooth devices may not connect to this unit depending on the Bluetooth version of the device This unit may not work for some Bluetooth devices Connecting conditi...

Page 29: ...ave entered in step 2 When pairing is completed the device is registered on the Paired Device List screen Note The PIN code is initially set to 0000 The maximum number of digits in the PIN code is 15 Connecting disconnecting a registered Bluetooth device 1 Display the Paired Device List screen On the Home screen touch as follows Then on the Settings screen touch as follows System Bluetooth Setup E...

Page 30: ... a call during navigation guidance the screen is switched automatically To return to the navigation screen touch During a call Touching the operation keys performs the following actions Ends a call Switches between handsfree mode and phone mode DTMF Enters DTMF Dual Tone Multi Frequency then sends text using the keypad NR LEVEL Adjusts the noise reduction level 5 to 5 initial 0 EC LEVEL Adjusts th...

Page 31: ...e phone has a voice recognition system If the unit cannot find the target Please speak into the microphone appears Touch Start then say the name again To cancel voice dialling touch Cancel Switching between two connected devices You can change the device to use when 2 devices are connected On the phone control screen The active device is highlighted Presetting phone numbers You can preset up to fi...

Page 32: ... see Common operation keys on source control screen on page 8 Bluetooth audio player JVC Streaming DJ When BT Audio is selected as the source you can connect up to five Bluetooth audio devices at the same time You can easily switch between these five devices by playing music from the device KW V340BT KW V340BTM Additional keys operations Touching the operation keys performs the following actions D...

Page 33: ...t answer the calls automatically Answer the calls manually Auto Pairing ON Initial Establishes pairing automatically with the Android or iOS device such as iPhone connected via USB Auto pairing may not work for some devices depending on the Android iOS version OFF Cancels Initialize Touch and hold Enter to reset all settings you have made for using Bluetooth mobile phones and Bluetooth audio playe...

Page 34: ...F Initial Level 1 Level 2 Level 3 Level 4 Level 5 Volume Link EQ Reduces the driving noise by raising the bandwidth OFF Initial ON Space Enhancement 1 Virtually enhances the sound space using the Digital Signal Processor DSP system Select the enhance level OFF Initial Small Medium Large K2 2 Restores the sound lost due to audio compression to a realistic sound OFF ON Initial Sound Response Virtual...

Page 35: ...location of the speakers 2 then display the Speaker Select screen 3 Speaker location selection is available only when X over Network is set to 2way 2 Select the speaker type 1 select the size of the selected speaker 2 then display the X over screen 3 If a speaker is not connected select None When setting the front speakers also select the speaker size for Tweeter 3 Adjust the crossover frequency o...

Page 36: ...computed and set 1 Determine the center of the currently set listening position as the reference point 2 Measure the distances from the reference point to the speakers 3 Calculate the differences between the distance of the furthest speaker and other speakers 4 Set the DTA value calculated in step 3 for individual speakers 5 Adjust gain for individual speakers E g When Front All is selected as the...

Page 37: ...designs are also changed 2 Change the background design Display the background design selection screen 1 select the dimmer setting 2 dimmer on or dimmer off then select the background design 3 3 Change the illumination color of the buttons on the monitor panel Display the illumination color selection screen 1 select the dimmer setting 2 Dimmer on or Dimmer off then select the illumination color 3 ...

Page 38: ...gnifies the scene OFF Zoom1 Zoom2 Zoom3 IW Starts pauses playback Advances scenes frame by frame A confirmation message appears Touch Yes to store the newly captured image The existing image is replaced with the new one To return to the previous screen touch No To cancel the capture touch Cancel Not displayed when playing an external component connected to the AV IN input terminal OSD Clock ON Dis...

Page 39: ...g settings Bright Adjusts brightness 15 to 15 Initial 0 for dimmer on 15 for dimmer off Black Adjusts blackness 10 to 10 Initial 0 Video Output Select the color system of the external monitor NTSC PAL Initial Please Power Off appears when the setting is changed Turn off the power then turn on to enable the change Viewing Angle Select the viewing angle in relation to the monitor panel to make the p...

Page 40: ...uetooth Go to step 3 Input Select the source screen to be displayed when you perform the following operation For KW V340BT KW V340BTM Press button on the monitor panel For KW V440BT KW V440BTM Touch on the pop up short cut menu RGB Switches to the navigation screen from the connected navigation unit OFF Initial Deactivates the display switch function Output Select which front speakers are used for...

Page 41: ...n touch Cancel Beep ON Initial Activates the key touch tone OFF Deactivates the key touch tone SETUP Memory Memorize recall or clear the settings you have made The memorized settings are kept even when the unit is reset Touch Yes to display the setting screen then select an operation Recall Recalls the memorized settings Memory Memorizes the current settings Clear Clears the currently memorized se...

Page 42: ...function list You cannot edit the function list To initialize the setting Touch Initialize for Steering Remote Control Setting A confirmation message appears Touch Yes To cancel the initialization touch No System Information Update the system by connecting a USB device containing an update file To obtain the update file visit http www jvc net cs car Connect a USB device with the update file to the...

Page 43: ...battery WARNINGS Do not ingest the battery as it presents a chemical burn hazard The remote controller supplied with this product contains a coin button cell battery If the coin button cell battery is swallowed it can cause severe internal burns in just 2 hours and can lead to death Keep new and used batteries away from children If the battery compartment does not close securely stop using the pro...

Page 44: ... a station frequency chapter title folder file track directly using the number buttons To search for a track from the VCD menu perform during PBC playback 1 Press DIRECT to enter the search mode Each time you press DIRECT the item to search for changes 2 Press a number button to select a desired item station frequency chapter title folder file track To erase a misentry press CLR 3 Press ENT to con...

Page 45: ... press hard on the panel surface when installing the unit to the car Otherwise scratches damage or failure may result If the power is not turned on Miswiring DC Offset Error Warning DC Offset Error is displayed the speaker wire may have a short circuit or have touched the chassis of the car and the protection function may have been activated In this case the speaker wire should be checked Keep all...

Page 46: ...ess 4 Connect the wires of the wiring harness in the following order ground battery ignition 5 Connect the wiring harness to the unit 6 Install the unit in your car Make sure that the unit is installed securely in place If the unit is unstable it may malfunction e g the sound may skip 7 Reconnect the battery 8 Press the reset button on the monitor panel Page 3 9 Configure Initial Settings Page 4 I...

Page 47: ...Mid range speakers right for 3 way crossover To rear speakers left Tweeters left for 3 way crossover To front speakers left Mid range speakers left for 3 way crossover Car battery Car fuse To the car chassis To the OE remote adapter not supplied which is compatible with your car To the power control terminal when using the optional power amplifier Or To the control terminal of the motor antenna or...

Page 48: ...ation and Connection Connecting external components 1 Navigation input NAV 1 2 3rd party TV output REMO OUT 2 3 Steering wheel remote controller input REMO IN Connect to the vehicle s steering remote harness using the Steering Remote cable Contact your JVC dealer for details 4 Microphone input MIC Page 45 5 Audio video input AV IN Connect the following type of 4 pole mini plug 1 Left audio 2 Right...

Page 49: ...ideo signals MPEG1 MPEG2 File format MP ML Main Profile at Main Level SP ML Simple Profile at Main Level MP LL Main Profile at Low Level Maximum video file size 2 GB This unit cannot play back the following files DivX files encoded in the interlaced scanning mode Picture files This unit can play back the following files with following codec and extension code JPEG jpg jpeg Other playable condition...

Page 50: ...ri IK Inupiak BI Bislama IN Indonesian BN Bengali Bangla IS Icelandic BO Tibetan IW Hebrew BR Breton JA Japanese CA Catalan JI Yiddish CO Corsican JW Javanese CS Czech KA Georgian CY Welsh KK Kazakh DZ Bhutani KL Greenlandic EL Greek KM Cambodian EO Esperanto KN Kannada ET Estonian KO Korean KOR EU Basque KS Kashmiri FA Persian KU Kurdish FI Finnish KY Kirghiz FJ Fiji LA Latin FO Faroese LN Lingal...

Page 51: ...ed for some USB devices Do not leave a USB device in the car or expose to direct sunlight or high temperatures to prevent deformation or damage to the device Unplayable USB device This unit may not play back files in a USB device properly when using a USB extension cable USB devices equipped with special functions such as data security functions cannot be used with the unit Do not use a USB device...

Page 52: ...o Signal appears Start playback on the external component connected to the AV IN input terminal Check the cords and connections Signal input is too weak Miswiring DC Offset Error Warning DC Offset Error appears A speaker cord has shorted or it has come into contact with the car chassis Wire or insulate the speaker cord as appropriate then reset the unit Parking off appears No playback picture is s...

Page 53: ...the audio signal to unit Cannot play back when Android Setup is set to AUTO MODE Make sure JVC Music Play APP is installed on the Android device Reconnect the Android device and select the appropriate control mode If this does not solve the problem the connected Android device does not support the Auto Mode NO DEVICE or READING keeps flashing Switch off the developer options on the Android device ...

Page 54: ...udio player supports AVRCP Audio Video Remote Control Profile The Bluetooth device does not detect the unit Search from the Bluetooth device again The unit does not pair with the Bluetooth device For devices compatible with Bluetooth 2 1 Register the device using a PIN code Page 31 For devices compatible with Bluetooth 2 0 Enter the same PIN code for both the unit and target device If the PIN code...

Page 55: ... W H KW V340BT KW V340BTM 6 2 inches diagonal wide 137 5 mm 77 2 mm KW V440BT KW V440BTM 6 75 inches diagonal wide 151 8 mm 79 68 mm Display System Transparent TN LCD panel Drive System TFT active matrix system Number of Pixels 1 152 000 800H 480V RGB Effective Pixels 99 99 Pixel Arrangement RGB striped arrangement Back Lighting LED USB interface section USB Standard USB 2 0 Full Speed High Speed ...

Page 56: ...d Audio Distribution Profile 1 3 AVRCP Audio Video Remote Control Profile 1 5 GAP Generic Access Profile PBAP PhoneBook Access Profile 1 2 SDP Service Discovery Profile SPP Serial Port Profile 1 2 DSP section Equalizer 13 Band Band Frequency Hz BAND1 13 62 5 100 160 250 400 630 1k 1 6k 2 5k 4k 6 3k 10k 16k Level 09 to 09 9 dB to 9 dB Q 1 35 1 5 2 0 HPF High Pass Filter Frequency Hz Through 30 40 5...

Page 57: ...e 4 Ω to 8 Ω General Operating Voltage 14 4 V 10 5 V to 16 V allowable Maximum Current Consumption 10 A Installation Size Main Unit W H D 178 mm 100 mm 162 mm Operational Temperature Range 10 C to 60 C Weight Main Unit 1 7 kg Design and specifications are subject to change without notice 55 ENGLISH 00_KW V2018ST_M_ENG indb 55 00_KW V2018ST_M_ENG indb 55 17 6 2017 7 35 55 AM 17 6 2017 7 35 55 AM ...

Page 58: ... OTHER USE ADDITIONAL INFORMATION MAY BE OBTAINED FROM MPEG LA L L C SEE HTTP WWW MPEGLA COM SPOTIFY and the Spotify logo are among the registered trademarks of Spotify AB Pandora the Pandora logo and the Pandora trade dress are trademarks or registered trademarks of Pandora Media Inc used with permission libFLAC Copyright C 2000 2009 Josh Coalson Copyright C 2011 2013 Xiph Org Foundation Redistri...

Page 59: ...00_KW V2018ST_M_ENG indb 57 00_KW V2018ST_M_ENG indb 57 17 6 2017 7 35 55 AM 17 6 2017 7 35 55 AM ...

Page 60: ...IN For updated information the latest Instruction Manual system updates new functions etc please visit the following website http www jvc net cs car 00_KW V2018ST_M_ENG indb 1 00_KW V2018ST_M_ENG indb 1 17 6 2017 7 35 55 AM 17 6 2017 7 35 55 AM ...

Reviews: