background image

Page 10

July 17, 2003 8:53 am

— 10 —

Other Functions

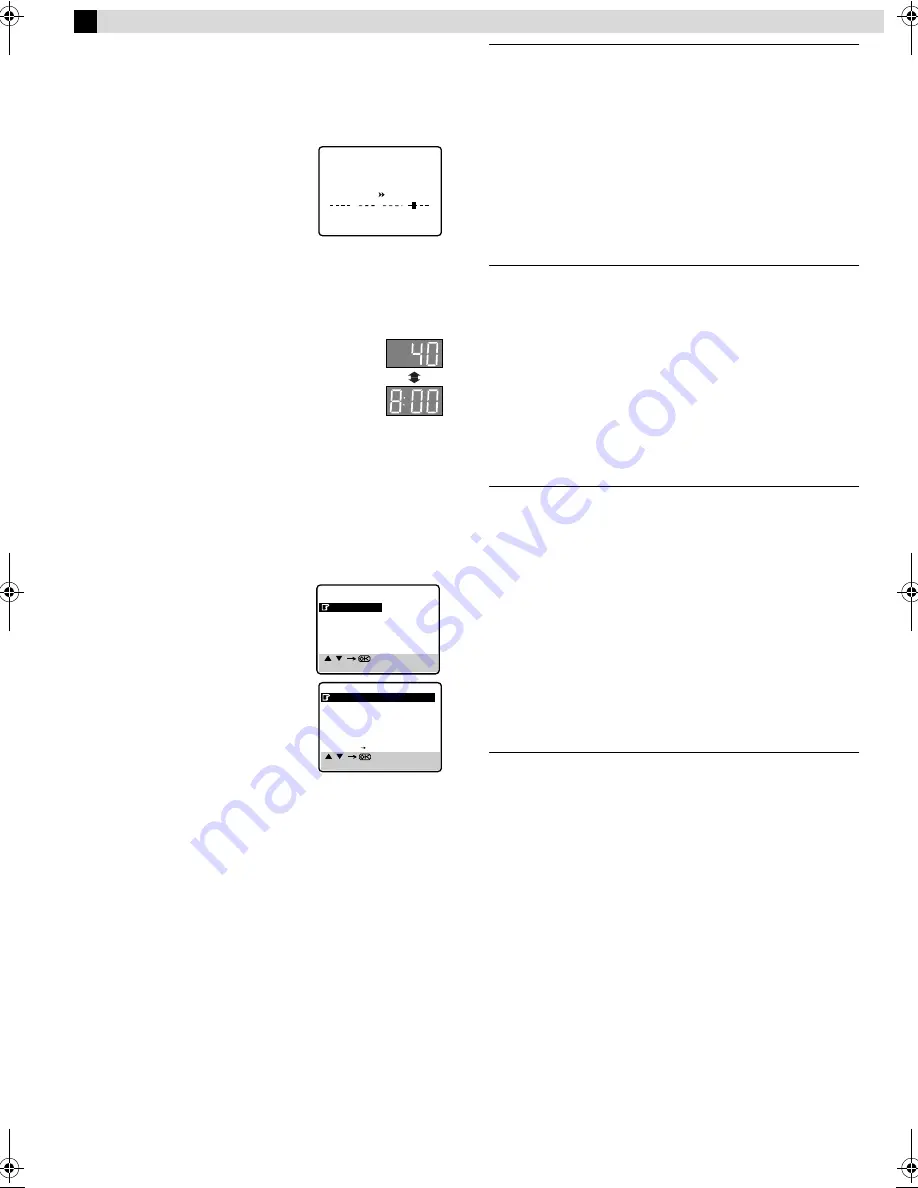
Checking tape position

When you change the recorder operation 
mode from the stop mode to fast forward 
or rewind mode, or when you perform an 
Index Search or Instant Review, the tape 
position indicator appears.
The position of “

q

” in relation to “0” 

(beginning) or “+” (end) shows you where 
you are on the tape.

Set “O.S.D.” to “ON” (

11).

Changing display information

Each time you press 

– –:– –

, the display panel shows 

the channel number and the clock time alternatively.

You can change display in the stop, recording or 
during rewind/fast-forward high-speed search.

When “O.S.D.” is set to “ON” (

11) and 

– –:– –


on the remote control is pressed, time counter will 
appear on the TV screen. To reset the time counter, press 

0000


on the remote control.

Function settings

You can use the other useful function settings on the Function Set 
screen.

Turn on the recorder and the TV, and set your TV to its AV mode 
or video channel.

A

Access Main Menu screen, then 
Function Set screen

Press 

MENU

 on the remote control. Press 

PR 

r

/

t

 to place the pointer next to 

“FUNCTION SET”, then press 

OK

 or 

e

.

B

Select Function

Press 

PR 

r

/

t

 to place the pointer next to 

the function you want to set.

C

Change setting

Press 

OK

 or 

e

. The default setting is 

bold

 in the following table. 

Press 

MENU

 to return to normal screen.

B.E.S.T. 

— 

ON 

/ OFF

When B.E.S.T. (Biconditional Equalized Signal Tracking) system is 
set to “ON”, this recorder checks the condition of the tape in use 
during playback and recording, and compensates to provide the 
highest-possible pictures. This takes place whenever you play 
back a tape or start recording after inserting a tape.

NOTE:

The recorder checks the tape condition for about 7 seconds, then 
starts recording. To make sure you record the desired scene or 
program completely, perform the following steps:

A

Press and hold 

9

, and press 

7

. After about 7 seconds, the 

recorder re-enters Record Pause mode.

B

Press 

4

 to start recording.

PICTURE CONTROL 

— 

AUTO

(NORM) / EDIT / SOFT

This function helps you to adjust the playback picture quality 
according to your preference.

AUTO 

(NORM):

 Normally select this. Picture quality is adjusted 

automatically. When “B.E.S.T.” is “OFF”, “NORM” will appear 
instead of “AUTO”.

EDIT:

 Minimizes picture degradation during editing (recording and 

playback).

SOFT:

 Reduces image coarseness when viewing overplayed tapes 

containing much noise.

NOTE:

Select “EDIT” when you are editing tapes. After you finish editing 
the tapes, select “AUTO”.

PAL/MESECAM 

— 

AUTO 

/ PAL / MESECAM

Select the appropriate colour system for recording or playback.

AUTO:

 Usually set to this mode. The appropriate colour system 

(PAL or MESECAM) will be selected depending on the playback or 
recording signals.

If the “AUTO” mode does not work properly, select either of the 
following manual modes.

PAL:

 To record PAL signals, or playback a PAL tape.

MESECAM:

 To record SECAM signals, or playback a SECAM or 

MESECAM tape.

NOTES:

SECAM signals will always be recorded as MESECAM. Select 
“AUTO” or “MESECAM” when recording SECAM signals.

When playing back a SECAM tape, select “AUTO” or 
“MESECAM”. The playback picture will always be 
monochrome.

NTSC

 — 

NTSC3.58 

/ NTSC4.43 / NTSC

]

PAL

To record NTSC signals or playback a NTSC tape, it will be 
necessary to select the appropriate mode.

NTSC3.58:

 To record NTSC signals or playback a NTSC tape.

NTSC4.43:

 To record NTSC4.43 signals or playback a NTSC4.43 

tape.

NTSC

]

PAL:

 To playback a NTSC tape on PAL TV.

NOTES:

The “NTSC

]

PAL” mode does not work during recording. In 

this mode, NTSC signals will be recorded as NTSC3.58.

The Menu screen is distorted during playing back a NTSC tape 
on PAL TV. Stop playback and access the Menu screen again.

In the “NTSC4.43” mode, with some TVs, on-screen displays 
(Program screen, etc.) may roll up or down and there may be a 
loss of colour. When this happens, select the “NTSC3.58” 
mode.

1:23:45


0

+

+

+

+

[    /    ]
[MENU] : EXIT


MAIN MENU

FUNCTION SET

TUNER SET
INITIAL SET


[    /    ]
[MENU] : EXIT     

FUNCTION SET

B.E.S.T.

ON

PICTURE CONTROL

AUTO

PAL/MESECAM

AUTO

NTSC

NTSC3.58

AUTO TIMER

OFF

O.S.D.

ON

AUTO SP   LP TIMER

OFF

HR-V400AG-EN.fm  Page 10  Thursday, July 17, 2003  8:53 AM

Summary of Contents for HR-V200AA

Page 1: ...elevision signals for recording and playback 2 Recordings made of SECAM television signals produce monochrome pictures if played back on another video recorder of SECAM standard or do not produce normal colour pictures if played back on another video recorder of PAL standard 3 SECAM prerecorded cassettes or recordings made with a SECAM video recorder produce monochrome pictures when played back wi...

Page 2: ...roplets form on the surface of a glass filled with cold liquid Moisture condensation on the head drum will cause damage to the tape In conditions where condensation may occur keep the recorder s power turned on for a few hours to let the moisture dry How to use the remote control Before use insert the lithium battery CR2032 correctly with the plus side up into the battery compartment To open it pr...

Page 3: ...ot recorded even if the recorder is in the recording mode A Channel and auxiliary input B Clock time C Current day month year D Time counter E Tape position F Tape direction G Colour system indicator H Tape speed I Recorder operation mode J Cassette mark Cassette loading slot VIDEO AUDIO input connectors For HR V400AG and HR V401AS only Display panel Play indicator Record indicator Timer mode indi...

Page 4: ...ecorder until the display panel shows the following B Press PR r or t on the remote control to set appropriate TV system that matches the system of TV being used refer to the table below 1 B G 2 D K 3 I 4 H C Set your TV to UHF channel 36 If the two vertical white bars appear clearly on the screen as shown on the right press OK or e and then go to step D If the two vertical white barsdonot appear ...

Page 5: ...lace the pointer next to INITIAL SET then press OK or e B Access Language Select screen Press PR r t to place the pointer next to LANGUAGE then press OK or e C Select language Press PR r t to place the pointer next to the language of your choice English Russian or Arabic then press OK or e Press MENU to return to normal screen Clock Setting A Access Main Menu screen then Initial Set screen Press M...

Page 6: ... s record safety tab is removed Turn on the TV and select the video channel or AV mode ATTENTION In the search still slow motion or frame by frame playback mode the picture will be distorted the noise bars will appear there may be a loss of colour During playback Stop playback Press 8 on the remote control OR Press 0 on the recorder Pause playback and view still picture Press 9 Press 4 to resume n...

Page 7: ...ion of the tape is skipped normal playback resumes automatically To return to normal playback during Skip Search press 4 Recording Accidental erasure prevention To prevent accidental recording on a recorded cassette remove its record safety tab To record on it later cover the hole with adhesive tape Basic Recording A Load a cassette Make sure the record safety tab is intact If not cover the hole w...

Page 8: ...et PROGRAM FULL appears on the TV screen After timer recording is completed the recorder turns off automatically You can program the timer recording while a regular recording is in progress the menu screens will not be recorded If the tape reaches its end during recording the recording stops and 䡬 and on the front display panel blink Press to disengage timer then press 0 on the recorder to eject t...

Page 9: ...s you have another program overlapping the program you have just made The Program Check screen appears and conflicting programs will start blinking Example Program 1 you have just made and Program 4 overlap each other A Select program to modify Press PR r t then press OK or e You can only select one of the overlapping programs If you do not mind this overlap press PROG to finish the timer program ...

Page 10: ...ess 4 to start recording 䡵 PICTURE CONTROL AUTO NORM EDIT SOFT This function helps you to adjust the playback picture quality according to your preference AUTO NORM Normally select this Picture quality is adjusted automatically When B E S T is OFF NORM will appear instead of AUTO EDIT Minimizes picture degradation during editing recording and playback SOFT Reduces image coarseness when viewing ove...

Page 11: ...than E 180 or with some tapes of shorter lengths Editing You can use your recorder as the playback or recording deck You can use a camcorder as the source player and your recorder as the recording deck Refer also to the other components instruction manuals for connection and its operations A Make connections Example When using this recorder as the source player When using this recorder as the reco...

Page 12: ...d if the TV does not have a V HOLD control During search still or frame by frame playback the picture will be distorted and there may be a loss of colour TV system Recorded tape Multi system tuner B G I D K NOTE This model does not operate in BRAZIL PAL M or ARGENTINA PAL N Recorded tape Multi system receiver Built in RF converter K I G H Manual switching Manual switching Playback circuit Multi sy...

Page 13: ... Tape To Tape Editing There are 4 different types of recorded tape depending on the signal recorded Recorded tape Dubbed tape Playback equipment Recording circuit Information on Multi System Compatibility ...

Page 14: ...te A Channel 墌 15 Manual Channel Set Store channels that were not stored during Auto Set Up or Auto Channel Set A Access Tuner Set screen Perform step A of Auto Channel Set B Access channel list Press PR r t to place the pointer next to CH EDIT then press OK or e C Select position Press PR r t to place the pointer next to an open channel position then press OK or e D Select band Press PR r t to pl...

Page 15: ...cessary E Return to normal screen Press MENU TV System Selection When you see the picture but the audio can t be heard or sounds unnatural A Access Tuner Set screen Perform step A of Auto Channel Set 墌 14 B Access channel list Press PR r t to place the pointer next to CH EDIT then press OK or e C Select channel Press PR r t until the channel you want to change its TV system begins blinking then pr...

Page 16: ... PAL type colour signal and CCIR monochrome signal 625 lines 50 fields NTSC colour and EIA monochrome signals 525 lines 60 fields Recording system HR V400AG V401AS DA 4 Double Azimuth head helical scan system HR V207AG V200AG V201AS V200AA Rotary 2 head helical scan system Signal to noise ratio 45 dB Horizontal resolution 250 lines PAL MESECAM 220 lines NTSC Frequency range 70 Hz to 10 000 Hz Inpu...

Reviews: