background image

EN 

55

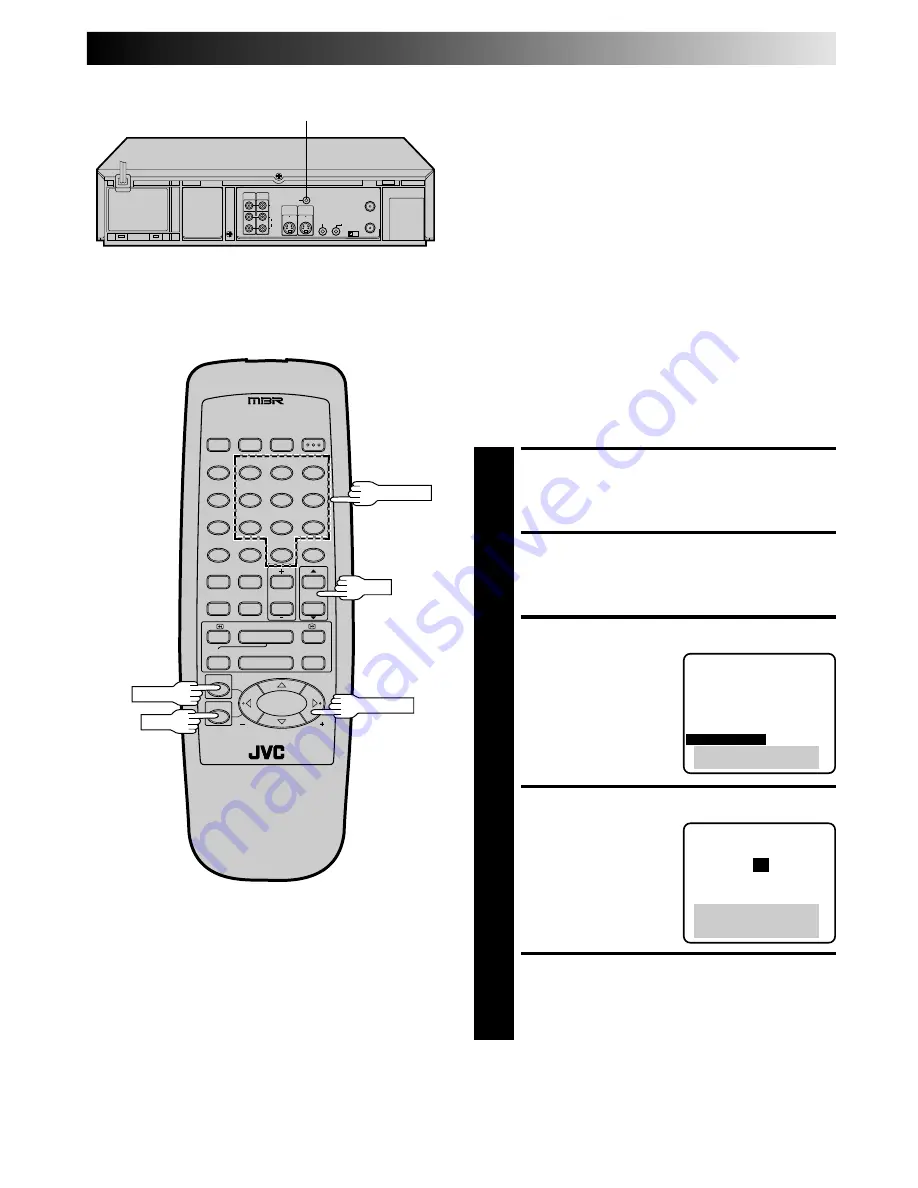
INFORMATION ON J TERMINAL

J Terminal (JLIP(Joint Level

Interface Protocol) Connector)

The J Terminal is used to connect the VCR to a personal
computer or similar device to allow computerized control of the
VCR during editing and certain other operations.

Example:
Allows you to capture still images from the recorder into a
personal computer with the optional JLIP VIDEO CAPTURE
BOX GV-CB1U.

For further details consult your nearest JVC dealer.
U.S. customers can contact JVC directly toll free at 1-800-252-
5722.

JLIP ID Number

Your VCR has its own JLIP ID number. This ID number must be
unique when your VCR is connected to another device via its J
terminal. The ID Number is preset to "1" at the factory. You can
change this number to any number between "1" and "99".
If it is necessary to change the JLIP ID number perform the
following steps.

1

2

3

4

5

6

7

8


0

9


3

4

¢

7

8

1

¡

CH

MENU

SHUTTLE PLUS

OK

J terminal

NUMBER

ACCESS MAIN MENU SCREEN

1

Press MENU as many times as necessary.

ACCESS CUSTOM SET SCREEN

2

Press CH

5∞

 or SHUTTLE PLUS

%fi

 to move the

highlight bar (arrow) to "CUSTOM SET", then press OK.

ACCESS JLIP ID NO. SET SCREEN

3

Press CH

5∞

 or SHUTTLE

PLUS

%fi

 to move the

highlight bar (arrow) to
"JLIP ID NO. SET", then
press OK.

SET JLIP ID NUMBER

4

Press NUMBER keys to
enter the desired ID
number, then press OK.

RETURN TO NORMAL SCREEN

5

Press MENU as many times as necessary.

CUSTOM SET

OVERRIDE

AUTO CLOCK SET

LANGUAGE SELECT
VCR PLUS+ SET-UP
DBS RECEIVER OUTPUT
DBS RECEIVER BRAND SET

=

JLIP ID NO. SET

PRESS (

5

,

), THEN (OK)

PRESS (MENU) TO END

JLIP ID NO. SET

1

PRESS NUMBER KEY (O-9)

THEN (OK)

PRESS (MENU) TO END

Summary of Contents for HR-S5400U

Page 1: ...E VIDEO MONO L AUDIO R SP EP LIVE SURROUND MENU CH OK A DUB REW FF H M S SP AM PM R E C PLAY SAP ST TIMER PAUSE M V C R 8 4 0 6 10 20dB NORM L R A B TV CABLE DBS TV CABLE DBS operation Press and hold TV CABLE DBS button then press POWER CH 5 TV VCR 0 9 ENTER TV VCR 1 2 3 4 5 6 7 8 DAILY 0 AUX 9 WEEKLY LIVE SURROUND MBR SET DISPLAY TIMER CANCEL C MEMORY SKIP SEARCH C RESET CH SKIP ADD OSD ENTER SP ...

Page 2: ...unstable or subject to vibration 2 DO NOT block the VCR s ventilation openings 3 DO NOT place heavy objects on the VCR or remote control 4 DO NOT place anything which might spill on top of the VCR or remote control 5 AVOID violent shocks to the VCR during transport MOISTURE CONDENSATION Moisture in the air will condense on the VCR when you move it from a cold place to a warm place or under extreme...

Page 3: ... paying particular attention to cords at plugs convenience receptacles and the point where they exit from the product 5 Ventilation Slots and openings in the cabinet are provided for ventilation To ensure reliable operation of the product and to protect it from overheating these openings must not be blocked or covered Do not block the openings by placing the product on a bed sofa rug or other simi...

Page 4: ...plained in the manual This section also illustrates the controls and connections on the front and rear panel the front display panel and the remote control The Z mark signals a reference to another page for instructions or related information Operation buttons necessary for the various procedures are clearly indicated through the use of illustrations at the beginning of each major section BEFORE Y...

Page 5: ...OUR NEW VCR 6 Connections 6 Basic Connections 6 S VIDEO Connection 7 INITIAL SETTINGS 8 Plug Play 8 Language 10 Clock 11 Preparation 11 Semi Auto 12 Manual 13 Auto 13 Tuner 14 Set Receivable Channels 14 Add Or Delete A Channel 16 Cable Box Control 17 Situate And Connect Controller 17 Set Cable Box Output Channel 18 Set Cable Box Brand 19 VCR Plus Setup 20 DBS Receiver Control 22 Situate And Connec...

Page 6: ...V you have RF Connection To Connect To A TV With NO AV Input Terminals a Disconnect the TV antenna from the TV b Connect the TV antenna cable to the ANTENNA IN jack on the rear of the VCR c Connect the supplied RF cable between the TV OUT jack on the rear of the VCR and the TV s antenna terminal Set TV on CH3 or CH4 corre sponding to the CH3 CH4 switch setting on the back of the VCR AV Connection ...

Page 7: ...remote control You can also use the TV VCR button on the VCR s remote control to set your TV to the AV mode Z pg 56 S VIDEO Connection CONNECT VCR TO TV a Connect both the RF cable and the AV cables to the TV as explained in step 3 of Basic Connections Z pg 6 b Connect the S Video cable between the S VIDEO OUT jack on the rear of the VCR and the S VIDEO IN jack on the TV Antenna or Cable AC Outlet...

Page 8: ... Failed on next page q IMPORTANT Don t press any buttons on the VCR or remote while Plug Play is in progress If you perform Plug Play successfully there s no need to perform the Clock Z pg 11 and Tuner Z pg 14 procedures If however you want to add or delete channels refer to Add Or Delete A Channel on page 16 PM Plug Play Completed The current time including AM PM is displayed During Initial Auto ...

Page 9: ... clock setting data of a PBS channel from an adjacent time zone or an incorrect PBS channel from a cable TV system In this case perform the Semi Auto Z pg 12 or Manual Clock Set Z pg 13 procedure Auto channel set has already taken place and it need not be set again If appears on the display your antenna cable may not be connected to the VCR there may not be a Host PBS signal available in your area...

Page 10: ...nch move the highlight bar arrow to LANGUAGE SELECT by pressing CH5 or SHUTTLE PLUS fi then pressOK SELECT LANGUAGE 5 At the Language Select screen move the highlight bar arrow to the desired language by pressing CH5 or SHUTTLE PLUS fi then press MENU as many times as necessary to return to the normal screen q Turn on the TV and select the VCR channel 3 or 4 or AV mode MAIN MENU PROGRAM SET FUNCTI...

Page 11: ...ve the highlight bar arrow to CUSTOM SET by pressing CH5 or SHUTTLE PLUS fi then press OK ACCESS CLOCK SET MODE SELECT SCREEN 4 Move the highlight bar arrow at the Custom Set screen to OVERRIDE AUTO CLOCK SET by pressing CH5 or SHUTTLE PLUS fi then press OK Turn on the TV and select the VCR channel 3 or 4 or AV mode MAIN MENU PROGRAM SET FUNCTION SET TUNER SET CUSTOM SET VIDEO CALIBRATION VIDEO ST...

Page 12: ...U if AUTO is highlighted on the Host Channel Select screen To manually select AUTO or the PBS channel press CH or SHUTTLE PLUS fi to cycle through AUTO or the channel numbers hold button down to speed through numbers and stop when the desired number appears Press MENU and the Semi Auto Clock Set screen reappears NOTES For cable box users Select AUTO or the channel on your VCR that receives the cab...

Page 13: ...ressing CH or SHUTTLE PLUS fi then press MENU twice to return to the Semi Auto Clock Set screen SELECT D S T MODE 9 You have three choices a Select AUTO and the adjustment to your VCR s clock will be made according to the incoming signal from the host channel b Select ON and the adjustment will be made based on the clock itself c Select OFF if Daylight Saving Time doesn t apply to you Move the hig...

Page 14: ...s are skipped NOTES At the end of Auto Channel Set SCAN COMPLETED appears on screen If the scan was unsuccessful SCAN COMPLETED NO SIGNAL appears on screen Check the connections and start again RETURN TO NORMAL SCREEN 5 Press MENU as many times as necessary INITIAL SETTINGS cont Turn on the TV and select the VCR channel 3 or 4 or AV mode MAIN MENU PROGRAM SET FUNCTION SET TUNER SET CUSTOM SET VIDE...

Page 15: ...hannels At the Tuner Set screen move the highlight bar arrow to BAND by pressing CH5 or SHUTTLE PLUS fi then press OK Press MENU as many times as necessary to return to the normal screen INFORMATION TUNER SET BAND AFC AUTO CHANNEL SET MANUAL CHANNEL SET PRESS 5 THEN OK PRESS MENU TO END BAND TV CATV PRESS 5 TO SELECT PRESS MENU TO END q MENU O K C H 1 2 3 4 5 6 7 8 0 9 3 4 7 8 1 CH MENU SHUTTLE PL...

Page 16: ...g on certain CATV systems ACCESS MANUAL CHANNEL SET SCREEN 4 Move the highlight bar arrow to MANUAL CHANNEL SET by pressing CH5 or SHUTTLE PLUS fi then press OK STORE OR SKIP DESIRED CHANNEL 5 Input the channel number using the NUMBER keys or by pressing CH5 or SHUTTLE PLUS fi then press ADD to add or CH SKIP to delete Repeat for each channel you want to store or skip RETURN TO NORMAL SCREEN 6 Pre...

Page 17: ... the same channel as the cable box RF output see page 18 also NOTE When connecting your cable box refer to its instruction manual CONNECT CONTROLLER TO VCR 4 Connect to the CABLE BOX connector on your VCR About Your Cable Box This VCR has two separate methods to control your Cable Box The VCR s Wireless Remote Control Unit can control your Cable Box This eliminates the need for a separate Cable Bo...

Page 18: ...r VCR s AUDIO VIDEO IN connectors press CH5 or SHUTTLE PLUS fi to move the highlight bar arrow to ON LINE RETURN TO VCR PLUS SET UP SCREEN 7 Press MENU Turn on the TV and select the VCR channel 3 or 4 or AV mode TURN ON THE VCR 1 Press POWER ACCESS MAIN MENU SCREEN 2 Press MENU as many times as necessary Set Cable Box Output Channel MAIN MENU PROGRAM SET FUNCTION SET TUNER SET CUSTOM SET VIDEO CAL...

Page 19: ...ENCY 51 SAMSUNG 8 13 49 50 SCIENTIFIC ATLANTA 9 10 62 63 SIGMA 19 20 21 SL MARX 8 13 49 50 SPRUCER 24 25 26 STARGATE 8 13 49 50 SYLVANIA 29 TEKNIKA 68 69 TELECAPTION 27 TELEVIEW 8 13 49 50 TEXSCAN 28 29 TOCOM 22 23 64 65 66 UNIKA 52 53 54 UNIVERSAL 38 39 40 41 VIDEOWAY 11 12 60 61 VIDEO TECH 55 VIDTER 55 VIEWSTAR 30 31 32 33 34 35 36 37 ZENITH 11 12 60 61 VCR PLUS SET UP GUIDE CHANNEL SET GUIDE CH...

Page 20: ... the Guide Channel numbers assigned to each station For accurate VCR Plus Programming the VCR Plus Guide Channel number for each station should match the channel number on which it is received in your area If the numbers match go directly to VCR Plus Timer Programming Z pg 42 If the numbers are different and you want to be able to timer record programs from those stations you have to inform the VC...

Page 21: ...hannel and VCR or cable box channel numbers you input appear on the screen in ascending order Check to ensure you ve entered them correctly If you entered more than 10 sets of numbers press OK to see the next set of numbers Guide Channel Map contains only the Guide Channels and VCR or CABLE channels that you entered RETURN TO NORMAL SCREEN 10 Press MENU as many times as necessary You can now use V...

Page 22: ...Unit can control your DBS Receiver This eliminates the need for a separate DBS Receiver Remote Control Unit The VCR s Controller can also control your DBS Receiver This allows the VCR to change your DBS receiver s channel number during timer recording Each method must be set up separately To set up the VCR s Remote Control unit refer to page 58 To set up the Controller go to page 23 CABLE BOX DBS ...

Page 23: ...to your VCR using an RF connection press CH5 or SHUTTLE PLUS fi to move the highlight bar arrow to the channel number representing the DBS receiver s output 3 4 If your DBS receiver is connected to your VCR s AUDIO VIDEO IN connectors press CH5 or SHUTTLE PLUS fi to move the highlight bar arrow to ON LINE RETURN TO CUSTOM SET SCREEN 6 Press MENU MAIN MENU PROGRAM SET FUNCTION SET TUNER SET CUSTOM ...

Page 24: ...an t use the Controller to change satellite channels In this case make sure to leave the DBS receiver turned on and tuned to the proper channel before the scheduled start of timer recording The VCR can only change the satellite channel through the Controller during timer recording If your DBS receiver is one that can t be operated with a remote control because it has no remote sensor you can t use...

Page 25: ...BRATION appears on the screen when PLAYBACK Active Video Calibration is set to ON Z pg 37 STOP PLAYBACK 4 Press STOP or STOP EJECT Then press STOP EJECT to remove the cassette Turn on the TV and select the VCR channel 3 or 4 or AV mode Usable cassettes Full Size VHS T 30 ST 30 T 60 ST 60 T 90 T 120 ST 120 T 160 ST 160 ST 210 Compact VHS TC 20 ST C20 TC 30 ST C30 TC 40 ST C40 Compact VHS camcorder ...

Page 26: ... beginning of both the first SP and the first EP recording after inserting the cassette when RECORD Active Video Calibration is set to ON Z pg 37 PAUSE RESUME RECORDING 5 Press PAUSE Press PLAY to resume recording During record pause you can change the recording channel by using the CH5 buttons or NUMBER keys Active Video Calibration will not take place if the tape speed is changed while in record...

Page 27: ...motion or to the left for reverse slow motion OR During still picture press and hold SHUTTLE PLUS for forward slow motion or press and hold SHUTTLE PLUS for reverse slow motion Release to return to still picture To resume normal playback press PLAY R e v e r s e R e v e rse Reverse Slow Pla y F o r w a r d s e a r c h p l a y slow motion s e a r c h Still motion q CH PLAY SHUTTLE J O G PAUSE 3 4 7...

Page 28: ...back press PLAY NOTE For short searches during playback or still press and hold FF or REW for over 2 seconds When released normal playback resumes SHUTTLE 1 2 3 4 5 6 7 8 0 9 3 4 7 8 1 REW FF CH PLAY P L A Y Manual Tracking Once playback begins the VCR s automatic tracking function is engaged If tracking noise appears in the picture you can override this and make the adjustment manually ENGAGE MAN...

Page 29: ...ER by pressing CH5 or SHUTTLE PLUS fi then press OK ACTIVATE VIDEO STABILIZER 3 Move the highlight bar arrow to ON by pressing CH5 or SHUTTLE PLUS fi RETURN TO NORMAL SCREEN 4 Press MENU NOTES Regardless of the setting this function has no effect with SP recordings during recording and during special effects playback When you finish viewing the tape be sure to set it back to OFF MAIN MENU PROGRAM ...

Page 30: ...gage the Record Pause mode RECORD PAUSE is displayed whether SUPERIMPOSE is set to ON or OFF The channel number except 0 or AUX is displayed if you select a channel on which no signal is received whether SUPERIMPOSE is set to ON or OFF FUNCTION AUTO TIMER SUPERIMPOSE AUDIO SELECT AUX INPUT SPECIAL FUNCTION TAPE DUB MODE S VHS MODE PRESS 5 THEN OK PRESS MENU TO END SUPERIMPOSE ON OFF PRESS 5 TO SEL...

Page 31: ...IX PRESS 5 TO SELECT PRESS MENU TO END q MENU O K C H FUNCTION AUTO TIMER SUPERIMPOSE AUDIO SELECT AUX INPUT SPECIAL FUNCTION TAPE DUB MODE S VHS MODE PRESS 5 THEN OK PRESS MENU TO END AUDIO SELECT 2ND AUDIO AUDIO MONITOR HI FI REC LEVEL PRESS 5 THEN OK PRESS MENU TO END NOTES If the tape being played back has no Hi Fi soundtrack the Normal soundtrack will be heard no matter what choice you make a...

Page 32: ...icating the start of the last timer recorded program then begins playback automatically You can access a program 2 9 index codes away from the current position on the tape If for example you have 5 programs recorded and you want to watch the third one press REVIEW three times If necessary press REW or FF when play starts to search visually to find the very beginning of the desired program If the t...

Page 33: ...playback then press REW or FF The tape rewinds or fast forwards and stops at approxi mately 0H 00M 00S automatically To cancel Counter Memory press C MEMORY Counter Reset Next Function Memory The Next Function Memory tells the VCR what to do after rewinding Before continuing ensure that the VCR is in stop mode a For Automatic Start Of Playback After Tape Rewind press REW then press PLAY within 2 s...

Page 34: ...moved MAKE CONNECTION 1 Connect your VCR to an AV COMPU LINK component as shown in the illustration on page 35 The mini plug cable is a mono 3 5 mm mini plug to mono 3 5 mm mini plug connector TURN ON THE VCR 2 Press POWER ACCESS MAIN MENU SCREEN 3 Press MENU as many times as necessary ACCESS FUNCTION SET SCREEN 4 Press CH5 or SHUTTLE PLUS fi to move the highlight bar arrow to FUNCTION SET then pr...

Page 35: ...ked components are turned on and the TV set to its AV mode automatically NOTE Connection varies depending on the type of JVC TV you have Please refer to the TV s instruction manual when making this connection SPECIAL FUNCTION PAUSE AV COMPU LINK PRESS 5 TO SELECT PRESS MENU TO END q MENU C H PLAY Example Your VCR VIDEO OUT AV COMPU LINK II VCR ONLY AUDIO IN VIDEO IN AUDIO OUT Audio Video cable sup...

Page 36: ...the bar arrow to ON or OFF to set the recording mode by pressing CH5 or SHUTTLE PLUS fi then press OK The playback section is then highlighted Move the bar arrow to ON or OFF to set the playback mode by pressing CH5 or SHUTTLE PLUS fi Press MENU to return to the normal screen Pressing OK returns the highlight bar to the Recording section NOTE When recording or when playing back tapes recorded on t...

Page 37: ...on function is operative To display the Active Video Calibration screen SUPERIMPOSE must be set to ON or the Video Calibration screen will not appear Z pg 30 START RECORDING 1 Press and hold REC and press PLAY on the remote control or press REC on the VCR s front panel The VCR takes about 7 seconds to assess the quality of the tape in use then recording begins with the picture level optimized NOTE...

Page 38: ...e used the tape remaining time reading may not appear right away or may not be correct may sometimes appear or the display may blink on occasion The tape remaining time indication is not accurate when using VHS C tapes with VHS C adapter Recording Features 1 2 3 4 5 6 7 8 0 9 DISPLAY C RESET TV VCR O S D ENGAGE TV MODE 1 During recording Press TV VCR The VCR s VIDEO indicator goes out If you are u...

Page 39: ...SHUTTLE PLUS OK S VHS Super VHS and VHS Your VCR can record in either S VHS or VHS S VHS allows you to make high quality video recordings with a horizontal resolution of 400 lines This compares with the 240 lines of resolution of normal VHS recordings To achieve the highest quality picture we recommend that you record in S VHS mode To record in S VHS perform the steps 1 5 below to set the S VHS MO...

Page 40: ...FUNCTION SET by pressing CH5 or SHUTTLE PLUS fi then press OK ACCESS AUDIO SELECT SCREEN 3 Move the highlight bar arrow to AUDIO SELECT by pressing CH5 or SHUTTLE PLUS fi then press OK ACCESS 2ND AUDIO SCREEN 4 Move the highlight bar arrow to 2ND AUDIO by pressing CH5 or SHUTTLE PLUS fi then press OK SELECT MODE 5 Move the highlight bar arrow to ON by pressing CH5 or SHUTTLE PLUS fi RETURN TO NORM...

Page 41: ...H5 or SHUTTLE PLUS fi to move the highlight bar arrow to HI FI REC LEVEL then press OK SELECT MODE 5 Move the highlight bar arrow to MANUAL by pressing CH5 or SHUTTLE PLUS fi ADJUST AUDIO RECORDING LEVEL 6 Press FF or REW Press FF or REW briefly 5 times to move the on screen s audio levels by one division on the scale To move the audio levels faster keep FF or REW presssed Adjust the recording lev...

Page 42: ...program you wish to record To make corrections press CANCEL and input the correct PlusCode number If the PlusCode number you input is incorrect ERROR may appear on the screen to advise you of the error This happens when the PlusCode number is for a program which has already passed ERROR is displayed for about 4 seconds and the VCR Plus screen reappears step 2 CHECK INPUT DATA 4 Press OK and the Pr...

Page 43: ... DBS RECEIVER USERS on page 45 RETURN TO NORMAL SCREEN 7 Press MENU as many times as necessary Press just once to access the Auto Timer screen Z pg 47 ENGAGE TIMER MODE 8 Press TIMER The VCR turns off automatically NOTES To disengage the timer before recording starts press TIMER again Pressing once more re engages it In case of a power failure after programming the VCR s memory backup keeps your s...

Page 44: ...keys to set the date start stop time and channel number Press CH5 or SHUTTLE PLUS fi to set AM PM and tape speed SP or EP Press OK after AM PM channel number and tape speed settings If you are using a DBS receiver see ATTENTION FOR DBS RECEIVER USERS in the page 45 Any information comprised of 1 digit except the channel number should have a 0 entered before it It is possible to set all information...

Page 45: ... cable or satellite channels through an external tuner be sure to keep the cable box or satellite receiver s power ON EXAMPLE If you program the VCR to timer record a show on December 24 on channel 40 from 12 00 noon to 1 00 PM in SP mode the screen will look like this PROGRAM 1 DATE 12 24 WED START 12 00 PM STOP 1 00 PM CHANNEL 40 SP PRESS NUMBER KEY O 9 OR 5 THEN OK PRESS MENU TO END ATTENTION F...

Page 46: ...ight bar arrow to PROGRAM SET then press OK CHECK PROGRAM INFORMATION 4 Press CH5 or SHUTTLE PLUS fi to check the programs in succession CANCEL A PROGRAM 5 Press CANCEL Repeat steps 4 and 5 as many times as necessary RETURN TO NORMAL SCREEN 6 Press MENU as many times as necessary If there are still programs remaining go to step 7 RE ENGAGE TIMER 7 Press TIMER again To Cancel A Program 1 2 3 4 5 6 ...

Page 47: ...n Screen Timer Programming procedure Z pg 44 press MENU SELECT MODE 2 Move the highlight bar arrow to your choice ON or OFF by pressing CH5 or SHUTTLE PLUS fi RETURN TO NORMAL SCREEN 3 Press MENU as many times as necessary NOTE For safety when AUTO TIMER is set to OFF all other VCR functions are disabled while the Timer mode is engaged To disengage the timer press TIMER Auto Timer When the Auto Ti...

Page 48: ...ou want to record for more than 30 minutes press REC to extend the time Each press extends recording time by 30 minutes NOTES You can only perform ITR using the REC button on the VCR s front panel After you set the ITR time the previous display reappears To check the remaining time press REC once during record ing and the remaining time will be displayed for about 5 seconds Be careful not to press...

Page 49: ...able feature then set SUPERIMPOSE to OFF before pressing PLAY Z pg 30 START RECORDER 6 Set to its record mode NOTES Be sure to set TAPE DUB MODE back to OFF when you finish editing When TAPE DUB MODE is set to ON Active Video Calibration is deactivated in order to provide better picture quality edits If you use an auxiliary input to connect a cable box or DBS receiver make sure that the correct in...

Page 50: ...CASSETTE 2 Insert the cassette to be recorded on into the recorder SET RECORDER S INPUT MODE 3 Press NUMBER key 0 to set to AUX ACCESS MAIN MENU SCREEN 4 Press MENU as many times as necessary ACCESS FUNCTION SET SCREEN 5 Press CH5 or SHUTTLE PLUS fi to move the highlight bar arrow to FUNCTION SET then press OK If you re using a JVC Master Edit Control equipped camcorder step 6 If not step 9 ACCESS...

Page 51: ...ting When TAPE DUB MODE is set to ON Active Video Calibration is deactivated in order to provide better picture quality edits If you use an auxiliary input to connect a cable box or DBS receiver make sure that the correct input FRONT VIDEO REAR S VIDEO or REAR VIDEO is selected after you have finished editing Z step 10 q RETURN TO FUNCTION SET SCREEN 8 Press MENU ACCESS AUX INPUT SCREEN 9 Press CH...

Page 52: ...UX input connector follow steps 4 5 9 10 14 from the Edit From A Camcorder section Z pg 50 LOCATE END POINT 3 Load the recording cassette into your VCR and play it back to determine the edit out point the end of the segment to be replaced using the JOG SHUTTLE controls or SHUTTLE PLUS and PAUSE RESET THE COUNTER 4 Press C RESET to change the counter display to 0H00M00S LOCATE START POINT 5 Determi...

Page 53: ...RT EDITING If you want to replace the picture Hi Fi audio soundtrack and normal audio soundtrack all at the same time In step 6 above after you press INSERT press A DUB also REC and PLAY blink and PAUSE lights up on the display panel NOTES Insert editing is not possible with cassettes whose safety tab has been removed In insert editing the recording speed SP EP is determined by the previous record...

Page 54: ...PLAY to resume dubbing END AUDIO DUBBING 6 Press STOP to stop the tape in your VCR and engage the audio component s Stop mode Pre recorded tape Audio dubbed tape Normal audio track Video Hi Fi audio track Audio component CD player etc NOTES When monitoring the sound during Audio Dubbing the normal soundtrack is automatically selected If you wish to hear the Hi Fi or mixed sound Hi Fi Normal soundt...

Page 55: ...he factory You can change this number to any number between 1 and 99 If it is necessary to change the JLIP ID number perform the following steps 1 2 3 4 5 6 7 8 0 9 3 4 7 8 1 CH MENU SHUTTLE PLUS OK J terminal NUMBER ACCESS MAIN MENU SCREEN 1 Press MENU as many times as necessary ACCESS CUSTOM SET SCREEN 2 Press CH5 or SHUTTLE PLUS fi to move the highlight bar arrow to CUSTOM SET then press OK ACC...

Page 56: ... function with one code try entering the other OPERATE TV 3 First while holding down TV press POWER on the remote to see if the TV s power goes off as it should If it does try other operations The POWER TV VCR CH5 TV VOL and NUMBER keys on the remote can all be used to operate the TV For some brands of TV you must press ENTER after having pressed the NUMBER keys To operate your TV while holding do...

Page 57: ... operate your cable box while holding down CABLE DBS press the corresponding button POWER CH5 NUMBER keys or ENTER For some brands of cable box you must press ENTER after having pressed the NUMBER keys NOTES Depending on the type of cable box there may be cases where some or all functions cannot be operated using the remote control It s not possible to set the remote control for both your cable bo...

Page 58: ...iver while holding down CABLE DBS press the corresponding button POWER CH5 NUMBER keys or ENTER Depending on the DBS receiver you may have to press ENTER after having pressed the NUMBER keys NOTES Depending on the type of DBS receiver there may be cases where some or all functions cannot be operated using the remote control It s not possible to operate a DBS receiver that is not equipped with a re...

Page 59: ...control signals and another set to respond to B code control signals The remote control is preset to send A code signals because your VCR is initially set to respond to A code signals You can easily modify your VCR to respond to B code signals S T O P TIMER TURN VCR POWER ON 1 Press POWER ENGAGE CHILD LOCK 2 Press and hold POWER on the remote control until the Child Lock indicator appears on the f...

Page 60: ... cassette is pointing towards the VCR Then insert the cassette Press C MEMORY to disengage the Counter Memory mode and extin guish the indicator Z pg 33 SYMPTOM 1 The tape is running but the picture won t appear 2 Noise appears during visual search 3 Breaks are noticeable in Hi Fi soundtrack 4 The playback picture is blurred or interrupted even though TV broadcasts are clear 5 The Hi Fi soundtrack...

Page 61: ...ole with adhesive tape or replace it with a cassette on which the safety tab is intact Check the programmed data and re program as necessary then press TIMER again The program may not have been recorded in its entirety Next time make sure you have enough time on the tape to record the entire program Connect the Controller correctly Z pg 17 After confirming your cable box s output channel number re...

Page 62: ...n the previous area All 8 programs of the VCR s timer memory are used OTHER PROBLEMS CORRECTIVE ACTION If you need the skipped channels restore them Z pg 16 Press PAUSE to pause the recording change channels then press PLAY to resume recording Re set the remote control to the correct brand Z pg 56 or 57 or 58 Select a different Host Channel during the Semi Auto setting procedure Z pg 12 or perform...

Page 63: ...fect does removing the safety tab have A It disables marking of index codes Q Sometimes during Index Search the VCR can t find the program I want to see Why not A There may be index codes too close together Q During playback on screen operational indicators sometimes jitter Why does this happen A If the condition of the tape being played back is not good jittering of the video including on screen ...

Page 64: ...rt Cassette 25 Insert Editing 52 Instant ReView 32 ITR Instant Timer Recording 48 L Language Selection 10 M Main Menu 10 Manual Channel Setting 16 Manual Clock Setting 13 Manual Tracking 28 MBR Multi Brand Remote Code Setting 56 N Next Function Memory 33 O On Screen Display 30 On Screen Timer Programming 44 On Screen Timer Recording 44 Override Auto Clock Setting 11 P PBS Channel 8 Playback 25 Plu...

Page 65: ...tton Z pg 32 Recording Speed SP EP Button Z pg 26 LIVE SURROUND Indicator Z pg 32 Front Display Panel Z pg 66 Remote Control Sensor INSERT Button Z pg 53 Audio Dubbing A DUB Button Z pg 54 PAUSE Button Z pg 27 STOP EJECT Button Z pg 25 PLAY Button Z pg 25 INSERT PAUSE REC STOP EJECT PLAY q POWER JOG SHUTTLE VIDEO MONO L AUDIO R SP EP MENU CH OK A DUB LIVE SURROUND REW FF H M S SP AM PM R E C PLAY ...

Page 66: ...N IN OUT S VIDEO IN S VIDEO VIDEO AUDIO L MONO R CABLE BOX CH4 IN VHF UHF OUT TV JLIP 1 2 6 7 8 9 0 3 4 5 FRONT DISPLAY PANEL H M S SP AM PM R E C PLAY SAP ST TIMER PAUSE M V C R 8 4 0 6 10 20dB NORM L R 9 7 2 1 6 4 8 3 5 0 1 Audio Level meter Z pg 41 2 Play Mode Indicator 3 Recording Mode Indicator Instant Timer Recording Indicator Z pg 48 4 VCR Mode Indicator Z pg 38 5 Multi Channel TV Sound Ind...

Page 67: ...tton Z pg 10 27 A B TV CABLE DBS TV CABLE DBS operation Press and hold TV CABLE DBS button then press POWER CH 5 TV VCR 0 9 ENTER TV VCR 1 2 3 4 5 6 7 8 DAILY 0 AUX 9 WEEKLY LIVE SURROUND MBR SET DISPLAY TIMER CANCEL C MEMORY SKIP SEARCH C RESET CH SKIP ADD OSD ENTER SP EP TV VOL CH MENU SHUTTLE PLUS OK REC 4 7STOP 8PAUSE POWER 3PLAY 1 FF REW y u i o 1 2 3 4 5 6 8 7 9 0 e r t q w Installing Batter...

Page 68: ...resolution 240 lines VHS 400 lines S VHS Frequency range Normal audio 70 Hz to 10 000 Hz Hi Fi audio 20 Hz to 20 000 Hz Input Output RCA connectors IN x 2 OUT x 1 S VIDEO connectors IN x 1 OUT x 1 TUNER Tuning system Frequency synthesized tuner Channel coverage VHF Channels 2 13 UHF Channels 14 69 CATV 113 Channels RF output Channel 3 or 4 switchable preset to Channel 3 when shipped 75 ohms unbala...

Page 69: ...AL HEADQUARTERS JVC SERVICE ENGINEERING COMPANY OF AMERICA DIVISION OF US JVC CORP 107 Little Falls Road Fairfield NJ 07004 2105 Pack your JVC unit in the original carton or one of equivalent size and strength Enclose with the unit a letter stating the problem or symptom that exists and also a copy of the receipt or bill of sale you received when you purchased your JVC unit Print your home return ...

Page 70: ... with the products or if the model or serial number has been altered tampered with defaced or removed 2 Initial installation and installation and removal for repair 3 Operational adjustments covered in the Owner s Manual normal maintenance video and audio head cleaning 4 Damage that occurs in shipment due to act of God and cosmetic damage 5 Signal reception problems and failures due to line power ...

Page 71: ...EN 71 MEMO ...

Page 72: ...1997 VICTOR COMPANY OF JAPAN LTD U U C Printed in Malaysia 0797HOV UN PJ JVC COMPANY OF AMERICA DIVISION OF US JVC CORP 41 Slater Drive Elmwood Park N J 07407 JVC CANADA INC 21 Finchdene Square Scarborough Ontario M1X 1A7 ...

Reviews: