


— 4 —
Page 4
February 10, 2004 8:45 am
SERVICING
1. Servicing
If your product is not operating correctly or exhibits a marked
change in performance and you are unable to restore normal
operation by following the detailed procedure in its operating
instructions, do not attempt to service it yourself as opening or
removing covers may expose you to dangerous voltage or other
hazards. Refer all servicing to qualified service personnel.
2. Damage Requiring Service
Unplug this product from the wall outlet and refer servicing to
qualified service personnel under the following conditions:
a. When the power supply cord or plug is damaged.
b. If liquid has been spilled, or objects have fallen into the
product.
c. If the product has been exposed to rain or water.
d. If the product does not operate normally by following the
operating instructions. Adjust only those controls that are
covered by the operating instructions as an improper
adjustment of other controls may result in damage and will
often require extensive work by a qualified technician to
restore the product to its normal operation.
e. If the product has been dropped or damaged in any way.
f. When the product exhibits a distinct change in performance—
this indicates a need for service.
3. Replacement Parts
When replacement parts are required, be sure the service
technician has used replacement parts specified by the
manufacturer or which have the same characteristics as the
original part. Unauthorized substitutions may result in fire, electric
shock or other hazards.
4. Safety Check
Upon completion of any service or repairs to this product, ask the
service technician to perform safety checks to determine that the
product is in safe operating condition.
Cassettes marked “S-VHS” and “VHS” can be used with this video
cassette recorder. However, S-VHS recordings are possible only
with cassettes marked “S-VHS”.
By using S-VHS ET it is possible to record and play back with
S-VHS picture quality on VHS cassettes with this VCR.
Failure to heed the following precautions may result in damage to
the VCR, Remote or video cassette.
1. DO NOT place the VCR . . .
...in an environment prone to extreme temperatures or
humidity.
...in direct sunlight.
...in a dusty environment.
...in an environment where strong magnetic fields are
generated.
...on a surface that is unstable or subject to vibration.
2. DO NOT block the VCR’s ventilation openings.
3. DO NOT place heavy objects on the VCR or on the Remote.
4. DO NOT place anything which might spill on the top of the
VCR or on the Remote.
5.AVOID violent shocks to the VCR during transport.
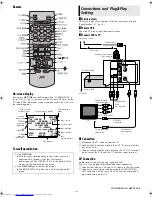
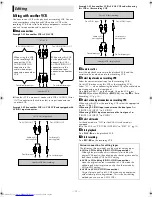
How to use the Remote
Before use, insert the lithium
battery — CR2032 —
correctly, with the plus(+)
side up into the battery
compartment. To open it,
press the release tab and
carefully, pull the
compartment out.
The Remote can operate most of your VCR’s functions, as well as
basic functions of JVC TVs.
●
Point the Remote towards the remote sensor on the target
component. The maximum operating distance is about 8m.
●
To operate a JVC TV, use any of the following buttons:
TV
POWER, TV INPUT, TV CH+/–
or
TV VOL +/–
.
NOTE:
If the Remote does not work properly, remove its battery, wait for a
few seconds, replace the battery and then try again.
Video heads cleaning
The heads get dirty in the following cases:
●
in an environment prone to extreme temperature or humidity.
●
in a dusty environment
●
flaw, dirt or mold on video tapes
●
continuous usage for a long time
Use a dry cleaning cassette — TCL-2 — when:
●
Rough, poor picture appears while a tape is played back.
●
The picture is unclear or no picture appears.
●
“USE CLEANING CASSETTE” appears on the screen (only with
“SUPERIMPOSE” set to “ON” (
墌
pg. 13)).
Caution on Replaceable lithium battery
The battery used in this device may present a fire or chemical
burn hazard if mistreated. Do not recharge, disassemble, heat
above 100°C or incinerate.
Replace battery with CR2032. Panasonic (Matsushita Electric)
or Maxell is recommended.
Danger of explosion or Risk of fire if the battery is incorrectly
replaced.
䡲
Dispose of used battery promptly.
䡲
Keep away from children.
䡲
Do not disassemble and do not dispose of in fire.
ATTENTION:
To mobile phone users:
Using a mobile phone in the vicinity of the VCR may cause
picture vibration on the TV screen or change the screen to a
blue back display.
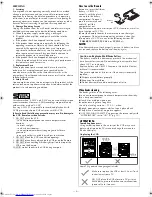
On placing the VCR:
Some TVs generate strong magnetic fields.
Make sure to place the VCR at least 20 cm (7 or 8
inches) away from a TV.
DO NOT place the VCR close to a TV as it may
cause noise, picture disturbance or malfunctions
(power off, etc.) to occur.
Release
tab
20 cm
HR-S2913U_EN.fm Page 4 Tuesday, February 10, 2004 8:45 AM


