


— 11 —
Page 11
February 9, 2004 6:50 pm
Recording Features
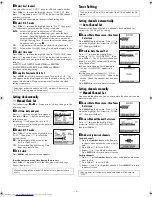
Specifying recording length
— Instant Timer Recording (ITR)
During recording, press
REC
(
7
) on the VCR repeatedly until the
recording length you want appears on the display panel. The
record indicator (
䡬
) on the display panel starts blinking.
●
Each time you press the button, recording length increases in
30-minute intervals (up to 6 hours).
●
The VCR shuts off after recording is finished.
●
To cancel an ITR, press
STOP
(
8
) on the Remote or
STOP/
EJECT
(
0
) on the VCR.
Watching one program while recording another
During recording...
●
If you connect the TV and the VCR only using the RF
connection (
墌
pg. 6) to view pictures from the VCR, press
TV/
VCR
on the Remote so that VCR mode indicator goes off from
the display panel. (The TV broadcast being recorded
disappears.)
●
If you are using the AV connection or S-video connection
(
墌
pg. 6) to view pictures from the VCR, change the TV’s input
mode from AV to TV.
Then, select the channel you want to watch, on the TV.
Second Audio Recording
This VCR’s built-in MTS decoder enables reception of
Multichannel TV Sound broadcast. To record a SAP program
received, set “2ND AUDIO RECORD” to “ON” (
墌
pg. 13).
S-VHS (Super VHS), S-VHS ET or VHS Recording
Mode
This VCR can record in S-VHS (Super VHS), S-VHS ET or VHS.
●
To record in S-VHS:
Set “S-VHS MODE” to “ON” (
墌
pg. 14). Then, insert a cassette
marked “S-VHS”. The S-VHS indicator lights up on the display
panel.
The S-VHS recording mode is selected.
●
To record in S-VHS ET on a VHS cassette:
Set “S-VHS ET” to “ON” (
墌
pg. 13). Then, insert a cassette
marked “VHS”. The S-VHS indicator lights up on the front
display panel.
●
To record in VHS:
Insert a cassette marked “VHS”.
Set “S-VHS ET” to “OFF” (
墌
pg. 13).
●
To record in VHS on an S-VHS cassette:
Insert a cassette marked “S-VHS”. The S-VHS indicator lights up
on the display panel. Then, set “S-VHS MODE” to “OFF”
(
墌
pg. 14). The S-VHS indicator goes off.
The VHS recording mode is selected.
NOTE:
When playing back a tape that has been recorded in S-VHS or
S-VHS ET, the S-VHS indicator lights up on the display panel
regardless of the “S-VHS ET” or “S-VHS MODE” setting.
Up to 8 timer recording programs can be made using express
timer programing method as far as a year in advance.
Remember, the clock must be set before you can program the
timer.
NOTES:
●
If all the 8 programs have already been set, “PROGRAM FULL”
appears on the TV screen.
●
After timer recording is completed, the VCR turns off
automatically.
●
You can program the timer recording while a regular recording
is in progress; the menu screens will not be recorded.
●
Even if a power failure occurs, the VCR keeps your timer
programs. However, the clock time, channel settings, and other
menu settings are lost. As a result, when the power is supplied
again to this VCR after the power failure, this VCR starts the
Plug&Play setting automatically to restore the clock time and
channel setting. If the clock time and channel setting are
restored correctly, each timer program you have made will start
at its start time unless its end time has elapsed.
●
If the tape reaches its end during timer recording, the recording
stops and “
#
“, “
䡬
” and “
$
” on the display panel blink. Press
TIMER
to disengage timer, then press
STOP/EJECT
(
0
) on
the VCR to eject the cassette or press
POWER
1
then press
REW
(
3
) to rewind the tape.
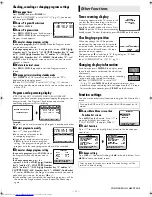
Express Timer Programing
Load a cassette with the record safety tab intact. The VCR turns
on, and the counter is reset, automatically.
A
Press
PROG.
on the Remote to access the Program screen.
B
Press
START
/
(
Number key “1”
and/or “4”
),
STOP
/
(
Number key
“2” and/or “5”
),
DATE
/
(
Number
key “3” and/or “6”
) or
CH
/
repeatedly to enter the start time, stop
time, date or channel.
●
Press and hold
START
/
or
STOP
/
to increase the time in 30-minute intervals.
●
To set the tape speed, press
SP/EP
.
●
To timer-record daily (Monday–Friday) or weekly serials,
press
DAILY
(
M-F
) (
Number key “8”
) or
WEEKLY
(
Number
key “9”
). Pressing the button again makes the “DAILY” or
“WEEKLY” display disappear.
C
Press
OK
or
PROG.
.
●
If “PROGRAM NOT COMPLETED PROGRAM OVERLAP”
appears, see “Program overlap warning display” (
墌
pg. 12).
D
Press
TIMER
. The VCR turns off automatically and “
#
” is
displayed on the display panel.
To use the VCR while it is in timer recording standby
mode
Press
TIMER
, then press
POWER
1
. After you use the VCR, press
TIMER
again to put the VCR into timer recording standby mode.
Turn on the VCR and TV, and select the VCR channel (or AV
mode).
Timer Recording
Turn on the VCR and TV, and select the VCR channel (or AV
mode).
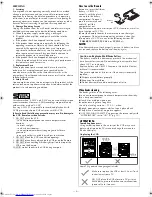
PROGRAM 1
START
STOP
– –:– –AM
– –:– –AM
DATE
CH
– –/– –/– –
– – – SP
PRESS (+/
–
, SP/EP, 8=DAILY
9=WEEKLY), THEN (0K)
PRESS (PROG.) TO END
CONTINUED ON NEXT PAGE
HR-S2913U_EN.fm Page 11 Monday, February 9, 2004 6:51 PM


