JVC HR-J690EU Instructions Manual Download Page 2

March 8, 2002 2:21 pm

Page 2

— 2 —

Master Page: Right

When the equipment is installed in a cabinet or a shelf, make sure 
that it has sufficient space on all sides to allow for ventilation 
(10 cm or more on both sides, on top and at the rear).

When discarding batteries, environmental problems must be 
considered and the local rules or laws governing the disposal of 
these batteries must be followed strictly.

Failure to heed the following precautions may result in damage to 
the recorder, remote control or video cassette.

1. DO NOT place the recorder …

… in an environment prone to extreme temperatures or 

humidity.

… in direct sunlight.
… in a dusty environment.
… in an environment where strong magnetic fields are 

generated.

… on a surface that is unstable or subject to vibration.

2. DO NOT block the recorder’s ventilation openings or holes.

(If the ventilation openings or holes are blocked by a 
newspaper or cloth, etc., the heat may not be able to get out.)

3. DO NOT place heavy objects on the recorder or remote 

control.

4. DO NOT place anything which might spill on top of the 

recorder or remote control.
(If water or liquid is allowed to enter this equipment, fire or 
electric shock may be caused.)

5. DO NOT expose the apparatus to dripping or splashing.
6. DO NOT use this equipment in a bathroom or places with 

water. Also DO NOT place any containers filled with water or 
liquids (such as cosmetics or medicines, flower vases, potted 
plants, cups, etc.) on top of this unit.

7. DO NOT place any naked flame sources, such as lighted 

candles, on the apparatus.

8. AVOID violent shocks to the recorder during transport.

MOISTURE CONDENSATION

Moisture in the air will condense on the recorder when you move 
it from a cold place to a warm place, or under extremely humid 
conditions—just as water droplets form on the surface of a glass 
filled with cold liquid. Moisture condensation on the head drum 
will cause damage to the tape. In conditions where condensation 
may occur, keep the recorder’s power turned on for a few hours to 
let the moisture dry.

How to use the remote control

Before use, insert the batteries in the correct directions as 
indicated under the battery cover. The remote control can operate 
most of your recorder’s functions, as well as basic functions of JVC 
TV sets.

Point the remote control toward the receiving window on the 
recorder.

The maximum operating distance of the remote control is about 
8 m.

To operate your JVC TV, while holding down 

TV

, press the 

corresponding button:

1

TV/VCR

TV PR +/–

TV 

%

+/–

(TV 

Volume), 

^

(TV Muting).

NOTE:

If the remote control does not work properly, remove its batteries, 
wait for a few seconds, replace the batteries and then try again.

Video heads cleaning

The heads get dirty in the following cases:

in an environment prone to extreme temperature or humidity

in a dusty environment

flaw, dirt or mold on video tapes

continuous usage for a long time

Use a dry cleaning cassette — TCL-2 — when:

Rough, poor picture appears while a tape is played back.

The picture is unclear or no picture appears.

“USE CLEANING CASSETTE” appears on the screen (only with 
“O.S.D.” set to “ON” (

12)).

Usable cassettes

Compact VHS camcorder recordings can 
be played on this recorder. Simply place 
the recorded cassette into a VHS Cassette 
Adapter and it can be used just like any 
full-sized VHS cassette.

This recorder is equipped with SQPB (S-VHS QUASI 
PLAYBACK) that lets you watch tapes recorded in the S-VHS 
format and the SP mode with regular VHS resolution.

* SQPB does not deliver Super VHS resolution.

This recorder can record on regular VHS and Super VHS 
cassettes. However, it will record regular VHS signals only.

* S-VHS recording is not possible with this recorder.

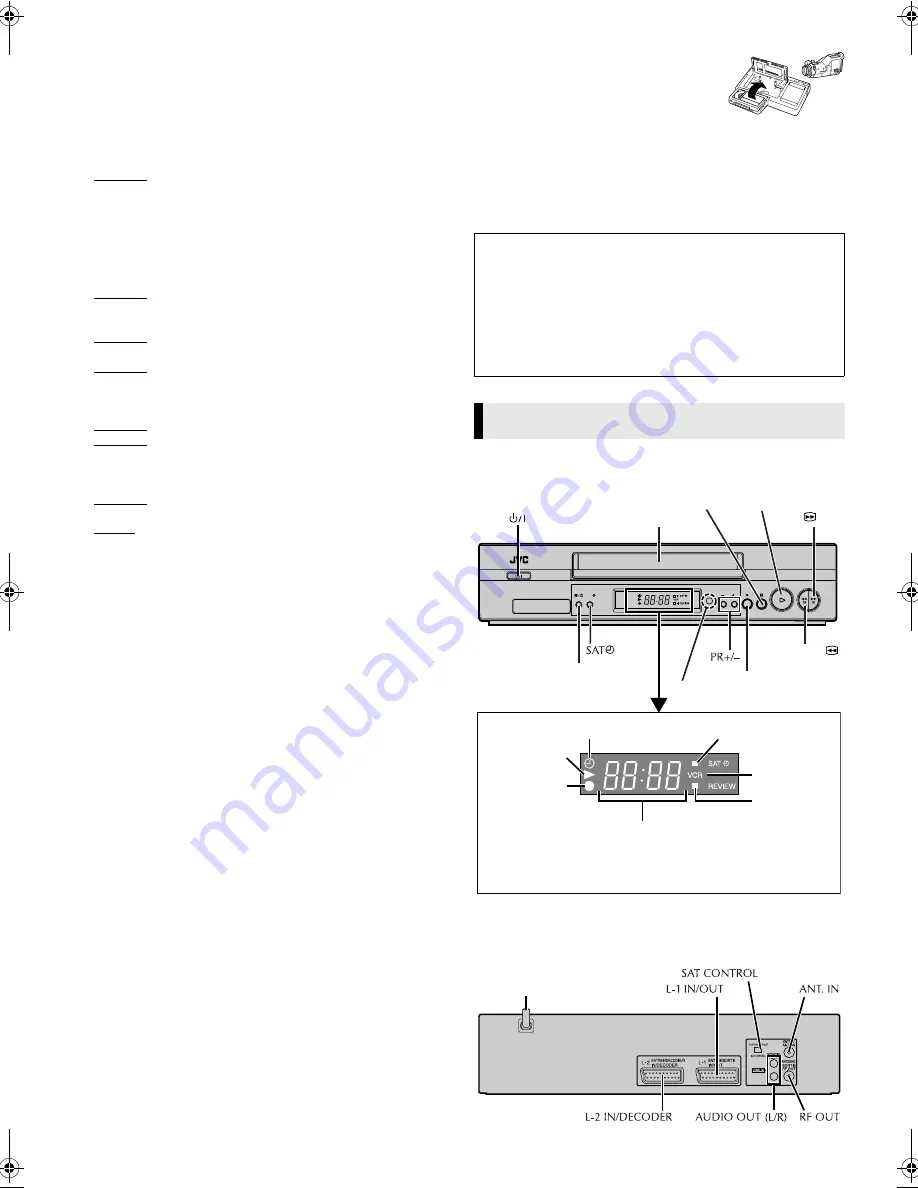
Front Panel

Rear Panel

ATTENTION:

To mobile phone users:

Using a mobile phone in the vicinity of the recorder may cause 
picture vibration on the TV screen or change the screen to a 
blue back display.

On placing the recorder:

Some TVs or other appliances generates strong magnetic fields. 
Do not place such appliance on top of the recorder as it may 
cause picture disturbance.

Buttons, Connectors and Indicators

SAT

PR

Cassette loading slot

Display panel

Play indicator

Record

indicator

Timer mode indicator

Channel and auxiliary input/
Clock time*

Infrared beam 
receiving window

SAT

#

 indicator

REVIEW 
indicator

VCR indicator

* Each time you press 

– –:– –

, the display panel shows the channel 

number and the clock time alternatively.

Pause

9

Play

4

Stop/Eject

0

Record

7

Rewind

3

Fast

Forward

5

Mains power cord

HR-J690EU-001EN.fm  Page 2  Friday, March 8, 2002  2:22 PM

Summary of Contents for HR-J690EU

Page 1: ...from the mains outlet 䡲 Dangerous voltage inside Refer internal servicing to qualified service personnel To prevent electric shock or fire hazard remove the power cord from the mains outlet prior to connecting or disconnecting any signal lead or aerial WARNING There are two different types of SECAM colour systems SECAM L used in FRANCE also called SECAM West and SECAM B used in Eastern European co...

Page 2: ...over The remote control can operate most of your recorder s functions as well as basic functions of JVC TV sets Point the remote control toward the receiving window on the recorder The maximum operating distance of the remote control is about 8 m To operate your JVC TV while holding down TV press the corresponding button 1 TV VCR TV PR TV TV Volume TV Muting NOTE If the remote control does not wor...

Page 3: ...B Situate recorder Place the recorder on a stable horizontal surface C Connect recorder to TV RF Connection A Disconnect the TV aerial cable from the TV B Connect the TV aerial cable to the ANT IN connector on the rear of the recorder C Connect the provided RF cable between the RF OUT connector on the rear of the recorder and the TV s aerial connector AV Connection If your TV is equipped with a 21...

Page 4: ... If both Auto Channel Set and Clock Set have been performed successfully the correct current time is displayed Turn on the TV and select its video channel or AV mode Then make sure that all necessary stations have been stored in the recorder s memory by using the PR button s If Auto Channel Set has succeeded but Clock Set has not 1 is displayed A Turn on the TV and select its video channel or AV m...

Page 5: ...receiver s 21 pin SCART connector D Connect Satellite Controller to recorder Connect the Satellite Controller to the SAT CONTROL connector on the rear panel E Turn on satellite receiver Turn on the satellite receiver s power F Access Main Menu screen then Initial Set screen Press MENU Press rt to place the pointer next to INITIAL SET then press OK or e G Access Sat Control Set screen Press rt to p...

Page 6: ...V mode During playback Stop playback Press 8 on the remote control OR Press 0 on the recorder Pause playback and view still picture Press 9 Press 4 to resume normal playback If there is vertical jitter press PR or to correct the picture Pause and Frame by Frame playback Press 9 to pause then press w or e or 9 repeatedly Press 4 to resume normal playback High Speed Search Press 3 or 5 Press 4 to re...

Page 7: ...prevent accidental recording on a recorded cassette remove its record safety tab To record on it later cover the hole with adhesive tape Basic Recording A Load a cassette Make sure the record safety tab is intact If not cover the hole with adhesive tape before inserting the cassette The recorder turns on and the counter is reset automatically B Select recording channel Press PR or the number keys ...

Page 8: ...ded on the Hi Fi audio track and the standard audio programme on the normal audio track NOTES If the quality of stereo sound being received is poor the broadcast may be received in monaural with better quality Before playing back a programme recorded in stereo or a bilingual programme refer to Selecting Soundtrack 墌 6 Set the Guide Program numbers manually only in the following cases When you sele...

Page 9: ... number key 9 Pressing the button again makes the DAILY or WEEKLY display disappear C Press OK or PROG D Press The recorder turns off automatically and is displayed on the display panel To timer record a satellite broadcast using the SHOWVIEW system A Perform Satellite Receiver Control Set 墌 5 B Perform steps 1 1 1 1 4 4 4 4 In step 2 2 2 2 you cannot set VPS PDC to ON C Leave the satellite receiv...

Page 10: ...programme on satellite receiver referring to its instruction manual C Load a cassette with the record safety tab intact D Set L 2 SELECT to A V or SAT 墌 13 E To set the tape speed press SP LP p The current setting for the tape speed appears on the display panel or the screen for about 5 seconds Press SP LP p again to change the setting while tape speed is displayed F Press SAT for more than 2 seco...

Page 11: ...the source player F Start recording Engage the Record mode of the recording deck NOTE When you select a country in Central or Eastern Europe for country setting you cannot use decoder with this recorder Connecting to a satellite receiver Connect the decoder to the satellite receiver s connector if you have a decoder L 1 IN OUT connector to TV s connector and L 2 IN DECODER connector to the satelli...

Page 12: ...s information on screen display appears on the screen NOTE When you use the recorder as the source player for editing a tape be sure to set this function to OFF Otherwise the recorder status information will be recorded on the edited tape 䡵 DIRECT REC ON OFF When this function is set to ON you can easily start recording the programme that you are watching on your TV Press and hold 7 and press 4 on...

Page 13: ...he pointer next to CLOCK SET then press OK or e C Set time date and year Press rt until the desired time appears then press OK or e Set the date and year in the same way Holding rt changes the time in 30 minute intervals or changes the date in 15 day intervals D Set Just Clock Set to ON or OFF by pressing rt then press OK or e Just Clock The Just Clock function provides accurate time keeping throu...

Page 14: ...B Select position Press rt w e to until the channel you want to delete begins blinking C Delete channel Press The channel directly beneath the cancelled one moves up one line Repeat steps 2 2 2 2 3 3 3 3 as necessary D Return to normal screen Press MENU Changing station channel positions A Access Confirmation screen Perform step 1 1 1 1 of Manual Channel Set 墌 14 B Select position Press rt w e unt...

Page 15: ...essary D Return to normal screen Press MENU TV station and ID list The ID abbreviation is what is shown on screen in lieu of the station name The ID abbreviation is listed in the Confirmation screen and is displayed on the screen when the recorder is tuned to a different station ID STATION NAME ID STATION NAME 1000 3SAT 9LIV ADLT ANT3 ARD ARTE B1 BBC BBC1 BBC2 BR3 C C1 CAN5 CANV CH4 CH5 CHLD CINE ...

Page 16: ...r clearly re set the video channel to another vacant position and try again D Exit Video Channel Set mode Press OK Specifications shown are for SP mode unless specified otherwise E O E Design and specifications subject to change without notice Major Countries TV System Austria Denmark Finland Holland Italy Norway Spain Switzerland Sweden Germany Egypt B G China Mongolia Rumania Bulgaria Czech Rep ...

Reviews: