


January 31, 2002 10:09 am
Page 12
— 12 —
Master Page: Right
Up to 7 timer recording programmes within a month can be
made.
Before starting:
●
Set the clock properly. (
墌
7)
●
Set “SYSTEM” to the appropriate mode. (
墌
4)
●
Load a cassette with the record safety tab intact.
NOTES:
●
If all the 7 programmes have already been set, “PROGRAM
FULL” appears on the screen.
●
If there is a conflict in the timer schedule and one programme
overlaps with another, the programme starting earlier will be
recorded. If the start times are the same, the programme made
most recently will be recorded.
●
If you wish to stop timer recording which has already started,
press
1
.
●
After timer recording is completed, the recorder enters the
standby mode automatically.
●
If the tape reaches its end during timer recordings, the recorder
stops recording, rewinds the tape and ejects the cassette, then
enters the standby mode automatically.
●
You can programme the timer recording while a regular
recording is in progress; the menu screens will not be recorded.
S
HOW
V
IEW
®
Timer Programming
The S
HOW
V
IEW
numbers are the numbers next to the programme
in most TV listing.
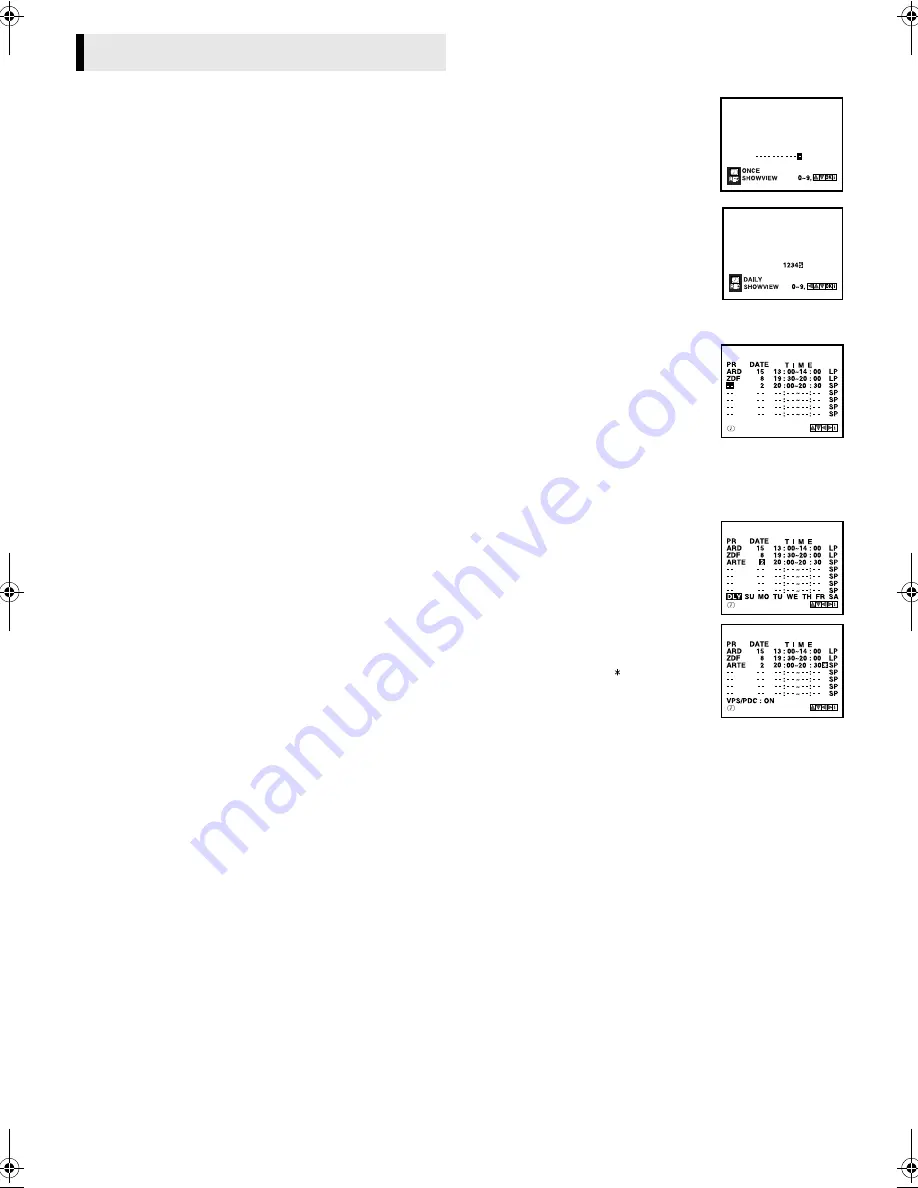
A
Press
SHOWVIEW
to access the
S
HOW
V
IEW
number screen.
●
Press
rt
to select “ONCE” (once),
“DAILY” (Monday–Friday) or “WEEKLY”
(weekly serials).
B
Press the appropriate
number keys
to
input the S
HOW
V
IEW
number, then press
OK
. The program list appears.
●
If the number you entered is invalid,
“PLEASE CHECK” appears on the screen.
Input a valid S
HOW
V
IEW
number, then
press
OK
.
●
If the number you entered is invalid,
press
w
, then input a valid S
HOW
V
IEW
number.
C
Check the settings.
●
If “- -” is displayed on the channel
position, press
w
e
to select “- -”, then
press the
number keys
then
rt
to select
the channel position you want to record
manually. This channel position is
registered to the recorder.
●
To change the channel position, press
w
e
to select the “PR” setting, then press
rt
to select the channel
position you want to record manually.
●
To change the date, press
w
e
to select the “DATE” setting, then
press the appropriate
number keys
or
rt
.
●
To change the daily or weekly serials,
press
w
e
to select the “DATE” setting,
then press
OK
. Press
w
e
, then press
OK
.
●
To change the stop time, press
w
e
to
select the stop time. Press the
appropriate
number keys
or
rt
.
●
To set VPS/PDC, press
w
e
to select the
space between the stop time and the
tape speed, then press
rt
. If you set
“VPS/PDC” to “ON”, “ ” appears.
墌
“VPS/PDC Recording” on page 13.
●
HR-J590/J593/J599EU only
To set the tape speed (SP/LP/IP), press
w
e
to select the tape speed, then press
rt
.
墌
“Intelligent LP Recording (HR-J590/J593/J599EU only)” on
page 13.
D
Press
MENU
. Press
MENU
again to return to normal screen.
E
Press
1
. The recorder enters timer standby mode. The timer
indicator and standby/record indicator light on the display panel.
●
If a cassette has not loaded when the recorder enters the timer
standby mode, the timer indicator blinks on the display panel.
To timer-record a satellite broadcast using the S
HOW
V
IEW
system:
A
Perform steps
1
1
1
1
–
5
5
5
5
. In step
3
3
3
3
, set the channel position to
“AV2”.
B
Set the satellite receiver to the appropriate channel before the
selected programme begins.
C
Leave the satellite receiver’s power on.
Timer Recording
HR-J590_593_290_293EU-001EN.fm Page 12 Thursday, January 31, 2002 10:12 AM


