background image

Playback Features

Adjusting tracking condition
— tracking adjustment

Automatic tracking adjustment

Whenever you insert a tape and start playback, automatic tracking
starts working and continuously analyzes the signal to enable
optimum picture quality during playback.

Manual tracking adjustment

If automatic tracking cannot eliminate noises well during
playback, follow the procedures below.

A

Press

SP/LP/EP

(

p

) on the remote control during playback to

activate manual tracking.

B

Press

PR +

and

to eliminate the noises. Press it briefly for a

fine adjustment, or press and hold for a coarse adjustment.

Press

SP/LP/EP

(

p

) again to reactivate automatic tracking.

Automatic operations after rewinding
— Next Function Memory

The Next Function Memory “tells” the recorder what to do after
rewinding is complete. Ensure that the recorder is in stop mode.

For Automatic Playback Start

Press

REW

(

3

), then press

PLAY

(

4

) within 2 seconds.

For Automatic Power Off

Press

REW

(

3

), then press

1

within 2 seconds.

For Automatic Timer Standby

Press

REW

(

3

), then press

#

within 2 seconds.

NOTE:

It is not possible to select the Automatic Timer Standby function if
the cassette’s record safety tab is removed.

Playing back tape repeatedly (100 times)
— Repeat Play

During playback, press and hold

PLAY

(

4

) for more than

5 seconds. The play indicator (

$

) on the display panel starts

blinking slowly. To stop playback, press

STOP

(

8

) on the remote

control or

STOP/EJECT

(

0

) on the recorder.

NOTE:

Pressing

PLAY

(

4

)

,

REW

(

3

)

,

FF

(

5

)

or

PAUSE

(

9

)

also stops

repeat playback.

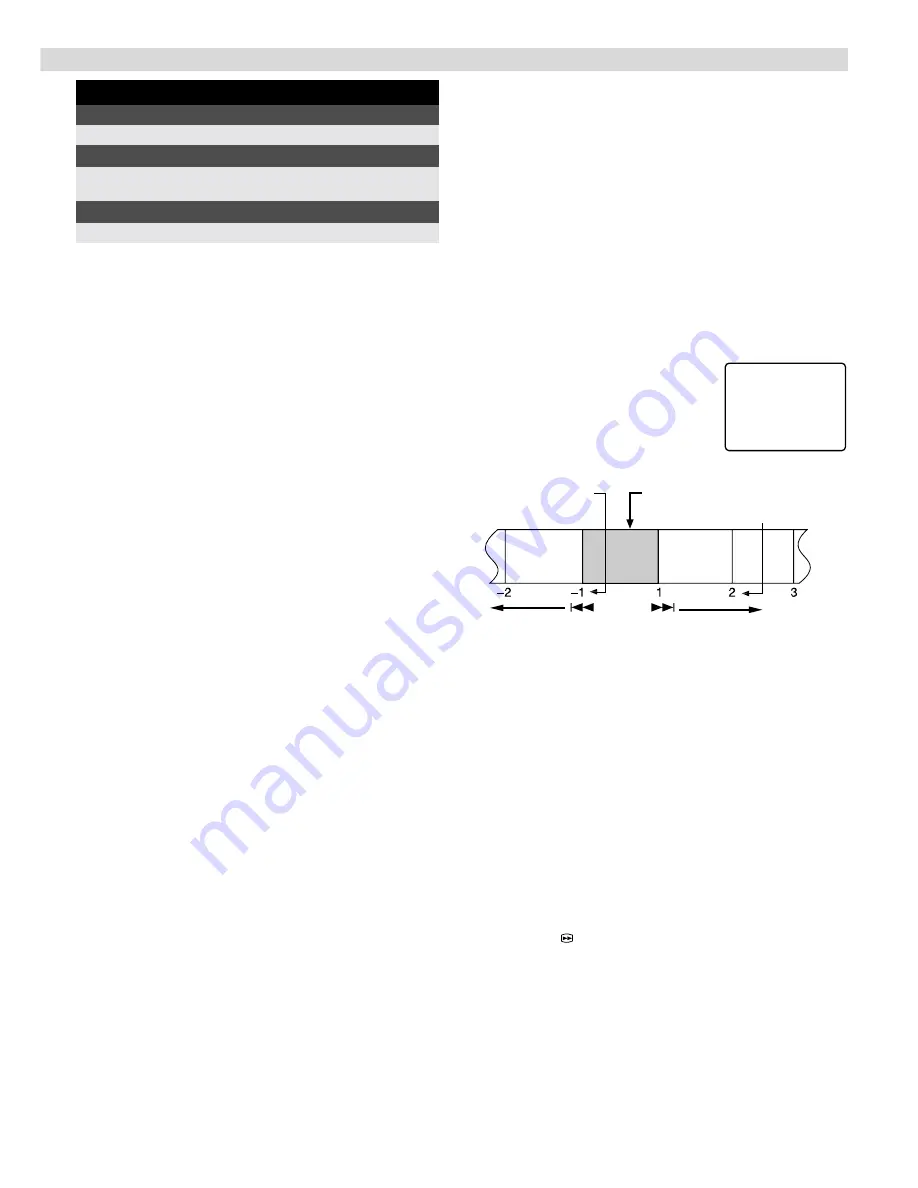
Locating beginning of recordings
— Index Search

Index codes are placed on the tape at the beginning of each
recording when recording on this recorder.

A

While the tape is not running, press

w

or

e

(

2

or

6

) on

the remote control to start search.

B

To access a recording of 2 to 9 index
codes away, press

w

or

e

(

2

or

6

) repeatedly until the correct

number is displayed on the screen
(only if “O.S.D.” is set to “ON”).
Playback begins automatically when
the desired recording is located.

Locating beginning of timer recordings
— Instant Review

After ensuring that the recorder is turned off and that the timer
mode is disengaged, press

REVIEW

on the remote control.

The recorder turns on, and rewinds to the index code indicating
the beginning of the last timer-recorded program, then begins
playback automatically.

You can access a program of 2 to 9 index codes away from the
current position on the tape. If, for example, you have
5 programs recorded and you want to watch the third one, press

REVIEW

three times.

The Instant Review function will also operate if the recorder is
turned on.

Skipping unwantedportions
— Skip Search

Press

30 SEC

on the remote control once to 4 times during

playback. Each press initiates a 30-second period of high speed
playback (up to 2 minutes). When the specified portion of the tape
is skipped, normal playback resumes automatically.To return to
normal playback during Skip Search, press

PLAY

(

4

).

When the tape is not running

Rewind/fast-forward

Press

REW

(

3

) or

FF

(

5

).

Ejectthe tape

Press

STOP/EJECT

(

0

).

You can also eject the cassette when the recorder is turned off.

Turn off the recorder

Press

POWER

.

6

2

2nd next

Beginning of the

current program

recorded

Current
position on
the tape

Beginning of the
2nd next program
recorded

Previous

program

recorded

Next

program

recorded

– Playback –

Summary of Contents for HR-J285EA

Page 1: ...f this unit CAUTION 䡲 When you are not using the recorder for a long period of time it is recommended that you disconnect the power cord from the mains outlet 䡲 Dangerous voltage inside Refer internal servicing to qualified service personnel To prevent electric shock or fire hazard remove the power cord from the mains outlet prior to connecting or disconnecting any signal lead or aerial ATTENTION ...

Page 2: ...d other brands Point the remote control toward the sensor window on the target component The maximum operating distance of the remote control is about 8 m NOTES When inserting the batteries be sure to insert in the correct directions as indicated under the battery cover If the remote control does not work properly remove its batteries wait for a few seconds replace the batteries and then try again...

Page 3: ...TV B Connect the TV aerial cable to the ANT IN terminal on the rear of the recorder C Connect the supplied RF cable between the RF OUT terminal on the rear of the recorder and the TV s aerial input terminal AV Connection improves picture quality during tape playback If your TV is equipped with AV input connectors A Connect the aerial recorder and TV as shown in the illustration B Connect an AV cab...

Page 4: ...ke sure that the power plug is connected to an AC outlet and turn off the recorder power B Open the battery cover while pressing the release tab as illustrated C Insert a lithium battery with the plus side up and push it in To remove the lithium battery press the latch downward using a pointed non metallic object then pull out the lithium battery D Close the battery cover until it clicks in place ...

Page 5: ...atically Select the appropriate colour system with PAL MESECAM and NTSC in Function settings If the cassette s record safety tab has been removed playback begins automatically B Start playback Press PLAY 4 ATTENTION In the search still slow motion or frame by frame playback mode the picture will be distorted the noise bars will appear there may be a loss of colour MENU EXIT MAIN MENU FUNCTION SET ...

Page 6: ...h Index codes are placed on the tape at the beginning of each recording when recording on this recorder A While the tape is not running press w or e 2 or 6 on the remote control to start search B To access a recording of 2 to 9 index codes away press w or e 2 or 6 repeatedly until the correct number is displayed on the screen only if O S D is set to ON Playback begins automatically when the desire...

Page 7: ... control while holding REC 7 press PLAY 4 NOTE If the tape reaches its end during recording the recording stops and 䡬 and on the front display panel blink Recording Features Specifying recording length Instant Timer Recording ITR During recording press REC 7 on the recorder repeatedly until the recording length you want appears on the display panel The record indicator 䡬 on the display panel start...

Page 8: ...he satellite broadcast is received on your recorder s auxiliary channel L 1 or F 1 select L 1 or F 1 for the channel position to which the satellite receiver is connected Repeat steps 3 and 4 as necessary E Return to normal screen Press MENU on the remote control G CODE Timer Programing The G CODE numbers are the numbers next to the program in most TV listing Remember the clock must be set before ...

Page 9: ...ropriate button START STOP DATE PR and or SP LP EP p when the Program screen on which you want to make changes is shown E Return to normal screen Press repeatedly until no Program screen is shown F Reengage timer recording standby mode Press The recorder turns off automatically and is displayed on the display panel When AUTO TIMER is set to ON the timer recording standby mode automatically resumes...

Page 10: ... overplayed tapes containing much noise SHARP Clearer sharper edged picture when viewing images with much flat same coloured surfaces such as cartoons NOTE Select EDIT when you are editing tapes After you finish editing the tapes select AUTO 䡵 PAL MESECAM AUTO PAL MESECAM Select the appropriate colour system for recording or playback AUTO Usually set to this mode The appropriate colour system PAL ...

Page 11: ...ton on the TV or its remote control B Set TV brand code A Press and hold TV B Press the Number keys to enter your TV s brand code C Press OK and release TV The TV should turn off C Operate TV First press TV to set the remote control to TV mode then press one of the following buttons 1 TV VCR TV PR TV Muting TV and the Number keys For some brands you must press ENTER after having pressed the Number...

Page 12: ...he other components instruction manuals for connection and its operations A Make connections Example When using this recorder as the source player When using this recorder as the recording deck connect this recorder s AV input connectors to the AV output connectors on the other recorder If the source player is monaural connect the audio output connector on the source player to the left audio input...

Page 13: ...ave a V HOLD control During search still or frame by frame playback the picture will be distorted and there may be a loss of colour ATTENTION When this recorder is connected to a multi system TV the audio signal may not be heard or may be noisy if the colour system select switch of the TV is adjusted to the AUTO position In such a case set the TV s colour system select switch to the appropriate po...

Page 14: ...se channels may be incorrect Select the appropriate TV system for those channels Refer to TV System Selection When you see the picture but the audio can t be heard or sounds unnatural Since your recorder memorises all detected stations even if the reception condition is poor some of those stored stations may produce a noisy picture To delete those stations refer to Delete A Channel Manual Channel ...

Page 15: ... rt to place the pointer next to CH EDIT then press OK or e C Select channel to fine tune Press rt until the channel you want to tune begins blinking then press OK twice The FRQ number for that channel starts blinking D Perform tuning Press rt until the picture becomes clearer then press OK or e Repeat steps C and D as necessary E Return to normal screen Press MENU TV System Selection When you see...

Page 16: ...5 lines 50 fields NTSC colour and EIA monochrome signals 525 lines 60 fields Recording system HR J485EA DA 4 Double Azimuth head helical scan system HR J285EA 2 Azimuth head helical scan system Signal to noise ratio 45 dB Horizontal resolution 250 lines PAL MESECAM 220 lines NTSC Frequency range Normal audio 70 Hz to 10 00 0Hz Hi Fi audio 20 Hz to 20 00 0Hz Input Output HR J485EA RCA connectors I ...

Reviews: