background image

Zooming and Focus

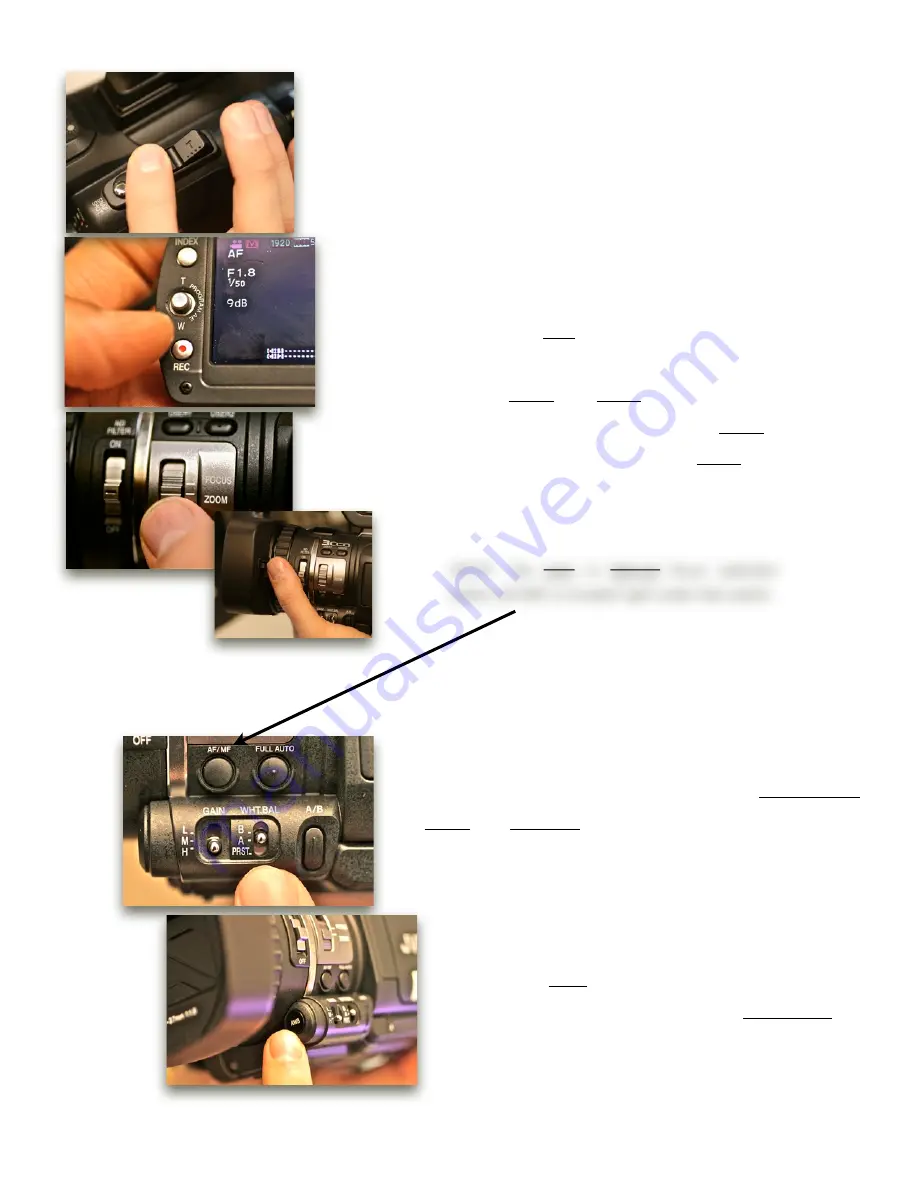
There  are  three  ways  to  zoom  on  the  camera.    First  by 
using  the rocker  located on  the right side above the hand 
strap.    Push the 

T

(Telephoto) to zoom-in and 

W

(Wide) to 

zoom-out.  

Second,  flip  the  LCD  open,  then  you  will  see  the  same 
corresponding (T,W) controls  on the left of the LCD panel.  
You can also use the REC button on that panel to record.  

Third, there is a Focus and Zoom switch located on the left 
side of camera, on the lens barrel.  Select Zoom to use the 
camera’s  manual  zoom  ring  or  select  Focus  to  turn  that 
same ring into a manual focus. 


NOTE:  The  Auto  or  Manual  focus  selection 
button (AF/MF) is located right under that switch.

Adjusting the White Balancing

The white balancing selection switch is located on the 
left side of  the camera, right under  the Auto/Manual 
Focus and Full Auto buttons. 

To  set  custom  white  balance,  first  point  at  a  white 
surface.   Make sure that there is nothing  else in the 
frame.    Next,  select A or  B  as  your  custom  preset.  
Then press the AWB button located on the front of the 
camera until the OK sign flashes on the LCD screen.

!"#$%&'%

7.

Summary of Contents for HM100U

Page 1: ...JVC HM100U BASIC OPERATIONS by EMMANUEL ALEXANDRE Jr CUNY TV Feb 29 2012 Ver 6 ...

Page 2: ...ertain information that I found either self explanatory or irrelevant to students I ve also kept away from advance video and audio settings Please refer to the manufacturer s PDF manual for a more in depth look Intro Link http inside massart edu Documents inside massart edu academic_resources GY HM100U pdf 1 ...

Page 3: ...he camera on by pressing the blue button on the wheel then turn it counter clock wise to the Standby On position Turn once more to the Mode position to switch to still camera mode NOTE Make sure the camera lens cover is open by flipping the Open Close switch located on the left of the Lens Cap To change the battery simply press the button marked BATT located right on top of the holster then slide ...

Page 4: ...le Format by pressing down on the center of controller Choose Quicktime file format Scroll down to the System Select menu to choose the camera s recording signal Select 1080 60 30 from the list NOTE Changing the camera s recording signal will cause the camera to reboot itself Now scroll down to select Record Mode The following selection will determine the recording settings of your camera from 192...

Page 5: ...ut using the controls Move the switch to Mic for microphones that use their own power supply or switch to Mic 48V for microphones that draw power from the camera Then plug the XLR cable to one of the inputs selected either 1 or 2 on the opposite side of the controls Make sure the arrow on the XLR Connector is pointing towards the PUSH button on the camera then push the connector forward until a cl...

Page 6: ...ke sure that your AUDIO INPUT 1 and INPUT 2 are set to Mic 48khz for on board microphone or your WIRED mics 3 Make sure that your CH 2 INPUT is set to INPUT 2 4 Make sure that your headphone levels are turned up by adjusting the ADJ VOL knob on the back of the camera 5 ...

Page 7: ...On Off knob Press once and a REC sign will appear on the LCD screen and you will see the counter begin to roll above it Press it once more and the counter will stop and a green Pause signal will appear on the screen Recording The SDHC card slots are located at the bottom of the camera under the LCD screen This camera model allows for a minimum Class 6 card and up to Class 10 card A standard 32 gig...

Page 8: ...he lens barrel Select Zoom to use the camera s manual zoom ring or select Focus to turn that same ring into a manual focus NOTE The Auto or Manual focus selection button AF MF is located right under that switch Adjusting the White Balancing The white balancing selection switch is located on the left side of the camera right under the Auto Manual Focus and Full Auto buttons To set custom white bala...

Page 9: ... value should disappear Selecting the shutter speed The Shutter is located right below the Iris Press the Shutter button to manually adjust it Once pressed a numerical value will be highlighted on the LCD screen right below the iris selection number The shutter increments are expressed in fractions i e 1 30 1 60 1 80 1 100 With the slower shutter speeds 1 30 or 1 15 your image will be brighter how...

Page 10: ...us Zoom switch User 3 is located inside the LCD compartment right next to the CAM MEDIA button NOTE The Cameras are preset with User 1 for Focus Assist User 2 for Color bars and User 3 for Zebra To assign a user function First press the Menu button then select Camera Settings from the menu window A list of choices will be displayed then press the T W controller to make a selection 9 ...

Page 11: ... to play push the T W controller left or right to either rewind fast forward through the clip and push the center to pause Push up to go back to the beginning of the clip and down to jump to the end then push down to exit back to the Viewing Menu Press the CAM MEDIA button once more to exit the reviewing mode NOTE You can Delete or Copy clips by pressing the Menu button while in the CAM MEDIA mode...

Page 12: ... you will be prompted to decide which formatting method to employ Choose FILE to wipe the card of all media then press OK Second while in CAM MEDIA mode press the Menu button then select Delete There will be choices to delete Current file to File Select or Delete All Third while in CAM MEDIA mode press the Menu button then proceed to Media Settings then follow Step one NOTE In certain Menus use th...

Page 13: ...ack of the camera under the battery slot and next to the HDMI port Once connected the camera will automatically prompt you to enter PLAYBACK ON PC mode Press the center of the T W controller to engage the PC link You will then see two Untitled Disks mounted on your Finder Follow the path to drag and drop your video files to your external hard drive NOTE Before disconnecting the USB cable please EJ...

Page 14: ... you will need to choose the proper Video Format before importing your files First select Easy Setup under the drop down menu bar in FCP The JVCHM100U uses the XDCAM HD format Importing into Final Cut Pro NOTE The JVC shoots HD footage in High Quality HQ at Variable Bit Rates VBR up to 35Mb s and in Standard Quality SP at a Constant Bit Rate of 25Mb s Please consult with your Instructors or Broadc...

Page 15: ...DATA RATE section you ll select Restrict to and Type in 10000 if you ll be uploading video with a resolution of 1920x1080 But if you re uploading video with a resolution of 1280x720 then type in 5000 Step 3 For FILTER you can skip these settings and move on to SIZE here you ll select the size that corresponds to your sequence settings which will be 1920x1080HD Please be aware the size settings are...

Page 16: ...xporting Video for a News Broadcast FCP 7 0 Step 5 If you re uploading to VIMEO You ll go through the same settings for Vimeo with a few minor changes Your settings in Vimeo only allows a certain amount of uploads and a size limit of 500mb if you aren t subscribed to Vimeo Pro In this instance you ll restrict your DATA RATE settings to 5000 and use a lower resolution depending on what the video is...

Page 17: ...r JVC HM100U XDCAM EX 1080i60 VBR Nothing needs to change This will be your Master Clip from which all other encoded video will come from Step 3 If you need to export your video to other settings refer to the web settings in the previous pages or use whatever format is requested You can do the exporting out of QuickTime Player7 Open the file with QuickTime Player 7 and choose export From there you...

Reviews: