background image

Playing Recorded Clips

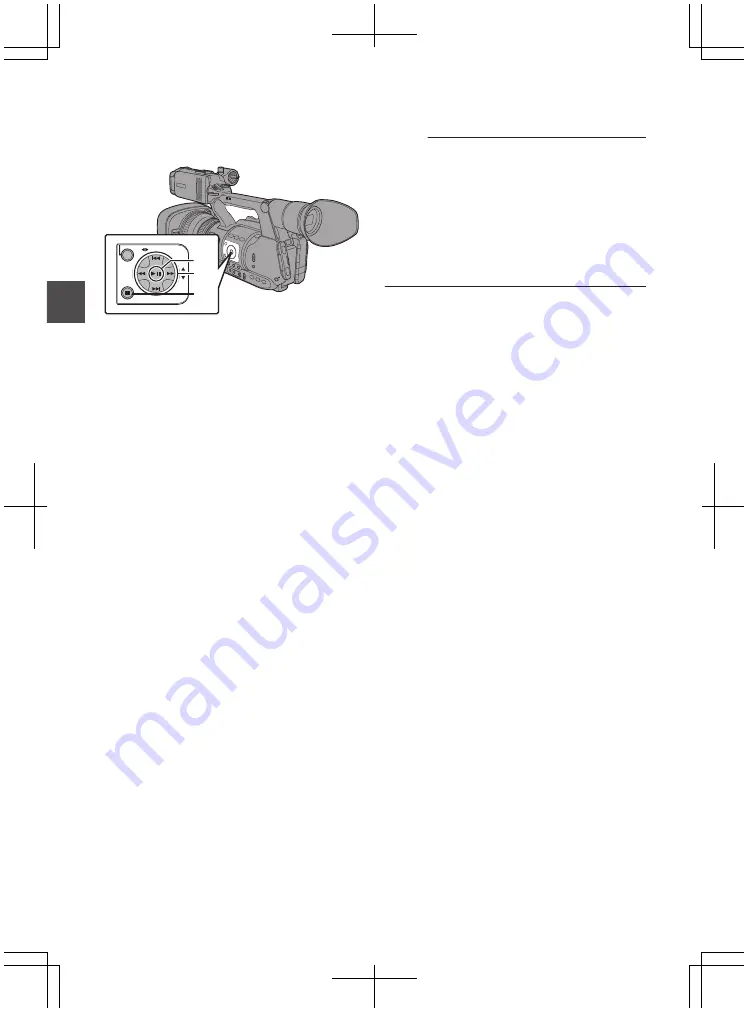
Use the operation buttons on the side control panel

of the camera recorder to play back.

.

AE LEVEL

MENU/THUMB

CANCEL

A

C

B

A

IW

 Button

0

Plays back/pauses the clip pointed by the

cursor.

0

You can press the cross-shaped button (

HI

)

to perform frame-by-frame forward playback

during pause mode.

B

S

/

T

 Button

Skips in the reverse or forward direction.

O

/

N

 Button

During Playback:

Fast forwards in the reverse or forward

direction.

While paused:

Frame-by-frame playback in the reverse or

forward direction.

C

o

 Button

Stops playback.

1

In the thumbnail screen, move the cursor to

the clip to be played back.

Move the cursor to the clip to be played back

using the cross-shaped button (

JKH


I

).

2

Press the playback/pause button.

Playback of the selected clip starts.

Audio Output during Playback

0

You can confirm the playback sound from the

monitor speaker, or the headphone connected

to the [

x

] terminal. When a headphone is

connected to the [

x

] terminal, sound cannot be

output from the monitor speaker.

0

Adjust the volume of the monitor speaker and

headphone using the [M/-] volume

adjustment button on the LCD monitor section

of the camera recorder.

Time Code Playback

Time code or user’s bit recorded on an SD card can

be displayed on the LCD monitor and viewfinder.
Memo : 

0

The time code is also superimposed on the

video signal output from the [HD/SD SDI] output

terminal.

0

User’s bit output from the [HD/SD SDI] output

terminal is used as a flag to determine valid

video signals. Therefore, accurate values will

not be output.

0

If a section without time code is played back, the

time code will stop. However, playback will

continue.

Displaying Information during Shooting

During playback, pressing the [DISPLAY] button

shows the display screen.

Pressing the [AE LOCK/4] button switches the

display information during shooting between no

display, camera information display, and GPS

display.

22

Playback

Summary of Contents for GY-HM620U/GY-HM620E

Page 1: ...ide When you are outside you can refer to the instructions from your Android phone or iPhone http manual3 jvckenwood com pro mobile global You can view the Mobile User Guide using the browser on your Android phone or iPhone IM 1 05 B5A 1234 10 Thank you for purchasing this product Before operating this unit please read the instructions carefully to ensure the best possible performance In this manu...

Page 2: ...ched particularly at plugs convenience receptacles and the point where they exit from the apparatus Only use attachments accessories specified by the manufacturer Use only with the cart stand tripod bracket or table specified by the manufacturer or sold with the apparatus When a cart is used use caution when moving the cart apparatus combination to avoid injury from tip over Unplug this apparatus ...

Page 3: ...s subject to the following two conditions 1 This device may not cause harmful interference and 2 this device must accept any interference received including interference that may cause undesired operation Changes or modifications not approved by JVC could void the user s authority to operate the equipment This equipment has been tested and found to comply with the limits for a Class A digital devi...

Page 4: ... sont utilisés qu aux Etats Unis WARNING TO PREVENT FIRE OR SHOCK HAZARD DO NOT EXPOSE THIS UNIT TO RAIN OR MOISTURE AVERTISSEMENT POUR EVITER LES RISQUES D INCENDIE OU D ELECTROCUTION NE PAS EXPOSER L APPAREIL A LA PLUIE NI A L HUMIDITE NOTES The rating plate and safety caution are on the bottom and or the back of the main unit The serial number plate is on the bottom of the unit The rating infor...

Page 5: ...ric shock CAUTION The following notes concern possible physical damage to this unit and to the user Carrying or holding this unit by the LCD monitor can result in dropping the unit or in a malfunction Do not use a tripod on unsteady or unlevel surfaces It could tip over causing serious damage to the unit CAUTION Connecting cables Audio Video etc to this unit and leaving it on top of the TV is not ...

Page 6: ... the cabinet No user serviceable parts inside Refer servicing to qualified personnel When you are not using the AC adapter for a long period of time it is recommended that you disconnect the power cord from AC outlet Blue to N Neutral or Black Brown to L Live or Red FOR EUROPE This equipment is in conformity with the provisions and protection requirements of the corresponding European Directives T...

Page 7: ... them away from the reach of infants and children by ensuring that they are disposed of properly Battery Pack The supplied battery pack is a lithium ion battery Before using the supplied battery pack or an optional battery pack be sure to read the following cautions To avoid hazards do not burn do not short circuit the terminals Keep it away from metallic objects when not in use When transporting ...

Page 8: ...ambiente o Para Retirar a Bateria Recarregável Pressione botão e puxe a bateria para fora Importer EU only 12 Priestley Way London NW2 7BA UNITED KINGDOM Importeur Nur EU Konrad Adenauer Allee 1 11 61118 Bad Vilbel DEUTSCHLAND Importatore Solo EU Via G Sirtori 7 9 20129 Milano ITALIA Importador Solamente EU Ctra Rubi 88 Edificio Can Castanyer 08174 Sant Cugat del Valles Barcelona ESPAÑA Importeur ...

Page 9: ...hart 26 Basic Operations in Menu Screen 27 Display Screen 28 Status Screen 35 Troubleshooting 36 Precautions for Proper Use 38 Specifications 42 Software License Agreement 44 Important Notice concerning the Software 46 Content of this Manual Symbols used Caution Describes precautions concerning the operation of this product Memo Describes reference information such as functions and usage restricti...

Page 10: ...e bottom of the lens and the REC HOLD button Z at the top of the handle AUX INPUT2 INPUT1 DEVICE AV A BATT RELEASE POWER CHG B HDMI REMOTE DC HD SD SDI REC HOST W T REC HOLD IN OUT TC L M N O d R S T X Z a b c Q P U V Y W S C REVIEW 7 Clip Review User 7 Button T Zoom Lever at the Grip U TC TC Input Output Terminal V IN OUT TC IN OUT Selection Switch W Hood Release Button X External Microphone Cabl...

Page 11: ...J FULL AUTO ON OFF Full Auto Switch K AE LOCK 4 AE Lock User 4 Button L ZEBRA 5 Zebra User 5 Button M MARKER 6 Marker User 6 Button N MODE Camera Media Mode Selection Button O POWER ON OFF CHG Lock Power ON OFF Switch P Cross Shaped Button JKHI Set Button R Q LOLUX 3 Low light Shooting User 3 Button R OIS 2 Optical Image Stabilizer User 2 Button S FOCUS ASSIST 1 Focus Assist User 1 Button T MENU T...

Page 12: ...utton G PEAKING LCD VF Contour Adjustment Button H DISPLAY Display Button I STATUS Status Screen Display Button J MONITOR Audio Monitor Selection Switch Volume Adjustment Button K INPUT1 INPUT2 Audio Input Signal Selection Switch L CH2 CH2 Audio Input Signal Selection Switch M CH1 CH1 Audio Input Signal Selection Switch N CH1 CH2 AUTO MANUAL CH1 CH2 Audio Recording Mode Switch Lens Section E C D A...

Page 13: ...nning low The battery is not charged when purchased 1 2 3 4 4 POWER CHG MODE POWER ON OFF CHG 1 Hold down the lock button blue at the center of the POWER ON OFF CHG switch to set to OFF CHG 2 Attach the supplied battery Slide it in until you hear a click 3 Connect the supplied AC adapter to the DC terminal Openthecoverofthe DC terminalandconnect as shown in the diagram 4 Connect the AC adapter to ...

Page 14: ...s refer to the INSTRUCTIONS of the battery o Continuous Operating Time supplied SSL JVC50 battery pack Approx 3 hrs a Approx 3 hrs 20 mins b Memo 0 Actual operating times may differ depending on the age of the battery charging condition and operating environment 0 Operating time is shortened in cold environment 0 The operating time may shorten when power zoom is used accessories are connected or w...

Page 15: ...ettings When the power is first turned on the Initial Setting screen for performing the initial settings in the camera recorder appears Set the date time of the built in clock in the Initial Setting screen All operations are disabled until initial settings are complete MODE POWER ON OFF CHG AE LEVEL MENU THUMB CANCEL MENU THUMB CANCEL Memo 0 It is recommended to use the AC adapter as the power sup...

Page 16: ...ial Setting screen appears 0 For U models 0 For E models Memo 0 The Initial Setting screen appears when the power is turned on for the first time and when the power is turned on after the built in battery is fully discharged 0 The configured date time data is saved in the built in rechargeable battery even if the power is turned off 5 Set the time zone and date time A Move the cursor with the cros...

Page 17: ...0p 480i 576i 960p 480p 4 GB 9 12 47 130 285 8 GB 18 25 95 270 580 16 GB 36 50 190 540 1160 32 GB 72 100 380 1080 2320 64 GB SDXC 145 200 760 2160 4720 128 GB SDXC 290 400 1520 4320 9440 Unit minute Memo 0 If the SD card contains files recorded by devices other than this camera recorder or files that are saved from a PC the recordable time may be shorter or data may not be properly recorded 0 The n...

Page 18: ... be formatted and press the Set button R 2 3 The status of the selected SD card appears 4 Select Format and press the Set button R 4 5 Formatting starts 6 Formatting is complete When formatting is complete Complete appears and the camera recorder returns to the Format Media screen Memo 0 During formatting menu operation is unavailable but you can start recording However this is only available when...

Page 19: ...nying data which are recorded from start to stop are recorded as one clip on the SD card 0 An 8 character clip name is automatically generated for the recorded clip Clip Name Prefix Clip Number 0 When Main Menu B System B Record Set B Record Format B WFormat is set to AVCHD the clip name generated consists of only the Clip Number 5 digit number Example In the case of QuickTime MP4 ABCG0001 This is...

Page 20: ... white balance adjustment in order to start shooting You also have to adjust the audio input settings and audio recording level for audio recording 0 Adjusting the Brightness 0 Adjusting the White Balance 0 Adjusting Audio Input Settings and Recording Level 2 Press the REC button to start recording to the SD card This camera recorder has three REC buttons Any of the REC buttons can be used to star...

Page 21: ...e content at the same time only on this camera recorder 0 Backup Rec Allows you to record only the preferred scenes to one slot using the record and stop operations while the other slot is continuously recording B Special recording Special recording can be specified in conjunction with A under given conditions 0 Pre Rec Enablesrecordingto gobacktothespecified duration in seconds of the video and a...

Page 22: ... monitor speaker or the headphone connected to the x terminal When a headphone is connected to the x terminal sound cannot be output from the monitor speaker 0 Adjust the volume of the monitor speaker and headphone using the MONITOR volume adjustment button on the LCD monitor section of the camera recorder Time Code Playback Time code or user s bit recorded on an SD card can be displayed on the LC...

Page 23: ...Select the output signal in A V Set B HDMI SDI Out When Record Format B System is set to SD only SD SDI signals are output To display the menu screen or display screen on an external monitor set A V Set B Video Set B Display On TV to On Connecting via SDI 0 Digital video signals together with embedded superimposed audio signals and time code signals are output for both the HD SDI and SD SDI signal...

Page 24: ...ra recorder to the PC using a USB cable A confirmation message Change to USB Mode to enable the USB connection appears AUX INPUT2 INPUT1 DEVICE AV A BATT RELEASE POW ER CHG B HDMI REMOTE DC HD SD SDI REC HOST AV DEVICE PC 2 Select Change using the cross shaped button JK and press the Set button R The camera recorder switches to USB mode 2 Memo 0 If recording is in progress the Change to USB Mode m...

Page 25: ...wser Editing Metadata 0 Planning Metadata You can access the page for editing the camera recorder s metadata via a web browser on devices such as a smartphone tablet terminal or PC and edit the metadata that is to be applied to clips to be recorded 0 Clip Metadata You can access the page for editing the metadata via a web browser on devices such as a smartphone tablet terminal or PC and display or...

Page 26: ...and Correction Shooting Mode AF Speed User Switch Set AF Assist System Information Time Zone Reserved Date Time Reset All Language Tally Lamp Auto Power Off Setup File Media Record Set System Audio Set Video Set A V Set LCD Mirror LCD Backlight LCD Contrast VF Contrast VF Bright VF Color LCD VF Display Settings Marker Settings Shooting Assist LCD VF Drop Frame UB Mode TC Preset TC Generator TC UB ...

Page 27: ...IS 2 TIME CODE MENU THUMB CANCEL DISPLAY A D B C A B C D E F G A MENU THUMB Button 0 Displays the menu screen The Main Menu screen is displayed by default 0 During normal usage Main Menu is displayed if the previous menu operation ended at Main Menu and Favorites Menu if the previous menu operation ended at Favorites Menu 0 Press this button to close the menu screen during menu display and return ...

Page 28: ...in use Memo 0 Displayed in the Display 0 and Display 1 screens during warnings only C Remaining Space on Media Displays the remaining recording time of the SD cards in slot A and slot B separately W Currently selected slot White card W z Write protect switch of SD card is set W INVALID SD card cannot be read or written to or restored W FORMAT SD card requires formatting W RESTORE SD card requires ...

Page 29: ...F B Display Settings B Record Format is set to Off G Audio Level Meter 0 Displays the audio levels of CH1 and CH2 0 a appears on the screen when in the Auto mode 4030 20 10 0 0 When Main Menu B System B Record Set B Rec Mode is set to Frame Rec Interval Rec or Variable Frame audio cannot be recorded and is indicated by the x mark 4030 20 10 0 Memo 0 This item is not displayed when Main Menu B LCD ...

Page 30: ...shooting 0 Z is displayed when AE LOCK is set to ON 0 LUX30 or LUX36 is displayed when in the low light shooting mode Memo 0 Displayed in the Display 0 screen only when there is a change P AE Level 0 Appears when the AE function is activated and Main Menu B Camera Function B AE Level is set to a value other than Normal 0 When operated while manual operation is disabled AE blinks for about 5 second...

Page 31: ...ill always be displayed 0 to 99 Memo 0 You can specify the display method Number Bar in LCD VF B Display Settings B Zoom This item will not be displayed when Off is selected 0 Displayed in the Display 0 screen only when there is a change X Network Connection Icon a When Main Menu B System B Network is set to On SDI Off or On HDMI Off the network connection status is displayed Thisiconisnotdisplaye...

Page 32: ...nuous Rec recording standby RRECC Clip Continuous Rec recording STBYC displayed in yellow Clip Continuous Rec recording pause STBY N Interval Rec recording standby STBYN displayed in red Interval recording pause RRECN Interval Rec recording STBY M Frame Rec recording standby RRECM Frame Rec recording STBYM displayed in yellow Frame Rec recording pause STOP Unable to record to the card in the slot ...

Page 33: ...he power supply in use Memo 0 Displayed in the Media Display 0 screen during warnings only C Resolution Displays the video image resolution D Frame Rate Bit Rate Displays the frame rate and bit rate in pairs E Operation Guide Displays a guide for the current operation buttons F Audio Level Meter Displays the audio levels of CH1 and CH2 4030 20 10 0 Memo 0 This item is not displayed when Main Menu ...

Page 34: ... Network Connection Icon a When Main Menu B System B Network is set to On SDI Off or On HDMI Off the network connection status is displayed Thisiconisnotdisplayedwhen Off isselected Icon Status Blink Connection is not established starting up preparing for connection Yellow Connection is not established preparing for connection Connection is established When a USB adapter different from the connect...

Page 35: ...ip Information Displays current clip number total number of clips Status Screen 0 This screen allows you to check the current settings 0 To display the status screen press the STATUS button in the normal screen 0 The status display differs according to the operation mode two types 0 Press the STATUS button to switch to the display screen 0 Press the MENU THUMB button at each status screen other th...

Page 36: ... and pressing the Set button R 0 Is the selected clip a playable clip Playback is not possible if the clip has a different video format setting No sound during playback 0 Is the currently played clip recorded in the Variable Frame Rec mode Images on the LCD monitor and viewfinder screen appear dark or blurred 0 Readjust the brightness of the LCD monitor and viewfinder 0 Is the ND FILTER switch set...

Page 37: ... cases other than WPS 0 Even if the Passphrase is wrong Completed the Setup Wizard Please Input the Passphrase into Your Device may appear at the browser setting depending on the type of encryption Adjust Passphrase again The View Remote screen turns black The screen flickers The screen freezes Cannot perform remote operation a 0 The network path is congested Wait a while before refreshing reloadi...

Page 38: ...theunitafter use o Protect this unit against penetration of dust when using it in a place subject to sandy dust Carrying the Camera o Do not drop or hit this unit against a hard object when transporting Power Saving o When this unit is not in use be sure to set the POWER ON OFF CHG switch to OFF CHG in order to reduce power consumption Maintenance o Turn off the power before performing any mainten...

Page 39: ...er or foreign objects to adhere to the terminals o Do not remove the labels or stick other labels or stickers on the SD cards o Do not use pencils or ballpoint pens to write on the SD cards Always use oil based pens o If you format initialize the SD card all data recorded on the card including video data and setup files will be deleted o You are recommended to use cards that are formatted initiali...

Page 40: ...RSONAL USE THAT COMPLIES WITH THE MPEG 2 STANDARD FOR ENCODING VIDEO INFORMATION FOR PACKAGED MEDIA IS EXPRESSLY PROHIBITED WITHOUT A LICENSE UNDER APPLICABLE PATENTS IN THE MPEG 2 PATENT PORTFOLIO WHICH LICENSE IS AVAILABLE FROM MPEG LA LLC 6312 S WHICH LICENSE IS AVAILABLE FROM MPEG LA LLC 6312 S Fiddlers Green circle Suite 400E Greenwood Village Colorado 80111 U S A Copyright o Any recordings m...

Page 41: ...exus are trademarks and or registered trademarks of Google Inc 0 QR Code is a registered trademark of Denso Wave Incorporated 0 Dolby and the double D symbol are trademarks of Dolby Laboratories 0 Microsoft Windows Windows Vista and Internet Explorer are either registered trademarks or trademarks of Microsoft Corporation in the United States and or other countries 0 Surface is the trademarks of Mi...

Page 42: ...ignal 1 0 V p p Audio signal 8 dBu during reference level input 1 kK unbalanced x terminal Φ3 5 mm mini jack stereo REMOTE terminal Φ2 5 mm mini jack stereo U terminal DEVICE Mini USB B type USB 2 0 slave function mass storage class only HOST a USB A type USB2 0 network connection function only Item Description TC terminal IN 1 0 V p p to 4 0 V p p high impedance OUT 2 0 1 0 V p p low impedance Le...

Page 43: ...59 94i 50i Audio Dolby Digital 2ch 48 kHz 16 Bit 256 kbps Item Description HD mode MOV H 264 Video recording file format QuickTime File Format Video XHQ Mode MPEG 4 AVC H 264 50 Mbps Max 1920x1080 59 94p 59 94i 29 97p 23 98p 50p 50i 25p UHQ Mode MPEG 4 AVC H 264 35 Mbps Max 1920x1080 59 94i 29 97p 23 98p 50i 25p Audio LPCM 2ch 48 kHz 16 Bit SD mode MOV H 264 Video recording file format QuickTime F...

Page 44: ...hen the User transfers the Product it may also transfer the license to use the Licensed Software embedded in the Product including any related materials updates and upgrades on condition that no original copies or related materials continue in the possession of the User and that the User shall cause the transferee to comply with this Software License Agreement 2 The User shall not carry out revers...

Page 45: ...any restrictions concerning the end users the use by end users and importing countries to be provided by the country of User and any other countries and any other governmental authorities 3 If the User is an agency of the United States of America the Government the User acknowledge Licensor s representation that the Licensed Software is a Commercial Item as defined in Federal Acquisition Regulatio...

Page 46: ...er applicable laws As to matters concerning the handling by JKC of the software components please refer to the Software License Agreement attached hereto Please note that any software component licensed under EULA which is not subject to GPL LGPL and those developed or created independently by JKC shall not be subject to the requirement for provision of the source code The software component distr...

Page 47: ...47 ...

Page 48: ... GY HM660U GY HM660E GY HM660RE GY HM620U GY HM620E HD MEMORY CARD CAMERA RECORDER 2017 JVC KENWOOD Corporation B5A 1234 10 ...

Reviews: