

r.002
-002
2
Available characters for “Title 1” and “Title 2” are as follows:
!"#$%&'()*+,-./0123456789:;<=>?@ABCDEFGHIJKLMNOPQRSTUVWXYZ[\]^_`abcdef
ghijklmnopqrstuvwxyz{|}~
¡¢£¤¥¦§¨©ª«¬®¯°±²³´µ¶
·
¸¹º»¼½¾¿ÀÁÂÃÄÅÆÇÈÉÊËÌÍÎÏÐÑÒÓÔÕÖ×ØÙÚÛÜÝÞßàáâ
ãäåæçèéêëìíîïðñòóôõö÷øùúûüýþÿ
Ğğİ
ıŒœ
Şş
ŠšŸŽžƒˆ˜–—‘’‚“”„†‡•…‰‹›€™
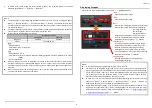
Adding additional logo images
You can add up to eight logo images in addition to those that come standard in the camera.
1.
Copy the SDP file into a root folder of a SDHC/SDXC card. The SDP file name length must be 8
characters or less. Also the filename extension must be “.sdp”.
Example:
“
overlay1.sdp
”
2.
Insert the SDHC/SDXC card into slot A or B, then select [Main Menu]
→
[Overlay Settings]
→
[Import User Layout]. The existing SDP data in the camera will be overwritten after importing.
3.
The SDP files in the root folder of slot A and B are displayed (max. 8 files each). Select the SDP file
you would like to import and execute “Import”. Import takes about 20 – 30 seconds.
In the case of import failure, the following message may be displayed:
Error Message
Status
Action
Failed To Read File From
Media!
・
Card is defective.
・
SDP file data is invalid.
・
Use other card.
No User Layout Exists.
・
SDP file data is invalid.
Use another SDP file.
Failed To Write File To The
Camera!
There may be a problem with
the camera.
Please contact a local dealer
in your area.
Import Error!
An internal error has
occurred.
Please contact
a
local dealer
in your area.
4.
In order to apply the imported SDP file to the overlay, set [Main Menu]
→
[Overlay Settings]
→
[Type] to “HoW (Custom)”. If a valid SDP file has not imported into the camera, the value will be
“None” and the characters grayed out. In this case, please import a valid SDP file [Import User
Layout].
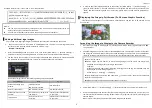
Displaying the Image in Full-Screen (Full-Screen Graphic Function)
This function allows images of announcements, advertisements and the like to be overlaid on the
entire screen.
Importing the Image to Display to the Camera Recorder
1.
Get ready the image to be displayed. Format supported include JPEG (.jpg extension) and PNG
(.png extension).
2.
Copy the image file to the root folder of the SDHC/SDXC card. The maximum number of files that
can be copied is 50. The display order can be sorted according to the file name. Use an SDHC/SDXC
card with recording specifications that fit the current recording settings of the camera recorder.
3.
Select [Main Menu]
→
[Overlay Settings]
→
[Full Screen Graphic] on the camera recorder unit.
4.
Insert the SDHC/SDXC card that contains the copied image file into the SD card slot A or B of the
camera recorder, followed by selecting [Graphic Import A] or [Graphic Import B] accordingly and
execute import.
When import is executed, the previously imported image will be deleted.
Memo
:
You can input up to 36 bytes of characters for the Title1 and up to 2047 bytes (up to 32
bytes of each line) of characters for the Title2.
The numbers of available characters are depending on kind of its character.
Rules for the file name
:
●
Add a 2-digit number from 01 to 50 to the beginning of the file name. The files will be
displayed in ascending order according to the number.
Example:
When files with the names of 01flower.png, 02car.jpg and 13red.png are imported, they will
be displayed in the following sequence:
01flower.png
→
02car.jpg
→
13red.png
●
Only alphanumeric characters and underscore (_) can be used for the 3rd and subsequent
characters of the file name.
●
Make sure that the file name does not exceed 31 characters.


