background image

90

OTHERS

Warnings and Responses (Cont’d)

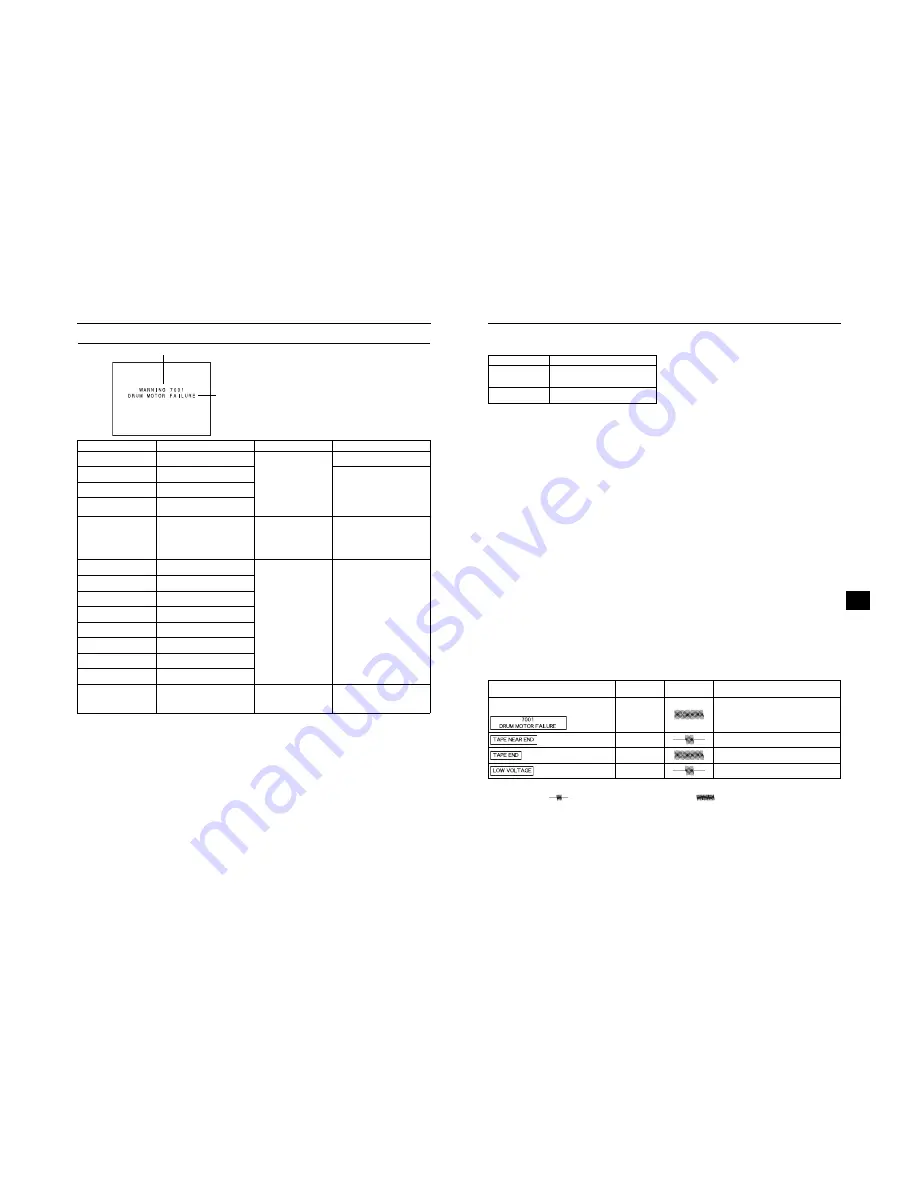
• Warning Indications for VTR Abnormalities

Should malfunctions occur during VTR operation, the unit
self-diagnoses the cause and shows the diagnose together
with an error code on the LCD monitor or in the viewfinder.

Error code

Warning

Error Code

Error Details

GY-HD110 Operation

Remedy

0201

CONDENSATION ON DRUM

Indicates dew formation (condensa-
tion).

Operation stops. All opera-
tions are rejected.

Leave the unit with the power ON, until
the indication disappears.

3200

LOADING FAILURE

Tape cannot be loaded.

Switch the power OFF and then switch
it back ON. However, the tape may be
damaged depending on the circum-
stances. Please consult the person in
charge of professional video equip-
ment  at your nearest JVC-authorized
service agent.

3300

UNLOADING FAILURE

Tape cannot be unloaded.

4100

CASSETTE EJECT FAILURE

Irregularity with eject operation.

5605 - 5609 

DEFECTIVE TAPE

Tape is cut.

Operation stops.

Press the EJECT button to take out the
cassette.
If the tape runs out during recording,
switch the power OFF and then switch
it back ON, press the EJECT button,
and then take out the cassette.

5702

TAPE END DET. ERROR

Tape end sensor error.

Operation  stops.  All  opera-
tions are rejected.

Switch the power OFF and then switch
it back ON. However, the tape may be
damaged depending on the circum-
stances. Please consult the person in
charge of professional video equip-
ment  at your nearest JVC-authorized
service agent.

5802

TAPE BEGIN DET. ERROR

Tape beginning sensor error.

7001

DRUM MOTOR FAILURE

Drum rotation error.

7101

CAP MOTOR FAILURE

Capstan rotation error.

7202 - 7203 

SUPPLY REEL FAILURE

Supply reel rotation error.

7302 - 7303 

TAKE UP REEL FAILURE

Take up reel rotation error.

7305

TAKE UP REEL FAILURE

Take up reel rotation error when un-
loading.

8000

EMERGENCY TAPE!

Tape problem detected.

TURN POWER OFF. 

TURN BACK ON LATER.

System error when power is turned on. HDV/DV  LED,  VTR  indicator

and TALLY lamp flash. Only
POWER switch operation is
accepted.

Turn off the power and let the unit sit
for sometime before turning it back on.

91

OTHERS

„

TALLY lamp
Blinks when remaining battery power or tape is low. (Only
in Camera mode)

„

Alarm Sound
When remaining battery power becomes low, a warning
sound is output from the monitoring loudspeaker and the
PHONES jack.
(In Camera mode only)
When an irregularity occurs in the VTR, a warning sound is
also output.

Whether or not alarm sound should be output and the vol-
ume level are selected with the ALARM VR LEVEL item on
the OTHERS [1/2] menu screen.

„

Depending on the alarm conditions, the warning indicators
on the LCD monitor/viewfinder screen, the TALLY lamp,
and alarm sounds appear as shown in the following table.

Blinking Pattern

Remaining Battery/Tape

Slow blinking 
(once per sec.)

• Remaining battery power is low.
• Remaining tape time is equivalent to less

than 3 minutes.

Fast blinking
(four times per sec.)

• Tape has run out.
• Irregularity has occurred in the VTR.

Alarm Indications on LCD Monitor/ 

Viewfinder Screen

TALLY lamp

Alarm Sound

Condition

VTR alarm indication
(Example)

I

Dew formation (condensation) or error has oc-
curred in the VTR.

J

About 3 min. before tape end
(displayed during recording).

I

Tape end
(displayed during recording).

J

Remaining battery power is low.

Display symbols

J

: Blinking once per second.

I

: Blinking four times per second.

: Sound interrupted once per second.

: Continuous sound.

Summary of Contents for GY-HD110

Page 1: ...Y HD111 Thank you for purchasing this JVC product Before operating this unit please read the instructions carefully to ensure the best possible performance For Customer Use Enter below the Serial No which is located on the body Retain this information for future reference Model No Serial No The illustration shows the GY HD110 GY HD111 HD CAMERA RECORDER with the pro vided lens viewfinder microphon...

Page 2: ...t fit into your outlet consult an electrician for replacement of the obsolete outlet 10 Protect the power cord from being walked on or pinched particularly at plug convenience receptacles and the point where they exit from the apparatus 11 Only use attachments accessories specified by the manufacturer 12 Use only with the cart stand tripod bracket or table specified by the manufacturer or sold wit...

Page 3: ...ION Afin d eviter tout resque d incendie ou d électrocu tion ne pas utillser d autres sources d alimentation électrique REMARQUE La plaque signalétique plaque du numéro desérie est située sur le cadre inférieur de l unité Due to design modfications data given in this instruction book are subject to possible change without prior notice The apparatus shall not be exposed to dripping or splashing and...

Page 4: ...g playback as well 24p DV format video uses a 2 3 2 3 pulldown 24p Mode A 2 3 3 2 pulldown 24p Advanced Mode is also sup ported It can shoot with the same number of frames as movie film Tapes recorded in the DVCAM format can only be played back simple playback Recording in the DVCAM format is not possible DVCAM is a registered trademark of Sony Corporation Supports 60 Hz 50 Hz HD or HDTV signals S...

Page 5: ...Adjustment 45 White Balance Adjustment Full Auto White Balance FAW SETTING AND ADJUSTMENTS BEFORE SHOOTING Setting the Video Format 46 Camera Settings 47 Screen Size 4 3 16 9 Mode Selection 47 Audio Input Signal Selection 48 Selecting the CH 2 channel input connector Selecting the audio signal input Adjusting Audio during Recording Monitoring Audio during Recording 5 CONTENTS SHOOTING OPERATION Ba...

Page 6: ...cified power cord accessory Using a power cord other than the one specified or using a damaged cord will result in a fire or electric shock Do not use the provided power cord with a device other than this one To prevent damage to the connectors use the camcorder with the connector covers on when you are not using the video signal output connectors CAUTION Do not point the lens or viewfinder direct...

Page 7: ...n dewing When this occurs the head drum and tape guides are covered with droplets allowing the tape to be stuck to them leading to tape damage Condensation occurs in the following cases When the unit is suddenly moved from a cold place to a warm place When a room heater has just started or when the unit is exposed directly to cold air from an air con ditioner When the unit is placed in a very humi...

Page 8: ...ens on page 30 X See Back Focus Adjustment on page 44 M RET W T A MACRO 3 2 4 5 6 7 8 9 1 0 a b c d A Activates the auto iris feature M Allows manual iris control S Servo zoom mode Allows operation by the zoom servo control lever 6 M Manual zoom mode Allows zoom control by the zoom lever ring 2 11 CONTROLS INDICATORS AND CONNECTORS Front Section 1Shoe Makes it possible to mount separately sold lig...

Page 9: ...TC DISPLAY TC UB display switch Selects the contents displayed on the TC counter of the LCD monitor or in the viewfinder This switch works when the TC UB item on the LCD VF 2 3 menu screen is set to ON 4 TC GENE Time code generator setting switch Switch for setting the time code generator to preset mode or regeneration mode It is also used to select the time code run mode when the preset mode is s...

Page 10: ... i OFF Turns the filter OFF FILTER OFF 1 Cuts the light intensity to approximately 1 4 1 4ND 2 Cuts the light intensity to approximately 1 16 1 16ND 15 CONTROLS INDICATORS AND CONNECTORS b GAIN Sensitivity selector switch Electronically boosts the light sensitivity when there is insufficient illumination on the subject The boosting level differs depending on the switch position as follows Factory ...

Page 11: ...oulder pad slide button Button to adjust the position of the shoulder pad When you press this button you can move the position of the shoulder pad b forward or backward bShoulder pad HDV For HDV format DV DV format 1 2 3 4 5 6 7 8 9 0 a b INPUT1 Inputs the audio from the INPUT1 connector 0 into CH 2 INPUT2 Inputs the audio from the INPUT2 connector 0 into CH 2 LINE Set to this position when connec...

Page 12: ...back Press to enter the still picture mode during playback in the stop mode or in the search mode Depending on the ambient temperature if still image play back mode continues for between 30 seconds and 3 min utes it stops automatically Tape protect mode During still picture playback and search mode press this button to return to the normal playback mode If the auto tracking is active at the moment...

Page 13: ...4 connector TRIGGER TO HDV TRIGGER TO DV Other Displays X See FILE MANAGE Menu Screen on page 83 85 X See Warnings and Responses on page 89 21 CONTROLS INDICATORS AND CONNECTORS No Item Contents 2 VTR mode indication STBY In record standby mode record pause mode REC During recording PLAY During playback FF During fast forward REW During rewind STL During still picture playback mode FWD During play...

Page 14: ...appears 4 Voltage indication Example 7 0V Indicates remaining battery level in 0 1V steps Example Time code TC 00 00 00 00 User s bits UB FF EE DD 20 Colon when non drop frame mode Dot when drop frame mode 23 CONTROLS INDICATORS AND CONNECTORS 5 Audio sampling frequency in dication 32 K Indicated when the AUDIO MODE item on the AUDIO MIC 1 2 menu screen is set to 32 K Au dio is recorded with 12 bi...

Page 15: ...m on the LCD VF 2 3 menu screen X See page 75 2 Time code TC and user s bits UB display Displays the time code data being recorded hour minute second frame when in VTR mode You can switch this display ON OFF using the TC UB item on the LCD VF 2 3 menu screen X See page 75 You can select to display either the time code or the user s bits using the TC DISPLAY switch in the LCD door 3 Remaining tape ...

Page 16: ...ed its operation status is displayed For details refer to the DR HD100 INSTRUCTION MANUAL AUDIOSEL ECT LCDBRIGHT CAM VTR AUTO TC UB REC FREE REGEN MANU CH 2 CH 1 DISPLAY GENE TC 266S DD DISPLAY button 1 3 2 4 Characters shown enlarged Image and characters displayed Only image displayed 27 CONTROLS INDICATORS AND CONNECTORS Auto White Balance Indication Camera mode only The AUTO WHITE indication an...

Page 17: ...IGHT CAM VTR AUTO TC UB REC FREE REGEN MANU CH 2 CH 1 DISPLAY GENE TC DISPLAY button Normal LCD Inverted LCD LCD open 40 or more LCD close less than 40 LCD Monitor Status LCD Display VF Display LCD Closed Normal LCD OFF ON Inverted LCD ON OFF LCD Open Normal LCD ON OFF Inverted LCD ON OFF LCD Monitor Status LCD Display VF Display LCD Closed Normal LCD OFF ON Inverted LCD ON ON LCD Open Normal LCD ...

Page 18: ...u slide the viewfinder Pin Hole Clamp 1 3 Knob 2 Microphone Microphone holder 5 Clamp 4 INPUT1 2 connector Knob Taking off the viewfinder 31 PREPARATIONS Inserting an SD Memory Card By using an SD memory card you can save and call up menu settings and camera settings for this camcorder X See FILE MANAGE Menu Screen on page 83 Check that the POWER switch is OFF Inserting an SD Memory Card 1 Open th...

Page 19: ... The built in battery will remain charged for about 3 months after being charged for about 4 hours POWER lamp DC INPUT connector To plug outlet AC adapter DC OUT connector Ferrite core DC cable Core filter gray 33 PREPARATIONS Battery Operation Charging the Battery Pack Before use the battery pack should be charged using the pro vided AC Adapter Be sure to pull the DC cable out of the AC adapter w...

Page 20: ...arging may not complete Battery pack Recharging time of a single pack Successive recharging time of two packs BN V428 Approx 3 hr 20 min Approx 6 hr 40 min BN V438 Approx 4 hr 20 min Approx 8 hr 40 min LCD monitor Viewfinder Battery Pack Continuous Operating Time at 25 C 77 F BN V428 Approx 40 minutes BN V438 Approx 60 minutes 35 PREPARATIONS FOR OPERATION Turning the Power ON Turning the Power ON...

Page 21: ...amera Record standby mode STOP mode REC INHIBIT is displayed on the LCD monitor and in the viewfinder VTR STOP mode 37 PREPARATIONS FOR OPERATION Setting and Displaying the Date and Time The date and time of the built in clock should be set Powered by the built in backup battery the set date and time data con tinue to count even when the power is switched off The set date and time data are display...

Page 22: ...re displayed In VTR playback mode The date and time recorded on the tape are displayed In VTR stop mode The last read date and time values are displayed When an HDV DV sig nal is input from the IEEE1394 connector The date and time of the DV input are displayed in DV format The date and time of the internal clock are displayed in HDV format GY HD110U GY HD111E only 39 PREPARATIONS FOR OPERATION Dis...

Page 23: ... placing emphasis on the recording time NON DROP The time code generator s running method is set to the non drop frame mode Use this setting when placing emphasis on the number of frames 41 PREPARATIONS FOR OPERATION Presetting time code data The time code and user s bit data are preset on the TC UB CLOCK menu screen 1 Display the TC UB CLOCK menu screen Select the TC UB CLOCK item on the TOP MENU...

Page 24: ...r unit and slave unit is not synchronized it will not run properly Synchronize frame rate before using If DROP NON DROP is not synchronized it will not run properly Synchronize DROP NON DROP before using MACRO MACRO Master unit Slave unit IEEE1394 cable IEEE1394 terminal IEEE1394 terminal Slide the IEEE1394 switch to the DV side Slide the IEEE1394 switch to the DV side DTCG TC SLAVE LOCK EXECUTE U...

Page 25: ...ustment Two kinds of white balance adjustment results can be stored in memories AUTO A and AUTO B Adjustment procedure 1 Set the following switches Set the POWER switch to ON Set the IRIS mode switch of the lens to A Auto Set the FULL AUTO switch to OFF 2 Set the ND filter switch according to the current lighting 3 Set the WHT BAL switch to A or B 4 Place a white object near the center of the scre...

Page 26: ...an be played back more smoothly than with normal progressive video X See page 68 This function is only enabled during playback It is not avail able during live output or shooting SHUTTER dial STATUS button 47 SETTING AND ADJUSTMENTS BEFORE SHOOTING Camera Settings 1 Set the switch positions A GAIN switch Set to L 0 dB B WHT BAL Auto White Balance switch Set to A or B 2 Set the lens iris mode switc...

Page 27: ...ment etc The reference input level is 4 dBs MIC Set to this position when using a dynamic micro phone MIC 48V Set to this position when a microphone phan tom microphone requiring 48 V DC power sup ply is connected 49 SETTING AND ADJUSTMENTS BEFORE SHOOTING CAUTION When the AUDIO INPUT switch is set to MIC be sure to check that the microphone is connected to the INPUT1 2 connector If the microphone...

Page 28: ...e before the tape protection mode is engaged from the record standby mode can be set to 5 minutes or 3 min utes with the LONG PAUSE TIME item on the OTHERS 1 2 screen menu X See page 80 When the record standby mode has continued for about 5 minutes or 3 minutes the GY HD110 automatically stops drum rotation in order to protect the tape Tape protect mode In the tape protect mode STOP is shown as th...

Page 29: ... UB DATA item on the HEADER REC menu screen User s bits The value specified for the UB PRESET item on the TC UB CLOCK menu screen only when set to REC RUN or FREE RUN mode 53 SHOOTING OPERATION The menu screen is not displayed during HEADER REC recording How to set the HEADER REC menu screen 1 Display the HEADER REC menu screen 1Select the TC UB CLOCK item on the TOP MENU screen 2Select the HEADER...

Page 30: ...required for fast forwarding and rewinding may become longer when used in a cold environment This is not a malfunction Search Press the FF button in the play mode or still mode to search the tape in the forward direction Playback takes place while fast forwarding Pressing the REW button executes search of the tape in the reverse direction Playback takes place while rewind ing Each press on the but...

Page 31: ...to a composite or component signal depending on which cable is connected to the video signal output terminal and outputs the signal COMPOSITE Outputs a composite signal regardless of which cable is connected to the video sig nal output connector COMPONENT Outputs a component signal regardless of which cable is connected to the video signal output connector Connector G Unconnected F Connected Outpu...

Page 32: ...le 1 IEEE1394 switch Signal flow 2 Recording unit VIDEO FORMAT menu screen 5 DV When dubbing in DV format HDV When dubbing in HDV format This camcorder Recorded videocassette tape Recording unit Videocassette you want to dub 59 USING EXTERNAL COMPONENTS CAUTION Set the IEEE1394 switch on both devices to either HDV or DV Start recording after making sure that both devices are properly connected Whe...

Page 33: ...r the backup unit the image audio and or time code may deviate from what they should be at the points where the recording is started or stopped MEMO When the backup recording is started the TRIGGER TO DV or TRIGGER TO HDV indication is shown on the LCD or in the viewfinder for approx 3 seconds When the Series Recording function of BR HD50 is used the GY HD110 s 1394 REC TRIGGER item should be set ...

Page 34: ... are displayed depending on whether the GY HD110 is in the Camera mode or in the VTR mode In the VTR mode the CAMERA OPERATION CAMERA PROCESS and SWITCH MODE menu screens are not displayed Item Function VIDEO FORMAT Displays the menu screen for setting the video format for shooting and playing back video The cursor K does not move to this item when the camcorder is recording CAMERA OPERATION Displ...

Page 35: ...Normally use the AUTO setting AUTO During tape playback the format signal is switched automatically and played back DV During tape playback only the part of the tape recorded in DV format is played back HDV During tape playback only the part of the tape recorded in HDV format is played back DVCAM During tape playback only the part of the tape recorded in DVCAM format is played back MEMO If you pla...

Page 36: ...e contour Decrease the number Softens the contour OFF Does not function Settings OFF MIN 10 9 NORMAL 0 9 MAX 10 When this item is set to OFF is displayed for the following menu items and they cannot be selected V H BALANCE Sets which contours details to sharpen those in the horizontal H direction or those in the vertical V direction Increase the number Sharpens H direction Decrease the number Shar...

Page 37: ...MATRIX and GAMMA items and cannot be selected COLOR MATRIX Sets the color matrix OFF Turns the function OFF STANDARD Sets a normal color matrix CINELIKE Sets a color matrix close to the characteristics of a movie screen ADJUST When STANDARD or CINELIKE is set for the COLOR MATRIX item a color matrix can be set individually Press the SHUTTER dial to call up the COLOR MATRIX ADJUST menu screen X See...

Page 38: ...re displayed using skin colors PAGE BACK When the cursor is in this position press the SHUTTER dial to return to the ADVANCED PROCESS menu screen 71 MENU SCREENS SWITCH MODE Menu Screen The SWITCH MODE menu screen is only displayed in camera mode Item Function Setting bold characters indicate initial settings SHUTTER Sets the fixed value STEP for values that can change using the SHUTTER dial on th...

Page 39: ...ds with a 12 bit 32 kHz sampling frequency 48K Digitally records with a 16 bit 48 kHz sampling frequency If the DV format is 12 bit 32 kHz up to 4 recording track channels are available Of those this camcorder records on the CH 1 and CH 2 channels This camcorder is not capable of dubbing NEXT PAGE To display the AUDIO MIC 2 2 menu screen move the cursor to this position and press the SHUTTER dial ...

Page 40: ...itor on page 26 NEXT PAGE When you display the LCD VF 2 3 menu screen move the cursor to this position and press the SHUTTER dial PAGE BACK When the cursor is in this position press the SHUTTER dial to return to the TOP MENU screen 75 MENU SCREENS LCD VF 2 3 Menu Screen 1 2 screen is displayed in the VTR mode Item Function Setting bold characters indicate initial settings VIDEO FORMAT Selects whet...

Page 41: ...TC PRESET To preset the time code align the cursor with this position and then press the SHUTTER dial EXECUTE The set time code is confirmed CANCEL The set time code is cancelled ZERO PRESET Resets all time codes to 0 UB PRESET To preset the user s bit data align the cursor with this position and then press the SHUTTER dial EXECUTE The set user s bit data are confirmed CANCEL The set user s bit da...

Page 42: ...ot recorded is played back there will be no display of time and date even when this item is set to ON DISPLAY MODE In the Camera mode the date and time are displayed in accordance with the following settings The date and time recorded on a tape are displayed in accordance with the following settings BARS CAM Date and time are always displayed BARS Date and time are displayed when the color bars ar...

Page 43: ... the IEEE1394 connector Can be displayed and set in camera mode Set this when recording a backup of the DV signal from this camcorder onto another device OFF Does not control the backup device SYNCRO Controls the backup device in conjunction with the recording start stop mode status on the camcorder and if there is no videocassette or if no tape remains for recording controls the backup device in ...

Page 44: ...een You can perform the following operations in the FILE MAN AGE menu screen Settings corresponding to shooting conditions can be read immediately with the following read only files LIVE HD30P Ideal setting for HD30P format LIVE HD25P Ideal setting for HD25P format CINELIKE HD24P Ideal setting for movie quality shooting The read only files listed above cannot be saved or reset Save menu settings C...

Page 45: ...d up READ ONLY FILE Indicates a read only file Read only files cannot be saved 1 2 3 4 5 6 Settable Characters Space Execute Complete Error Flashing Error display 85 MENU SCREENS Resetting the menu settings to the fac tory settings Select the RESET FILE item on the FILE MANAGE menu screen 1 Turn the SHUTTER dial bring the cursor K to SELECT and press the SHUTTER dial The file name setting area for...

Page 46: ...s the SHUTTER dial o The setting area flashes and can be changed 2Turn the SHUTTER dial up or down to widen or narrow the color range Set the range as you check the color display 3To confirm the color range press the SHUTTER dial The setting returns to its lit state 6 To stop the SKIN COLOR ADJUST function turn the SHUTTER dial bring the cursor K to the PAGE BACK item and press the SHUTTER dial US...

Page 47: ...50 25 and a tape record ed in 24 frame DV format is played back or it is input into the IEEE1394 port in VTR mode DV 60I INVALID DV 24P INVALID DV 24PA INVALID A tape recorded in DV 60I DV 24P or DV 24PA format was played back or input into the IEEE1394 connector in VTR mode on the E model The E model cannot play back tapes recorded in DV 60I DV 24P or DV 24PA format or input into the IEEE1394 con...

Page 48: ...otation error 7202 7203 SUPPLY REEL FAILURE Supply reel rotation error 7302 7303 TAKE UP REEL FAILURE Take up reel rotation error 7305 TAKE UP REEL FAILURE Take up reel rotation error when un loading 8000 EMERGENCY TAPE Tape problem detected TURN POWER OFF TURN BACK ON LATER System error when power is turned on HDV DV LED VTR indicator and TALLY lamp flash Only POWER switch operation is accepted T...

Page 49: ...may be insufficient Check the power volt age Time code or user s bits data not displayed Is the TC UB item on the LCD VF 2 3 menu screen set to OFF If so set to ON The date and time are not displayed or recorded Is the DISPLAY item on the TIME DATE menu screen set to OFF Set to ON when the data should be displayed and recorded Is the date and time setting made X See Setting and Displaying the Date...

Page 50: ...rmat DV format 8 bit 25 Mbps Compression DV compression 4 1 1 NTSC 4 2 0 PAL Audio HDV Audio signal record ing format MPEG1 Audio Layer II DV Audio signal record ing format 16 bit locked audio 48 kHz PCM for 2 channels or 12 bit 32 kHz PCM for 4 channels Usable tape MiniDV tape Tape speed 18 8 mm sec Record play time 63 minutes with an M DV63PROHD tape Analog composite output 1 0 V p p 75 unbalanc...

Page 51: ...resetting of the time code 2 Press the USER2 button to reset all data Data becomes 00 00 00 00 and the hour digit starts blinking 3 Set the time code hour minute second and frame The blinking digit can be set 1 Turn the SHUTTER dial to change the value of the blinking digit Turn the SHUTTER dial up to increase the value and down to decrease the value 2 Press the SHUTTER dial to change the blinking...

Reviews: