background image

18

TROUBLESHOOTING

Before consulting your JVC dealer, please check the following to see if you can correct the problem
yourself.

Vertical white lines appear when shooting a 
very bright object.

• This sometimes occurs when the contrast

between the background and the object is
great. It is not a defect of the camcorder.

Bright, crystal-shaped spots appear in the 
LCD monitor and the viewfinder.

• Sunlight is directly entering the lens. This is not

a defect of the camcorder.

Coloured bright spots appear all over the 
LCD monitor or the viewfinder.

• The LCD monitor and the viewfinder are made

with high-precision technology. However, black
spots or bright spots of light (red, green or
blue) may appear constantly on the LCD
monitor or in the viewfinder. These spots are
not recorded on the tape. This is not due to any
defect of the unit. (Effective dots: more than
99.99 %.)

Animation or Time-Lapse is not available.

• Before recording in the Animation mode at the

very beginning of a tape, set the camcorder to
the Recording mode for about 5 seconds, so
that the tape runs smoothly. Using the Fade-in
function at this point is a good way to begin an
animated programme (


pg.


17 REC TIME/

INT. TIME in SYSTEM MENU).

The tape is running, but there is no play-
back picture.

• The TV has not been set to its VIDEO mode or

channel.

• If A/V connection is used, the TV’s VIDEO/TV

Switch has not been set to VIDEO.

Playback picture is blurred or interrupted.

• The video heads are dirty or worn out. Consult

your nearest JVC dealer for head cleaning or
replacement.

The tape stops during fast-forwarding or 
rewinding.

• The Counter Memory Function has been

activated (


pg. 17, “COUNTER MEMORY”).

The date and time displays disappear.

• If you remove the power source from the

camcorder while the power is on, all settings
and selections are erased. Make sure to turn
the camcorder’s power off before
disconnecting the power source.

The tape will not eject.

• The battery pack is running low.
• If the LCD monitor is not open over 60

degrees, the EJECT button 

(

 does not

function.

TROUBLESHOOTING

The camcorder is a microcomputer-controlled device.
External noise and interference (from a TV, a radio, etc.) might prevent it from functioning properly. In
such cases, first disconnect its power supply unit (battery pack, AC Adapter, etc.); and then re-
connect it and proceed as usual from the beginning.

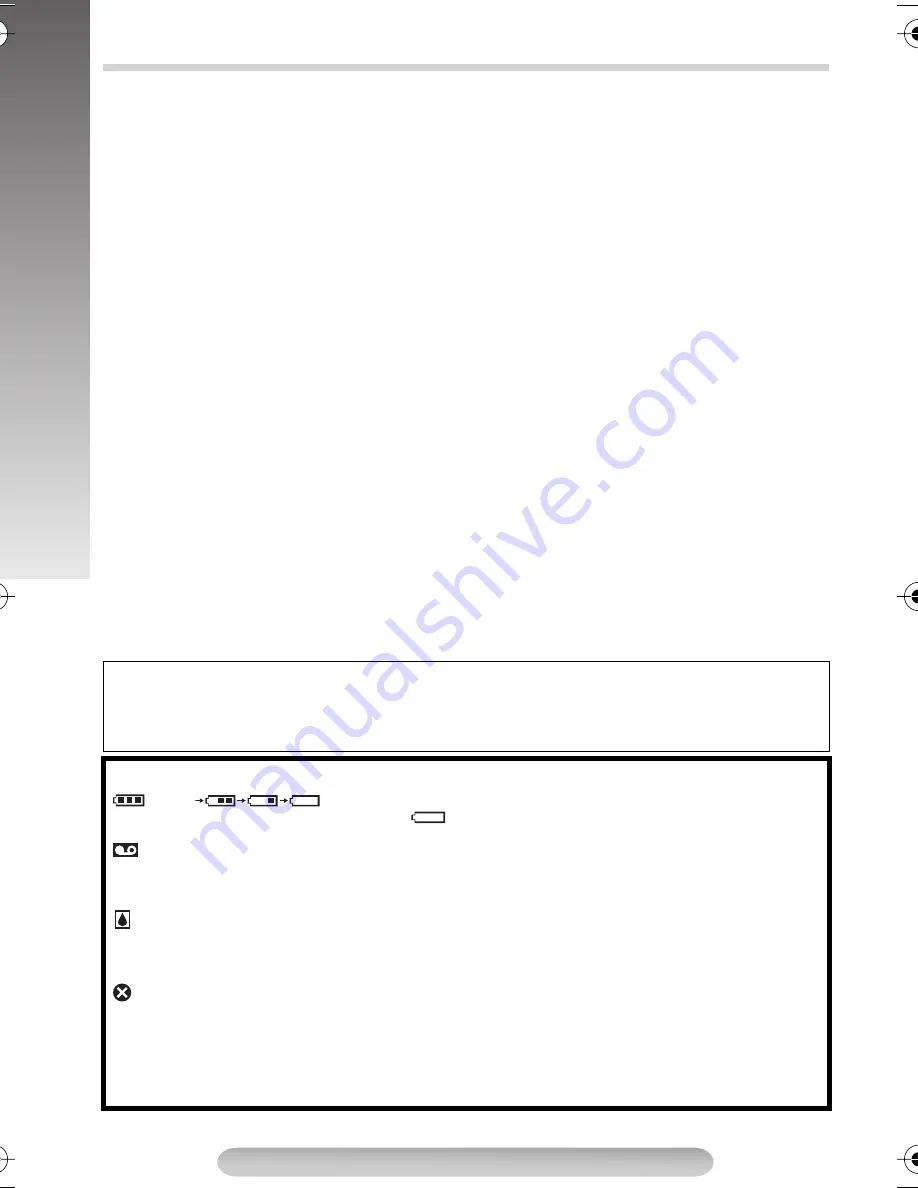
WARNING INDICATIONS: 

 (high) 

 (exhausted) : Displays the battery remaining power level. As the battery

power comes close to nil, the battery indicator 

 blinks (battery power warning). When the battery power is

exhausted, power turns off automatically.


: Blinks when no cassette is loaded, or when the erase protection tab is not in the position that allows

recording.

TAPE END

: Appears when the tape ends during recording, playback or fast-forwarding.

LENS CAP

: Appears for 5 seconds after power is turned on if the lens cap is attached.


CONDENSATION OPERATION PAUSED    PLEASE WAIT

: These 2 warnings appear alternately every 3

seconds if condensation occurs. In this case, all functions except tape eject and power on/off are disabled.
Remove the tape, turn the unit off (without removing the power supply), wait a few minutes for the warnings to
clear, and turn it on again.


HEAD CLEANING REQUIRED    USE CLEANING CASSETTE

: These 2 warnings appear alternately

every 3 seconds if dirt is detected on the heads during recording. In this case, use an optional cleaning
cassette. If the warning remains after cleaning, consult your nearest JVC dealer.

E01—E06 UNIT IN SAFEGUARD MODE    REMOVE AND REATTACH BATTERY

: The error indications (E01

— E06) show what type of malfunction has occured. If an error indication and warning appear, turn the unit off,
remove the power supply (battery, etc.) and wait a few minutes for them to clear. When it does, you can
resume using the camcorder. If the indication remains, consult your nearest JVC dealer.

GR-FXM42EN(EK)2.fm  Page 18  Friday, December 2, 2005  9:46 AM

Summary of Contents for GR-FXM42EK

Page 1: ... to or To cancel Automatic Demonstration set DEMO MODE to OFF pg 17 Dear Customer Thank you for purchasing the JVC Compact VHS camcorder Before use please read SAFETY PRECAUTIONS pg 3 4 to ensure safe use of this product LYT1525 001A COMPACT VHS CAMCORDER GR FXM42EK CONTENTS GETTING STARTED 6 10 RECORDING PLAYBACK 11 BASIC FEATURES 11 13 MENU SETTINGS 14 17 TERMS 22 ...

Page 2: ...s Cap AC Adapter AP V14E Power Cord NOTE In order to maintain optimum performance of the camcorder provided cables may be equipped with one or more core filter If a cable has only one core filter the end that is closest to the filter should be connected to the camcorder OPTIONAL ACCESSORIES Some accessories are not available in some areas Please consult your nearest JVC dealer for details on acces...

Page 3: ... wire to terminal coded L Live or coloured Red If in doubt consult a competent electrician To prevent shock do not open the cabinet No user serviceable parts inside Refer servicing to qualified personnel When you are not using the AC Adapter for a long period of time it is recommended that you disconnect the power cord from AC outlet NOTES The rating plate serial number plate and safety caution ar...

Page 4: ...electronic equipment should not be disposed as general household waste at its end of life Instead the product should be handed over to the applicable collection point for the recycling of electrical and electronic equipment for proper treatment recovery and recycling in accordance with your national legislation By disposing of this product correctly you will help to conserve natural resources and ...

Page 5: ...s it is specifically stated that it is designed for unattended operation or has a standby mode Switch off using the switch on the equipment and make sure that your family knows how to do this Special arrangements may need to be made for infirm or handicapped people DON T use equipment such as personal stereos or radios so that you are distracted from the requirements of road safety It is illegal t...

Page 6: ...P 3 4 A 5 T 45 90 180 180 90 1 2 34 5 6 7 8 9 Eyepiece During shooting Keep the lens cap attached to the camcorder Cassette holder Erase protection tab LCD monitor Speaker Viewfinder During Recording During Playback LCD Monitor Viewfinder Indications _ V 0 1 2 34 6 pg 18 for Warning Indications 5 5 Turn the gear to take up slack Connector Cover Microphone Refer to this diagram while reading the in...

Page 7: ... Button pg 10 Dioptre Adjustment Control pg 10 Grip Strap pg 10 Tripod Mounting Socket pg 10 Tape Remaining Time pg 16 Recording Mode Indicator pg 15 Backlight Compensation Indicator pg 11 Tape Length Indicator pg 16 Zoom Indicator Bar pg 12 a Zoom Level Indicator b Approximate Zoom Ratio Recording Indicator pg 11 Digital Effect Indicator pg 14 Programme AE Indicator pg 14 Fade Wipe Standby Indica...

Page 8: ... features automatic voltage selection in the AC range from 110V to 240V ATTENTION Before detaching the power source make sure that the camcorder s power is turned off Failure to do so can cause the camcorder to malfunction REFRESH Be sure to fully discharge a battery pack before recharging or storing it for a long period of time otherwise the battery performance will be reduced 1 Perform steps 1 t...

Page 9: ...tery pack without the camcorder However it cannot be used as an AC adapter To avoid interference with reception do not use the AC Adapter near a radio Recording time is reduced significantly when Zoom or Record Standby mode is engaged repeatedly or the LCD monitor is used repeatedly Before extended use it is recommended that you prepare enough battery packs to cover 3 times the planned shooting ti...

Page 10: ...ON When using a tripod be sure to extend its legs fully to stabilise the camcorder To prevent damage to the unit caused by falling over do not use a small tripod 1 Open the LCD monitor fully and keep it aligned vertically with the camera do not tilt it Press EJECT for more than 2 seconds until the cassette holder opens Do not force open 2 When inserting a cassette make sure the label is facing out...

Page 11: ...gle of 60 degrees or more the LCD monitor switches on and the viewfinder switches off automatically to save power The playback picture can be viewed in the viewfinder with the LCD monitor shut on the LCD monitor or on a connected TV pg 12 Connections To A TV VCR To control the speaker volume 6 rotate the MENU Wheel 1 towards to turn up or towards to turn down While shooting sound is not heard from...

Page 12: ...ING Wheel 1 for approx 2 seconds MT 5 appears 2 Rotate the TRACKING Wheel 1 so that the noise bars disappear To return to Auto Tracking press the TRACKING Wheel 1 for approx 2 seconds or set the Power Switch to OFF and then PLAY again AT 5 blinks When Auto Tracking finishes the indication disappears When noise bars appear during playback the camcorder enters the Auto Tracking mode and AT 5 appears...

Page 13: ... 4 changes from blue red green indicating playback is possible 3 Load the cassette adapter into the VCR and play the tape back To record on a VCR using a compact cassette and the adapter cover the adapter s recording safety hole with Adhesive tape 4 To unload the cassette turn the dial 5 in the direction of UNLOADING all the way until it stops The colour shown in the window 4 changes from green re...

Page 14: ...lare on the subject FOG Makes the picture look misty white as when an external fog filter is attached to the lens Softens the image and gives it a fantasy look TWILIGHT Dusk twilight scenery fireworks etc look more natural and dramatic In this mode the Auto Focus pg 11 and S LX pg 15 may not work 1 2000 1 2000 sec High Speed Shutter Captures faster action than Sports mode The screen becomes slight...

Page 15: ... switched the playback picture will be blurred at the switching point CAMERA MENU The Picture Stabiliser compensates for unstable images caused by camera shake particularly at high magnification ON The Picture Stabiliser is activated appears OFF The Picture Stabiliser is deactivated disappears Accurate stabilisation may not be possible in certain conditions including excessive hand shake appears b...

Page 16: ...ions appear on the LCD monitor viewfinder during playback or recording SIMPLE Makes the following indications disappear from the LCD monitor viewfinder during recording or playback 0 tape remaining time tape length ON On screen indications are displayed OFF On screen indications are turned off except Date Time Instant Title and Warning Indication To adjust the brightness of the LCD monitor perform...

Page 17: ...me spans Leaving the camcorder aimed at a specific subject you can record subtle changes over an extended period of time Time Lapse REC MODE should be set to SP Please note that it is necessary to set the REC TIME Animation in the SYSTEM MENU before performing the INT TIME Time Lapse function Select the desired interval time and press the Recording Start Stop Button Fade or wipe in out cannot be p...

Page 18: ...urn the camcorder s power off before disconnecting the power source The tape will not eject The battery pack is running low If the LCD monitor is not open over 60 degrees the EJECT button does not function TROUBLESHOOTING The camcorder is a microcomputer controlled device External noise and interference from a TV a radio etc might prevent it from functioning properly In such cases first disconnect...

Page 19: ... to 40 C Storage 10 C to 30 C Recharging time is based on room temperature of 20 C The lower the temperature the longer recharging takes Cassettes To properly use and store your cassettes 1 During use beware that recording onto prerecorded tapes automatically erases the previously recorded video and audio signals make sure the cassette is positioned properly when inserting do not load and unload t...

Page 20: ...essing the Close button 4 Close and lock the LCD monitor 5 Slide BATTERY RELEASE to remove the battery pack 6 Attach the provided lens cap to the camcorder s lens 2 Cleaning The Camcorder 1 Gently wipe the exterior with a soft cloth with diluted mild soap wipe off heavy dirt then wipe again with a dry cloth 2 Wipe the LCD monitor gently with a soft cloth Be careful not to damage the monitor Close ...

Page 21: ...mm W x H x D with the LCD monitor closed and with the viewfinder fully tilted downward Pickup 1 6 format CCD Lens F1 8 f 2 2 mm to 55 mm 25 1 power zoom lens with auto iris and macro control Filter diameter ø 30 5mm Viewfinder Electronic viewfinder with 0 24 black white LCD White balance adjustment Auto Manual adjustment LCD monitor 2 50 diagonally measured LCD panel TFT active matrix system Speak...

Page 22: ... Viewfinder Indications pg 6 7 Load A Tape pg 10 Manual Focus pg 11 Menu Screen pg 14 17 Monotone Effect pg 14 Mosaic Effect pg 15 ND Effect Mode pg 14 Nega Posi Mode pg 15 Picture Stabiliser pg 15 Playback pg 11 Programme AE with Special Effects pg 14 Provided Accessories pg 2 Quick Review pg 12 Recording Start Stop pg 11 Recording Mode pg 15 Record Standby pg 11 Red Filter Effect pg 14 Retake pg...

Page 23: ...23 NOTE NOTE ...

Page 24: ...Printed in Malaysia 1205YDR NF VM EK 2005 Victor Company of Japan Limited ...

Reviews: