background image

70

 EN

TROUBLESHOOTING


(cont.)

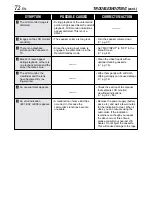
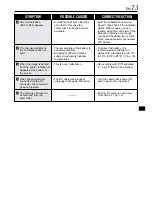
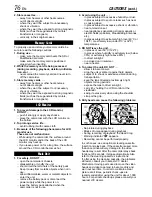
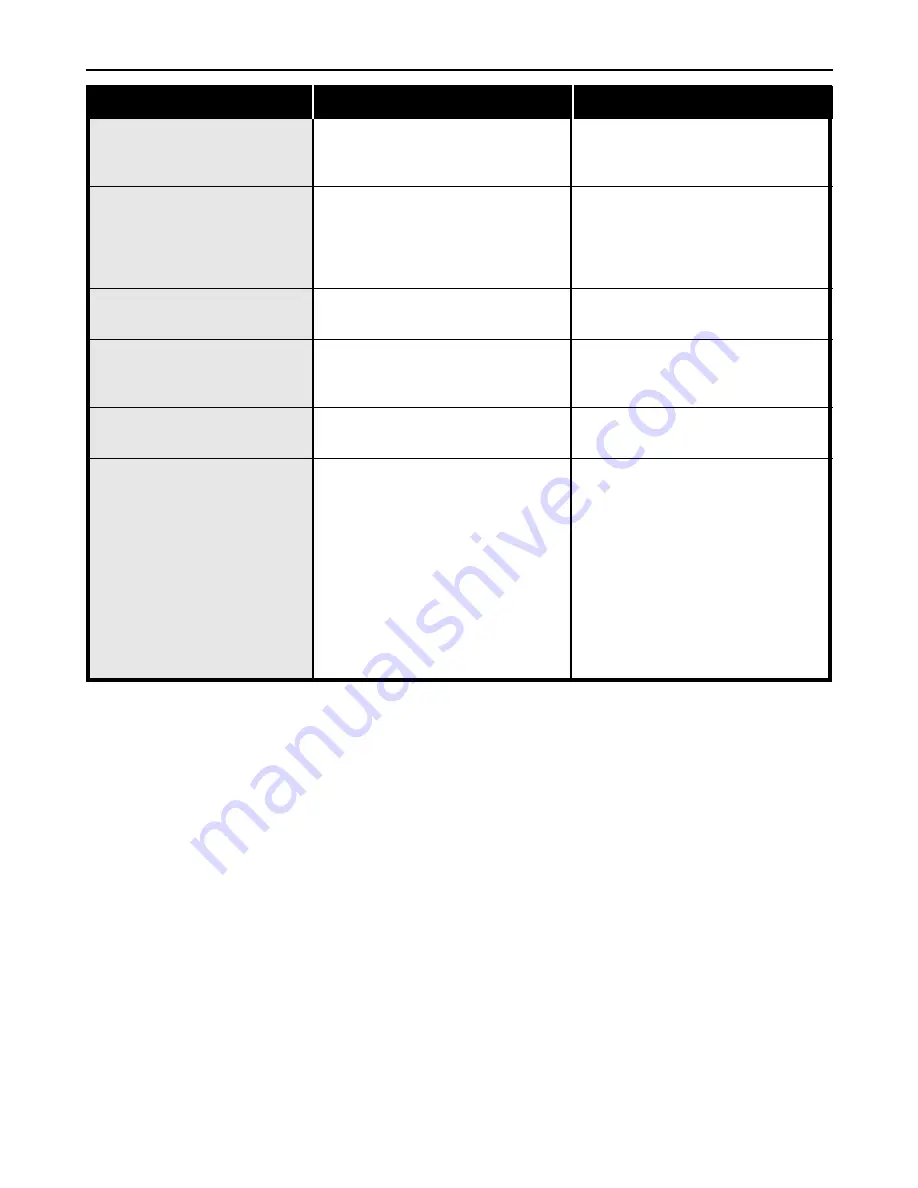
SYMPTOM

POSSIBLE CAUSES

CORRECTIVE ACTION

^

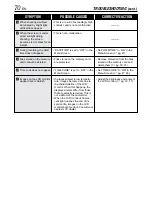
When shooting a subject
illuminated by bright light,
vertical lines appear.

&

When the screen is under
direct sunlight during
shooting, the screen
becomes red or black for an
instant.

*

During recording, the date/
time does not appear.

(

Files stored on the memory
card cannot be deleted.

)

Time code does not appear.

q

Images on the LCD monitor
appear dark or whitish.

• This is a result of exceedingly high

contrast, and is not a malfunction.

• This is not a malfunction.

• “DATE/TIME” is set to “OFF” in the

Menu Screen.

• Files stored on the memory card

are protected.

• “TIME CODE” is set to “OFF” in the

Menu Screen.

• In places subject to low tempera-

ture, images become dark due to
the characteristics of the LCD
monitor. When this happens, the
displayed colors differ from those
that are actually recorded. This is
not a defect of the camcorder.

• When the LCD monitor's fluores-

cent light reaches the end of its
service life, images on the LCD
monitor become dark. Consult your
nearest JVC dealer.

————

————

• Set “DATE/TIME” to “ON” in the

Menu Screen (

 pg. 47).

• Remove protection from the files

stored on the memory card and
delete them (

 pg. 30, 31).

• Set “TIME CODE” to “ON” in the

Menu Screen (

 pg. 47, 48).

• Adjust the brightness and angle of

the LCD monitor (

 pg. 16, 17).
Summary of Contents for GR-DVL725

Page 1: ...RDING PLAYBACK 25 34 MEMORY CARD RECORDING 26 27 MEMORY CARD PLAYBACK 28 29 ADVANCED FEATURES 30 34 ADVANCED FEATURES 35 65 FOR RECORDING 36 43 USING MENUS FOR DETAILED ADJUSTMENT 44 49 DUBBING 50 52 USING THE REMOTE CONTROL UNIT 53 64 SYSTEM CONNECTIONS 65 REFERENCES 66 Back Cover DETAILS 67 TROUBLESHOOTING 68 73 USER MAINTENANCE 74 CAUTIONS 75 77 SPECIFICATIONS 78 79 INDEX 80 86 TERMS 87 Back Co...

Page 2: ...to alert the user to the presence of important operating and maintenance servicing instructions in the literature accompanying the appliance You are recommended to carefully read the cautions on pages 75 through 77 before use NOTES The rating plate serial number plate and safety caution are on the bottom and or the back of the main unit The rating information and safety caution of the AC Adapter a...

Page 3: ...eries environmental problems must be considered and the local rules or laws governing the disposal of these batteries must be followed strictly The apparatus shall not be exposed to dripping or splashing Do not use this equipment in a bathroom or places with water Also do not place any containers filled with water or liquids such as cosmetics or medicines flower vases potted plants cups etc on top...

Page 4: ...sing serious damage to the camcorder CAUTION Connecting cables Audio Video S Video etc to the camcorder and leaving the unit on top of the TV is not recommended as tripping on the cables will cause the camcorder to fall resulting in damage 䡲 This camcorder is designed exclusively for the digital video cassette SD Memory Card and MultiMediaCard Only cassettes marked and memory cards marked or can b...

Page 5: ... to the camcorder Remote Control Unit RM V717U GR DVL820 only CD ROM AAA R03 Battery x 2 for remote control unit Audio Video Cable ø3 5 mini plug to RCA plug Editing Cable GR DVL820 only Shoulder Strap Memory Card 8 MB Already inserted in the camcorder USB Cable Battery Pack BN V408U AC Adapter AP V10U AP V11U or AP V12U Remote Control Unit RM V715U GR DVL725 only Lens Cap 墌 pg 6 for attachment Le...

Page 6: ...reen appears 2 Rotate the MENU BRIGHT wheel to select SYSTEM and press it The SYSTEM Menu appears 3 Rotate the MENU BRIGHT wheel to select DEMO MODE and press it The Sub Menu appears 4 Rotate the MENU BRIGHT wheel to select OFF and press it 5 Rotate the MENU BRIGHT wheel to select RETURN and press it twice The normal screen appears NOTE If you do not detach the Lens Cap you cannot see the actual c...

Page 7: ...S Power 8 9 Grip Adjustment 10 Viewfinder Adjustment 10 Shoulder Strap Attachment 10 Tripod Mounting 10 Date Time Settings 11 Loading Unloading A Cassette 12 Recording Mode Setting 13 Loading A Memory Card 14 Picture Quality Image Size Setting 14 ...

Page 8: ... 30 min approx 3 hrs approx 5 hrs Power This camcorder s 2 way power supply system lets you choose the most appropriate source of power Do not use provided power supply units with other equipment CHARGING THE BATTERY PACK 1 Tilt the viewfinder upward 1 With the arrow on the battery pack pointing downward push the battery pack slightly against the battery pack mount 2 then slide down the battery pa...

Page 9: ...nd supply power directly to the camcorder Lithium ion is vulnerable in colder temperatures About Batteries DANGER Do not attempt to take the batteries apart or expose them to flame or excessive heat as it may cause a fire or explosion WARNING Do not allow the battery or its terminals to come in contact with metals as this can result in a short circuit and possibly start a fire The Benefits Of Lith...

Page 10: ...attery pack is removed Following the illustration thread the strap through the eyelet 1 then fold it back and thread it through the buckle 2 Repeat the procedure to attach the other end of the strap to the other eyelet 3 located under the Grip Strap Confirm the strap is not twisted Tripod Mounting CAUTION When attaching the camcorder to a tripod extend its legs to stabilize the camcorder It is not...

Page 11: ... it Repeat to input the day year hour and minute Rotate the MENU BRIGHT wheel to select RETURN and press it twice The Menu Screen closes NOTE Even if you select CLOCK ADJ if the parameter is not highlighted the camcorder s internal clock continues to operate Once you move the highlight bar to the first date time parameter month the clock stops When you finish setting the minute and press the MENU ...

Page 12: ...e holder resulting in injury or product damage NOTES It takes a few seconds for the cassette holder to open Do not apply force If you wait a few seconds and the cassette holder does not open close the cassette holder cover and try again If the cassette holder still does not open turn the camcorder off then on again If the tape does not load properly open the cassette holder cover fully and remove ...

Page 13: ... press it Rotate the MENU BRIGHT wheel to select RETURN and press it twice The Menu Screen closes Audio Dubbing 墌 pg 63 and Insert Editing 墌 pg 64 are possible on tapes recorded in the SP mode LP Long Play is more economical providing 1 5 times the recording time NOTES If the recording mode is switched during recording the playback picture will be blurred at the switching point It is recommended t...

Page 14: ...g a new memory card it is necessary to FORMAT the card 墌 pg 34 ATTENTION Do not insert remove the memory card while the camcorder is turned on as this may cause the memory card to be corrupted or cause the camcorder to become unable to recognize whether or not the card is installed Picture Quality Image Size Setting The Picture Quality Image Size can be selected to best match your needs Refer to t...

Page 15: ...cording 16 Journalistic Shooting 17 Self Recording 17 Operation Mode 17 Zooming 18 Video Light 19 Time Code 20 TAPE PLAYBACK 21 24 Normal Playback 21 Still Playback 21 Shuttle Search 21 Frame By Frame Playback 21 Connections 22 23 Blank Search 24 TAPE RECORDING PLAYBACK ...

Page 16: ...otate the MENU BRIGHT wheel until the bright level indicator on the display moves and the appropriate brightness is reached NOTES If the Record Standby mode continues for 5 minutes the camcorder s power shuts off automatically To turn the camcorder on again set the Power Switch to OFF then back to AUTO or MANUAL The image will not appear simultaneously on the LCD monitor and the viewfinder It will...

Page 17: ...ng try this mode AUTO Full Auto Allows you to record using NO special effects or manual adjustments Suitable for standard recording OFF Allows you to switch off the camcorder PLAY Allows you to play back a recording on the tape Allows you to access data stored on the memory card or to transfer a still image stored on the memory card to a computer VIDEO MEMORY Switch Position VIDEO Allows you to re...

Page 18: ... is possible to a maximum of 700X or it can be switched to 10X magnification using the optical zoom 墌 pg 45 Zoom magnification of over 10X is done through Digital image processing and is therefore called Digital Zoom During Digital zoom the quality of image may suffer Digital zoom cannot be used when the VIDEO MEMORY Switch is set to MEMORY 墌 pg 17 Macro shooting as close as approx 5 cm 2 to the s...

Page 19: ...ff using LIGHT OFF AUTO ON While the SHUTTER or SPORTS mode 墌 pg 37 is engaged the light is likely to stay on While the TWILIGHT mode 墌 pg 37 is engaged the light will not activate While the Night Alive mode 墌 pg 36 is engaged the light will not activate LIGHT OFF AUTO ON Switch Open the LCD monitor to access this switch DANGER 䡲 The video light can become extremely hot Do not touch it either whil...

Page 20: ...rtially recorded tape When shooting on a blank portion located partway through the tape When shooting again after shooting a scene then opening closing the cassette holder cover Recording From The Middle Of A Tape 1 Play back a tape or use Blank Search pg 24 to find the spot at which you want to start recording then engage the Still Playback mode pg 21 2 Set the Power Switch to AUTO or MANUAL whil...

Page 21: ...nector the sound is not heard from the speaker Still Playback Pauses during playback 1 Press 4 6 during playback 2 To resume normal playback press 4 6 again If still playback continues for more than about 3 minutes the camcorder s Stop mode is automatically engaged After 5 minutes in the Stop mode the camcorder s power is automatically turned off When 4 6 is pressed the image may not pause immedia...

Page 22: ...EO IN To TV or VCR S Video cable optional TV VCR Connector cover Yellow Not connected When connecting the cables open this cover The Audio cable is not required for watching still images only B Connection to a TV or VCR equipped only with A V input connectors When connecting the cables open this cover The Audio cable is not required for watching still images only Connector cover Audio Video cable ...

Page 23: ... the camcorder playback picture If no image is displayed or no sound is heard from the TV set S AV INPUT to OFF in the Menu Screen GR DVL820 only pg 48 While the Audio Video cable is connected to the AV connector sound cannot be heard from the speaker 1 Make sure all units are turned off 2 Connect the camcorder to a TV or VCR as shown in the illustration pg 22 If using a VCR go to step 3 If not go...

Page 24: ... position is at a blank portion the camcorder searches in the reverse direction and if the current position is at a recorded portion the camcorder searches in the forward direction Blank Search does not work if HEAD CLEANING REQUIRED USE CLEANING CASSETTE has appeared with the tape If the beginning or end of the tape is reached during Blank Search the camcorder stops automatically A blank portion ...

Page 25: ...28 Auto Playback 28 Index Playback 29 Viewing File Information 29 Removing On Screen Display 29 ADVANCED FEATURES 30 36 Protecting Files 30 Deleting Files 31 Setting Print Information DPOF Setting 32 33 Making A New Folder 34 Initializing A Memory Card 34 MEMORY CARD RECORDING PLAYBACK MEMORY CARD RECORDING PLAYBACK ...

Page 26: ... being taken The image is recorded on the memory card Still images are recorded in the snapshot mode with no frame Power Switch SNAPSHOT Button Lock Button VIDEO MEMORY Switch Open the LCD monitor to access this switch 5 1 1024 Display Shooting icon Appears and blinks during shooting Image Size Displays the image file size 1280 1280 x 960 1024 1024 x 768 or 640 640 x 480 pg 14 Remaining number of ...

Page 27: ... the VIDEO MEMORY Switch is set to MEMORY Still images taken are compliant to DCF Design rule for Camera File system They do not have any compatibility with devices which are not compliant to DCF FULL Snapshot mode with no frame There is the sound of a shutter closing To Protect Valuable Files available only for SD Memory Card Approximate Number of Storable Images Image Size Picture SD Memory Card...

Page 28: ... Press 4 6 If you press 2 during Auto Playback images are displayed in descending order If you press 3 during Auto Playback images are displayed in ascending order 3 To end Auto Playback press 5 NOTE Even if you shoot a new image after playing back a low numbered one this will not overwrite an existing image because new images are automatically stored after the last recorded one Images shot in a f...

Page 29: ... Screen INDEX Button Selected image Index number Index Screen Viewing File Information You can get the relevant image file information by pressing the INFO button during normal playback or Index playback DCF Folder and file number FOLDER Folder name pg 34 FILE File name pg 34 DATE Date the file was made SIZE Image size pg 14 QUALITY Picture quality pg 14 PROTECT When set to ON the file is protecte...

Page 30: ...OTECT Screen appears If you selected CURRENT in step 4 press 2 or 3 to select the desired file 6Rotate the MENU BRIGHT wheel to select EXECUTE and press it To cancel protection select RETURN NOTES If the mark appears the currently displayed file is protected When the memory is initialized or corrupted even protected files are deleted If you do not want to lose important files transfer them to a PC...

Page 31: ...rs If you selected CURRENT in step 4 press 2 or 3 to select the desired file 6Rotate the MENU BRIGHT wheel to select EXECUTE and press it If the mark appears the selected file is protected and cannot be deleted pg 30 To cancel deletion select RETURN NOTES Protected files pg 30 cannot be deleted with the above operation To delete them remove protection first Once files are deleted they cannot be re...

Page 32: ...he VIDEO MEMORY switch to MEMORY then set the Power Switch to PLAY while pressing down the Lock Button located on the switch A stored image is displayed 2 Press the MENU BRIGHT wheel in The Menu Screen appears 3 Rotate the MENU BRIGHT wheel to select DPOF and press it The Sub Menu appears 4 Rotate the MENU BRIGHT wheel to select ALL 1 and press it Selection is complete The DPOF Screen appears 5 Ro...

Page 33: ... you did not change any settings in step 3 through 5 the Menu Screen reappears 7 Rotate the MENU BRIGHT wheel to select EXECUTE then press it to save the setting you have just made To cancel selection rotate the MENU BRIGHT wheel to select CANCEL and press it To Reset The No Of Prints select RESET in step 4 on pg 32 The number of prints is reset to 0 for all still images CAUTION While performing t...

Page 34: ...p 1 of Making A New Folder above 2 Press the MENU BRIGHT wheel in The Menu Screen appears Rotate the MENU BRIGHT wheel to select FORMAT and press it The FORMAT Screen appears 3 Rotate the MENU BRIGHT wheel to select EXECUTE and press it The memory card is initialized When initialization is finished NO IMAGES STORED appears To cancel initialization rotate the MENU BRIGHT wheel to select RETURN and ...

Page 35: ...48 49 DUBBING 50 52 Dubbing To Or From A VCR 50 Dubbing To Or From A Video Unit Equipped With A DV Connector 51 Dubbing Still Images Recorded On A Tape To A Memory Card 52 USING THE REMOTE CONTROL UNIT 53 64 Installing The Batteries Installing The Battery 53 Slow Motion Playback GR DVL820 only 56 Frame By Frame Playback GR DVL820 only 56 Playback Special Effects GR DVL820 only 56 Playback Zoom 57 ...

Page 36: ...n brighter than they would be under good natural lighting Although the recorded image is not grainy it may look as if it is strobing due to the slow shutter speed 1 Set the Power Switch to MANUAL while pressing down the Lock Button located on the switch 2 Press NIGHT so that the Night Alive indicator appears The shutter speed is automatically adjusted to provide up to 30 times sensitivity A appear...

Page 37: ...ages to be captured one frame at a time for vivid stable slow motion playback The faster the shutter speed the darker the picture becomes Use the shutter function under good lighting conditions SNOW Compensates for subjects that may otherwise appear too dark when shooting in extremely bright surroundings such as in the snow SPOTLIGHT Compensates for subjects that may otherwise appear too bright wh...

Page 38: ...ENU BRIGHT wheel in The Menu Screen appears 3 Rotate the MENU BRIGHT wheel to select WIPE FADER then press it 4 Rotate the MENU BRIGHT wheel to select the desired function then press it Selection is complete Press the MENU BRIGHT wheel in again The WIPE FADER Menu disappears and the effect is reserved The indicator representing the selected effect appears 5 Press the Recording Start Stop Button to...

Page 39: ...he corners gradually wiping out to the center Wipe in from right to left or wipe out from left to right Wipe in as the two halves of a black screen open to the left and right revealing the scene or wipe out and the black screen reappears from left and right to cover the scene The scene wipes in from the bottom to the top of a black screen or wipes out from top to bottom leaving a black screen Wipe...

Page 40: ... effect similar to serial photography Interval between still images approx 1 second NOTES To remove the shutter sound 墌 BEEP on pg 44 46 If Snapshot recording is not possible PHOTO blinks when SNAPSHOT is pressed If Program AE with special effects 墌 pg 36 is engaged certain modes of Program AE with special effects are disabled during Snapshot recording In such a case the icon blinks If SNAPSHOT is...

Page 41: ...lose to the lens zoom out first 墌 pg 18 If zoomed in in the auto focus mode the camcorder may automatically zoom out depending on the distance between the camcorder and the subject This will not occur when TELE MACRO 墌 pg 46 is activated FEATURE Manual Focus PURPOSE To obtain correct focus OPERATION 1 If you are using the viewfinder you should already have made the necessary viewfinder adjustments...

Page 42: ...ght spotlight 墌 pg 37 compensation and SNOW 墌 pg 37 Iris Lock Use this function in the following situations When shooting a moving subject When the distance to the subject changes so its size in the LCD monitor or the viewfinder changes such as when the subject is backing away When shooting on a reflective natural background such as at the beach or when skiing When shooting objects under a spotlig...

Page 43: ...Automatic White Balance select AUTO in step 4 Or set the Power Switch to AUTO NOTE White balance cannot be used when Sepia or Monotone 墌 pg 37 is activated Manual White Balance Operation Perform Manual White Balance when shooting under various types of lighting 1 Follow steps 1 through 4 of the white balance adjustment and select MWB 2 Hold a sheet of plain white paper in front of the subject Adju...

Page 44: ...ress it Selection is complete 6 Rotate the MENU BRIGHT wheel to select RETURN and press it twice The Menu Screen closes The icon represents END NOTE When the Menu Screen is left on for a couple of minutes a residual image may be left on the screen and it may take several seconds for the residual image to disappear This is not due to any defect of the unit USING MENUS FOR DETAILED ADJUSTMENT RE N E...

Page 45: ...u to use the Digital Zoom By digitally processing and magnifying images zooming is possible from 10X the optical zoom limit to a maximum of 700X digital magnification Refer to Snapshot For Tape Recording 墌 pg 40 Allows you to shoot dark scenes with no picture brightness adjustment The overall appearance may be grainy but the image is bright The shutter speed is automatically adjusted 1 30 1 200 se...

Page 46: ...nly when the VIDEO MEMORY Switch is set to VIDEO For playback on TVs with an aspect ratio of 16 9 Naturally expands the image to fit the screen without distortion appears When using this mode refer to your wide screen TV s instruction manual During playback recording on 4 3 TVs LCD monitor viewfinder the image is elongated vertically The SQUEEZE mode is effective only when the VIDEO MEMORY Switch ...

Page 47: ...he demonstration cannot be turned on DEMO MODE remains ON even if the camcorder power is turned off If DEMO MODE remains ON some functions will not be available After viewing demo set to OFF The Side LED indicator 墌 p 80 81 lights on the camcorder when the Power Switch is set to AUTO or MANUAL Does not reset all settings to the factory preset Resets all settings to the factory preset Keeps the cam...

Page 48: ... turned on off by pressing DISPLAY on the remote control provided with GR DVL820 only REC MODE can be set when the Power Switch is set to PLAY or MANUAL 墌 pg 13 45 When S AV INPUT is set to ON camcorder playback cannot be viewed on the AV output Menu Screen Explanations 墌 pg 49 墌 pg 49 墌 pg 62 Allows you to set the tape recording mode SP or LP depending on your preference 墌 pg 13 It is recommended...

Page 49: ... 16 bit is called 48 kHz The camcorder cannot detect the sound mode in which the recording was made during fast forward or rewind During playback the sound mode is displayed in the upper left corner SOUND MODE 12BIT MODE Factory preset STEREO SOUND L SOUND R MIX SOUND 1 SOUND 2 Sound is output on both L and R channels in stereo Sound from the L channel is output in stereo Sound from the R channel ...

Page 50: ...E CODE to ON or OFF in the Menu Screen 墌 pg 48 Playback Sound Mode Tape Speed And Tape Running Displays set ON SCREEN to LCD or LCD TV in the Menu Screen 墌 pg 48 The S Video cable is optional Be sure to use the YTU94146A S Video cable Consult the JVC Service Center described on the sheet included in the package for details on its availability Make sure to connect the end with a core filter to the ...

Page 51: ...ayer during dubbing the dubbing may stop so that an unusual image is not dubbed Even though the DV cable is connected correctly sometimes the image may not appear in step 4 If this occurs turn off the power and make connections again If Playback Zoom 墌 pg 57 Playback Special Effects GR DVL820 only 墌 pg 56 or Snapshot is attempted during playback only the original playback image recorded on the tap...

Page 52: ...bbed start playback by pressing 4 6 At the moment you find the image you wish to dub press it again to engage Still Playback 7 To start dubbing press SNAPSHOT The selected image is stored on the memory card blinks during dubbing NOTES If SNAPSHOT is pressed in step 7 when a memory card is not loaded the message COPYING FAILED is displayed If an image recorded on the tape using the WIDE mode 墌 pg 4...

Page 53: ...r Installing The Battery RM V700U optional The remote control uses one lithium battery CR2025 1There are 2 ways to pull the battery holder out of the RM V700U Pull out the battery holder while sliding the lock hole Pinch the release tab and pull out the battery holder 2 Insert the battery in the holder and be sure to have the mark visible 3 Slide the holder back in until you hear a click Read the ...

Page 54: ...its the beam signal Zoom in out 墌 pg 18 Functions the same as the Recording Start Stop Button on the camcorder Functions the same as SNAPSHOT on the camcorder With the camcorder s Power Switch set to PLAY Zoom in out 墌 pg 57 墌 pg 23 50 59 墌 pg 57 58 墌 pg 56 墌 pg 57 Rewind Reverse Shuttle Search on the tape 墌 pg 21 Displays previous page file on the memory card 墌 pg 28 墌 pg 60 墌 pg 56 墌 pg 56 墌 pg ...

Page 55: ... Recording Start Stop Button on the camcorder With the camcorder s Power Switch set to PLAY Zoom in out 墌 pg 57 Starts Playback of the tape 墌 pg 21 Starts Auto Playback of the memory card 墌 pg 28 Rewind Reverse Shuttle Search on the tape 墌 pg 21 Displays previous page file on the memory card 墌 pg 28 Stops the tape 墌 pg 21 Stops Auto Playback 墌 pg 28 墌 pg 64 Forward Forward Shuttle Search on the ta...

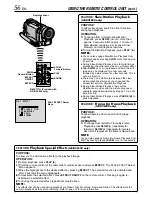
Page 56: ...DVL820 only PURPOSE To allow frame by frame search during tape playback OPERATION 1 To change from normal to Frame By Frame Playback press SLOW 0 repeatedly for forward or SLOW 9 repeatedly for reverse Each time it is pressed the frame is played back NOTE You can also engage Frame By Frame Playback from Still Playback by pressing SLOW 9 or 0 repeatedly FEATURE Playback Special Effects GR DVL820 on...

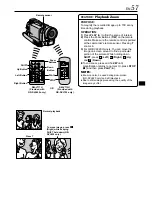
Page 57: ...ion of the picture While holding down SHIFT press Left Right Up and Down 䡲 To end zoom press and hold W until magnification returns to normal Or press STOP 5 and then press PLAY 4 NOTES Zoom can also be used during slow motion GR DVL820 only and still playback Due to ditital image processing the quality of the image may suffer Remote sensor Down Button Press T Normal playback To move image press R...

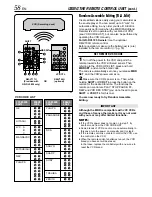
Page 58: ...not need to press SHIFT or VCR CTL for this one You are now ready to try Random Assemble Editing IMPORTANT Although the MBR is compatible with JVC VCRs and those of many other makers it may not work with yours or may offer limited functions NOTES If the VCR s power does not come on in step 1 try another code from the VCR CODE LIST Some brands of VCR do not come on automatically In this case turn t...

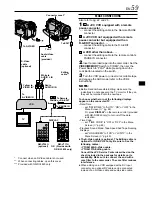
Page 59: ... the remote control provided with GR DVL820 only to turn on off the date indication Time Code set TIME CODE to ON or OFF in the Menu Screen 墌 pg 48 Playback Sound Mode Tape Speed And Tape Running Displays set ON SCREEN to LCD or LCD TV in the Menu Screen 墌 pg 48 The S Video cable is optional The Editing cable is optional for GR DVL725 only Be sure to use the following cables YTU94146A S Video cabl...

Page 60: ... at a time from the most recently registered point For GR DVL820 Owners If you are not using Fade Wipe or Program AE with special effects repeat steps 6 and 7 only NOTES When choosing a scene set Edit In and Edit Out points so that there is a relatively large difference between them If the search time for an in point exceeds 5 minutes the recording deck s Record Standby mode will be canceled and e...

Page 61: ...ting will stop 14Engage the Stop modes for the camcorder and the VCR To make the R A Edit counter display disappear press R A EDIT ON OFF or ON OFF on the remote control NOTES Pressing R A EDIT ON OFF or ON OFF on the remote control clears all settings registered during Random Assemble Editing When the editing cable is connected to the remote control s Pause In connector during dubbing make sure t...

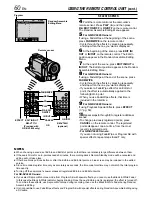
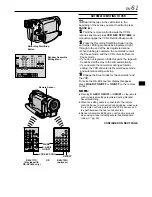
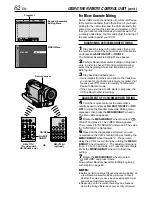
Page 62: ... at the camcorder s remote sensor and press R A EDIT ON OFF or ON OFF to make the Random Assemble Editing menu disappear then press the MENU BRIGHT wheel in The Menu Screen appears 5 Rotate the MENU BRIGHT wheel to select VIDEO and press it The VIDEO Menu appears Then rotate it to SYNCHRO and press it The value for SYNCHRO is highlighted 6 Based on the diagnostics performed you can now advance the...

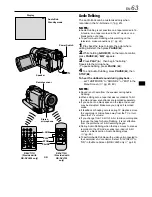
Page 63: ...n editing onto a tape that was recorded at 12 bit the old and new soundtracks are recorded separately If you dub onto a blank space on the tape the sound may be disrupted Make sure you only edit recorded areas If feedback or howling occurs during TV playback move the camcorder s microphone away from the TV or turn down the TV s volume If you change from 12 bit to 16 bit in mid recording and then u...

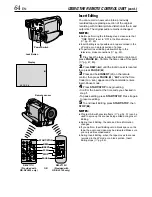
Page 64: ...s PAUSE 6 6w and the Time Code min sec appear and the camcorder enters Insert Pause mode 4 Press START STOP to begin editing Confirm the insert at the time code you checked in step 1 To pause editing press START STOP Press it again to resume editing 5 To end Insert Editing press START STOP then STOP 5 NOTES Program AE with special effects 墌 pg 36 37 can be used to spice up the scenes being edited ...

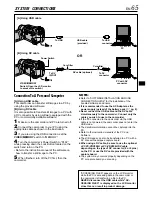
Page 65: ...till images to a PC by using the provided software B Using DV cable It is also possible to transfer still images to a PC with a DV connector by using software equipped with the PC or commercially available software 1 Make sure the camcorder and PC are turned off 2 Connect the camcorder to your PC using the appropriate cable as shown in the illustration 3 If you are using the USB connection set the...

Page 66: ...FERENCES CONTENTS DETAILS 67 TROUBLESHOOTING 68 73 USER MAINTENANCE 74 CAUTIONS 75 77 SPECIFICATIONS 78 79 INDEX 80 86 Controls Connectors And Indicators 80 81 Indications 82 86 TERMS 87 Back Cover REFERENCES ...

Page 67: ...rder When you use the LCD monitor outdoors in direct sunlight the LCD monitor may be difficult to see If this happens use the viewfinder instead The cassette holder cannot be opened unless a power supply is attached There may be a delay after you open the cassette holder cover until the cassette holder opens Do not use force Once the cassette holder is closed it recedes automatically Wait until it...

Page 68: ...pen For Memory Card Recording The VIDEO MEMORY Switch is set to VIDEO The camcorder is not getting power or some other malfunction exists Focus is set to the Manual mode The recording was done in a dark place or the contrast was low The lens is dirty or covered with condensation Connect the AC Adapter securely 墌 pg 9 Replace the dead battery with a fully charged one 墌 pg 8 9 Set the date time 墌 pg...

Page 69: ...the Squeeze mode 墌 pg 46 Find a white subject and compose your shot so that it also appears in the frame 墌 pg 26 40 Turn off Sepia and Monotone 墌 pg 36 37 Press the BACKLIGHT Button 墌 pg 42 Set PROGRAM AE to SPOTLIGHT in the Menu Screen 墌 pg 36 Set ZOOM to 40X or 700X in the Menu Screen 墌 pg 45 Set the VIDEO MEMORY Switch to VIDEO 墌 pg 17 18 Turn off Sepia and Monotone 墌 pg 36 37 If you want the l...

Page 70: ...t to OFF in the Menu Screen Files stored on the memory card are protected TIME CODE is set to OFF in the Menu Screen In places subject to low tempera ture images become dark due to the characteristics of the LCD monitor When this happens the displayed colors differ from those that are actually recorded This is not a defect of the camcorder When the LCD monitor s fluores cent light reaches the end ...

Page 71: ...The Power Switch is set to AUTO or MANUAL The Power Switch is set to AUTO or MANUAL The VIDEO MEMORY Switch is set to VIDEO Close the LCD monitor to turn it off or set the Power Switch to OFF and let the unit cool down Re read the sections covering Fade Wipe effects Program AE with special effects and DIS 墌 pg 36 39 45 Set the Power Switch to PLAY 墌 pg 21 Set the Power Switch to PLAY 墌 pg 28 Set t...

Page 72: ...t explains LCD monitor viewfinder indications 墌 pg 82 86 Remove the power supply battery pack etc and wait a few minutes for the indication to clear When it does you can resume using the camcorder If the indication remains even though you repeat the above two or three times please consult your nearest JVC dealer Do not eject the cassette This will cause damage to the tape SYMPTOM POSSIBLE CAUSES C...

Page 73: ...e times please consult your nearest JVC dealer To protect the battery it is recommended to charge it in places with a temperature of 10 C to 35 C 50 F to 95 F 墌 pg 75 By recording with DIS activated 墌 pg 45 this can be avoided Turn the camcorder s power off and on again then operate it Push in the memory card a few more times 墌 pg 14 SYMPTOM POSSIBLE CAUSES CORRECTIVE ACTION Y An error indication ...

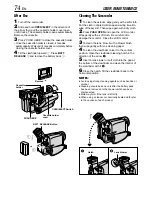
Page 74: ...ntal position NOTES Avoid using strong cleaning agents such as benzine or alcohol Cleaning should be done only after the battery pack has been removed or other power units have been disconnected Mold may form if the lens is left dirty When using a cleaner or chemically treated cloth refer to the cautions of each product After Use 1 Turn off the camcorder 2 Slide and hold OPEN EJECT in the directio...

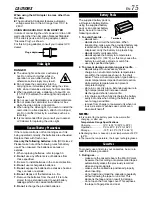
Page 75: ... carry the battery in a plastic bag do not modify or disassemble do not expose the battery to temperatures exceeding 60 C 140 F as this may cause the battery to overheat explode or catch fire use only specified chargers 2 To prevent damage and prolong service life do not subject to unnecessary shock charge in an environment where temperatures are within the tolerances shown in the chart below This...

Page 76: ... leave the battery pack attached when the camcorder is not in use 2 Avoid using the unit in places subject to excessive humidity or dust in places subject to soot or steam such as near a cooking stove in places subject to excessive shock or vibration near a television set near appliances generating strong magnetic or electric fields speakers broadcasting antennas etc in places subject to extremely...

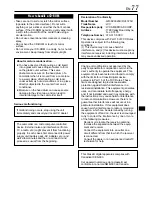
Page 77: ...rcuit different from that to which the receiver is connected Consult the dealer or an experienced radio TV technician for help Serious malfunctioning If malfunctioning occurs stop using the unit immediately and consult your local JVC dealer The camcorder is a microcomputer controlled device External noise and interference from a TV a radio etc might prevent it from functioning properly In such cas...

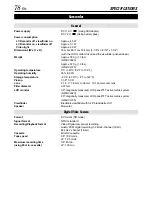
Page 78: ... 80 Storage temperature 20 C to 50 C 4 F to 122 F Pickup 1 3 8 CCD Lens F 1 8 f 3 8 mm to 38 mm 10 1 power zoom lens Filter diameter ø37 mm LCD monitor 3 5 diagonally measured LCD panel TFT active matrix system GR DVL820 2 5 diagonally measured LCD panel TFT active matrix system GR DVL725 Viewfinder Electronic viewfinder with 0 24 black white LCD Speaker Monaural Digital Video Camera Format DV for...

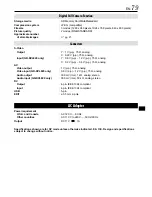
Page 79: ...Ω analog C 0 2 V p p 0 4 V p p 75 Ω analog AV Video output 1 V p p 75 Ω analog Video input GR DVL820 only 0 8 V p p 1 2 V p p 75 Ω analog Audio output 300 mV rms 1 kΩ analog stereo Audio input GR DVL820 only 300 mV rms 50 kΩ analog stereo DV Output 4 pin IEEE 1394 compliant Input 4 pin IEEE 1394 compliant USB 5 pin EDIT ø3 5 mm 2 pole AC Adapter Power requirement U S A and Canada AC 120 V 60 Hz Ot...

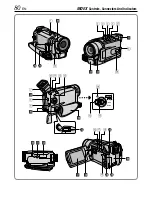
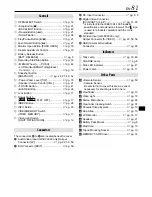
Page 80: ...80EN INDEX Controls Connectors And Indicators MANUAL AUTO PLAY OFF 6 W U E y 7 8 9 T R Q O 3 2 4 5 0 o a s P p I Y e t r q 1 u w i ...

Page 81: ...d beneath a cover Audio Video Input GR DVL820 only Output Connector AV 墌 pg 22 50 59 q Edit Connector EDIT 墌 pg 59 w DC Input Connector 墌 pg 8 9 e Digital Video Connector DV IN OUT i Link 墌 pg 51 65 i Link refers to the IEEE1394 1995 industry specification and extensions thereof The logo is used for products compliant with the i Link standard r S Video Input GR DVL820 only Output Connector S VIDEO...

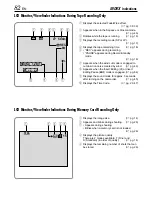
Page 82: ...the Insert Editing w or Insert Editing Pause 6w mode is engaged 墌 pg 64 9 Displays the sound mode for approx 5 seconds after turning on the camcorder 墌 pg 45 0 Displays the Time Code 墌 pg 20 47 LCD Monitor Viewfinder Indications During Memory Card Recording Only 1 Displays the image size 墌 pg 14 2 Appears and blinks during shooting 墌 pg 26 3 Appears during shooting Blinks when a memory card is not...

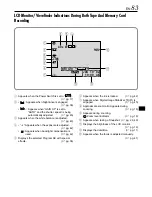
Page 83: ...ance is adjusted 墌 pg 43 4 ⴣ Appears when the exposure is adjusted 墌 pg 42 Appears when backlight compensation is used 墌 pg 42 5 Displays the selected Program AE with special effects 墌 pg 36 6 Appears when the iris is locked 墌 pg 42 7 Appears when Digital Image Stabilizer DIS is engaged 墌 pg 45 8 Approximate zoom ratio Appears during zooming 墌 pg 18 9 Appears during zooming Zoom level indicator 墌 ...

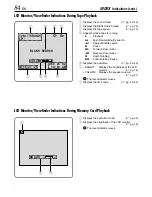
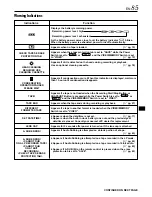
Page 84: ...ng 6e Audio Dubbing Pause 5 Displays the date time 墌 pg 48 49 6 BRIGHT Displays the brightness of the LCD monitor 墌 pg 16 VOLUME Displays the speaker volume 墌 pg 21 The level indicator moves 7 Displays the time code 墌 pg 48 49 6w 12 1 2 0 5 0 0 0 1 2 B I SOUND BLANK SEARCH VOLUME T DE 116 21 25 C M A P S 64 L 5 1 3 2 4 7 6 INDEX Indications cont 1 Displays the operation mode 墌 pg 29 2 Displays the...

Page 85: ...tape ends during recording or playback 墌 pg 67 Appears if a tape in another format is loaded when the VIDEO MEMORY Switch is set to VIDEO Appears when the date time is not set 墌 pg 11 Appears when the built in clock battery runs out and the previously set date time is erased Consult your nearest JVC dealer for replacement Appears for 5 seconds after power is turned on if the lens cap is attached A...

Page 86: ...indication appears If the indication still appears the memory card is corrupted Appears if a file in another format is selected Appears when you attempt to record on a copy protected SD Memory Card Appears when you attempt Memory Card menu operation with a copy protected SD Memory Card loaded The error indications E01 E02 or E06 show what type of malfunction has occured When an error indication ap...

Page 87: ...g 16 Recording Mode 墌 pg 13 Remote Control 墌 pg 53 Reset 墌 pg 47 Rewind The Tape 墌 pg 21 A AC Adapter 墌 pg 8 9 Analog Input 墌 pg 48 50 Audio Dubbing 墌 pg 63 Auto Date 墌 pg 47 Auto Focus 墌 pg 41 Auto Playback 墌 pg 28 Auto Shut off 墌 pg 16 21 27 B Backlight Compensation 墌 pg 42 Battery Low 墌 pg 85 Battery Pack 墌 pg 8 9 75 Beep 墌 pg 46 Blank Search 墌 pg 24 Brighten The LCD Monitor 墌 pg 16 C Channels ...

Page 88: ... 墌 pg 26 40 Snapshot Mode 墌 pg 40 Snow 墌 pg 37 Sound Mode 墌 pg 45 48 49 Speaker Volume 墌 pg 21 Specifications 墌 pg 78 79 Sports 墌 pg 37 Spotlight 墌 pg 37 Squeeze 墌 pg 46 Still Playback 墌 pg 21 Strobe 墌 pg 37 T Tally 墌 pg 46 Tele Macro 墌 pg 46 Time Code 墌 pg 20 47 49 Tripod Mounting 墌 pg 10 Twilight 墌 pg 37 U Unload A Tape 墌 pg 12 V VIDEO MEMORY Switch Position 墌 pg 17 Video Light 墌 pg 19 W White B...

Reviews: