17
Connections
Ho
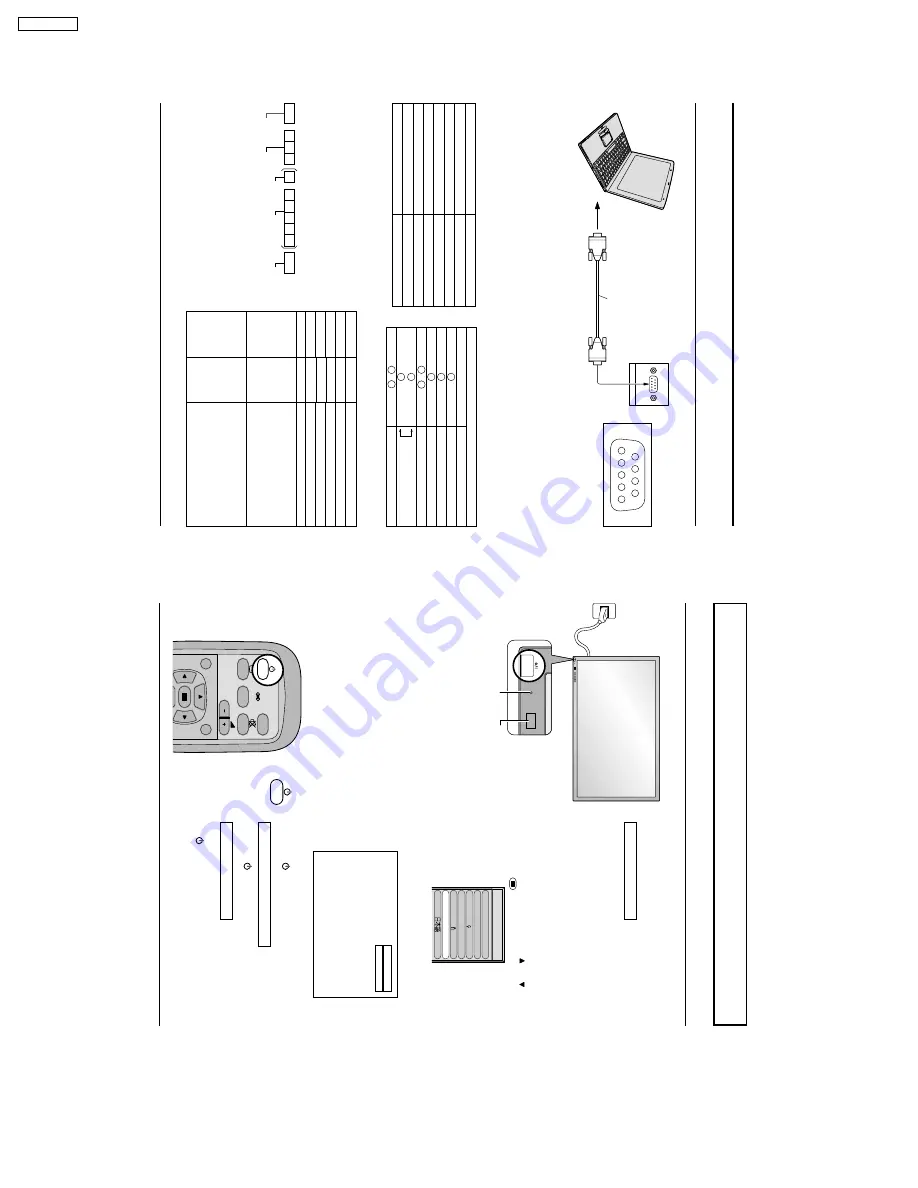
w to connect the SERIAL
T
erminals
SERIAL
RS-232C cable
D-sub 9p
COMPUTER
The SERIAL ter
minal is used when the Plasma Displa
y Monitor is controlled b
y
a computer
.
9
8
7
6
5
3
2
14
Pin layout for RS-232C
Communication parameters
Notes:
(1) Use the RS-232C cab
le to connect the computer to the Plasma Displa
y Monitor
.
(2)
The computers sho
wn is f
o
r e
xample pur
poses only
.
(3) Additional equipment and cab
les sho
wn are not supplied with this set.
The SERIAL terminal conforms to the RS-232C interface specification, so that the Plasma Display Monitor can be controlled
by a computer which is connected to this terminal.
The computer will require software which allows the sending and receiving of control data which satisfies the conditions
giv
en below
. Use a computer application such as a progr
amming language to softw
are
. Ref
er to the documentation f
or the
computer application for details.
Command
Command
PON
POF
AUU
AUD
AMT
IIS
DAM
Control details
Power ON
Power OFF
V
olume increase
V
olume decrease
Mute (toggle)
Input select (toggle)
A
V
Mode
Component / RGB mode (processed as a
Y/P
B
/P
R
or RGB signals as set by this unit)
PC mode
Screen mode select (toggle)
NORMAL (4:3)
ZOOM
FULL
JUST
AU
T
O
Parameter
None
None
None
None
None
None
VID
YP1
RG1
None
NORM
ZOOM
FULL
JUST
SELF
Basic format for control data
The tr
ansmission of control data from the computer star
ts
with a STX signal, f
ollow
ed b
y
the command, the
par
ameters
, and lastly an ETX signal in that order
. If there
are no par
ameters
, then the par
ameter signal does not need
to be sent.
Note:
(1) If m
ultiple commands are tr
ansmitted, be sure to wait
for the response f
or the first command to come from
this unit bef
ore sending the ne
xt command.
(2) If an incorrect command is sent b
y
mistak
e
, this unit will
send an
“ER401
” command bac
k to the computer
.
STX
Start
(02h)
ETX
:
C2
C1
C3
P2
P1
P3
P4
P5
Colon
Parameter(s)
(1 - 5 bytes)
End
(03h)
3-character
command (3bytes)
RS-232C Pin assignment
Pin number
2
3
5
4
• 6
7
8
1
• 9
Signal
R X D
T X D
GND
NC
Shor
ted
NC
Signal level
Synchronization method
Baud rate
Parity
Character length
Stop bit
X parameter
S parameter
RS-232C compliant
Asynchronous
9600 bps
None
8 bits
1 bit
None
None
18
Power ON/OFF
Connecting the plug to the
W
all Outlet
Push the POWER switch on the Plasma Display Monitor
to turn the set on POWER-ON
Power Indicator: Green
Example:
The screen belo
w is displa
y
ed f
or a while after
the Plasma Display Monitor is turned on.
(setting condition is an example.)
When the POWER is turned on for the first time, the
LANGUAGE selection screen is displayed.
From the second time on, language selection can be
done from the setup menu. (see page 21)
Select the desired language using the
and
keys and
press the store
button.
From the second time on, the screen shown below is
displayed for a while (setting condition is an example).
Press the
button on the remote control to turn the
Plasma Displa
y Monitor off
P
o
w
er Indicator
: Red (standb
y)
Press the
button on the remote control to turn the
Plasma Display Monitor on
P
o
w
er Indicator
: Green
T
o
tur
n the po
w
er f
or the Plasma
Displa
y
Monitor off
, press
the
s
witch on the
Plasma
Displa
y
Monitor
, when the
Plasma
Display
Monitor is on or in standby mode.
VIDEO
NORMAL
Remote Control Sensor
INPUT
SURROUND
VOL
NR
OSD LANGUAGE
En
g
lish
(UK
)
Deutsch
Fran ais
Italiano
Es
p
a ol
ENGLISH
(US
)
R - ST
ANDBY
G PO
WER ON
INPUT
–
VO
L
+
R - ST
ANDBY
G PO
WER ON
Power Indicator
Power ON/OFF and Input Signal Selection
12
GD-V500PZU


