background image

11

ENGLISH

4

  Finish the procedure.


 indicator lights up.


Reception improves, but stereo effect will 
be lost.

To restore the stereo effect,

 repeat the same 

procedure and select “Off” in step 

3

.

 indicator goes off.

 To tune in FM stations only with 

strong signals—LO/DX (Local/
Distance-extreme)

If received signals are weak, you may only 
hear noises. You can make this unit detect only 
stations with sufficient signal strength while 
searching for FM stations.

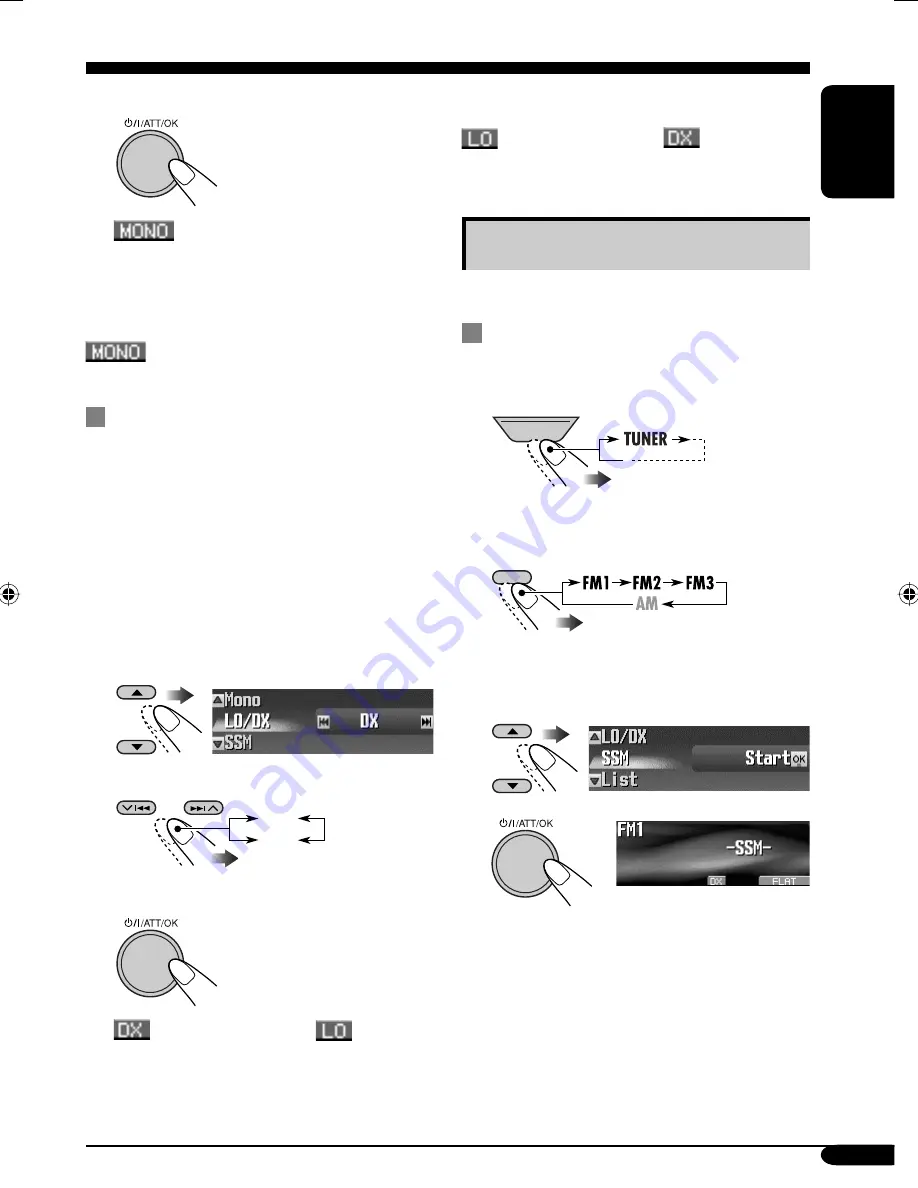
1

  Enter the MODE menu (see page 5).

2

  Select “LO/DX.”

3

  Select “Local.”

4

  Finish the procedure.

 indicator goes off and 

 indicator 

lights up.
Only stations with sufficient signal strength 
will be detected.

DX

Local

To tune in to all receivable stations,

 repeat the 

same procedure and select “DX” in step 

3

.

 indicator goes off and 

 indicator 

lights up.

Storing stations in memory

You can preset six stations for each band.

 FM station automatic presetting —

SSM (Strong-station Sequential 
Memory)


1

Select the FM band (FM1 – FM3) 
you want to store into.

3

  Enter the MODE menu (see page 5).

4

  Select “SSM.”

5


Local FM stations with the strongest signals are 
searched and stored automatically in the FM 
band.

SOURCE

BACK

BAND

To be continued....

EN08-12_KD-SHX855[U]f.indd   11

EN08-12_KD-SHX855[U]f.indd   11

05.4.8   8:56:53 PM

05.4.8   8:56:53 PM

Summary of Contents for EXAD KD-SHX855

Page 1: ... RECEIVER KD SHX855 KD SHX855 For canceling the display demonstration see page 9 For installation and connections refer to the separate manual INSTRUCTIONS LVT1373 001A U UH MENU KD SHX855 PICT SOURCE DISP BACK BAND ...

Page 2: ...or flower otherwise it will cause a malfunction Do not expose discs to direct sunlight or any heat source or place them in a place subject to high temperature and humidity Do not leave them in a car Thank you for purchasing a JVC product Please read all instructions carefully before operation to ensure your complete understanding and to obtain the best possible performance from the unit IMPORTANT ...

Page 3: ...ing your own sound modes 26 Adjusting Parametric EQ 27 Sound adjustments Preference settings 28 Setting the basic sound selection menu SEL 29 Graphic displays 32 Basic procedure 32 Downloading the files 33 Deleting the files 34 Activating the downloaded files 36 General settings PSM 37 Basic procedure 37 Selecting the dimmer mode 40 Other main functions 41 Assigning titles to the sources 41 Changi...

Page 4: ...uttons at the same time The following marks are used to indicate Built in CD player operations External CD changer operations SD card operations How to forcibly eject a disc If a disc cannot be recognized by the receiver or cannot be ejected eject the disc as follows If an SD card is inserted eject the SD card first see page 15 1 2 If this does not work reset your receiver Be careful not to drop t...

Page 5: ...erate as instructed on the screen How to change the display pattern Ex When tuner is selected as the source Source operation screen Small CD jacket image graphic 1 is displayed Large full screen size graphic 1 is shown as the display background Graphic screen 1 Audio level meters are displayed see LevelMeter on page 37 Goes back to the initial display pattern 1 You can use your edited file for gra...

Page 6: ...erses the track if pressed and held For menu operations Selects the menu items values 7 Remote sensor DO NOT expose the remote sensor on the control panel to strong light direct sunlight or artificial lighting 8 Color display window 9 BAND BACK button For FM AM Selects the band For menu operations Goes back to the previous screen p PICT picture button Displays the PICT menu q MENU button Displays ...

Page 7: ... insulate when throwing away or saving it Caution Main elements and features 1 standby on attenuator button Turns on and off the power and also attenuates the sound 2 SOURCE button Selects the source 3 5 up down buttons For FM AM Changes the preset stations For MP3 WMA discs or an SD card Changes the folders 4 VOL volume buttons Adjusts the volume level 5 Number buttons For FM AM Selects the prese...

Page 8: ...urn on the power Ÿ You cannot select some sources if they are not ready For FM AM tuner Adjust the volume Adjust the sound as you want See pages 21 31 To drop the volume in a moment ATT To restore the sound press it again To turn off the power Getting started Basic operations BACK BAND SOURCE BACK BAND SOURCE ...

Page 9: ...H then select 24H or 12H 3 Finish the procedure Canceling the display demonstration If no operations are done for about 45 seconds display demonstration starts Initial Demo see page 37 1 Enter the PSM menu see page 5 2 Select Off Make sure Demo Link is shown on the display If not press 5 or 3 Finish the procedure To activate the display demonstration In step 2 above select Demo For more details se...

Page 10: ...ations Ÿ 1 To assign names to the stations see page 41 2 LO or DX indicator See page 11 3 STEREO or MONO indicator STEREO indicator lights up when receiving an FM stereo broadcast with sufficient signal strength For MONO see the following section Start searching for a station Listening to the radio SOURCE BACK BAND SOURCE BACK BAND On Off Current band Preset number if any Station frequency Activat...

Page 11: ...e 5 2 Select LO DX 3 Select Local 4 Finish the procedure indicator goes off and indicator lights up Only stations with sufficient signal strength will be detected DX Local To tune in to all receivable stations repeat the same procedure and select DX in step 3 indicator goes off and indicator lights up Storing stations in memory You can preset six stations for each band FM station automatic presett...

Page 12: ...elect List 6 7 Select a preset number You can move to the lists of the other FM bands by pressing 4 BACK BAND SOURCE BACK BAND SOURCE 8 Store the station When using the remote controller After tuning in to a station you want to preset Listening to a preset station 1 2 3 Perform steps 4 to 7 on left column to enter the Preset Station List 4 When using the remote controller To directly select the pr...

Page 13: ...indicator and the track title with indicator will appear if Tag is set to On see page 38 3 Appears only for CD Texts and CDs if it has been recorded or assigned No Name appears if no name is recorded or assigned to an audio CD 4 Appears only for CD Texts No Name appears if no name is recorded To stop play and eject the disc To return the control panel to its previous position press it again Disc S...

Page 14: ...angers except CH X99 and CH X100 However they are not compatible with MP3 discs so you cannot play back MP3 discs You cannot use the KD MK series CD changers with this receiver Disc text information recorded in the CD Text can be displayed when a JVC CD Text compatible CD changer is connected You cannot control and play any WMA disc in the CD changer All tracks of the inserted discs in the magazin...

Page 15: ...ages 37 and 47 for details The required SD recording format is FAT 12 16 and the recommended storage type is 8 MB to 512 MB You cannot use MMC or mini SD with this receiver Before detaching the control panel turn off the power Detach the control panel Ÿ Press in the SD card until you hear a clicking sound To eject the SD card press the SD card again Press the SD card softly do not release your fin...

Page 16: ...e recorded If an SD card has been loaded 1 2 The album name performer with indicator and the track title with indicator will appear if Tag is set to On see page 38 Track name Current track number Current folder number Elapsed playing time Folder name Track name Current track number Folder name Current folder number Elapsed playing time SOURCE ...

Page 17: ...s Holding the buttons can display the Disc List and Folder List see the following section Other main functions Selecting a disc folder track on the list This function is not available for an audio CD or a CD Text when the source is CD 1 Enter the MODE menu see page 5 2 Select List 3 Select the list type Disc 1 Folder 2 or File 2 1 Selectable only when the source is CD CH 2 Appears only for MP3 WMA...

Page 18: ...ers are assigned with 2 digit number at the beginning of their folder names 01 02 03 and so on To start playback Only for MP3 If you select the current disc highlighted on the screen its Folder List appears 2 When Folder is selected Folder List appears You can move to the other lists by pressing 4 To select a folder To start playback If you select the current folder highlighted on the screen its F...

Page 19: ...ndom 3 Select your desired playback modes For details see table on page 20 4 Finish the procedure Prohibiting disc ejection You can lock a disc in the loading slot 1 2 After making sure No Eject is selected highlighted No Eject flashes and the disc cannot be ejected To cancel the prohibition Repeat the same procedure press in step 2 after making sure that Eject OK is selected highlighted Eject OK ...

Page 20: ...eatedly Track The current track While playing lights up Folder 1 All tracks of the current folder While playing lights up Disc 2 All tracks of the current disc While playing lights up Off Cancels Random play Ex When Disc is selected while playing an MP3 disc in the receiver Mode Plays at random Folder 1 All tracks of the current folder then tracks of the next folder and so on While playing lights ...

Page 21: ...t Defeat in step Ÿ MENU DISP You can create a more acoustic sound field such as in a theater hall etc When crossover network see page 28 is activated the DSP mode is fixed to Defeat Available DSP modes Defeat No acoustic effect is applied Theater Hall Club Dome Studio V Cancel Voice Cancel Reduces the vocal sounds Good for mastering your favorite songs Karaoke Enter the DSP menu see page 5 Ÿ Selec...

Page 22: ...r the front right seat L Front For the front left seat 4 Select the speaker to be adjusted L Front For left front speaker R Front For right front speaker L Rear For left rear speaker R Rear For right rear speaker Subwoofer For subwoofer Appears only when 4ch is selected in step 2 5 Select distance between the selected speaker and the seat You can change the measuring unit to inch by holding DISP E...

Page 23: ...en a speaker reproduces sound it introduces frequency dependent phase shifting causing high frequency sounds to take longer to reach the ear than low frequency sounds BBE Digital adjusts the phase relationship between the low mid and high frequencies by adding a progressively longer delay time to the low and mid frequencies so that all frequencies reach the listener s ears at the proper time 1 Ent...

Page 24: ...bandwidth and center frequencies at three bands You can make more precise settings than using Graphic EQ Adjust the equalizer to match the reproducible frequency range of the connected speakers otherwise the adjustments may not be effective You cannot activate both Graphic EQ and Parametric EQ at the same time Enter the EQ menu see page 5 Ÿ Select Graphic or Parametric To select preset sound modes...

Page 25: ...SP The list below shows the preset frequency level settings for each sound mode Sound Preset equalizing values Mode 63 Hz 125 Hz 250 Hz 500 Hz 1 kHz 2 kHz 4 kHz 8 kHz 12 5 kHz Flat 00 00 00 00 00 00 00 00 00 Hard Rock 06 06 04 02 00 00 02 04 02 R B 06 04 04 04 00 02 02 02 06 Pop 00 04 02 00 00 02 02 02 04 Jazz 06 04 02 02 02 02 02 06 04 Dance 08 04 02 00 04 02 00 02 02 Country 04 02 00 00 00 00 00...

Page 26: ...cted 3 4 Select the frequency band 63 Hz 125 Hz 250 Hz 500 Hz 1 kHz 2 kHz 4 kHz 8 kHz 12 5 kHz 5 Adjust the enhanced level for the selected frequency band within the range of 10 to 10 6 Repeat steps 4 and 5 to adjust the other frequency bands 7 8 Select one of the user modes User 1 2 3 9 Store the adjustments Ex When User 1 is selected ...

Page 27: ... 10 4 5 Select the frequency adjustable between 20 Hz 20 kHz Band 1 2 3 are required to be preset at least 5 steps frequencies away from each other Only selectable frequencies are shown on the display Ex When 1 kHz is selected for Band2 6 Select the band width Q 0 7 1 2 3 4 5 To adjust the other bands press BACK Then repeat steps 2 to 6 7 Finish the procedure Once you have made adjustments it is m...

Page 28: ...ollowing procedure you cannot perform other operations While the power is turned off 1 2 To cancel the procedure press and hold The power turns off 3 Finish the procedure indicator lights up in sequence with other indicators To cancel Crossover Repeat the same procedure Make sure that Crossover Off appears on the display in step 1 and Crossover Off OK in step 2 indicator goes off Adjustable items ...

Page 29: ... Ÿ Select a setting item Fad Bal Crossover Subwoofer or VolAdjust Ex When Fad Bal is selected Appears only when crossover network is activated see page 28 When selecting Fad Bal Crossover or Subwoofer press to enter the its submenu Adjust the selected setting item To adjust other SEL settings press BACK Then repeat steps Ÿ and Finish the procedure ...

Page 30: ...wider To adjust fader and balance Fad Bal Adjust the fader speaker output balance between the front and rear speakers When crossover network is activated speaker output balance between high range and mid range speakers is adjusted F12 Upmost front only R12 Downmost rear only Adjust the balance speaker output balance between the left and right speakers L12 Leftmost left only R12 Rightmost right onl...

Page 31: ... the slope Adjust the slope continuity of sound among speakers 18 12 6 dB As the number becomes higher the reproduced band width shared among speakers becomes wider To adjust the input level of each source VolAdjust This setting is required for each source except FM Before making an adjustment select an appropriate source for which you want to make an adjustment Once you have made an adjustment it...

Page 32: ...rting the following procedure prepare a CD R or an SD card including still images pictures and animations movies With Image Converter Color Ver 2 0 included in the supplied CD ROM you can create your own images and animations Samples are included in the CD ROM You can store two sizes of picture and animation Large and Small as the graphic display see page 5 Insert a CD R an SD card or the supplied...

Page 33: ...e the following Do not download a file while driving Do not turn off the ignition key of the car while downloading or deleting a file Do not detach the control panel while downloading or deleting a file If you do so the file download or deletion will not be done correctly Downloading the files Picture Graphic screen To download delete still images 16 still images each for large size and for small ...

Page 34: ...sh the procedure Deleting the files Deleting the stored pictures and animations 1 Follow steps to on page 32 In step select the picture size Then in step select Delete 2 Select the file type either Picture or Movie Ex When Picture is selected 3 To delete the stored pictures 1 2 Select Delete The File List appears 3 Select a file You can move the other lists by pressing 4 4 When a file is deleted t...

Page 35: ...ected for the picture size 3 When all files are deleted the PICT menu appears again 4 Finish the procedure To delete the stored animation 1 Ex When Large is selected for the picture size 2 When the animation is deleted the PICT menu appears again 4 Finish the procedure Deleting all the stored pictures and animations for each size To delete all the stored pictures You can delete all stored pictures...

Page 36: ...5 Picture One of your edited still images stored in Picture is activated Go to step 6 Slideshow All stored still images are activated and shown in sequence UserSlide Go to step 7 Movie Your edited animation stored in Movie is activated Go to step 6 6 Select a file For Movie select either Default or UserMovie If no animation is stored you can only select Default 7 Finish the procedure To activate t...

Page 37: ...und screen of the display window Standard 1 Initial O Standard 2 O Standard 3 O back to the beginning LevelMeter Audio level meter You can select the level meter Meter1 Initial O Meter2 O Meter3 O back to the beginning Press DISP repeatedly to show the selected level meter PICT Pictures You can activate the graphic screen using either movie or picture 36 Select the picture size first Large Initial...

Page 38: ...ats scrolling in 5 second intervals Off Cancels Holding DISP for more than one second can scroll the display regardless of the setting Dimmer Dimmer mode Auto Initial Dims the display when you turn on the headlights Time Set Sets the timer for dimmer 40 Off Cancels On Activates dimmer From To 1 Dimmer time Any hour Any hour 40 Initial 6PM 7AM Bright Brightness 1 8 Adjust the display brightness to ...

Page 39: ...tone On Initial Activates the key touch tone Off Deactivates the key touch tone Telephone Telephone muting Muting1 Muting2 Select either one which mutes the sounds while using the cellular phone Off Initial Cancels If CD or CD changer has been selected as the source playback pauses during telephone muting Amp Gain Amplifier gain control You can change the maximum volume level of this receiver High...

Page 40: ...cedure Selecting the dimmer mode You can dim the display at night or as you set the timer 1 Enter the PSM menu see page 5 2 Select Dimmer 3 Select a setting Auto Dims the display when you turn on the headlights Go to step 6 Time Set Sets the timer for dimmer Go to step 4 Off Cancels Go to step 6 On Always dims the display Go to step 6 ...

Page 41: ...ces Maximum number of characters Station frequencies Up to 16 characters up to 30 station frequencies including both FM and AM CDs CD CH Up to 32 characters up to 30 discs External components Up to 16 characters You cannot assign a title to a CD Text or an MP3 WMA disc 1 Select the source For FM AM tuner Select a station For a CD in this receiver Insert a CD For CDs in the CD changer Select CD CH ...

Page 42: ...panel and on the panel holder Detaching the control panel Before detaching the control panel be sure to turn off the power Attaching the control panel Angle 2 Angle 4 Angle 1 Angle 3 Changing the control panel angle The control panel changes its angle as follows When using the remote controller Caution Do not insert your finger behind the control panel ...

Page 43: ...sound as you want See pages 21 31 You can connect an external component to the LINE IN plugs on the rear You can also connect an external component to the CD changer jack on the rear using the Line Input Adapter KS U57 optionally purchased or Aux Input Adapter KS U58 optionally purchased Before operating the external component select the external input correctly see page 39 For connection see Inst...

Page 44: ...1 Accented letters upper case Accented letters lower case Numbers and symbols How to clean the connectors Frequent detachment will deteriorate the connectors To minimize this possibility periodically wipe the connectors with a cotton swab or cloth moistened with alcohol being careful not to damage the connectors Connector Moisture condensation Moisture may condense on the lens inside the CD player...

Page 45: ...igital Audio standard Therefore the use of Non DVD side of a DualDisc on this product may not be recommended General This receiver has been designed to reproduce CDs CD Texts and CD Rs Recordable CD RWs Rewritable in audio CD CD DA MP3 and WMA format and MP3 WMA files recorded in an SD card When a disc or an SD card has been loaded selecting CD or SD for the playback source starts playback Inserti...

Page 46: ...r and ID3 Tag Version 1 0 1 1 2 2 2 3 or 2 4 for MP3 files and for WMA files This receiver can display only one byte characters No other characters can be correctly displayed see page 44 This receiver can play back MP3 WMA files meeting the conditions below Bit rate 8 kbps 320 kbps Sampling frequency 48 kHz 44 1 kHz 32 kHz for MPEG 1 24 kHz 22 05 kHz 16 kHz for MPEG 2 48 kHz 44 1 kHz 32 kHz for WM...

Page 47: ...dust Disc will not play this time Sound adjustments Daily use Selecting the DSP modes DSP Effectiveness of V Cancel depends on the recording condition of the sources Especially if you play back the following sources you cannot get the satisfactory results Monaural sources such as AM and monaural FM broadcasting programs Multiplex sound sources and Sources recorded with duets strong echo a chorus o...

Page 48: ...dure If you try to store the 17th image for picture screen for each Large and Small size Picture Full appears and you cannot start downloading Delete unwanted files before downloading General settings PSM To set the PICT setting as you like download the required files before setting If Default for Picture and Movie and No Slide for Slideshow cannot be changed to other options required files have n...

Page 49: ...etting does not work Signals are too weak Store stations manually Static noise while listening to the radio The antenna is not connected firmly Connect the antenna firmly Disc playback CD R CD RW cannot be played back Tracks on the CD R CD RW cannot be skipped CD R CD RW is not finalized Insert a finalized CD R CD RW Finalize the CD R CD RW with the component which you used for recording Disc cann...

Page 50: ...not correct This sometimes occurs during play This is caused by how the tracks are recorded Not Support appears on the display and track skips Tracks are not encoded in an appropriate format Copy protected WMA tracks cannot be played back Skip to the next track No Music appears on the display No MP3 WMA tracks are recorded on the disc Only jpl jpm jpa jpb jpw files are recorded on the disc Change ...

Page 51: ...e power and wait until the operating temperature resumes You cannot activate Slideshow for PICT No Slide is shown as the selectable item No still images are downloaded yet Download a still image CD changer No Magazine appears on the display No magazine is loaded in the CD changer Insert the magazine No Disc appears on the display No disc is in the magazine Insert disc into the magazine Disc is ins...

Page 52: ...tortion Rear 35 W per channel into 4 Ω 40 Hz to 20 000 Hz at no more than 0 8 total harmonic distortion Load Impedance 4 Ω 4 Ω to 8 Ω allowance Equalizer Control Range Frequencies Graphic EQ 63 Hz 125 Hz 250 Hz 500 Hz 1 kHz 2 kHz 4 kHz 8 kHz 12 5 kHz 9 bands Parametric EQ 3 bands Band 1 2 3 20 Hz 25 Hz 31 5 Hz 40 Hz 50 Hz 63 Hz 80 Hz 100 Hz 125 Hz 160 Hz 200 Hz 250 Hz 315 Hz 400 Hz 500 Hz 630 Hz 8...

Page 53: ...Format FAT 12 16 Storage Up to 512 MB Playable Audio Format for SD Card MP3 WMA GENERAL Power Requirement Operating Voltage DC 14 4 V 11 V to 16 V allowance Grounding System Negative ground Allowable Operating Temperature 0 C to 40 C Dimensions W H D Installation Size approx 182 mm 52 mm 159 mm Panel Size approx 188 mm 58 mm 13 mm Mass approx 1 7 kg excluding accessories Design and specifications ...

Page 54: ... 2005 Victor Company of Japan Limited EN TH 0405MNMMDWJEIN Having TROUBLE with operation Please reset your unit Refer to page of How to reset your unit ...

Page 55: ...ª Õ ÀȵËÕ π È Ë Insert the two handles then pull them as illustrated so that the unit can be removed Ë π ß 2 Õ π ß π ËÕß À Èæ π ß æ π Èπ ÀÈ ËÕπ ÿ ª Õ ÕÕ π Ë ËÕ Ê ß π ß Èß Õß Õ πÕÕ π ÿ ª Õ π È È ÕÕ æ ËÕ Èß π øøÈ π È µ ß 12 Ï À πµÏ Õß ÿ Ë È È π È µÈÕß È ËÕß ª ß ø Ë Ëß À ÈÕ È È π ËÕß ß πµÏ JVC Ë πª Õ À µ µ Èß ËÕ µËÕ π πª Õ µËÕ ªπ È ÀÈ ÿ ª Õ π È À ß µ Õ È ª µ Èß ËÕß ÀÈ Ÿ µÈÕß µ µ Èß ª Õ ºßÀπÈ ª Ï È æµ...

Page 56: ...he fuse block connecting to the car battery bypassing the ignition switch constant 12 V µËÕ È Ë øøÈ π ºßø Ï ËßµËÕ µ µÕ Ë πµ ˵ÈÕß È Ï ÿ 12 Ï ß Ë To an accessory terminal in the fuse block µËÕ È ò πª Õ π ºßø To the remote lead of other equipment 200 mA max µËÕ È Õª ÏÕË π π Ÿß 200 mA Fuse block ºßø To car light control switch µ Ï ÿ ø Õß πµ Ï To cellular phone system µËÕ æ Ï ËÕπ Purple Ë ß Right spea...

Page 57: ...h paint remove the paint before attaching the wire Failure to do so may cause damage to the unit 3 µËÕ π ÀÈ πËπ È µ ß À Á À Õµ ß µ ß Ë π Ë Ë Õ À Õ Õ ŸË ÀÈ Ÿ ÕÕ ËÕπ ËÕπµËÕ π À 軯 µ µ π π π È ËÕßÕ ÿ À Õ À 4 Signal cord not supplied for this unit 4 Ë È ÀÈ ÿ ª Õ π È JVC Amplifier ËÕß ß JVC Front speakers æßÀπÈ JVC Amplifier ËÕß ß JVC Rear speakers æßÀ ß ÿ µËÕ Õ æ ø ÕÕ Ï Õÿª ÏÕ òπÊ ô æ ËÕ æ Ë ÿ æ ß ÀÈ µ...

Page 58: ...ß π πµÏ Õ ÀÈ Ÿ ÿ µËÕ ªπ È ÀÈ µËÕ æßµ Ÿª ËÕπ Èß π Õ ÀÈ ª È Õ Ë µ Èß Ëπ ˵ À HPF LPF ËÕπ æ À HPF Ë Ëππ Èπ æßÕ È Ÿ Õ π µ Èß Ë È π ŸË Õ Èß πÀπÈ 28 31 Connecting subwoofer µËÕ Ÿ øÕ When connecting the speakers high range mid range through the speaker output ËÕ µËÕ æß æ Ÿß æ ß ºË π È Ëß ÕÕ æß When connecting the speakers high range mid range through the external amplifiers to obtain more powerful sound ...

Reviews: