background image

Masterpage:Right+

EN


85

Filename [DVM70S_142RS232.fm]

Page 85

Friday, 6 May 2005  12:06

RS-232C INTERFACE

Operation Commands

Commands for operating functions such as PLAY and REC on the 
HDD/DVD/Mini DV deck.

System Commands

Commands relating to RS-232C control system.

Response Commands

Commands for acquiring information such as deck status.

* See pages 86 and 87 for data format.

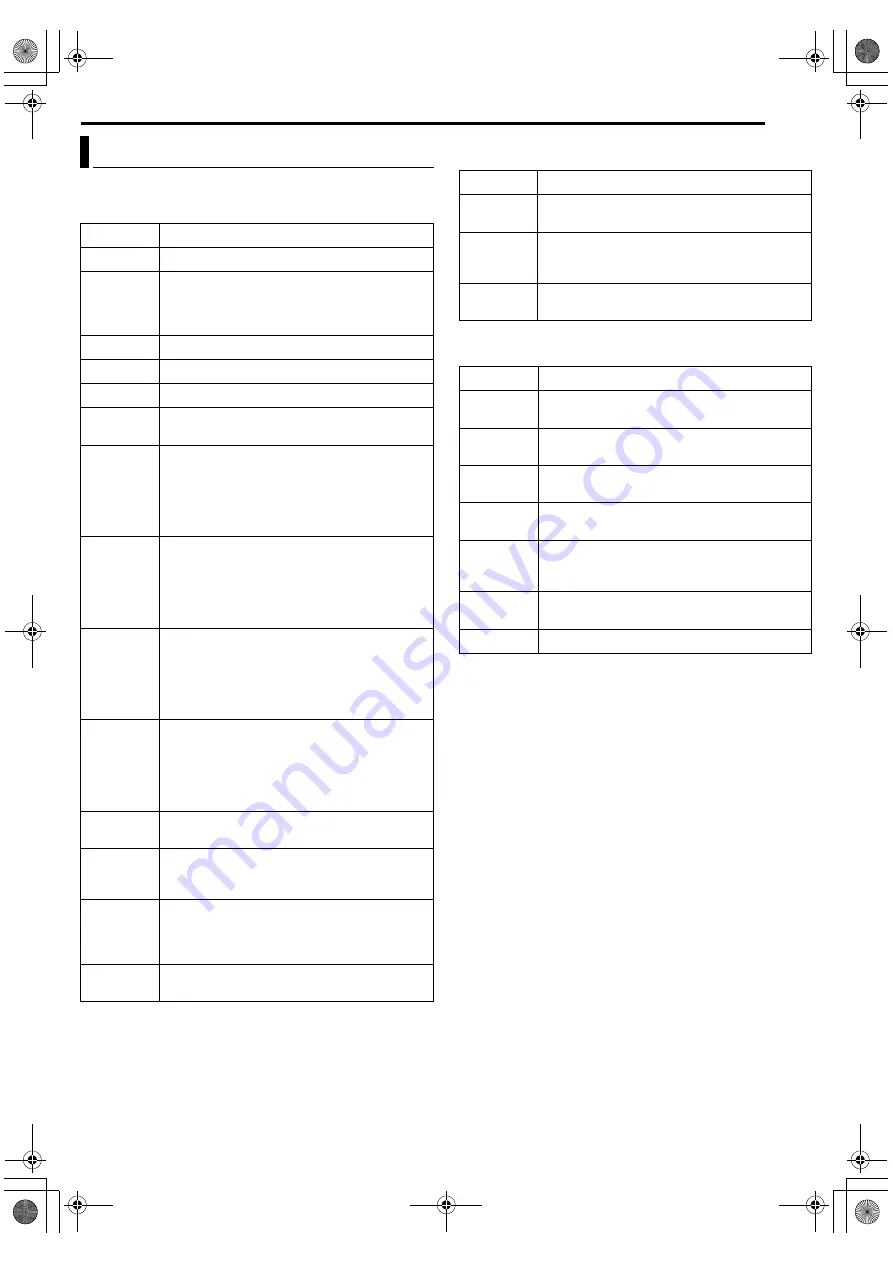
RS-232C Interface – Command –

Command

Description

3A

Plays the selected deck.

3F

Stops the selected deck. Resume will be cleared 
when this is pressed while in the Stop mode. 
(HDD/DVD Deck)
Rec Request will be cleared.

4F

Switches the selected deck to the Still mode.

AO

Power On

A1

Power Off

A3

Eject: HDD/DVD Deck: Opens/Closes tray.
Mini DV Deck: Removes cassette.

AB

FF: HDD/DVD Deck: Functions only during 
playback. Activates forward search. Forward 
search speed increases in step of 2x, 4x, 8x and 
16x via each operation.
Mini DV Deck: Fast forward. Search Fwd during 
playback.

AC

REW: HDD/DVD Deck: Functions only during 
playback. Activates reverse search. Reverse 
search speed increases in step of 2x, 4x, 8x and 
16x via each operation.
Mini DV Deck: Rewind. Search Rev during 
playback.

B5

Fwd Shtl: HDD/DVD Deck: Functions only during 
playback. Activates forward search. Forward 
search speed increases in step of 2x, 4x, 8x and 
16x via each operation.
Mini DV Deck: Fast forward. Search Fwd during 
playback.

B6

Rev Shtl: HDD/DVD Deck: Functions only during 
playback. Activates reverse search. Reverse 
search speed increases in step of 2x, 4x, 8x and 
16x via each operation.
Mini DV Deck: Rewind. Search Rev during 
playback.

CA

Rec: Starts recording at the selected deck when 
a Rec Request is received. 

CB

Rec Pause: Switches the selected deck to the 
Rec Pause mode when a Rec Request is 
received.

F0

Command Target: VTR1: For selecting Mini DV 
deck.
HDD1: For selecting HDD deck.
DVD1: For selecting DVD deck.

FA

Rec Request: For issuing approval for recording. 
This can be cleared using STOP.

Command

Description

0A

ACK:  A return command issued when a defined 
command is received.

0B

NAK: A return command issued when an 
undefined or possibly nonexistent command is 
received.

FB

VTR Ind: A command for checking whether the 
connected device is a VTR.

Command

Description

03

Cassette Out: Issued by the Mini DV deck when 
the cassette is ejected after ejecting is performed.

BE

Date Sense: For acquiring the currently 
configured year, month and day.*

BF

Time Sense: For acquiring the currently 
configured hour, minute and second.*

D7

Status Sense: For acquiring the deck 
information.*

D8

TC Data Sense: For acquiring the total remaining 
time in the current recording mode when there is 
a media in the selected deck.*

D9

CTL Data Sense: For acquiring the lapse counter 
when there is a media in the selected deck.*

DD

JVC Data Sense: Returns data from the unit.*

DVM70S_00.book  Page 85  Friday, May 6, 2005  12:06 PM

Summary of Contents for DVM70US - DVDr / HDDr

Page 1: ...NGLE LIVE CHECK PROGRESSIVE SCAN EJECT EJECT DISPLAY OPERATE DV HDD DVD REC MODE INSTANT REPLAY AUDIO DUB INSERT S VIDEO IN F 1 VIDEO MONO L AUDIO R REC DVD REC HDD REC DV DV IN OUT REC PAUSE PLAY CH FF REW STOP NTSC LPT1006 001B EN DVD HDD Mini DV VIDEO RECORDER INSTRUCTIONS SR DVM70US For Customer Use Enter below the Model No and Serial No which are located on the rear of cabinet Retain this inf...

Page 2: ...OK INTO THE INSIDE OF THIS UNIT USE OF CONTROLS OR ADJUSTMENTS OR PERFORMANCE OF PROCEDURES OTHER THAN THOSE SPECIFIED HEREIN MAY RESULT IN HAZARDOUS RADIATION EXPOSURE DO NOT OPEN COVERS AND DO NOT REPAIR YOURSELF REFER SERVICING TO QUALIFIED PERSONNEL CAUTION AVIS RISK OF ELECTRIC SHOCK DO NOT OPEN CABLE COMPATIBLE TELEVISION APPARATUS TELEVISION CABLOCOMPATIBLE CANADA RISQUE DE CHOC ELECTRIQUE ...

Page 3: ...sk of fire or electric shock 4 Power Cord Protection Power supply cords should be routed so that they are not likely to be walked on or pinched by items placed upon or against them paying particular attention to cords at plugs convenience receptacles and the point where they exit from the product 5 Ventilation Slots and openings in the cabinet are provided for ventilation To ensure reliable operat...

Page 4: ...vicing to qualified service personnel 2 Damage Requiring Service Unplug this product from the wall outlet and refer servicing to qualified service personnel under the following conditions a When the power supply cord or plug is damaged b If liquid has been spilled or objects have fallen into the product c If the product has been exposed to rain or water d If the product does not operate normally b...

Page 5: ...ns just as water droplets form on the surface of a glass filled with cold liquid In conditions where condensation may occur disconnect the unit s power plug from the wall and keep it disconnected for a few hours to let the moisture dry then turn on the unit DISCLAIMER OF LIABILITY JVC shall not be liable for any loss relating to the unit s failure to properly record store or playback any content v...

Page 6: ... ON HDD DVD DECK 50 Library Database Navigation 50 Edit Original Information 51 Edit Play List Information 53 Edit Library Information 55 Playback With MP3 WMA JPEG Navigation 56 EDITING 57 Dubbing 57 DV Dubbing HDD DVD Deck Only 60 Edit From A Camcorder 62 Edit To Or From Another Recorder 63 Digital Audio Dubbing 64 Audio Dubbing DV Deck Only 65 Insert Editing DV Deck Only 66 REMOTE CONTROL 67 Re...

Page 7: ...the VR mode of DVD RW discs Before finalizing it is possible to record on unrecorded areas of the disc edit the disc title and program titles and delete programs It is impossible to record or edit DVD R RW discs recorded on other devices even if they have not been finalized It is impossible to overwrite recorded areas of DVD R discs Available recording capacity does not increase even if a recorded...

Page 8: ...types of discs cannot be played using this unit Do not attempt to play back any kind of disc that is damaged cracked warped or repaired with adhesive tape or discs in unusual shapes heart shaped octagonal or other forms If such discs are accidentally played back it may cause noise that can lead to speaker damage CD ROM discs including PHOTO CD and CD G Discs recorded in Packet Write UDF format 1 3...

Page 9: ...g either recording or playback Once the disc has been finalized these chapter marks are deleted and new chapter marks are assigned automatically approximately every 5 minutes In Video mode even before finalizing it is impossible to perform editing operations other than changing the disc name and or title names and deleting programs and or titles After finalizing it is impossible to perform editing...

Page 10: ...cs Remove the disc from the cartridge Align the disc with the grooves on the disc tray as shown in the illustration and insert with the side you wish to play back or record facing down If you insert the disc with ASide AB facing down programs are recorded on the side A Single sided discs Remove the disc from the cartridge Align the disc with the grooves on the disc tray as shown in the illustratio...

Page 11: ...t scratched or dirty when removed from cartridge then put back in after use Storage Make sure that discs are kept in their cases If discs are piled on top of one another without their protective cases they can be damaged Do not put discs in a location where they may be exposed to direct sunlight or in a place where the humidity or temperature is high Avoid leaving discs in your car Maintenance of ...

Page 12: ...g 62 P Video Audio Input Connectors VIDEO AUDIO MONO L R A pg 62 Q Channel Buttons CH JK A pg 34 37 R Front Display Panel A pg 14 S Infrared Beam Receiving Window T Stop Button STOP o A pg 24 39 U Reverse Search Button O HDD DVD deck A pg 25 44 Rewind Button REW O DV deck A pg 41 42 V Play Button PLAY I A pg 24 39 W Forward Search Button N HDD DVD deck A pg 25 44 Fast Forward Button FF N DV deck A...

Page 13: ...232C interface cable straight type For details on the RS 232C interface command refer to page 86 F S video Video Audio Output Connectors S VIDEO VIDEO AUDIO OUTPUT HDD DVD deck only A pg 18 G S video Video Audio Input Connectors S VIDEO VIDEO AUDIO INPUT L 1 A pg 62 H S video Video Audio Output Connectors S VIDEO VIDEO AUDIO OUTPUT A pg 18 I Antenna Input Connector VHF UHF IN A pg 18 J Digital Aud...

Page 14: ...isplay F Channel Indicator Indicates the channel received G Track Chapter Indicator TRK CHAP ATRKB or ACHAPB lights depending on a disc loaded while the 3rd and 4th digits from the left of the Multi Display N indicate the numbers explained below ATRKB Total number of tracks or track number being played back are displayed on the Multi Display ACHAPB Chapter number being played back are displayed on...

Page 15: ...50 d Enter Button ENTER A pg 20 e Return Button RETURN A pg 28 30 46 f Forward Skip Button T A pg 25 44 Next Button NEXT A pg 28 g Forward Search Button N HDD DVD deck A pg 25 44 Fast Forward Button N DV deck A pg 41 Forward Slow Button SLOW A pg 26 h Play Button I A pg 24 39 Select Button SELECT A pg 56 i Pause Button W A pg 24 39 j Stop Button o A pg 24 39 Clear Button CLEAR A pg 32 k Skip Searc...

Page 16: ...rent time D Recording channel number When pressing REC MODE Appears for eight seconds A Remaining disc time for each recording speed B Recording speed When pressing R during recording A Recording time for Instant Timer Recording ITR mode When using Live Memory playback HDD DVD A Time scale for recording HDD deck Bar meter for recording DVD deck B Current recording point C Recording mode D Current ...

Page 17: ...or mode O Remote control switch P Auto capture button Q Sound monitor switch R Elapsed recording time On Screen Display DV deck When ASUPERIMPOSEB is set to AONB or AAUTOB and ON SCREEN on the remote control is pressed various operational indicators appear on the TV screen To clear the operational indicators press ON SCREEN again A Operation Mode Indicators B Tape Speed SP LP C Sound Mode Display ...

Page 18: ...nent video input connectors C Connect the unit s AUDIO OUTPUT connectors to the TV s AUDIO input connectors You can obtain high quality component video pictures The COMPONENT VIDEO OUT Y PB PR connectors do not output DV signals If your TV is not stereo capable use the unit s AUDIO OUTPUT connectors to connect to an audio amplifier for Hi Fi stereo sound reproduction By using the component video c...

Page 19: ...If this function is taking a considerable amount of time it may be necessary to perform the Semiauto or Manual Clock Set procedure INFORMATION If AAUTO CLOCKB is set to AONB A pg 21 the clock will be adjusted automatically by the host channel every hour except 11 00 PM midnight 1 00 AM and 2 00 AM using the incoming PBS channel clock setting data This automatic clock adjustment can only be perform...

Page 20: ...screen 3 Press D E to select ADVD VIDEO SET UPB then press G 4 Press D E to select ALANGUAGE SETB then press G 5 Press F G to select AMENU LANGUAGEB then press ENTER 6 Press F G to select your desired language then press ENTER See ALanguage Code ListB A pg 81 7 Press SET UP to complete the setting NOTE When the selected language is not available on the disc the disc s default menu language is play...

Page 21: ... SET UP to access the Main Menu screen 3 Press D E to select AINITIAL SET UPB then press G 4 Press D E to select ACLOCK SETB then press G 5 Press F G to select AAUTO CLOCKB then press ENTER Press F G to select AOFFB then press ENTER 6 Press F G to select ATIMEB then press ENTER Press F G until the desired time appears then press ENTER to start clock Set the date and year in the same way Holding F ...

Page 22: ... Press F G to select ACHB then press ENTER B Press the number keys to enter a channel number you want to add then press ENTER C Press F G to select AADD SKIPB then press ENTER D Press F G to select AADDB then press ENTER E Repeat B D to add other channels To skip channels A Press F G to select ACHB then press ENTER B Press F G to select a channel number you want to skip then press ENTER C Press F ...

Page 23: ...not be shown on the screen 16 9AUTO Wide television conversion Select this when the aspect ratio of your TV is 16 9 wide TV 16 9FIX Wide television conversion Select this when the aspect ratio of your TV is fixed to 16 9 wide TV The unit automatically adjusts the screen width of the output signal correctly when playing back a picture whose aspect ratio is 4 3 Pan Scan Letter Box In general DVD VID...

Page 24: ...select the desired titles A pg 51 4 Press W to pause playback To resume normal playback press I 5 Press o to stop playback When a recordable disc is played playback stops and a program received with the unit s tuner resumes on the TV screen When a playback only disc is played playback stops and the TV screen becomes all blue when you press o Pressing o again resumes a program received with the uni...

Page 25: ...n then resumes playback Variable Speed Search During playback press N for forward variable speed search or O for reverse variable speed search Each press of the button increases the search speed for each direction To resume normal playback press I For Audio CD You can perform 4 levels of speed search with N and O Audio is active also during variable speed search You cannot perform slow motion for ...

Page 26: ...ress o during playback to memorize a resume point The unit enters Resume Stop mode and memorizes the position where you have stopped playback as a resume point The inside of the disc status indicator on the front display panel blinks while memorizing The unit retains a memory of the resume points of the last 30 discs played back even though they have been ejected if ARESUMEB is set to ADISC RESUME...

Page 27: ...ginning only discs before finalizing During recording playback or in stop mode Press REC MODE The disc remaining time according to recording modes appears on the TV screen It is possible to check disc remaining time according to recording modes also by pressing REMAIN In FR mode it is possible to set recording time in detail While the recording mode and the disc remaining time are displayed by pre...

Page 28: ...discs you can switch the audio channel to choose Karaoke either with or without the vocal 1 Press AUDIO during playback The Audio Language Sound selection display appears 2 Press AUDIO or D E to select your desired audio language sound Each time you press AUDIO or D E the audio language sound changes To clear the Audio Language Sound selection display press ENTER NOTES When A7B appears on the TV s...

Page 29: ...n Bar Example When selecting Picture Control function of DVD During playback or while stopped 1 Press ON SCREEN twice to access the on screen bar The item currently selected is highlighted and pointed by 2 Press D E to select A B then press ENTER The pop up window appears under the selected item 3 Press F G to select the desired option then press ENTER To clear the on screen bar Press ON SCREEN NO...

Page 30: ... the procedure from step 1 The point B must be set at least 3 seconds after the point A When playing back a DVD A B Repeat Playback is possible only within the same title AA B xB cannot be selected during Program and Random Playback AA B xB cannot be selected while stopped Locating The Beginning Of A Desired Selection You can locate the beginning of a title chapter group or track During playback o...

Page 31: ... appears and disappears alternately To clear the on screen bar Press ON SCREEN To cancel the simulated surround effect Press ENTER to clear A3D ONB from the screen NOTES Simulated Surround Effect works correctly only when playing back a title recorded in multichannels Simulated Surround Effect does not affect the DVD VIDEO bitstream signal from the DIGITAL AUDIO OUT connectors When Simulated Surro...

Page 32: ...the number key A1B and A5B C To select track 25 press the number key A2B and A5B If you have specified a wrong selection Press CANCEL L The last selection is erased Or press CLEAR o The whole selection is erased 4 Press I Playback starts in the programmed order When all of the programmed tracks have been played back Program Playback stops but the programmed information remains To add tracks to the...

Page 33: ...a Code List for Parental LockB A pg 82 6 Press the number keys to enter the same password as in step 6 of ATo Set Parental Lock For The First TimeB then press ENTER 7 Press SET UP to complete the setting NOTE If you forget your password enter A8888B in step 6 To Temporarily Release Parental Lock When you set the Parental Lock level strictly some discs may not be played back at all When you insert ...

Page 34: ... back on other DVD players Perform AFinalize A Disc DVD Deck Only B A pg 75 You can record up to 99 programs and 99 play lists on each disc Some programs can only be recorded one time When recording is started an index of the first part of recording is automatically recorded A pg 50 To delete the index refer to page 52 Recording sometimes may stop or cannot be performed even if there is enough ava...

Page 35: ...ng on you can watch another program on the TV It does not interfere with recording 1 Turn on the TV 2 Select the desired channel to watch on the TV using your TV s remote control Elapsed Recording Time And Disc Remaining Time Indication During recording press DISPLAY repeatedly until the desired indication appears on the front display panel Each time you press DISPLAY the time indication changes a...

Page 36: ...If you programmed to timer record for 60 minutes in SP mode on a 120 minute disc the disc remaining time would be 30 minutes in XP mode 60 minutes in SP mode 120 minutes in LP mode 180 minutes in EP mode and 240 minutes in FR480 mode Timer recording will not complete beyond these remaining times The maximum recording time of FR JUST mode is the same as the recording time of FR480 mode When timer p...

Page 37: ...ressing W initiates Live Memory Playback However it is still possible to pause recording only when recording the channels of external sources AL 1B AF 1B and ADVB While holding R press W on the remote To resume recording while holding R press I on the remote No operation can be made with the buttons on the unit Recording Mode MPEG2 format is used as recording format As a guide for picture quality ...

Page 38: ...he front display panel Each time you press DISPLAY the time indication changes as follows Elapsed recording time N Disc remaining time N Clock N Back to the beginning You can also check the disc remaining time by pressing REMAIN while the unit is stopped or recording is in progress The list of disc remaining times for all recording modes appears on the TV screen Second Audio Recording This unit s ...

Page 39: ... O or SLOW N advances reverses the still picture frame by frame To resume normal playback press I Slow Motion 1 Press W to pause during playback 2 Press SLOW O or SLOW N for 2 or more seconds Each press of SLOW O or SLOW N increases the slow motion speed for each direction Skip Search During playback press v Each press initiates an approximately 30 second period of fast motion playback Normal play...

Page 40: ...The subsequent jumps will then be in accordance to the selected time interval When you cannot advance any further beginning or end of program reached the message AUNABLE TO GO BACK ANY MOREB appears on the screen and the on air screen resumes In such a case press S O or o Example Playback search when jump interval is set to 15 MIN jumps Taking for instance you want to start jump search 40 minutes ...

Page 41: ...ssette press M DV NOTE When you record a tape on the DV deck with the recording speed set to ALPB it is recommended to play back that tape back on this DV deck Digital video recorder from other manufacturers may not be able to play back the tape properly Basic Playback Turn on the unit Turn on the TV and select the AV mode Slide the TV CABLE DBS DVD switch to DVD DV HDD DVD I M o O N DV o N O o CA...

Page 42: ...Playback Press O then press I within 2 seconds Soundtrack Selection Your unit is capable of recording two soundtracks L and R and will play back the one you select During Playback Pressing AUDIO changes the soundtrack as follows Time Code During recording a time code is recorded on the tape This time code is used to confirm the position on the tape when playing back or editing a tape 1 Press DISPL...

Page 43: ... recording playback is automatically stopped just before recording starts and then recording starts when the time arrives for the next timer program It is impossible to perform ITR even if you press R during Live Memory Playback A pg 38 Press o to display the program being recorded then perform ITR settings Playback may be paused for a moment during Live Memory Playback which does not interfere wi...

Page 44: ...vailable only when paused Each press of the button advances the still picture frame by frame Pressing down for 2 or more seconds advances playback at 1 16 times the normal speed Then each press of the button advances slow motion at 1 16 times 1 4 times and 1 2 times the normal playback G o Pressing once during Live Memory Playback or RetroActive Recording returns to the screen on air Pressing twic...

Page 45: ... AONB A pg 71 4 Press D E to select the desired playback method ABEGINNINGB ARESUMEB or AREPEATB then press ENTER Playback of the selected title begins automatically 5 Press o to stop playback The on air screen resumes NOTES You can use various playback features during Live Memory Playback To stop simultaneous playback press o The on air screen resumes To stop actual recording press o again Instan...

Page 46: ...aily RecordingB AREC MODEB A pg 34 ARecording ModeB 9 Press F G to select AOKB then press ENTER to access the Program Confirmation screen 10 Press D E to select AEXITB then press ENTER to complete timer programming To program another timer press D E to select ACONTINUEB then press ENTER If APROGRAM OVERLAPPEDB appears on the TV screen delete or modify the programs NOTES There may be cases that the...

Page 47: ...h to save then the recorded program is saved and will not be overwritten by the new program MON SUN FOR A WEEK MON SAT FOR A WEEK MON FRI FOR A WEEK Daily Recording Weekly Overwrite When the set weekly program is broadcast the program recorded on the same day last week is automatically deleted and overwritten by the new program Save the title of each program you wish to save then the recorded prog...

Page 48: ...lete timer programming To program another timer press D E to select ACONTINUEB then press ENTER If APROGRAM OVERLAPPEDB appears on the TV screen delete or modify the programs NOTES When two successive programs are recorded on a DVD RW disc with Manual Timer Programming function the beginning of the second one may be left off the recording If the copy limited program is received during timer record...

Page 49: ... 1 Press FGD E to select ACANCELB then press ENTER To modify the program settings 1 Press FGD E to select AMODIFYB then press ENTER 2 Change the settings of the desired recording options as required Refer to steps 4 13 in AManual Timer ProgrammingB A pg 48 To skip the weekly daily programs to the next week day It is easy to temporarily cancel weekly daily programs of a week day 1 Press FGD E to se...

Page 50: ...registered for each title when ordinary recording or timer recording is performed then stored in an area specified on the unit index reduced pictures to show program titles program title category date and time channel recording mode length of recording time The items marked with an asterisk can be easily modified and registered again after recording by using Library Database Navigation system The ...

Page 51: ...en 8 Press EDIT to return to the normal screen Modify Title Name 1 Perform steps 1 4 of AModify IndexB A pg 51 before continuing 2 Press FGD E to select ANAMEB then press ENTER 3 Press FGD E to select the desired letter or command then press ENTER Repeat this process to complete the name To correct a letter press FGD E to select ADELETEB then press ENTER You can enter the letters up to 64 4 Press ...

Page 52: ...you want to delete then press ENTER 5 Press D E to select ADELETEB then press ENTER When you cancel the deletion select ACANCELB then press ENTER 6 Press EDIT to return to the normal screen Delete Unwanted Part Of The Title DVD RAM DVD RW VR mode only You can delete unwanted part of the title 1 Perform steps 1 2 of AModify IndexB A pg 51 before continuing 2 Press FGD E to select ADEL SCENB then pr...

Page 53: ... press D E to select ARETRYB then press ENTER Repeat the above steps 3 and 4 to locate another point to mark 5 Press S or T to select one chapter you want to delete press D E to select AERASEB then press ENTER To undo the deletion press D E to select ARETRYB then press ENTER 6 Press EDIT to return to the normal screen NOTE There may be a discrepancy of several seconds between the scene you intend ...

Page 54: ...hen press ENTER 8 Perform steps 5 11 in ACreate Play ListB A pg 54 Add scenes 1 Perform steps 1 5 in AEdit ScenesB A pg 54 before continuing 2 Press FGD E to select ASEL TITLEB then press ENTER 3 Perform steps 4 11 in ACreate Play ListB A pg 54 Move Scenes 1 Perform steps 1 5 of AEdit ScenesB A pg 54 before continuing 2 Press FGD E to select AMOVEB then press ENTER 3 Press F G to select a scene to...

Page 55: ... Navigation screen appears 2 Press FGD E to select the appropriate sort button to sort the information then press ENTER ADATEB Sort by date ADISC No B Sort by disc number ACATEGORYB Sort by category ANAMEB Sort by name ADATEB and ADISC No B are available for the DVD deck only 3 Press FGD E to select the desired title then press ENTER Playback begins automatically after the selected title is locate...

Page 56: ...played back NOTES If you press SELECT I instead of ENTER in step 4 the unit starts playback from the first file of the group JPEG files are played back as a slide show at the set intervals A pg 32 If a file name includes any 2 byte character the unit may not show the file name correctly The order of the groups and items shown in steps 4 and 5 may differ from the order shown on your PC Playback Wit...

Page 57: ...bed and the available disc space 1 Load a recordable disc 2 Press DUBBING to access the Dubbing Menu screen 3 Press FGD E to select AHDDNDVDB then press ENTER 4 Press FGD E to select AJUSTB then press ENTER 5 Perform steps 5 6 of AHigh Speed Dubbing From HDD To DVD B NOTES Play lists are dubbed as programs In Video mode if the selected play list includes the scenes recorded in the different transf...

Page 58: ...NG to access the Dubbing Menu screen 3 Press FGD E to select ADVDNHDDB then press ENTER 4 Press FGD E to select indexes small pictures of desired original recordings and or play lists then press MARK After selecting all indexes you want to dub press ENTER You can select up to 8 original recordings and or play lists 5 Press D E to select AEXECUTEB then press ENTER to start dubbing NOTES It is not p...

Page 59: ...elect ADVNDVDB then press ENTER 4 Select AENTIREB then press ENTER 5 Press F G to select ASELECT RECORDING MODEB then press ENTER Press F G to select the desired option then press ENTER 6 Press F G to select ASELECT SOUND MODEB then press ENTER Press F G to select the desired option then press ENTER 7 Press G to select ACONFIRMB then press ENTER The confirmation screen appears 8 Press D E to selec...

Page 60: ...g to the right for the DV equipment 6 Press REC MODE repeatedly to set the recording mode 7 Locate the point from where you want to start dubbing then stop or pause playback by pressing the following buttons on the remote control I N O o W To play back in slow speed 1 10 of the normal speed press W to pause playback then press O or N To play back frame by frame press W to pause playback then press...

Page 61: ...Press ENTER to stop both equipment then press D E to select Locate the point where you want to restart dubbing by pressing I N or O then press o Press D E to select then press ENTER to restart dubbing When you dub from DV equipment other than a camcorder A Perform step 1 to 4 B Locate the point from where you want to start dubbing then stop on the DV equipment If you pause the DV equipment in this...

Page 62: ...ress REC MODE repeatedly to set the recording mode 5 Start playback on the camcorder slightly before the actual point from where you wish to start dubbing 6 Press R on the unit to start recording Or while holding R press I on the remote control The dubbing starts 7 Press o on the unit then stop playback on the camcorder NOTES All necessary cables can be obtained from your dealer Refer to the camco...

Page 63: ...nnected to the unit s VIDEO AUDIO or S VIDEO AUDIO input connectors on the rear panel 3 Press REC MODE repeatedly to set the recording mode 4 Engage the Play mode on the source player 5 Engage the Record mode on the recording deck 6 Stop recording on the recording deck then stop playback on the source player NOTES All necessary cables can be obtained from your dealer When you use this unit as the ...

Page 64: ...s W to pause playback 6 Select the input mode on the connected digital audio device 7 Press I to start playback on the unit 8 Start recording on the digital audio device 9 Stop recording on the digital audio device Then press o to stop playback on the unit NOTE There may be a discrepancy of several seconds between where you intend editing to start and where it actually starts Digital Audio Dubbing...

Page 65: ...with audio mixing is not possible if you are using a monaural audio component or if you don t have an audio mixer 8 Engage the audio device s playback then press I to start the tape in the unit Audio dubbing starts at this point To stop dubbing temporarily press W Press I to resume dubbing 9 Press o on the unit then stop playback on the audio device to end the audio dubbing NOTES Once the Audio Du...

Page 66: ... be inserted When you reach the start of the section of the source tape that you wish to insert press I to start the tape in your unit Insert editing begins at this point 8 Press o to stop recording on the DV deck to end insert editing NOTES Once the Insert Editing starts you cannot use the other deck All necessary cables can be obtained from your dealer Insert Editing cannot be performed on a Min...

Page 67: ...TV Multi Brand Remote Control Your remote control can operate the basic functions of your TV set In addition to JVC TVs other manufacturer s TVs can also be controlled IMPORTANT Although the provided remote control unit is compatible with JVC televisions as well as many other models it may not work with your TV or in some instances may have limited function capability Keep pressing SET UP down dur...

Page 68: ...y not function with some cable boxes IMPORTANT It may not work with your cable box or in some instances may have limited function capability NOTES It s not possible to operate a cable box or DBS receiver that is not equipped with a receiving window It s not possible to set the remote control for both your cable box and a DBS receiver at the same time You can only set the remote control to operate ...

Page 69: ... It is recommended that you check the maximum level if you are going to listen to the Hi Fi audio signals through a stereo amplifier A sudden surge in the input level to the speakers may damage them Some speakers and televisions are specially shielded to prevent television interference If both are of the non shielded type do not place the speakers adjacent to the TV set as this can adversely affec...

Page 70: ...it s AUDIO OUTPUT connectors connected to a stereo amplifier receiver or TV set or in case you want to record the audio from a DVD VIDEO disc to a Mini Disc etc DOLBY SURROUND Select this when listening to multichannel surround audio with the unit s AUDIO OUTPUT connectors connected to an amplifier receiver with a built in surround decoder or a surround decoder 8 D RANGE CONTROL NORMAL WIDE RANGE ...

Page 71: ... back when both MP3 WMA files and JPEG files are recorded on a disc MP3 WMA Select this to play back MP3 WMA files JPEG Select this to play back JPEG files 8 DISC TYPE MANUAL START MENU STOP AUTO REPEAT MANUAL START To be chosen when you want to playback the disc manually by pressing I each time after the disc is read MENU STOP To be chosen when you want playback to stop each time a menu screen is...

Page 72: ... playback the operation mode indicators may be disturbed depending on the type of disc being used 8 BLUE BACK OFF ON When this function is set to AONB the TV screen becomes all blue when receiving a channel not in use NOTE When you want to receive an unstable channel with poor signals set this function to AOFFB 8 DIMMER BRIGHT DIMMED You can change the brightness of the front display panel BRIGHT ...

Page 73: ... ATUNER SETB then press G 5 Press FGD E to select AGUIDE CH SETB then press ENTER 6 Press F G to select AGUIDE CH SETB then press ENTER 7 Press F G to select the Guide Channel number for the desired station as shown in the TV listings Then press ENTER If you receive your channels with a cable box and if you have properly set your Controller ACABLE CHB appears in place of ADVD CHB 8 Press F G to se...

Page 74: ... erase or edit data on the disc repeatedly AVIDEO MODEB To be chosen when you want to erase all the data on the disc once played back to record new data or play back the disc on other DVD players 3 Press D E to select AEXECUTEB then press ENTER NOTES It is impossible to format Version 1 0 DVD RW discs in Video mode It is impossible to format DVD R discs All the titles on a disc will be deleted onc...

Page 75: ...be possible to play back the discs In this case play back the discs on this unit Additional recordings become impossible Finalize A DVD R RW Disc 1 Perform steps 1 to 4 of AFormat A DVD RAM DiscB A pg 74 before continuing 2 Press FGD E to select AFINALIZEB then press ENTER For DVD R RW Video mode discs the background selection screen will appear Press FGD E to select the desired background from a ...

Page 76: ...l is output from S VIDEO OUTPUT connector and VIDEO AUDIO OUTPUT connectors You can lock the disc tray to prohibit the unwanted disc ejection by children To lock tray While the unit is turned off press and hold o then press M on the unit ALOCKB appears on the front display panel and the disc tray is locked To unlock tray While the unit is turned off press and hold o then press M on the unit AUNLOC...

Page 77: ...at the DVD lamp lights up on the unit The TV receiver s channel selector is not set to the AV mode Set the TV to its AV mode When interlace scanned program is played back progressive scan mode is selected Press and hold PROGRESSIVE SCAN until q disappears from the front display panel A pg 76 The disc is loaded upside down Place the disc on the disc tray with the playback surface facing down A pg 1...

Page 78: ...in the Record Pause mode Press I to resume recording There is no cassette loaded or the cassette loaded has had its erase protection switch set to ASAVEB Insert a Mini DV cassette or set the erase protection switch set to ARECB The camcorder has not been properly connected Confirm that the camcorder is properly connected The input mode is not correct Set the input mode to AF 1B or ADVB The end of ...

Page 79: ...o its microphone is away from the TV The TV s volume is too high Turn the TV s volume down Those channels have been designated to be skipped If you need the skipped channels restore them A pg 22 Recording or RetroActive Recording is in progress Press W to pause recording change the channel then press I to resume recording HDD deck only After the manual settings were made Auto Channel Set was perfo...

Page 80: ... finalization is not complete since the disc may be dirty or damaged Take out the disc clean it and retry A pg 11 75 During Live Memory playback o has been pressed A pg 44 Timer recording has finished during Live Memory playback Timer recording finished during Live Memory playback then the next timer recording is about to begin while playback continues An attempt has been made to record copy prote...

Page 81: ... LN Lingala SS Siswati CO Corsican LO Laothian ST Sesotho CS Czech LT Lithuanian SU Sundanese CY Welsh LV Latvian Lettish SW Swahili DZ Bhutani MG Malagasy TA Tamil EL Greek MI Maori TE Telugu EO Esperanto MK Macedonian TG Tajik ET Estonian ML Malayalam TH Thai EU Basque MN Mongolian TI Tigrinya FA Persian MO Moldavian TK Turkmen FJ Fiji MR Marathi TL Tagalog FO Faroese MS Malay MAY TN Setswana FY...

Page 82: ...reland BB Barbados EC Ecuador IL Israel BD Bangladesh EE Estonia IN India BE Belgium EG Egypt IO British Indian Ocean Territory BF Burkina Faso EH Western Sahara IQ Iraq BG Bulgaria ER Eritrea IR Iran Islamic Republic of BH Bahrain ES Spain IS Iceland BI Burundi ET Ethiopia IT Italy BJ Benin FI Finland JM Jamaica BM Bermuda FJ Fiji JO Jordan BN Brunei Darussalam FK Falkland Islands Malvinas JP Jap...

Page 83: ...u RE Réunion UA Ukraine MP Northern Mariana Islands RO Romania UG Uganda MQ Martinique RU Russian Federation UM United States Minor Outlying Islands MR Mauritania RW Rwanda US United States MS Montserrat SA Saudi Arabia UY Uruguay MT Malta SB Solomon Islands UZ Uzbekistan MU Mauritius SC Seychelles VA Vatican City State Holy See MV Maldives SD Sudan VC Saint Vincent and the Grenadines MW Malawi SE...

Page 84: ...and Target Rec Dub Request Vtr Ind RS 232C Interface Specifications 1 6 5 9 NOTES When using the Serial Command Connector the cable to be used should be a RS 232C interface cable straight type It takes about 10 seconds for the communication to be established after turning on the unit PIN No Signal Operation Direction of signal 2 RxD Receive data HDD DVDOPC 3 TxD Transmit data HDD DVDNPC 5 GND Sign...

Page 85: ...V Deck Fast forward Search Fwd during playback B6 Rev Shtl HDD DVD Deck Functions only during playback Activates reverse search Reverse search speed increases in step of 2x 4x 8x and 16x via each operation Mini DV Deck Rewind Search Rev during playback CA Rec Starts recording at the selected deck when a Rec Request is received CB Rec Pause Switches the selected deck to the Rec Pause mode when a Re...

Page 86: ... Audio Mute 0 Fixed 0 Fixed bit3 Cassette Not Inserted Cassette Not Inserted Occurrence of abnormality in VTR Occurrence of abnormality in VTR 0 Fixed 0 Fixed bit2 0 Fixed 0 Fixed Occurrence of moisture condensation in VTR Occurrence of moisture condensation in VTR 0 Fixed During Repeat Playback Including PAUSE bit1 0 Fixed 0 Fixed 0 Fixed 0 Fixed bit0 Occurrence of DV EMG Occurrence of EMG 0 Fixe...

Page 87: ... Byte CTL Data Sense Hr Tens Hr Ones Min Tens Min Ones Sec Tens Sec Ones Frame Tens Frame Ones D9 3 3 3 3 3 3 3 3 Eg 01 23 45 30 31 32 33 34 35 30 30 DD JVC SENSE 1byte 2byte 3byte 4byte DV HDD DVD DV HDD DVD DV HDD DVD DV HDD DVD bit7 1 Fixed 1 Fixed 0 Fixed 0 Fixed 0 Fixed 0 Fixed 1 Fixed 1 Fixed bit6 0 Fixed 0 Fixed 0 Fixed 0 Fixed 0 Fixed 0 Fixed 1 Fixed 1 Fixed bit5 0 Fixed 0 Fixed 1 Fixed 1 ...

Page 88: ...sion system MPEG2 CBR VBR Video recording compression system MPEG2 VBR Audio recording system Dolby Digital 2 ch Linear PCM XP mode only Recording time Maximum 300 hours with 160 GB HDD XP Approx 34 hours SP Approx 69 hours LP Approx 138 hours EP Approx 209 hours FR Approx 300 hours Signal system NTSC color signal and EIA monochrome signal 525 lines 60 fields Recording system Digital Component Rec...

Page 89: ...ock Set 21 Marking Positions To Play Back Again Later 27 40 Menu Audio Subtitle Language Set 20 Mode Lock 76 N Next Function Memory 42 O On screen Bar 29 On screen Language Set 20 P Pan Scan 23 Play List 53 Playback Control PBC 28 Program Playback 32 Progressive scan 76 R Random Playback 32 Recordable Playable Discs 7 Recording Medium And Format 9 Recording Mode 34 37 Region Number 8 Register Disc...

Page 90: ...Filename DVM70S_15IX fm Masterpage Left No Heading 90 EN Page 90 Friday 6 May 2005 12 06 MEMO DVM70S_00 book Page 90 Friday May 6 2005 12 06 PM ...

Page 91: ...Masterpage Right No Heading EN 91 Filename DVM70S_15IX fm Page 91 Friday 6 May 2005 12 06 MEMO DVM70S_00 book Page 91 Friday May 6 2005 12 06 PM ...

Page 92: ... 2005 Victor Company of Japan Limited US Printed in China 0405CSH SW BJ EN SR DVM70US DVM70S_00 book Page 92 Friday May 6 2005 12 06 PM ...

Reviews: