ENGLISH
BASIC MENU OPERATIONS
(MAIN MENU, SETUP MENU)
䡵
ABOUT MENU SCREENS
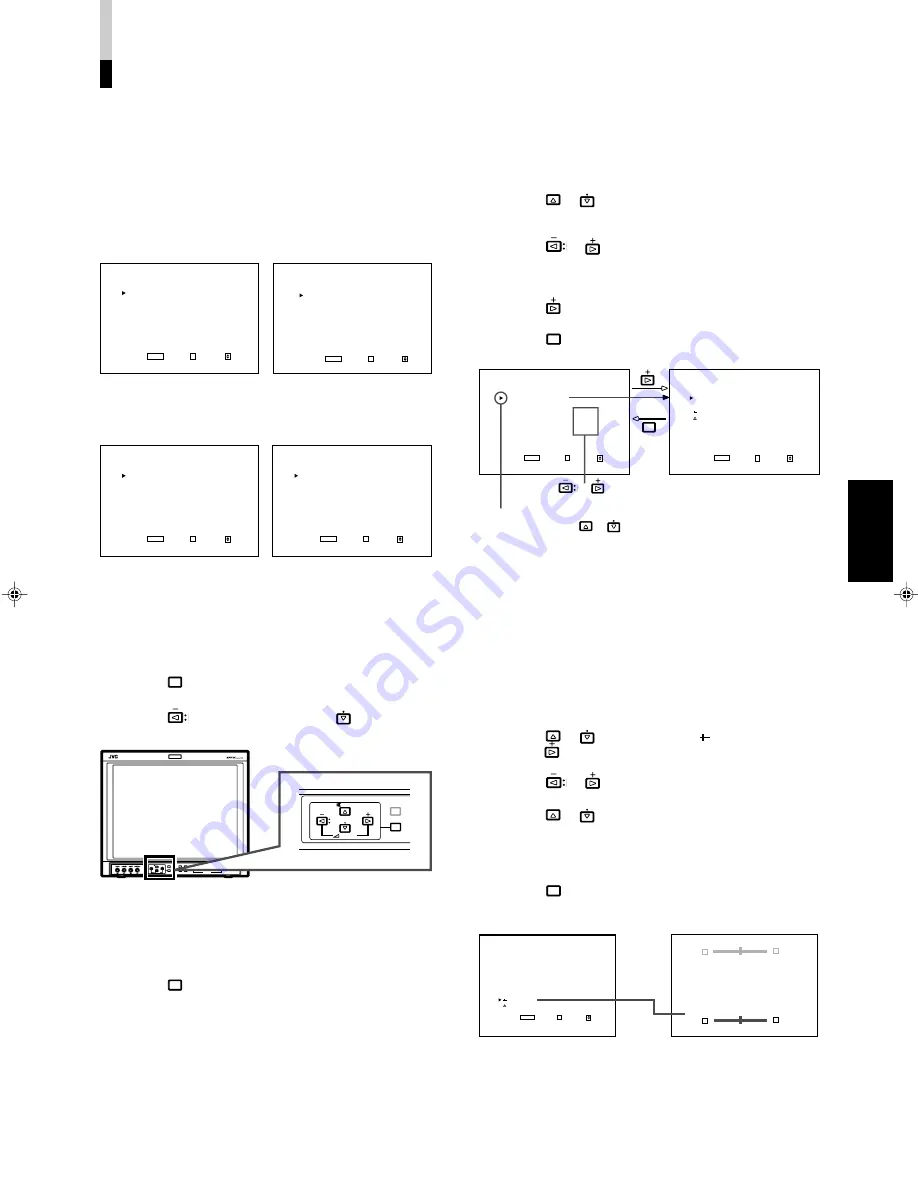
This monitor features a MAIN MENU (main menu screen) and
a SETUP MENU (setup menu screen).
The MAIN MENU contains the functions normally used, and
the SETUP MENU contains the settings required for initial
setup.
<SETUP MENU>
FUNCTION SETTING
PICTURE SUB ADJ.
COLOR TEMP/BAL.
SIZE/POSI.ADJ.
DISTORTION ADJ.
STATUS DISPLAY
CONTROL LOCK :ON
all reset
EXIT:
MENU
ENTER:+ SELECT:
<MAIN MENU>
APERTURE CONTROL
SLOT CONDITION
sub menu POSITION :LOWER
AREA MARKER :OFF
AREA MARKER-R :OFF
CENTER MARKER :OFF
COLOR MATRIX
EXIT:
MENU
ENTER:+ SELECT:
<MAIN MENU>
APERTURE CONTROL
SLOT CONDITION
sub menu POSITION :LOWER
COLOR MATRIX
EXIT:
MENU
ENTER:+ SELECT:
<MAIN MENU>
SLOT CONDITION
sub menu POSITION :LOWER
EXIT:
MENU
ENTER:+ SELECT:
䡵
DISPLAYING THE MENU
SCREENS
●
To display MAIN MENU
Press the
MENU
button on the front panel.
●
To display SETUP MENU
Press the
button while pressing the
button on the
front panel.
VOLUME
SLOT 1
A
B
DEGAUSS
MENU
MUTING
SCREENS
CHECK
ASPECT
AREA
MARKER
UNDER
SCAN
PULSE
CROSS
COLOR
OFF
SLOT 2
C
D
SLOT 3
POWER
E
F
INPUT SELECT
VOLUME
DEGAUSS
MENU
MUTING
䡵
CLOSING THE MENU
SCREENS
●
Using the MENU button
Press the
MENU
button a few times until the Menu Screen
disappears.
●
With no operation
When approx. 30 seconds have passed since the last Menu
operation, both screens will disappear.
* Some items on the Menu Screens disappear automatically
after setting.
NOTE : When you perform the “reset” or “all reset” function,
the Menu Screen does not disappear unless you
press the MENU button.
䡵
BASIC MENU OPERATION
●
To select an item,
Press the
or
buttons to move the cursor (
4
) on the
Menu Screens and select the desired item.
●
To set (select) or adjust an item,
Press the
or
buttons to select or adjust the desired
item.
●
When the desired item has other menus (hierarchical
menus),
Press the
button to display the lower hierarchical menu.
●
To return to the former Menu Screen,
Press the
MENU
button.
<MAIN MENU>
APERTURE CONTROL
SLOT CONDITION
sub menu POSITION :LOWER
AREA MARKER :OFF
AREA MARKER-R :OFF
CENTER MARKER :OFF
COLOR MATRIX
EXIT:
MENU
ENTER:+ SELECT:
<APERTURE CONTROL>
LEVEL :00
CONTROL FREQ. :HIGH
sub menu
reset
EXIT:
MENU
ENTER:+ SELECT:
MENU
䡵
HOW TO USE THE SUB
MENU
The sub menu function applies to Menu Screen items that
should be adjusted or set while watching the picture. This
function simplifies the adjustment or setting while watching
the picture by displaying the single item on the top or bottom
of the screen.
●
To use the sub menu function,
Press the
or
buttons to select “ sub menu”. Then,
press the
button to display the sub menu screen.
●
To adjust or set an item in the sub menu screen,
Press the
or
buttons.
●
To change the item to be adjusted or set,
Press the
or
buttons.
●
To change the position of the sub menu screen,
Set “UPPER” (on the top) or “LOWER” (on the bottom) in
“sub menu POSITION” of MAIN MENU.
●
To close the sub menu screen,
Press the
MENU
button. The previous Menu Screen is
displayed.
<PICTURE SUB ADJ.>
CONTRAST : 00
BRIGHT : 00
CHROMA : 00
PHASE : 00
NTSC SETUP : 00
COMPO.LEVEL :SMPTE
sub menu
reset
EXIT:
MENU
ENTER:+ SELECT:
CONTRAST : 00
- - + +
CONTRAST : 00
- - + +
MAIN MENU (main menu screen)
SETUP MENU
(setup menu screen)
The upper pale screen; when setting
“UPPER” in “sub menu POSITION”
The lower dark screen; when setting
“LOWER” in “sub menu POSITION”
MAIN MENU when the 4:3 video
signal is input
NOTE : The contents of menus vary depending on the input
signal or combination of the monitor’s settings.
MAIN MENU when the RGB signal
is input
Cursor
Move (select) with the
or
buttons.
Press the
or
buttons to
select or adjust the item.
Menu in an item
Example of sub menu screen
11
LCT1116-001A(EN)
02.1.29, 2:53 PM
13
Summary of Contents for DT-V1900CG
Page 30: ......


