background image

– 29 –

English

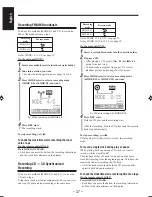
Recording on MDs

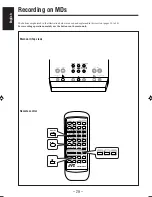
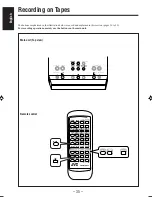
Main unit (Top view)

The buttons emphasized in the illustration below are used and explained in this section (pages 30 to 34.)
For recording operations, mainly use the buttons on the main unit.

Remote control

FM MODE

10

COLOR

MD GROUP 

MD TITLE

INPUT/EDIT

CLOCK

/TIMER

DISPLAY

/CHARA

MD TITLE

SEARCH

SOUND

MODE

  AHB

PRO

SET

CANCEL

CD

DIMMER

1

2

3

ENTER

FM/AM

/AUX

REV.MODE

REPEAT

TAPE

STANDBY/ON

SLEEP 

PLAY MODE

MARK

BEEP

VOLUME

MD

4

5

6

7

8

9

10

0

+

10

RM-SUXF70MDU

SET

CD

FM/AM

/AUX

TAPE

DISPLAY

/CHARA

F M / A M

STANDBY/ON

COLOR

A U X

VOLUME

MODE

select

MD GROUP
REC MODE

T A P E

REC

start

open/close

C D

open/close

M D

EN29-39UX-F70MD[UB]_f

01.7.10, 2:59 PM

29

Summary of Contents for CA-UXF70MD

Page 1: ...UND MODE AHB PRO SET CANCEL CD DIMMER 1 2 3 ENTER FM AM AUX REV MODE REPEAT TAPE STANDBY ON SLEEP PLAY MODE BEEP VOLUME MD 4 5 6 7 8 9 10 0 10 RM SUXF70MDU MARK STANDBY ON COMPACT DIGITAL AUDIO MICRO COMPONENT MD SYSTEM UX F70MD PHONES COLOR MD GROUP MD TITLE IMPUT EDIT CLOCK TIMER FM MODE DISPLAY CHARA MD TITLE SEARCH SOUND MODE AHB PRO SET CANCEL CD DIMMER 1 2 3 ENTER FM AM AUX REV MODE REPEAT T...

Page 2: ...ely the STANDBY ON lamp goes off The STANDBY ON button in any position does not disconnect the mains line When the unit is on standby the STANDBY ON lamp lights red When the unit is turned on the STANDBY ON lamp lights green The power can be remote controlled Warnings Cautions and Others ...

Page 3: ...tc the heat may not be able to get out Do not place any naked flame sources such as lighted candles on the apparatus When discarding batteries environmental problems must be considered and local rules or laws governing the disposal of these batteries must be followed strictly Do not use this apparatus in a bathroom or places with water Also do not place any containers filled with water or liquids ...

Page 4: ...No obstructions and open spacing 2 Sides Top Back No obstructions should be placed in the areas shown by the dimensions below 3 Bottom Place on the level surface Maintain an adequate air path for ventilation by placing on a stand with a height of 10 cm or more UX F70MD UX F72MD 1 cm 15 cm 15 cm 15 cm 10 cm UX F70MD UX F72MD 1 cm 15 cm 15 cm 15 cm G 3 ...

Page 5: ...e laser radiation when open and interlock failed or defeated AVOID DIRECT EXPOSURE TO BEAM e ADVARSEL Usynlig laser stråling ved åbning når sikkerhedsafbrydere er ude af funktion Undgå udsæt telse for stråling d VARNING Osynlig laser strålning när denna del är öppnad och spärren är urkopplad Betrakta ej strålen s VARO Avattaessa ja suo jalukitus ohitettaessa olet alttiina näkymättömälle lasersätei...

Page 6: ...etain this manual for future reference Power sources When unplugging the unit from the wall outlet always pull the plug not the AC power cord DO NOT handle the AC power cord with wet hands Moisture condensation Moisture may condense on the lens inside the unit in the following cases After starting heating in the room In a damp room If the unit is brought directly from a cold to a warm place Should...

Page 7: ...D CD Messages 64 Troubleshooting 65 Specifications 66 Location of the Buttons 3 Main Unit 3 Remote Control 5 Getting Started 6 Unpacking 6 Connecting Antennas 6 Connecting Speakers 7 Connecting Other Equipment 8 Putting the Batteries into the Remote Control 9 Basic and Common Operations 10 Turning On the Power 11 Selecting the Sources and Starting Play 11 Adjusting the Volume 12 Turning On Off the...

Page 8: ...OR A U X VOLUME TAPE EJECT MODE select MD GROUP REC MODE T A P E M D C D open close REC start 1 2 3 4 5 8 6 7 q p 9 t PHONES MICRO COMPONENT MD SYSTEM STANDBY ON COMPACT DIGITAL AUDIO PBC REC DAIRY SOUND AHB GROUP PRO ST MONO o i y u Display window on the electronic swing panel Top view Front view PBC REC SOUND AHB GROUP PRO DAILY ST MONO a s d g h f k l j ...

Page 9: ...button 11 34 38 Pressing this button also turns on the unit r TAPE EJECT 0 portion 28 t Cassette holder 28 y Electronic swing panel u Display window i PHONES jack stereo mini type 12 o Remote sensor STANDBY ON lamp 11 When using the remote control point it at the remote sensor on the electronic swing panel Display window a Timer mode indicators Timer DAILY Daily Timer and REC Recording Timer s CD ...

Page 10: ...AHB Active Hyper Bass PRO button 12 y REV reverse MODE button 28 u STANDBY ON button 11 15 58 59 i FM MODE button 15 o SLEEP button 60 Number buttons 1 10 10 buttons Character entry buttons A Z 0 9 a buttons 13 26 50 54 55 s PLAY MODE button 19 20 24 26 d REPEAT button 21 26 f MD 3 8 play pause button 11 23 26 31 Pressing this button also turns on the unit g TAPE 2 3 button 11 28 Pressing this but...

Page 11: ... type connector should be used To connect an outdoor FM antenna Before connecting it disconnect the supplied FM antenna Continued ANTENNA FM 75Ω COAXIAL AM EXT AM LOOP Connecting Antennas FM antenna 1 Attach the FM antenna to the FM 75 Ω COAXIAL terminal 2 Extend the FM antenna 3 Fasten it up in the position which gives you the best reception About the supplied FM antenna The FM antenna supplied w...

Page 12: ...nna supplied Vinyl covered wire not supplied 3 ANTENNA FM 75Ω COAXIAL AM EXT AM LOOP 1 2 Connecting Speakers To attach spacers If you want to place the speakers beside the main unit it is recommended to leave a space 1 cm between the main unit and the right speaker for ventilation It is recommended to attach the spacers supplied to the right speaker as the illustration below Spacers supplied The r...

Page 13: ... through this unit connect between the audio output jacks on the other equipment and LINE IN AUX jacks by using audio cords not supplied To connect speakers You can connect the speakers by following the procedure below 1 If cords are covered with insulation twist the core of the cord at the end of each cord then remove the insulation 2 Open the speaker terminal 3 Insert the end of the speaker cord...

Page 14: ...partment when you are not going to use the remote control for an extended period of time Otherwise it will be damaged from battery leakage When connecting the AC power cord into a wall outlet the unit automatically starts the display illumination To stop and cancel the display demonstration press COLOR during display illumination while the unit is turned off on standby To start the display illumin...

Page 15: ...D TITLE SEARCH SOUND MODE AHB PRO SET CANCEL CD DIMMER 1 2 3 ENTER FM AM AUX REV MODE REPEAT TAPE STANDBY ON SLEEP PLAY MODE MARK BEEP VOLUME MD 4 5 6 7 8 9 10 0 10 RM SUXF70MDU STANDBY ON COLOR DIMMER SET 10 0 10 SOUND MODE AHB PRO CD FM AM AUX TAPE BEEP VOLUME MD F M A M open close STANDBY ON COLOR A U X VOLUME MODE select MD GROUP REC MODE T A P E M D C D open close REC start Main unit Front vi...

Page 16: ... display Each time you press the button the sources change as follows When you change the source from the others TUNER appears for a while For more detailed tuner operations see pages 14 to 16 For operating the external equipment see the manuals supplied with them When using the main unit Press FM AM to select the tuner Each time you press the button the band alternates between FM and AM Press AUX...

Page 17: ... get the effect press AHB PRO The AHB PRO indicator lights on the display Each time you press the button the effect changes as follows AHB 1 Bass sound is clearly heard even in the low volume AHB 2 More richness and fullness of the bass sound is heard AHB OFF Cancels the AHB PRO effect The AHB PRO indicator goes off from the display To check the AHB PRO setting currently selected press AHB PRO onc...

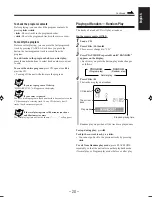
Page 18: ...rk but this is not a malfunction To adjust and register the color You can adjust the color by changing the tone whiteness brigtness and register into COLOR 1 to 7 There is a time limit in doing the following steps If the setting is canceled before you finish start from step 1 again On the remote control ONLY 1 Press COLOR repeatedly until the color number COLOR 1 to 7 you want to adjust appears on...

Page 19: ...MD TITLE INPUT EDIT CLOCK TIMER DISPLAY CHARA MD TITLE SEARCH SOUND MODE AHB PRO SET CANCEL CD DIMMER 1 2 3 ENTER FM AM AUX REV MODE REPEAT TAPE STANDBY ON SLEEP PLAY MODE MARK BEEP VOLUME MD 4 5 6 7 8 9 10 0 10 RM SUXF70MDU SET FM AM AUX FM MODE DISPLAY CHARA 1 2 3 4 5 6 7 8 9 10 0 10 F M A M STANDBY ON COLOR A U X VOLUME MODE select MD GROUP REC MODE T A P E M D open close REC start open close C...

Page 20: ...or 4 The frequency changes step by step To change the FM reception mode When an FM stereo broadcast is noisy or hard to receive you can change the FM reception mode to improve the reception On the remote control ONLY Press FM MODE so that the MONO indicator lights on the display Each time you press the button MONO indicator lights and goes off alternately When the MONO indicator is lit Reception i...

Page 21: ...ilure occurs The preset stations will be erased If this happens preset the stations again Tuning in a Preset Station On the remote control ONLY 1 Press FM AM AUX repeatedly to select FM or AM The unit automatically turns on with the last source selected Each time you press the button the source changes as follows 2 Press the number buttons to select a preset number Ex For preset number 5 press 5 F...

Page 22: ...NPUT EDIT CLOCK TIMER DISPLAY CHARA MD TITLE SEARCH SOUND MODE AHB PRO SET CANCEL CD DIMMER 1 2 3 ENTER FM AM AUX REV MODE REPEAT TAPE STANDBY ON SLEEP PLAY MODE MARK BEEP VOLUME MD 4 5 6 7 8 9 10 0 10 RM SUXF70MDU REPEAT PLAY MODE CD 10 1 2 3 MARK 4 5 6 7 8 9 10 0 10 DISPLAY CHARA CANCEL F M A M open close CD STANDBY ON COLOR A U X VOLUME MODE select MD GROUP REC MODE T A P E M D open close REC s...

Page 23: ...D Text CD G CD Graphics and CD Extra When playing a CD R or CD RW User edited CD Rs CD Recordable and CD RWs CD ReWritable can be played back when they are already finalized If you play back the unfinalized CDs UNFINALIZE appears on the display You can play back your original CD Rs or CD RWs recorded in music CD format ONLY If CD RWs have been recorded in different format erase all the data on CD ...

Page 24: ...ck CD On the remote control ONLY Press DISPLAY CHARA Each time you press the button the disc informations and the clock time alternate on the display CD indicator Total playing time Total track number Programing the Playing Order of the Tracks Program Play You can arrange the order in which the tracks play before you start playing You can program up to 32 tracks On the remote control ONLY 1 Load a...

Page 25: ...le selecting track 14 on a CD that only has 12 tracks Such entries are ignored If the total playing time is 100 minutes one hour and 40 minutes or more The total playing time will not be shown will appear Playing at Random Random Play The tracks of a loaded CD will play at random On the remote control ONLY 1 Load a CD 2 Press CD 3 8 then 7 The source is changed to CD 3 Press PLAY MODE repeatedly u...

Page 26: ...s REPEAT ALL Repeats all the tracks on the CD in Normal play or Random play mode or all the tracks in the program REPEAT ONE Repeats one track REPEAT OFF Cancels the repeat play If the play mode is either Program or Random the repeat mode indication appears on the display for a while each time you press REPEAT To exit from Repeat play mode press REPEAT repeatedly until REPEAT OFF appears on the di...

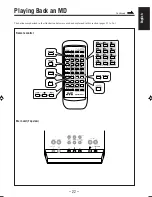
Page 27: ...t MD GROUP REC MODE T A P E M D open close REC start open close C D FM MODE 10 COLOR MD GROUP MD GROUP MD TITLE INPUT EDIT CLOCK TIMER DISPLAY CHARA MD TITLE SEARCH SOUND MODE AHB PRO SET CANCEL CD DIMMER 1 2 3 ENTER FM AM AUX REV MODE REPEAT TAPE STANDBY ON SLEEP PLAY MODE MARK BEEP VOLUME MD 4 5 6 7 8 9 10 0 10 RM SUXF70MDU MD 10 1 2 3 MARK 4 5 6 7 8 9 10 0 10 REPEAT PLAY MODE DISPLAY CHARA CANC...

Page 28: ... stereo recording and playing The MDLP logo is marked on the MD recorders and players compatible with MDLP It is also marked on MDs pre recorded in ATRAC3 excluding recordable MDs Playing Back the Entire MD Normal Play You can play an MD 1 Press MD open close 0 on the main unit The unit automatically turns on the electronic swing panel slides downward so the MD loading slot appears If an MD is alr...

Page 29: ...ying or pausing Normal source playing indication Group title and play mode Remaining recording time Clock time back to the beginning 7 When the MD recorder stops Normal source indication Remaining recording time Clock time back to the beginning Programing the Playing Order of the Tracks Program Play You can arrange the order in which the tracks play before you start playing You can program up to 3...

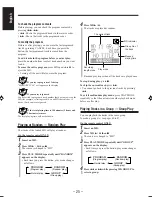
Page 30: ...of the loaded MD will play at random On the remote control ONLY 1 Insert an MD 2 Press MD 3 8 then 7 The source is changed to MD 3 Press PLAY MODE repeatedly until RANDOM appears on the display Each time you press the button play mode changes as follows 4 Press MD 3 8 The tracks are played at random Random play stops when all the tracks are played once To stop during play press 7 To skip the curre...

Page 31: ... can playback a track by searching its title You cannot perform title search for the tracks without titles You can search a title while playing back an MD On the remote control ONLY 1 Insert an MD If the current source is not an MD press MD 3 8 then 7 2 Press MD TITLE SEARCH The unit enters the title input screen 3 Input the title of the track You can input up to the first 5 letters of the track y...

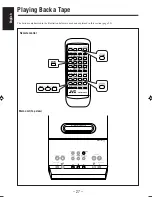
Page 32: ... INPUT EDIT CLOCK TIMER DISPLAY CHARA MD TITLE SEARCH SOUND MODE AHB PRO SET CANCEL CD DIMMER 1 2 3 ENTER FM AM AUX REV MODE REPEAT TAPE STANDBY ON SLEEP PLAY MODE MARK BEEP VOLUME MD 4 5 6 7 8 9 10 0 10 RM SUXF70MDU TAPE REV MODE DISPLAY CHARA AUTO REVERSE CASSETTE DECK F M A M STANDBY ON COLOR A U X VOLUME TAPE EJECT MODE select MD GROUP REC MODE T A P E M D open close REC start open close C D ...

Page 33: ...lock time alternate on the display The use of the C 120 or thinner tape is not recommended since characteristic deterioration may occur and this tape easily jams in the pinchrollers and the capstans Playing Back a Tape You can play back type I II and IV tapes 1 Press TAPE EJECT 0 The cassette holder opens 2 Put a cassette in with the exposed part of the tape in front 3 Close the cassette holder ge...

Page 34: ...Remote control FM MODE 10 COLOR MD GROUP MD TITLE INPUT EDIT CLOCK TIMER DISPLAY CHARA MD TITLE SEARCH SOUND MODE AHB PRO SET CANCEL CD DIMMER 1 2 3 ENTER FM AM AUX REV MODE REPEAT TAPE STANDBY ON SLEEP PLAY MODE MARK BEEP VOLUME MD 4 5 6 7 8 9 10 0 10 RM SUXF70MDU SET CD FM AM AUX TAPE DISPLAY CHARA F M A M STANDBY ON COLOR A U X VOLUME MODE select MD GROUP REC MODE T A P E REC start open close C...

Page 35: ...the beginning of each track enabling you to locate the track This mark is called a track mark and the portion between two adjacent track marks is called a track When recording from the CD player a track mark is recorded automatically at the beginning of each track When recording from an analog source such as FM AM broadcasts no track mark is recorded on the MD This means that when playing this MD ...

Page 36: ... 4 times long hour recording mode can only be played back on the equipment provided with MDLP compatible with a long hour stereo recording function otherwise LP is displayed before a title and playback proceeds without sounds When editing songs tracks on an MD you cannot join JOIN songs tracks recorded in different recording length modes SP LP2 LP4 More about MDLP You cannot make a long hour monau...

Page 37: ...RMAL SPEED REC MODE 3 5 LP4 NORMAL SPEED REC MODE 1 15 SP NORMAL SPEED REC MODE 2 15 LP2 NORMAL SPEED REC MODE 3 15 LP4 NORMAL SPEED REC MODE 4 15 SP HIGH SPEED REC x2 MODE 5 15 LP2 HIGH SPEED REC x2 MODE 6 15 LP4 HIGH SPEED REC x2 MODE 7 15 SP HIGH SPEED REC x4 Recording mode Recording length mode Recording Speed Recording CD CD Synchronized Recording You have seven methods MODE 1 15 7 15 to reco...

Page 38: ...mode Recording Speed Recording mode Reverse Mode 4 Press REC start Both the CD play and the recording start After the recording both the CD player and the MD recorder stop automatically To stop recording press 7 UTOCwriting appears on the display for a while To record a single track during play or pause While playing back or pausing a CD track you want to record perform steps 3 and 4 The playback ...

Page 39: ...t a recording mode MODE 1 5 MODE 3 5 you want 4 Press REC start AUX Ready appears on the display 5 Start playback on the external equipment The recording starts automatically when the sound comes into this unit To stop recording press 7 UTOCwriting appears on the display for a while To put a track mark manually while recording press SET on the remote control at the place you want Recording length ...

Page 40: ...ain unit Remote control FM MODE 10 COLOR MD GROUP MD TITLE INPUT EDIT CLOCK TIMER DISPLAY CHARA MD TITLE SEARCH SOUND MODE AHB PRO SET CANCEL CD DIMMER 1 2 3 ENTER FM AM AUX REV MODE REPEAT TAPE STANDBY ON SLEEP PLAY MODE MARK BEEP VOLUME MD 4 5 6 7 8 9 10 0 10 RM SUXF70MDU SET CD FM AM AUX MD F M A M STANDBY ON COLOR A U X VOLUME MODE select MD GROUP REC MODE T A P E REC start open close C D open...

Page 41: ...ng To protect your recording remove these tabs To re record on a protected tape cover the holes with adhesive tape To keep the best recording and playback sound quality If the heads capstans and pinch rollers of the cassette deck become dirty the following will occur Loss of sound quality Discontinuous sound Fading Incomplete erasure Difficulty in recording To clean the heads capstans and pinch ro...

Page 42: ...LY 1 Insert a recordable cassette into the cassette holder 2 Prepare a CD After placing a CD press CD 3 8 then 7 before going to the next step You can make a program see page 19 or select Random play mode see page 20 if you want 3 Press MODE select to select a recording mode MODE 8 15 or MODE 9 15 you want 4 Press REC start Both the CD play and the recording start After the recording both the CD p...

Page 43: ...D onto a tape Using these synchronized recording methods you can start and stop MD play and tape recording at the same time On the main unit ONLY 1 Insert a recordable cassette into the cassette holder 2 Prepare an MD After inserting an MD press MD 3 8 then 7 before going to the next step You can make a program see page 24 or select Random play mode see page 25 or Group play mode see page 25 if yo...

Page 44: ...tically To stop recording press 7 UTOCwriting appears on the display for a while MODE 10 15 NORMAL SPEED REC SP MODE 11 15 NORMAL SPEED REC SP MODE 12 15 NORMAL SPEED REC LP2 MODE 13 15 NORMAL SPEED REC LP2 MODE 14 15 NORMAL SPEED REC LP4 MODE 15 15 NORMAL SPEED REC LP4 Recording length mode Recording Speed Recording mode Reverse Mode To record a single track during play or pause While playing bac...

Page 45: ...1 2 3 ENTER FM AM AUX REV MODE REPEAT TAPE STANDBY ON SLEEP PLAY MODE MARK BEEP VOLUME MD 4 5 6 7 8 9 10 0 10 RM SUXF70MDU MD TITLE INPUT EDIT SET MD GROUP CANCEL ENTER 10 1 2 3 MARK 4 5 6 7 8 9 10 0 10 About MD Group MD group helps you to play or edit many tracks easily You can form up to 99 groups A single track can form a group You can do that following using groups Group Play See page 25 Assig...

Page 46: ...ions consists of Group play Group recording and Group editing Group play see page 25 You can play back and repeat the desired group without making a program For example you can play back repeatedly the genre B tracks by selecting Group 1 in the left figure Group recording see page 32 You can form a group while tracks are being recorded Group editing You can edit the groups using the following func...

Page 47: ... 1 1 2 3 4 Group 2 5 6 7 8 9 10 11 Group 3 12 13 14 Group 4 15 16 17 Group 5 18 19 20 Group 6 21 22 23 24 Group 3 Group 1 1 2 3 4 Group 2 Group 3 5 6 7 8 9 10 11 Group 4 12 13 14 Group 5 15 16 17 Group 6 18 19 20 Group 7 21 22 23 24 Group 1 1 2 3 4 Group 2 5 6 7 8 9 10 11 Group 4 12 13 14 Group 5 15 16 17 Group 6 18 19 20 Group 7 21 22 23 24 1 2 3 4 5 6 7 8 9 10 11 12 13 14 15 Group 1 Group 2 Grou...

Page 48: ...cted track starts playback repeatedly During playback The selected track starts playback repeatedly FORM GR ENTRY GR DIVIDE GR UNGROUP UNGR ALL ERASE GR Canceled JOIN GR MOVE GR GR 1 TITLE 5 Press SET GROUP TRACK appears when the track is already in a group To cancel the setting press CANCEL then repeat step 4 6 Press or 4 to select the last track of a new group You can select the track using numb...

Page 49: ...ting process press MD TITLE INPUT EDIT On the remote control ONLY 1 Insert an MD to edit Adding a Track to a Group ENTRY GR This function allows you to enter a track into a group The track will be added as the last track in the selected group The track numbers will be renumbered To stop any time during editing process press MD TITLE INPUT EDIT On the remote control ONLY 1 Insert an MD to edit 2 Pr...

Page 50: ... GR DIVIDE GR UNGROUP UNGR ALL ERASE GR Canceled JOIN GR MOVE GR GR 1 TITLE Joining Two Groups JOIN GR This function allows you to join two adjacent groups into a single group When the groups have each title the title of the preceding group is reassigned to the joined group Once two groups are joined the other groups are renumbered To stop any time during editing process press MD TITLE INPUT EDIT ...

Page 51: ...ORM GR ENTRY GR DIVIDE GR UNGROUP UNGR ALL ERASE GR Canceled JOIN GR MOVE GR GR 1 TITLE 7 Press SET MOVE GR appears on the display To cancel the setting press CANCEL then repeat step 4 8 Press ENTER to finish the editing procedure EDITING then UTOCwriting appears on the display while the editing you have made is being recorded on the MD Moving a Group MOVE GR This function allows you to move a gro...

Page 52: ...tep 4 6 Press ENTER to finish the editing procedure EDITING then UTOCwriting appears on the display while the editing you have made is being recorded on the MD FORM GR ENTRY GR DIVIDE GR UNGROUP UNGR ALL ERASE GR Canceled JOIN GR MOVE GR GR 1 TITLE Dissolving All Groups UNGR ALL This function allows you to dissolve all the groups You cannot erase the tracks using this function To stop any time dur...

Page 53: ...control FM MODE 10 COLOR MD GROUP MD TITLE INPUT EDIT CLOCK TIMER DISPLAY CHARA MD TITLE SEARCH SOUND MODE AHB PRO SET CANCEL CD DIMMER 1 2 3 ENTER FM AM AUX REV MODE REPEAT TAPE STANDBY ON SLEEP PLAY MODE MARK BEEP VOLUME MD 4 5 6 7 8 9 10 0 10 RM SUXF70MDU CANCEL ENTER SET MD TITLE INPUT EDIT 10 1 2 3 MARK 4 5 6 7 8 9 10 0 10 MD Continued ...

Page 54: ...ge 51 This function moves a track by reordering the track numbers Erasing tracks ERASE Page 52 This function erases selected tracks After the erasure the subsequent tracks are justified and their track numbers are renumbered automatically You can erase up to 15 tracks at a time B C A1 1st A2 2nd 3rd 4th D 5th 1st 2nd 3rd 4th B C A D After dividing track A Track No C D E A B C D E A B After moving ...

Page 55: ...when you want to add track marks at a certain point within a track or if you want to separate a recording When the original track has a title two separate tracks are reassigned the same title as the original track Once a new track is divided the other tracks are renumbered To stop any time during editing process press MD TITLE INPUT EDIT On the remote control ONLY 1 Insert an MD to edit 2 Press MD...

Page 56: ... It is useful to change the order of the tracks as you like Once a track is moved the tracks and the other groups are renumbered To stop any time during editing process press MD TITLE INPUT EDIT On the remote control ONLY 1 Insert an MD to edit Ex When you want to join tracks 1 and 2 2 Press MD TITLE INPUT EDIT repeatedly until MOVE appears on the display The source changes to MD Each time you pre...

Page 57: ...to erase To cancel press CANCEL 6 Press ENTER ERASE appears on the display 7 Press ENTER again to finish the editing procedure EDITING then UTOCwriting appears on the display while the editing you have made is being recorded on the MD Erasing All Tracks ALL ERASE This function allows you to erase all the tracks on an MD On the remote control ONLY 1 Insert an MD to edit 2 Press MD TITLE INPUT EDIT ...

Page 58: ... MD GROUP REC MODE T A P E REC start open close open close C D M D FM MODE 10 COLOR MD GROUP MD TITLE INPUT EDIT CLOCK TIMER DISPLAY CHARA MD TITLE SEARCH SOUND MODE AHB PRO SET CANCEL CD DIMMER 1 2 3 ENTER FM AM AUX REV MODE REPEAT TAPE STANDBY ON SLEEP PLAY MODE MARK BEEP VOLUME MD 4 5 6 7 8 9 10 0 10 RM SUXF70MDU 10 1 2 3 MARK 4 5 6 7 8 9 10 0 10 MD TITLE INPUT EDIT DISPLAY CHARA MD TITLE SEARC...

Page 59: ... for an MD is 1792 The maximum number that can be input for a disc title is 64 and for each track 61 However the actual number you can input may be slightly less than this maximum numbers due to the MD limitations see page 63 A space can be counted as one character When the stereo long hour recording LP2 or LP4 see page 31 method is used for recording the maximum number you can input for a track t...

Page 60: ...title and group title The MD recorder continues recording even after you press ENTER in step 6 above When you press ENTER a title is assigned to the track or group where you have started the title entry If you do not press ENTER before recording ends the title assigned will be canceled When assigning titles to a disc or track next title entry mode appears You cannot assign group title if the MD ha...

Page 61: ... control FM MODE COLOR MD GROUP MD TITLE INPUT EDIT CLOCK TIMER DISPLAY CHARA MD TITLE SEARCH SOUND MODE AHB PRO SET CANCEL CD DIMMER 1 2 3 ENTER FM AM AUX REV MODE REPEAT TAPE STANDBY ON SLEEP PLAY MODE MARK BEEP VOLUME MD 4 5 6 7 8 9 0 10 RM SUXF70MDU SLEEP CLOCK TIMER DIMMER SET CANCEL 10 1 2 3 4 5 6 7 8 9 10 0 10 STANDBY ON Continued ...

Page 62: ...set to on The clock time will be indicated by sound Using Recording Timer With Recording Timer you can make an unattended recording You can set Recording Timer whether the unit is turned on or off on standby To correct a mis entry any time during the setting process press CANCEL How Recording Timer actually works The unit automatically turns on and starts recording on an MD or a tape when the time...

Page 63: ...2 on page 57 The timer and REC indicators go off from the display To turn on the Recording Timer again press 4 to select ON in step 2 above The timer and REC indicators light on the display The settings you have done are shown on the display for your confirmation Recording Timer will be canceled and the unit will not turn off automatically in the following When you press 7 while recording When you...

Page 64: ...adjust the volume level within the range of 0 silent to 40 maximum When you select VOLUME the volume is set to the current volume level 2 Press SET The setting you have done are shown on the display in sequence The DAILY indicators stop flashing and remains lit on the display 6 Press STANDBY ON to turn off the unit on standby To turn off the Daily Timer after its setting is done 1 Press CLOCK TIME...

Page 65: ...EEP repeatedly until the time length you want appears on the display The timer indicator starts flashing and SLEEP 10 appears on the display Each time you press the button the time length changes as follows 2 Press SET or wait for about 5 seconds The display illumination dim SLEEP appears on the display To check the remaining time until the shut off time press SLEEP once The remaining time until t...

Page 66: ...k in its case after use to prevent warping Be careful not to scratch the surface of the disc when placing it back in its case Avoid exposure to direct sunlight temperature extremes and moisture To clean the disc Wipe the disc with a soft cloth in a straight line from center to edge DO NOT use any solvent such as conventional record cleaner spray thinner or benzine to clean the disc Handling MDs Do...

Page 67: ...que developed for MD This technology cuts out faint sounds that would not be heard by the human beings This technology based on human sensitivity to sounds reduces recorded data volume up to about one fifth of the original data volume Furthermore this unit takes advantage of the latest ATRAC3 techniques which can reduce the amount of data to record to one 10th or one 20th of the original data volu...

Page 68: ...ent System Now onto recordable MDs minidiscs you can record copy sound at a recording speed exceeding the normal speed This fact requires some restrictions for protecting copyrights On this unit you cannot re record at either high speed or normal speed a song track that has been recorded once from a CD at high speed until 74 minutes elapse after the first recording of the song started For example ...

Page 69: ...d once at high speed before 74 minutes have passed after its first recording MD is not loaded correctly There is no MD You are trying to copy a non audio disc like a CD ROM Video CD or DVD You are trying to edit or record on a playback only MD Solution Change the MD with another if you want to enjoy playback This is not a malfunction See ENTRY GR on page 44 This is not a malfunction See FORM GR on...

Page 70: ...ween the remote control and the remote sensor on the unit is blocked The batteries have lost their charge You are using the remote control far from the unit You are using a prerecorded MD The MD is write protected The antenna is not connected correctly The AM loop antenna is too close to the unit The FM antenna is not properly extended and positioned The main AC power cord is not plugged in The CD...

Page 71: ...stem CIRC Cross Interleave Reed Solomon Code Recording Playback time when using a 80 minute MD SP 80 minutes LP2 160 minutes LP4 320 minutes Sampling frequency 44 1 kHz Audio compression system ATRAC Adaptive TRansform Acoustic Coding ATRAC3 Cassette deck Frequency response Normal type I 60 Hz 14 000 Hz Wow and flutter 0 15 WRMS Speaker Section Speakers Woofer 10 cm Tweeter 4 cm Impedance 4 Ω Dime...

Page 72: ...EN CH 0701MWMMDWJEM VICTOR COMPANY OF JAPAN LIMITED J VC ...

Reviews: