


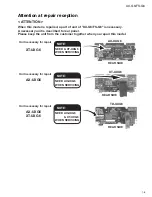


1-12
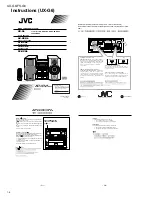
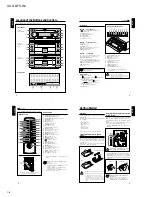
UX-G6/FS-G6
19
English
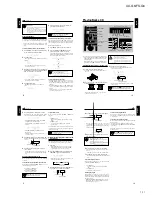
Repeating Tracks — Repeat Play
You can have the entire disc, the programed tracks, or the
individual track repeat as many times as you like.
1
Place a CD.
If the current playing source is not the CD, press
6
(play/pause) button on the CD unit, then
7
(stop) button
before going to the next step.
2
Press REPEAT button on the remote control
repeatedly to set the repeat mode.
• Each time you press the button, repeat mode indicators
light in the display window, and Repeat playback
mode changes as follows:
:
Repeats one track on the CD or in a
program.
: Repeats all the tracks on the CD or a
program.
3
Press
7
(stop) button to quit Repeat play.
To exit from Repeat play mode
Pressing REPEAT button repeatedly until repeat mode
indicators (
and
) goes off in the display window.
Combining play modes:
• When combining Program play and Repeat play,
you can repeat whole the programed tracks or
one track among them (
and
).
• When combining Random play and Repeat play,
you can just repeat whole the shuffled tracks
(only
).
Playing at Random — Random Play
The tracks of the loaded CD will play in no special order
(at random) when you select this mode.
1
Place a CD.
If the current playing source is not the CD, press
6
(play/pause) button on the CD unit, then
7
(stop) button
before going to the next step.
2
Press PLAY MODE button repeatedly until “CD
RANDOM” appears in the display window.
• Each time you press the button, playback mode
indicator also changes as follows:
3
Press
6
(play/pause) button on the CD unit.
The track numbers are shuffled in the display window
for a few seconds, and start playing back at random.
Random play ends when all the tracks are played back
once.
• Other CD operations are the same as Normal play.
4
Press
7
(stop) button to quit Random play.
To exit from Random play mode
Before playing back the CD, you can exit from Random
play mode as follows:
• Before playback, press PLAY MODE button once.
• During playback, press
7
(stop) button then press
PLAY MODE button once.
Play mode indicator goes off and the system resumes the
normal play mode.
Pressing
0
(open/close) button to open the CD
tray also quits and erases the random play.
Canceled
(Normal play)
Continued
PROGRAM
Canceled
(Normal play)
RANDOM
20
English
• DO NOT try to open or close the tape tray by
hands as it will be damaged.
• DO NOT place any foreign matters.
• DO NOT prevent the tray from opening and
closing, because it may results damages on the
unit.
3
Press
0
(open/close) button again to close the tray.
4
Press
`
(playback) button on the unit or TAPE
`
(playback) button on the remote control.
The tape playback starts and the tape direction indicator
blinks slowly in orange to show the tape running
direction.
• Each time you press
`
(playback) on the cassette
deck unit or TAPE
`
(playback) button on the remote
control, you can change the tape sides to be played
back currently.
3
3
3
3
3
: plays the forward side.
2
2
2
2
2
: plays the reverse side.
Playback comes to an end (Auto Reverse)
The cassette deck unit automatically changes the tape
direction to the reverse side, and continue playback
both sides. Each time to press the button, Auto
Reverse feature is set to on/off alternately.
You can listen to Normal (Type I), High position (TypeII),
and Metal (Type IV) type tapes without further settings.
• When using the inner buttons, press OPEN/CLOSE button
on AX-UXG6 unit to open the sliding panel first.
• When using the remote control, press TAPE
23
(playback) button first and
7
(stop) button successively.
DO NOT use tapes longer than 120 minutes.
The characteristic deterioration may occur and these
tapes easily jam in the tape transport mechanism.
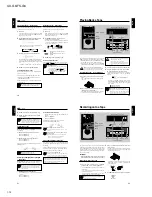
Playing Back a Tape — Basic Operation
1
Press
0
(open/close) button on the cassette deck
unit.
The system automatically turns on and the tape tray
comes out.
2
Place a tape on the tray with the side you want to
listen to facing up (forward side).
Tape fits in the caved-in area so that an exposed edge
of the tape faces toward the inside of the unit.
Playing Back a Tape
REC PAUSE
DOLBY B NR
AUTO
REVERSE
REC
DOLBY B NR
π
(auto reverse)
0
(open/close)
`
(playback)
7
(stop)
Tape operation indicators
DISPLAY
/CHARA.
PLAY
MODE
REC
MODE
TITLE
/EDIT
CLOCK
/TIMER
CANCEL
ENTER
SET
4
¢
Buttons behind the sliding panel
4
¢
REC
REC
Tape direction indicator
VOLUME
MD
CANCEL
DISPLAY
/CHARA.
>
<
TAPE
FM/AM
DOWN
SET
UP
AUX
CD
4
/
¢
7
(stop)
TAPE
`
(playback)
21
English
To skip forward to the next music
Press the button same as the tape direction indicator as
follows:
3
]
Press
¢
button.
2
]
Press
4
button.
During Music Scan progressed, the tape direction
indicator starts blinking rhythmically.
Repeating Music Scan feature made easy
searching a desired program on a tape one after
another.
The beginning of the desired program may not be
located properly
If blanks between music are too short, the blanks
contain too much noise or the program itself
contains very low-level or silent part.
Playing Back Dolby-Recorded Tape
You can play back the tape recorded with Dolby B NR
system. The Dolby NR system allows to reduce hiss noise
in playback.
Press DOLBY B NR button on the cassette deck before
playback. Each time you press the button, the Dolby NR
lamp on the unit lights up orange or turns off.
A tape recorded using Dolby NR
Should be played back using the Dolby NR of the
same type as that used in recording. The audio quality
will be affected if a different type is used in playback.
Dolby Noise Reduction manufactured under license from
Dolby Laboratories Licensing Corporation. “Dolby” and
double-D symbol are registered trademarks of Dolby
Laboratories Licensing Corporation.
5
Press
7
(stop) button to stop playback the tape.
6
Press
0
(open/close) button directly to stop and
remove the tape.
While the system is turned off (standby mode)
Pressing
`
(playback) or TAPE
`
(playback)
button automatically switches the system turned on
and starts playback if a tape is already loaded.
Fast-Winding a Tape
While stopping the tape,
press
4
/
¢
button to fast-
wind the tape.
To fast-forward, if the current tape direction is:
3
]
Press
¢
button.
2
]
Press
4
button.
To fast-rewind, if the current tape direction is:
3
]
Press
4
button.
2
]
Press
¢
button.
During fast-winding, the tape direction indicator starts
blinking quickly.
When the tape comes to an end
The deck unit automatically stops.
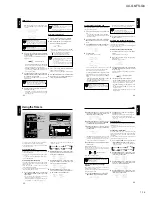
Searching and Skipping to Each Program
— Music Scan
While playing the tape,
you can search and skip to the
beginning of the current and next program on a tape.
Music scan searches for blank portions that usually
separate programs recorded onto the tape, then
automatically plays the program beginning after
that blank portion.
To skip backward to the current music
Press the button opposite to the tape direction indicator
as follows:
3
]
Press
4
button.
2
]
Press
¢
button.
REC
REC
or
forward
reverse
REC
REC
or
forward
reverse
Continued
22
English
2
Place a recordable tape with the side you want to
record facing up.
Press
0
(open/close) button on the cassette deck unit to
open the tape tray; place a tape on it; and press
0
(open/
close) button again to close it.
• You cannot record onto the tape without a protect tab.
When using that tape, cover the hole for desired side
with adhesive tape.
3
Press REC PAUSE button on the cassette deck unit.
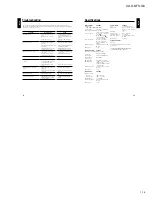
Recording onto a Tape
REC PAUSE
DOLBY B NR
AUTO
REVERSE
REC
REC PAUSE
DOLBY B NR
π
(auto reverse)
0
(open/close)
`
(playback)
7
(stop)
Tape operations indicators
\
REC
REC indicator
Two types of cassette tapes can be recorded onto, including
normal (Type I), and High position (Type II) tapes. These
types are identified automatically by the cassette deck unit
and the recording level is also corrected automatically.
Neither volume level nor sound effects during playback does
affect to the recording.
IMPORTANT:
• It may be unlawful to record or play back copyrighted
material without the consent of the copy right owner.
Manual Recording onto a Tape
1
Select one of the recording sources — FM/AM
broadcasts, CD, or other external equipment.
• To record FM/AM broadcasts, receive a station with
Tuner unit.
• To record a CD or its tracks programed, set the play-
pause mode for CD unit.
• To record from an external equipment connected to
ANALOG IN jacks, prepare it as required.
Make sure to select a source first, otherwise you
cannot use recording function.
DISPLAY
/CHARA.
PLAY
MODE
REC
MODE
TITLE
/EDIT
CLOCK
/TIMER
CANCEL
ENTER
SET
SET
REC MODE
Buttons behind the sliding panel
4
¢
VOLUME
MD
ENTER
CANCEL
DISPLAY
/CHARA.
>
<
TAPE
FM/AM
DOWN
SET
UP
AUX
TITTLE/EDIT
CD
7
(stop)
TAPE
`
(playback)
CD
6
(play/pause)
FM/AM
AUX
Summary of Contents for AX-UXG6
Page 16: ...1 16 UX G6 FS G6 M E M O ...
Page 17: ...2 1 UX G6 FS G6 AX UXG6 ...
Page 27: ...2 11 UX G6 FS G6 XT UXG6 ...
Page 46: ...2 30 UX G6 FS G6 M E M O ...
Page 47: ...2 31 UX G6 FS G6 TD UXG6 ...
Page 65: ...2 49 UX G6 FS G6 A B C D E F G 3 4 5 2 1 FL Display and micom section AX UXG6 ...
Page 66: ...2 50 UX G6 FS G6 A B C D E F G 3 4 5 2 1 System control section XT UXG6 Main signal ...
Page 68: ...2 52 UX G6 FS G6 A B C D E F G 3 4 5 2 1 Tuner section XT UXG6 except Ver J FM Tuner signal ...
Page 69: ...2 53 UX G6 FS G6 A B C D E F G 3 4 5 2 1 Tuner section XT UXG6 only Ver J FM Tuner signal ...
Page 73: ...2 57 UX G6 FS G6 A B C D E F G 3 4 5 2 1 System control Analog IN digital OUT board XT UXG6 ...
Page 74: ...2 58 UX G6 FS G6 A B C D E F G 3 4 5 2 1 CD Servo Main board XT UXG6 ...
Page 75: ...2 59 UX G6 FS G6 A B C D E F G 3 4 5 2 1 Main board TD UXG6 ...
Page 76: ...2 60 UX G6 FS G6 A B C D E F G 3 4 5 2 1 Tuner board TD UXG6 ...
Page 85: ...3 9 UX G6 FS G6 M E M O ...