0
0
1
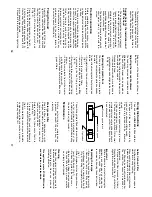
Intensive speed
Light switch
Electronic speed switch
— The manufacturers refuse to accept any
responsibility for damage to the hood or
its catching on fire because of failure to
observe the above instructions.
Suggestions for the installation and
use of the hood
— The horizontal sections of the pipe must
be slanted slightly upwards (about 10%)
to ensure an easy flow of the air outwards.
— The best performance of the unit is
obtained in the external exhaust model
(suction), therefore in the limits of the
possibilities it is advised to use the external
exhaust (suction) type.
— The best performances are obtained with
short pipes (max. 4 m) and with few
curves.
Electric connection
Before completing any connection, make
sure the house voltage corresponds with the
voltage indicated on the label affixed inside
the hood.
The hood is supplied with a standard plug;
connect it to a correspondingly standard
socket. In the case is intended to connect the
appliance permanently to the mains after
having removed the plug supplied, must be
fitted a two-pole switch conforming to
regulations with an opening distance
between contacts of not less than 3mm
The manufacturers are not liable for any
problems caused by the user’s failure to
observe the above instructions.
Fixing the hood
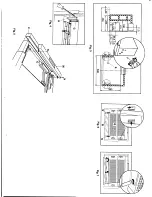
Apply the scheme supplied (Nº 49) on the
right of the cabinet so that the lines marked
by the arrows match the cabinet ensuring
that they meet at the back and under.
Make two Ø 2 mm holes at points
1
and
2
(fig. 3).
Carry out the same operation on the left.
Fix the hood to the cabinet using screws
E
(4,5x16) supplied with the appliance (fig. 3).
Use the shim
F
supplied with the hood for 16
mm cupboard side panels.
Fit the shim
F
to the left and to the right of the
fixing curves of the hood and hook them in
the holes.
Adjusting the removable drawer
The hood may be mounted in cabinets with
different depths.
The back of the drawer can be adjusted so
that the front of the removable drawer is the
same depth as the cabinet.
Proceed as follows:
— Unscrew the screws
G
, move the square
plates
H
as required and tighten the screw
G
(fig. 4).
Replacing the plastic front
The hood is supplied with a brown plastic
front which can replace the white one already
mounted.
To mount the brown plastic front proceed as
follows:
— Completely open the removable drawer
L
(fig. 1).
— Remove the two grease filters.
— remove the shaped metal piece
M
by
unscrewing the two fixing screws
N
(fig. 5).
— Remove the three screws
O
which fix the
band
P
from the inside of the removable
drawer.
— Fit the brown plastic front to the drawer
with the same three screws
O
.
— Refit the shaped metal piece
M
and the
grease filters.
Using Instructions
The hood model
JDA 3830
is fitted with two
motors.
The speed of the motors is adjusted by
means of a continuous sliding switch.
The hood is provided with an intensive
speed.
Use the intensive speed switch only in case
of high concentration of vapour.
The hood should be switched ON several
minutes before you start cooking and should
be allowed to run until all the vapours have
been eliminated.
The switching plate is fitted with two switches
one for continuous adjustment of the
ventilator (left switch) and one for illuminating
the work surface (right switch).
Maintenance
Before performing any maintenance
operation, disconnect the hood from the
electricity.
Metal grease filter
Wash the filter, in a dishwasher or with
detergent and water, periodically according
to how often the appliance is used, but at
least once every 4 weeks.
Before refitting the filter ensure that it is
perfectly dry.
To remove this filter push simultaneously
the two handle
Q
first upwards then inwards
(fig. 6).
Grill and metal filter are a unique indivisible
component and they cannot be divided, to
avoid any damage to it.
Active Carbon Filter
This filter eliminates the odours and vapours
which form during cooking.
When used in normal conditions it should be
replaced at intervals of 6-8 months.
These filter can be ordered from the supplier
The carbon filter cannot be washed or
regenerated.
To dismount,the filter proceed as follows:
Press the two buttons
C
(fig. 2), pull the filter
slightly forwards and remove it.
Important
Failure to observe the rules for cleaning the
appliance and changing and cleaning the
filters may cause fires. Therefore, we
recommend observing these instructions.
Replacing the lamps
— Disconnect the hood from the electricity.
— Remove the lamp cover
R
by pushing
simultaneously two unlocking button
S
(Fig. 6) 'till having it completely removed
(fig. 7).
— Always replace burnt-out lamps with neon-
lamp 14 Watt max. (Fig. 7).
— Re-close the grate or the lamp cover.
— Before calling for Repair Service because
the hood fails to light up, make sure the
neon lamp is well-inserted.
Cleaning
To clean the outside of the hood use a cloth
moistened with denatured alcohol or neutral
liquid detergents. Never use products
containing abrasive.
This appliance meets 87/308 EWG radio
and television noise standards.
16
17


