background image

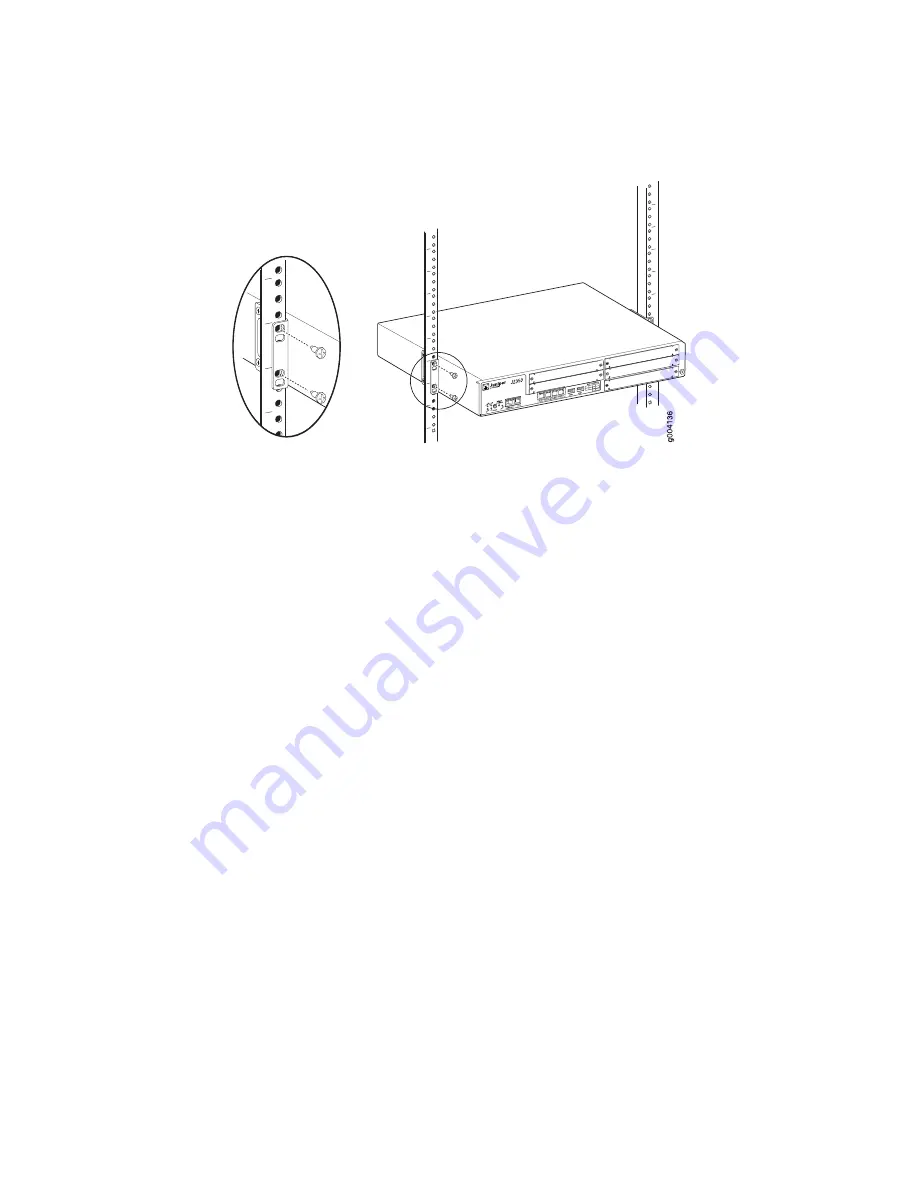
Figure 4: Hanging a J2350 Router in a Rack

3.

Have a second person install a mounting screw into each of the two aligned
holes. With a number 2 Phillips screwdriver, tighten the screws.

4.

Verify that the mounting screw on one side of the rack is aligned with the
mounting screw on the opposite side and that the router is level.

5.

Install the second screw in each mounting bracket.

Installing J4350 or J6350 Services Routers

To install a J4350 or J6350 Services Router in a rack:

1.

Make sure the rack is properly secured to the building in its permanent location.

2.

Attach a screw to each rack rail in the third hole down from where you want the
top of the router to be positioned, as shown in Figure 5 on page 8. Screw only
part way in, leaving about 1/4 in. (6 mm) distance between the screw head and
the rail.

3.

Lift the router and insert the elliptical openings in the mounting brackets onto
the partially inserted screws so that the router is hanging from the two screws.

Installing a Services Router

7

Installing a Services Router

Summary of Contents for JUNOS J Series

Page 1: ...rovides instructions to initially set up J2320 J2350 J4350 and J6350 Services Routers You need no previous JUNOS software experience but must have managed a network and configured other routers For mo...

Page 2: ...iguration with the CLI 12 Step 1 Connecting Logging In and Starting the CLI 12 Step 2 Configuring Basic Settings with the CLI 13 Step 3 Installing the JUNOS Enhanced Services Software 14 Step 4 Adding...

Page 3: ...g the J Web Interface on page 9 CLI Console Access Services Routers are shipped with a console cable and adapter To configure a Services Router through the console port with the JUNOS Enhanced Service...

Page 4: ...r you can use the feature You must install and properly configure the license The router allows you to commit a configuration with a feature that requires a license even if the license is not present...

Page 5: ...preinstalled on J2320 and J2350 models and must be installed on J4350 and J6350 models Electrostatic discharge ESD grounding strap not provided For AC power an AC power cord with a plug appropriate f...

Page 6: ...ling J2320 and J2350 Services Routers To install the J2320 and J2350 router into a rack 1 Have one person grasp the sides of the router lift the router and position it in the rack 2 Align the top hole...

Page 7: ...Routers To install a J4350 or J6350 Services Router in a rack 1 Make sure the rack is properly secured to the building in its permanent location 2 Attach a screw to each rack rail in the third hole do...

Page 8: ...a Connect one end to a proper earth ground point the rack for example b Remove the screw and washer from the PEM nut on the protective earthing terminal at the rear of the router chassis The J4350 and...

Page 9: ...Services Router through one of the built in Ethernet interfaces The examples in this document use port 0 0 For information about the J Web interface see J Web Basics on page 15 Step 1 Connecting Logg...

Page 10: ...ved and activated automatically To configure basic settings with the J Web interface 1 If the Set Up Quick Configuration page is not displayed select Configuration Quick Configuration Set Up 2 Enter i...

Page 11: ...Access Enables remote SSH access to the router Allow SSH Access 3 To configure additional interfaces a Under Quick Configuration click Interfaces and then click the interface you want to configure b...

Page 12: ...box type the URL for the license key Web site Copy the license key text and paste it into the License Key Text box separating multiple license keys with a blank line c Click OK For complete instructio...

Page 13: ...ices Router Getting Started Guide Step 2 Configuring Basic Settings with the CLI In CLI configuration mode you use the set command to enable features and the delete command to disable them The command...

Page 14: ...S Enhanced Services software see the JUNOS Enhanced Services Administration Guide Step 4 Adding Licenses with the CLI If you purchased one or more licenses you received an envelope with instructions f...

Page 15: ...icies schedulers zones VPNs firewall NAT authentication and ALGs For configuration details and tasks not covered by Quick Configuration you can access a graphical version of the JUNOS CLI known as the...

Page 16: ...n cli Show command line interface settings configuration Show current configuration connections Show circuit cross connect connections dialer Show dialer information dlsw Show DLSw information more 93...

Page 17: ...1089 CORE Issue 4 and require isolation from the exposed outside plant OSP cabling To comply with NEBS requirements and protect against lightening surges and commercial power disturbances the intrabui...

Page 18: ...the router into position and a second person secure the mounting screws To prevent injury keep your back straight and lift with your legs not your back Mount the Services Router at the bottom of the r...

Page 19: ...t Building System NEBS standards The equipment is suitable for installation as part of the Common Bonding Network CBN The equipment is suitable for installation in locations where the National Electri...

Page 20: ...Declarations of Conformity 20 Declarations of Conformity JUNOS Enhanced Services J series Services Router Quick Start...

Page 21: ...iguration statements and operational mode commands documented in JUNOS configuration guides and command references To configure and operate a Integrated Services Module you must also use WX documentat...

Page 22: ...ation Guide Explains how to configure and manage security services such as stateful firewall policies IPSec VPNs firewall screens Network Address translation NAT and Router interface modes Public Key...

Page 23: ...S Network Management Configuration Guide Provides an overview of policy concepts and describes how to configure routing policy firewall filters and forwarding options JUNOS Policy Framework Configurat...

Page 24: ...routing platforms JUNOS CLI User Guide JUNOS API and Scripting Documentation Describes how to use the JUNOScript application programming interface API to monitor and configure Juniper Networks routin...

Page 25: ...with the Case Manager link at http www juniper net support or call 1 888 314 JTAC from the United States Canada or Mexico or 1 408 745 9500 from elsewhere Revision History 12 October 2007 Revision 1 C...

Reviews: