5
Preventive compressor maintenance
An hour meter is installed on all "BD" and "PD" models.
Observe after 1 month how many hours the compressor has
performed in order to obtain an impression of the maintenance
intervals which are every 2000 working hours. However, at
least once every year.
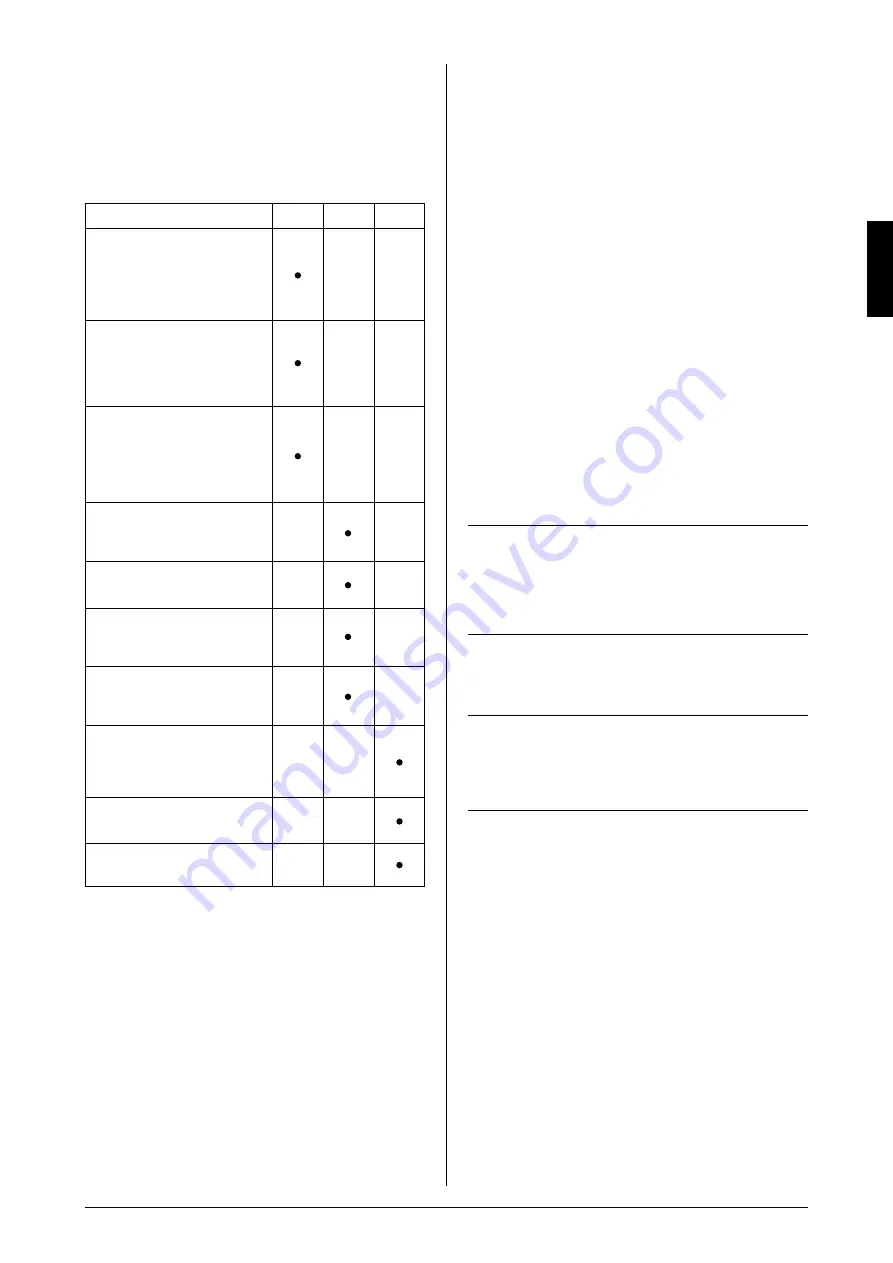
Weekly
Monthly Annually
If compressor is not fitted with dryer,
drain condensate from air receiver
(at a pressure of max. 2 bar/0 psi).
If equipped with autodrain, this will
take place automatically, however,
drain bottle has to be emptied.
If compressor is fitted with outlet
filter, check and empty for water
by pressing the black button in the
bottom. If fitted with autodrain, this
will take place automatically.
Make sure that the fan at the top
of the cover works. Fan starts at a
motor temperature of 2°C/89°F and
runs continuously until temperature
has fallen, although compressor
does not work.
Check compressor, air tubes and
equipment for leaks, and check the
pumping time.
Inspect and replace intake filter, if
necessary.
Clean the compressor with a soft,
damp cloth. Dust and dirt prevent
cooling.
Check dryer function according to
instructions in the "Adsorption Dryer
Manual".
Check the Oring in the nonreturn
valve and replace if necessary.
Note! Empty receiver of air before
dismounting.
Check filter and filter elements for
optimum efficiency.
Test the safety valve by gently pulling
the ring with pressure in the receiver.
Replace the air intake filters after each 2000 working hours
1. Switch off current.
2. Lift off the upper part of the cabinet (is locked with screws).
Be careful not to unplug the cable for the fan (this only
applies to model „P“) (fig. 5).
. Pull out the filters by means of inserting a screwdriver below
the rubber part. The new filters can then be pressed into
place (fig. 6).
Compressors with adsorption dryer:
1. Test that the automatic dryer/filter works satisfactorily
by opening the manual control drain cock, which has an
internal tube leading to the bottom of the air receiver. If
water comes out, the dryer needs to be serviced. (See
"Adsorption Dryer Manual").
2. In order to avoid pressure loss due to saturated filter
element, the pre and after filters are equipped with a pop
up indicator. When the filter element needs replacement,
the indicator turns red instead of green. Under normal
conditions the filter element must be replaced after
approx. 4000 working hours. If the environment is very
contaminated, intervals for changing filter element may be
2000 working hours. See "Adsorption Dryer Manual" for
further information.
. After 2000 to 4000 working hours dependent on the working
conditions or when desiccant in inspection glass changes
color, the desiccant in the dryer system must be replaced,
see "Adsorption Dryer Manual".
Check the pumping time
The pumping time indicates the condition of the compressor
provided that there
are no leaks in the system where the compressed air may leak.
Test the compressor as follows:
1. Empty the air receiver of compressed air (the pressure
gauge shows 0 bar).
2. Close the outlet on the air receiver and check that the drain
cock is closed.
. Start the compressor and note how long it takes until it
switches off.
Make sure that the pressure in the air receiver is 8 bar/
120 psi as deviations may indicate the wrong results (see
technical details).
Important!
Always test the compressor when cold as the time
indicated refers to the pumping time of a cold
compressor. The pumping time of a warm compressor
is much longer and consequently, the result would be
misleading.
Fault finding and repair
Important!
Switch off and isolate from electrical supply before
removing any parts from the compressor.
Empty air receiver of air before dismantling any parts
of compressor unit’s pressure system.
1. Compressor does not start (no sound):
a) No power from mains. Check fuses and plug.
b) Breakage or loose joints in electrical connections.
c) Pressure in the air receiver is too high for activation
of the pressure switch. The pressure switch makes
circuit only when pressure has dropped to preset start
pressure. Empty receiver.
d) Capacitor defective.
2. Compressor does not start, makes a buzzing sound
followed by clicking noise (cannot start against high
pressure):
a) Leaky nonreturn valve. Remove the flexible pressure
pipe and clean to find out whether air leaks from the
valve. If so, clean or replace.
3. Compressor works, but pressure does not increase in
tank (or increases too slowly):
a) Intake filter clogged. Replace.
b) Leaks in fittings, tubes or pneumatic equipment. Check
with soapy water. Pressure drop is not to exceed 1 bar
per hour.
Operating manual
GB
Summary of Contents for 1000 motor
Page 2: ......
Page 11: ...11 10 4 A B 6 B A 6 8 90 120 psi 50 15 8 120 psi 15 14 2 30 psi 32 89 F BD PD 2000 RU...
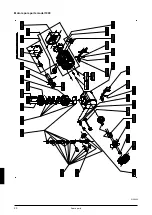
Page 20: ...20 Motor spare parts model 1000 0100400 Spare parts...
Page 21: ...21 Motor spare parts model 2000 0200300 Spare parts...
Page 22: ...22 0200600 Spare parts model 2000 40B Spare parts...
Page 23: ...23 Spare parts model 2000 40BD2 0200610 Spare parts...
Page 24: ...24 0200620 Spare parts model 2000 40P Spare parts...
Page 25: ...25 0200630 Spare parts model 2000 40PD2 Spare parts...
Page 26: ...26 Spare parts model 4000 40B 0400200 Spare parts...
Page 27: ...27 Spare parts model 4000 40BD3 0400210 Spare parts...


