Juliana F09472 Assembly Instruction Manual Download Page 4

4

Dear Customer!

The assembly of your new house requires 

a bit of technical knowledge. However, it is 

important that the assembly instructions are 

followed strict-ly. The assembly instruction 

is a combination of text and illustrations. The 

profiles are packed in separate numbered packs 

corresponding to the order in the assembly 

instruction. Erect one pack at a time. All nuts 

and bolts and fittings are found in bag No. 0 

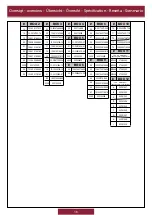
(specified on page 12). Each pack is specified in 

separate lists of components. 

All detailed illustrations are marked with 

symbols:

Seen from inside          Seen from outside.

Precautions.

• 

Assembly must only be carried out in dry 

and calm weather.

• 

Always use working gloves while glazing. 

Greenhouse glass has sharp edges, 

especially if the glass breaks.

• 

Assistants and especially children must be 

warned that broken glass is an element of 

danger. Pick up broken glass at once and 

remove it with care.

• 

We recommend to use protective glasses 

while fixing the spring wire clips.

• 

Place the ladder on a level support.

• 

It is essential to have an assistant.
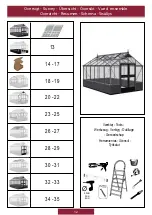
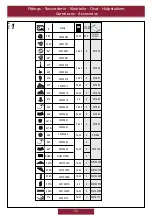
References

The column marked              indicates the 

page(s) on which the component is used.
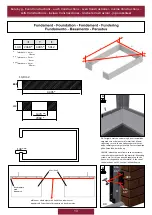
Page 13: 

Foundation

The base is not included in this delivery. 

However, an original base can be bought 

separately. It ensures you a stable and easy to 

build base. 

If you make your own base the measurements 

indicated must be external measurements.

If you buy an original base you furthermore 

need about 75 litres of concrete and 6/8 

plastic-/concrete pipes of about 800 mm which 

are placed in a non-freezing depth for the 

fastening of the corner and middle anchors.

The base must be 100% level and square; the 

latter is ensured by checking that the two 

diagonal measurements are equal.

Tools

The mounting of the greenhouse requires the 

tools shown on page 12.

Page 14-27:

Place the components as shown on the 

illustration and assemble in the order shown 

in the pictures. Do not tighten the nuts 

completely until the front gable construction 

has been assembled.


Page 13:

(Fastening to the base).

When constructing your own base you have 

to drill holes (7 mm) in the ground frame 

between all the vertical frames, the greenhouse 

is then fastened to the base with screws (A). 

Using an original base the greenhouse is 

fastened to each vertical bar as shown on 

drawing B/C.

Page 24-27:

For an easier assembly we recommend that you 

oil the screws for the doors.

Fitting of glass/polycarbonate

Important before glazing! 

Make sure that gables and sides are level and 

square, and that door(s) and window(s) are 

functioning perfectly. 

Best order of assembly:

1) Windows – 2) Roof – 3) Doors – 4) Gables 

– 5) Sides

Page 30-33:

Glazing (illustration 1 to 8)

Degrease the sheets and frames with spirit.

Start glazing from below, one glass at a time. 

Apply a 3 mm silicone line on the vertical 

frames where indicated (dotted lines on 

the illustration). (A 3 mm line of silicone is 

sufficient to obtain maximum attachment). If 

you do use more than recommended, you can 

buy extra tubes. 

Spring wire clips and glassholders are to be 

fitted as shown.

X = Spring wire clips, > = Glassholders

In case of broken glass carefully pull it 

outwards and loosen the silicone by means of a 

sharp craft knife.

Clean the profile completely before inserting a 

new pane of glass.

Page 34-37:

Mounting of polycarbonate 

The illustrations at the bottom of page 34/36 

show where to mount the polycarbonate plates 

and lists. The type indication states the length 

in mm. A possible adjustment is made by 

means of a fine-tooth saw. 

NB! To avoid the formation of algae the 

polycarbonate sheets must not come into 

contact with the ground. Rest them on a piece 

of cardboard.

A-lists are mounted as shown on page 35/37. 

Put the sheet into the bottom list, bend the 

sheet slightly outwards and put it in the top list.

M-lists are mounted as shown on page 35/37. 

Place the upper part of the list under the alu. 

profile in the whole length of the sheet and 

hereafter click on the list from above.

Sealing of the polycarbonate sheets

The sheets may be sealed against insects. 

Close the top end off with alu-tape or silicone. 

The bottom only with  airstrip tape to let 

condensation out (available at your local 

dealer).

Now your greenhouse is completely assembled. 

However, please notice the following:

Maintenance

• 

Grease doors (hinges and lock).

• 

Clean the gutter for leaves, etc.

• 

Adjustment of windows.

• 

Replacement of broken glass.

• 

Clean the house with disinfectant before 

and after the growing season.

Winter Protection

In areas with occurrence of snow we 

recommend the following winter protection:

• 

Support the roof ridge at the centre of the 

house.

• 

Remove greater snow loads from the roof.

• 

Take precautions against snow falling 

down from for instance a tree or a roof.

• 

Dismount the cylinders for the automatic 

window openers, if any (optional extras).

• 

Secure door(s) and window(s) preventing 

wind damage to the house.

Insurance

Please note that not all insurance companies 

cover glasshouses automatically. Please 

contact your insurance company to ensure an 

insurance coverage.

Guarantee

Juliana grants a guarantee of 12 years which 

covers replacement of faulty parts. The 

guarantee does not cover polycarbonate, glass, 

transport, assembly, freight etc. 

Juliana grants a guarantee of 2 years on painted 

parts, if any. Note that marks in the painting 

may occur due to suspension of the profiles. 

The guarantee is invalid if the greenhouse is 

not assembled according to these instructions.

Complaints

All our greenhouses are built to high standards 

of quality. However, should a complaint 

occur please contact your dealer at once. 

Remember to specify the defect by indicating 

the greenhouse model and number of the 

component and the quality control number.

May we congratulate you on your new greenhouse

GB

USA

DEAR CUSTOMER

Congratulations on purchasing your new 

greenhouse. It is important that you follow these 

assembly instructions step-by-step. 

The assembly instructions are a combination of text 

and illustrations. The profiles are packed in separate, 

numbered packs corresponding to their order of use 

in the instructions. Assemble one pack at a time. All 

nuts, bolts and fittings are contained in a Box. 

Each pack is specified in separate lists of 

components. 

All detailed illustrations are marked with the 

following symbols:


Seen from the inside     Seen from the outside

This part is used on page

SOME SAFETY PRECAUTIONS

• 

Assembly must only be carried out in dry and 

calm weather.

• 

Always wear work gloves when installing the 

glazing. Greenhouse glass has sharp edges, 

especially if it breaks.

• 

Assistants and especially children must be 

warned that broken glass is dangerous. Pick 

up all broken glass at once and remove it with 

care.

• 

We recommend that you wear protective 

glasses while fixing the spring wire clips.

• 

Any ladders that are used must be placed on a 

level surface.

• 

It is essential to have an assistant available.

TOOLS

Assembling the greenhouse requires tools.

FOUNDATIONS

The base is not included in this consignment, but an 

original base/wall can be purchased separately. This 

base is easy to construct and will guarantee you a 

stable base for your greenhouse. 

If you construct your own base, the specified 

measurements must be external measurements.

If you buy our original base/wall, the anchor legs 

must be cast in cement in eight places. These eight 

holes must be dug out to below the frost line. Place 

the assembled base with anchor legs over the holes 

so the anchor legs fit into the holes; it takes about 

75 litres of concrete to fill up the holes.

Make sure the base is completely level and square. 

To square the base, make sure the two diagonal 

measurements are identical.

The width of the front and back gables must also be 

identical.

ATTACHMENT TO THE BASE/WALL

If you build the base yourself, drill holes that fit the 

size of the screws you have purchased and choose 

screws that are appropriate for the wall material, 

The greenhouse must then be secured to the base 

using screws (A). 

If you are using an original base/wall, attach the 

house using the self-tapping screws included for the 

pre-drilled holes.

ORDER OF ASSEMBLY

Place the components as shown on the illustration 

and assemble in the order shown in the pictures. Do 

not tighten the nuts fully until the entire sub-frame 

has been assembled.

DOORS AND WINDOWS

For easier assembly, we recommend that you oil the 

screws for the doors. The glass or polycarbonate for 

the door(s) and windows must be fitted at the same 

time as the profiles.

FITTING OF GLASS

Important before assembly! 

Make sure that the gables and sides are level 

and square and that door(s) and window(s) are 

functioning perfectly. 

The best order of assembly for the glass is as follows:

Windows - Roof - Doors - Gables - Sides

GLASS INSTALLATION

Glass installation (illustrations 1 to 8)

Clean the glass and profiles with methylated spirits.

Start glazing from the bottom, one pane at a time. 

Apply a 3mm silicone bead around the vertical 

frames as indicated (the dotted lines on the 

illustration). (A 3mm bead of silicone is sufficient to 

ensure maximum adhesion). If you use more silicone 

than recommended, extra tubes can be purchased. 

If you accidentally break a pane, carefully pull the 

broken glass outwards and loosen the silicone using 

a sharp craft knife.

Clean the profile completely before inserting a new 

pane of glass.

Your greenhouse is now fully assembled. However, 

please note the following:

MAINTENANCE

• 

Grease the doors (hinges and locks).

• 

Keep the gutters free from leaves, etc.

• 

Adjust the windows as necessary.

• 

Replace any broken glass.

• 

Clean the greenhouse with disinfectant before 

and after the growing season.

WINTER PROTECTION

If you anticipate snow during the winter, we 

recommend the following winter precautions:

• 

Support the apex of the roof in the middle.

• 

Remove any deep snow from the roof.

• 

Take precautions to prevent snow falling from 

a tree or roof, for example.

• 

Remove the cylinders for the automatic 

window openers, if fitted (optional extras).

• 

Secure the door(s) and window(s) to prevent 

wind damage to the greenhouse.

WATER AND CONDENSATION

Please note that your greenhouse is not like a 

conservatory, for example, and that you should 

therefore be aware that the greenhouse may leak 

during or after precipitation and that condensation 

will occur on the inside of the greenhouse. Good 

ventilation will help prevent condensation.

INSURANCE

Please note that not all insurance companies cover 

greenhouses automatically. Please contact your 

insurance company to ensure that your greenhouse 

is covered.

GUARANTEE

Juliana greenhouses are covered by a 12-year 

guarantee, which covers the replacement or repair 

of faulty parts. The guarantee does not cover 

polycarbonate, glass, transport, assembly, freight, 

etc. 

Juliana greenhouses are covered by a two-year 

warranty on painted parts, where fitted. Note that 

marks on the paint may occur due to suspension of 

the profiles. 

The guarantee will be void if the greenhouse is not 

assembled in accordance with these instructions.

COMPLAINTS

All our greenhouses are built to the highest quality 

standards. However, should you experience any 

problems, please contact your dealer at once. When 

describing the defect, please state the greenhouse 

model, the component number. 

Congratulations on your new greenhouse, which we 

hope will bring you a lot of pleasure for many years 

to come.


Yours sincerely,

Juliana Drivhuse A/S

Summary of Contents for F09472

Page 1: ...Mur Wall Mauer 13 0m Premium Mur Wall Mauer 13 0 m2 Premium 17032021 2 01 ...

Page 2: ...liana Integreret aluminiums drivhusbord sort Juliana integriert Alutische schwarz Juliana integrated Aluminium table black Table intégré en alu noir Juliana Juliana Intergreret aluminiums drivhushylde sort Juliana integriert Alutregale schwarz Juliana integrated Aluminium shelve black Etagére intégré noir Juliana Juliana Univent automatisk vinduesåbner Juliana Univent automatischer Fensteröffner J...

Page 3: ...or lettere montage Glas eller polycarbonat til døre og vinduer monteres samtidig med profilerne MONTAGE AF GLAS Vigtigt før montage Kontroller at gavle og sider er i vandret lod og vinkel samt at dør e og vindue r fungerer perfekt Bedste monteringsrækkefølge for glas Vinduer Tag Døre Gavle Sider GLASMONTAGE Glasmontage tegning 1 til 8 Rengør glas og profiler med ethanol Påfør en 3 mm silikonestren...

Page 4: ...member to specify the defect by indicating the greenhouse model and number of the component and the quality control number May we congratulate you on your new greenhouse GB USA DEAR CUSTOMER Congratulations on purchasing your new greenhouse It is important that you follow these assembly instructions step by step The assembly instructions are a combination of text and illustrations The profiles are...

Page 5: ...arantie entfällt wenn das Haus fehlerhaft montiert wurde Reklamationen Wir haben strenge Qualitätsansprüche um Ihnen ein fehlerfreies Produkt zu sichern Sollten trotzdem Fehler oder Mängel auftreten so bitten wir Sie sofort Ihren Händler zu kontaktieren Sie müssen die Reklamation spezifizieren indem Sie uns das Gewächshausmodell die Komponentennummer sowie die Qualitäts Kontroll nummer mitteilen W...

Page 6: ...ng Tänk på att det kan förekomma märken i lackeringen som kommer från uppsättningen av profilerna Garantin bortfaller då växthuset inte monteras enligt dessa anvisningar Reklamationer Vi ställer höga krav vad gäller kvalitet för att säkra Er en felfri produkt Skulle det emellertid uppstå anledning till reklamation ber vi Er genast kontakta återförsäljaren genom vilken Ni köpt växthuset För att pås...

Page 7: ... à votre agent tout en vous réferant au modèle de serre et les numéros de référence des composants ansi qu au numéro de contrôle de qualité Nous vous souhaitons beaucoup de plaisir avec votre nouvelle serre F CHER CLIENT Pour le montage de votre nouvelle serre il est important de suivre strictement l ensemble de ces instructions Ces instructions sont une combinaison de texte et de dessins Les prof...

Page 8: ...leiding gemonteerd is Reclamaties Wij voldoen aan strenge kwaliteitseisen om u een foutloos product te garanderen Mochten er toch fouten of gebreken zijn dient u meteen contact op te nemen met uw handelaar Denk eraan het gebrek te specificeren door het vermelden van het model en componentennummer evenals het kwali teitsnummer Gefeliciteerd met uw nieuwe kas NL BESTE KLANT Gefeliciteerd met uw nieu...

Page 9: ...e un producto libre de fallos Sin embargo si encuentra algún defecto o fallo por favor póngase en contacto con su distribuidor Recuerde especificar el defecto informando el modelo de invernadero y el número de componente además del número de control de la calidad Enhorabuena por su nuevo invernadero E ESTIMADO CLIENTE Enhorabuena por la adquisición de su nuevo invernadero Es importante que siga es...

Page 10: ...etti qualora ne vengano rilevati contattare il rivenditore Ricordare di specificare il difetto comunicando il modello della serra e il numero del componente insieme al numero di controllo di qualità Congratulazioni per la Sua nuova serra I CARO CLIENTE complimenti per l acquisto della sua nuova serra È importante seguire scrupolosamente passo passo le istruzioni di montaggio di seguito riportate L...

Page 11: ...oille Hvom Maalatoille voi vaurioitua mikäli profiilit pääsevät vääntymään Huomautukset Lasin rikkoontuessa poista varovasti lasit ja silikonit terävän terän avulla Puhdista profiili hyvin ennen uuden asentamista Huomautusten osalta sinun tulee ottaa yhteyttä myyjään Määrittele puute tai vika kasausohjeen avulla Onnittelut JULIANA kasvihuoneen hankinnan johdosta FIN ARVOISA ASIAKAS Onnittelumme uu...

Page 12: ...versikt Vue d ensemble Overzicht Resumen Schema Sisällys 13 14 17 18 19 20 22 23 25 30 31 26 27 28 29 32 33 34 35 Værktøj Tools Werkzeug Verktyg Outillage Gereedschap Herramientas Utensili Työkalut 2 5mm 4mm 6mm Ø Olie Oil Öl Huilef ...

Page 13: ...passer l materialet Monte ringsskruer mm l de e købes separat l huset da det a ænger af væg materiale Passer størrelsen på hullerne ikke bores de op USA GB A ach the base frame to the manufactu red wall with screws that fit the material Moun ng screws ect For this purchased separately to the house as it depends on wall material If the size of the holes does not fit You shall drilled them up Målene e...

Page 14: ...69S 05S 4 F01831 26 27 26 27 26 27 26 27 26 27 26 27 26 27 28 29 610 20 M6X15 16 35 F01848 618 10 16 35 F01850 693 1 26 27 1 B O X 00300664 00300662 00300470 00300469 00300693 00300300S 00401011 00401005 00300691 13 20200080 68S 13 20210040 06S 13 20200080 69S 13 20210040 05S 00300634S 00300612 00300629 00300615 00300450 00300407 00310204S 00310205S 00300617 00300616 00300610 00300618 Article Fitt...

Page 15: ...S 16 20 34 35 34 35 34 35 34 35 34 35 22 34 35 34 35 34 35 34 35 332S 16 20 1 00310332S 440 422 RN441 8 4 4 34 35 F018142 280 270 34 35 F01852 F01853 F01854 Article 00402280 00401007 00300621 00300667 00300415 00300420 00300416 00300417 00300418 00300419 00300422 00300440 00300441 00300441 00300442 00300422 00300440 00310335S 00310336S 00300713 00310337S 00310338S 00310332S RN00310441 1 B O X Fitt...

Page 16: ...44 51 13 10541470 54 00300350 00300443S 13 20194376 34S 13 20244376 50 55 56 57 58 59 61 13 20170517 55S 13 20160517 56S 13 20221075 57S 13 20221075 58S 13 20220812 59S 13 10020651 61S BOX 8 59 62 63 64 65 66 67 339S 13 20220812 59S 13 20170578 62S 13 20160578 63S 20231075 64S 13 20221075 65S 13 20230812 66S 13 10020712 67S 00310339S 3 mm List Hærdet glas Tempered glass Sicherheitsglas 70 71 13 20...

Page 17: ...17 Oversigt overview Übersicht Översikt Spécification Reseña Sommario ...

Page 18: ... 20 22 29 1270 1120 1644 2896 1551 1551 2884 23 1938 2 3 4 1 14 20 20 23 20 13 21 20 22 13 21 2 2 2 1 1 1 1 1 14 13 21 13 335S 335S 15 15 22 23 29 332S 14 6 10 14 15 11 12 13 336S 336S 5 4 3 2 1 14 13 21 23 22 29 13 15 15 9 8 7 14 617 M6x11 616 M6 617 M6x11 616 M6 617 M6x11 616 M6 617 M6x11 616 M6 2 B O X 332S 1 23 26 33 52 1325 1791 4 4 ...

Page 19: ... 29 29 29 13 23 22 14 335S 335S 335S 14 14 13 13 29 29 21 22 23 15 15 15 15 23 15 15 15 15 332S 332S 336S 336S 96mm 96mm 113mm 179mm 617 M6x11 616 M6 Baggavl Rear gable Hintergiebel Bakgavel Pignon derrière Achtergevel Frontis trasero Pannello posteriore Peräpääty ...

Page 20: ... M6 x4 617 M6x11 x3 617 M6x11 2 3 4 1 14 09 09 13 11 14 13 06 81 13 335S 335S 15 15 00 12 11 19 19 08 334S 14 05 6 9 12 17 19 18 10 11 13 7 8 14 94 22 20 21 337S 338S 10 09 00 10 13 13 09 16 15 337S 5 4 3 2 1 00 19 81 08 09 10 12 15 14 1468 1404 742 742 2168 2168 1120 13 1270 11 1 2 1 1 1 1 1 1 2 2 2 00 94 809 1 1644 388 730 334S 1 617 M6x11 616 M6 mm 13 0 3 B O X ...

Page 21: ... Voorgevel Frontis frontal Pannello frontale Ovipääty 5 6 7 10 9 8 11 12 13 16 15 14 12 13 14 12 19 335S 15 00 08 338S 19 11 14 10 11 14 13 08 338S 337S 81 12 13 19 19 14 13 15 11 335S 19 08 338S 14 15 335S 10 13 335S 19 198 mm 617 M6x11 616 M6 2 x 617 M6x11 600 mm ...

Page 22: ... Forgavl Front gable Vordergiebel Frontgavel Pignon devant Voorgevel Frontis frontal Pannello frontale Ovipääty 17 18 19 12 15 15 334S 81 334S 15 334S 94 94 22 21 20 337S 94 15 334S 94 15 81 15 334S 94 15 81 ...

Page 23: ...nnelli laterali Sivut 2 3 1 33 30 31 31 32 31 30 32 33 31 3 30 31 31 31 31 33 617 M6x11 1 2 617 M6x11 30 31 31 31 31 31 33 33 30 31 33 4332 1120 1325 32 4376 2 10 4 2 mm 13 0 4 B O X 13 0 5 B O X mm 26 51 54 1644 1470 10 5 350 6 2 B O X mm 13 0 443 4 1450 36 x2 ...

Page 24: ...24 24 1 2 3 4 5 6 2 3 5 1 2 14 x4 419 616 M6 00 12 BASE 09 14 12 13 00 00 09 10 14 15 19 32 19 29 14 15 15 30 15 Sider Sides Seiten Sidor Cötés Zijkanten Laterales Pannelli laterali Sivut ...

Page 25: ...4 5 15 00 11 14 6 4 5 4 5 6 15 14 33 32 29 33 19 15 13 32 335S 14 13 335S 616 M6 19 13 33 32 32 32 00 14 33 13 19 15 BASE 09 30 638 2 3 Sider Sides Seiten Sidor Cötés Zijkanten Laterales Pannelli laterali Sivut ...

Page 26: ... 6 7 8 50 75 54 9 30 31 1 2 4 3 15 50 81 15 334S 50 15 15 23 50 51 54 4376 1644 1791 1470 75 718 52 1 10 4 4 5 94 15 50 81 15 334S 94 52 52 332S 50 15 15 23 332S 52 52 mm 13 0 6 B O X 34 2 4376 B O X mm 5 13 0 350 6 2 B O X mm 13 0 10 B O X mm 13 0 B B B B C C C C A A ...

Page 27: ...27 27 Tag Roof Dach Tak Toit Dak Tejado Tetto Katto 51 617 M6x11 205S 51 75 54 54 50 7 6 31 32 51 52 34 54 51 8 6 50 51 5 A 3 x 617 M6x11 B 4 x 617 M6x11 C 5 x 617 M6x11 ...

Page 28: ...60 713 62 62 59 57 55 56 55 58 65 67 68 69 68 69 68 69 68 69 691 299 9 10 11 12 691 693 691 7B A 662 5 0x80 3 10 mm Olie Oil Öl Huilef 340S 339S 812 1 59 8 mm 55 56 57 58 517 517 1075 1075 812 578 578 4 1 1 1 1 1 2 1 4 61 651 59 62 63 64 65 66 1075 812 1075 9 mm 67 1 1 1 712 1 339S 261x578 1 340S 261x517 B O X B O X ...

Page 29: ...7 61 664 3 5x16 57 55 68 55 62 67 59 69A 62 5 6 7 8 10 713 58 691 55 59 67 65 06 11 68 300 12 662 5 0x80 340S 3 mm 662 5 0x80 3 mm 68 662 5 0x80 3 mm 3 mm 3 mm 662 5 0x80 1005 3 5x16 2 5 mm 662 5 0x80 664 3 5x16 69 664 3 5x16 662 5 0x80 10 10 11 11 693 7A 7B 62 66 12 12 55 68 57 68 57 55 58 55 68 59 65 713 ...

Page 30: ...duer Windows Fenster Fönster Fenêtres Ramen Ventanas Finestre Luukut 2 3 4 1 71 70 71 72 70 71 72 71 3 4 5 6 1 2 70 71 71 72 407 73 204S 3 mm 3 10 mm mm 13 0 70 71 72 73 738 611 738 510 4 8 4 4 75 718 4 10 B O X ...

Page 31: ...önster Fenêtres Ramen Ventanas Finestre Luukut 5 6 7 73 407 50 70 12 72 629 M5 450 204S 629 612 M5x10 73 615 M5x20 11 7 73 50 70 205S 51 12 75 8 8 51 205S 10 75 51 634 75 51 634 51 51 51 54 54 75 12 415 50 420 416 420 50 9 10 8 11 9 ...

Page 32: ...00 M1600 M1600 M 1 6 4 4 M 1 6 4 4 M 1 6 4 4 M 1 6 4 4 M 1 6 4 4 E A A A B B C D I I E M 1644 M 2465 M 2465 M 1644 M 2465 M 2465 M1600 M1600 M1600 M1600 M1600 M 1 6 4 4 M 1 6 4 4 M 1 6 4 4 M 1 6 4 4 M 1 6 4 4 M 2465 M 2465 M 2465 M 2465 6 350 OBS 13 0 11 B O X mm 5 B O X mm 13 0 3 mm Hærdet glas Tempered glass Sicherheitsglas Verre Cristales Vetro Lasit ...

Page 33: ...7 1952 G 517 x 700 H 578 x 700 I 691 x 204 394 375 12 8 4 4 4 2 2 2 2 A 3 mm Silicone M A B C 3 mm 3 mm 3 mm Rubber list 3 mm 2 8 mm 2 8 mm RUBBER LIST FOR UK MARKET 413 1 2 3 STEP STEP STEP B 3 mm 13 0 12 B O X 3 mm Hærdet glas Tempered glass Sicherheitsglas Verre Cristales Vetro Lasit ...

Page 34: ...440 440 443 2 1 2 8 4 11 3 6 7 9 13 14 15 16 16 15 15 15 13 0 443 4 1450 34 2 5812 mm 13 0 6 B O X mm 5 B O X 3 34 33 32 34 32 33 6 10 12 Færdiggørelse Finishing Abscgluss Slutförande Achévement Voltooiing Terminación Completamento Valmistuminen ...

Page 35: ...6 470 32 51 34 31 Silicone 7 6 34 422 443 1 15 441B 667 3 5x6 5 418 1007 M5x10 621 M5 4 mm 443 1 5 Moun ng screws ect For this purchased separately to the house as it depends on wall material Monterings skruer mm l de e købes separat l huset da det a ænger af væg materiale Færdiggørelse Finishing Abscgluss Slutförande Achévement Voltooiing Terminación Completamento Valmistuminen ...

Page 36: ......

Page 37: ...s sur fils Juliana Juliana plantehylde sort Juliana Pflanzen Aluregale Schwarz Juliana Plant Aluminium shelve black Juliana Plante plateau aluminium noir Juliana skyggent skærmer for solen Juliana Schattierungsnetz schützt gegen die Sonne Juliana shade net to shield sunlight Le filet d ombrage protége contre le soleil Juliana Juliana Vanlet automatisk vandings og gødningsanlæg Juliana Vanlet autom...

Page 38: ...l 45 66 11 18 11 mail juliana com www juliana com COMPACT 5 m2 6 6 m2 8 2 m2 GARTNER 16 2 m2 18 8 m2 21 4 m2 ORANGERI 15 2 m2 GRAND OASE 13 0 m2 OASE 8 8 m2 13 5 m2 URBAN 0 16 m2 0 25 m2 0 32 m2 VERANDA 4 4 m2 6 6 m2 12 9 m2 PREMIUM 8 8 m2 10 9 m2 13 0 m2 ...

Reviews: