background image

ENGLISH

22

Do not use damaged accessories. Always check that the mounting plate for the sanding pad,
including any accessories, are free from damage. Make sure that no one could be hit by any
ejected parts, and run the tool at maximum speed for one minute to test the accessory.

Switch off the tool and wait until all moving parts have completely stopped before putting down the
tool. Otherwise you could lose control of the tool.

Regularly clean the air outlets on the tool.

Hold the tool firmly with both hands while working.

Do not use oversized sandpaper. Note the manufacturer's instructions for the choice of sanding
pad. If the sandpaper extends outside of the sanding head, this can result in personal injury or
damage to the surface.

Never use more than one extension pole.

Always wear heavy-duty gloves and safety glasses when working with the tool.

Do not wear loose-fitting clothing, ties, scarves, etc., as these can get caught in moving parts.

Pay attention to the risk of kickback.

Wear a P2 dust filter mask and connect the dust extraction port to a vacuum cleaner.

Switch off the tool and unplug the power cord before making adjustments or replacing accessories.
The power tool must only be repaired by qualified personnel or an authorised service centre.

TECHNICAL DATA

Rated voltage

230 V ~ 50 Hz

Output

1220 W

Speed (no load)

1500-2100 rpm

Sanding pad

Ø 215 mm

Sandpaper

Ø 225 mm

Extractor hose

Ø 32 mm

Safety class

II

Weight

2.8 kg

Sound pressure level, LpA

88 dB(A), K=3 dB

Sound power level, LwA

99 dB(A), K=3 dB

Max vibration level

4.9 m/s², K=1.5 m/s²

Always wear ear protection!

The declared vibration value, which has been measured by a standardised test method, can be used to
compare different tools with each other and for a preliminary assessment of exposure.

WARNING:

The actual vibration level when using power tools may differ from the specified maximum

value, depending on how the tool is used. It is therefore necessary to determine which safety precautions
are required to protect the user, based on an estimate of exposure in actual operating conditions (taking
into account all stages of the work cycle, e.g. the time when the tool is switched off and when it is idling,
in addition to the start-up time).
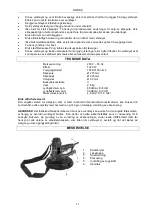
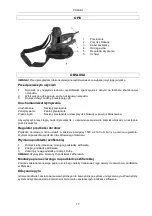
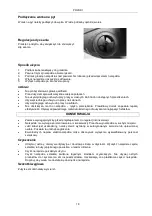
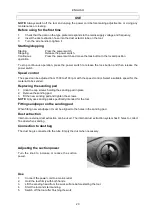
DESCRIPTION

1.

Power switch

2.

Lock button

3.

Power cord

4.

Dust extractor

5.

Knob to adjust suction power

6.

Handle

Summary of Contents for Meec tools 210-255

Page 1: ...r veggslipemaskin Instrukcja obs ugi szlifierki do cian Operating Instructions for Wall Sander 210 255 SV Bruksanvisning i original NO Bruksanvisning i original PL Instrukcja obs ugi w oryginale EN Op...

Page 2: ...se 7 Inst llning av sugkraft 7 Anv ndning 7 UNDERH LL 8 Reng ring 8 Kolborstar 8 FELS KNING 8 NORSK 9 SIKKERHETSANVISNINGER 9 Arbeidsomr de 9 El sikkerhet 9 Personlig sikkerhet 10 Bruk og vedlikehold...

Page 3: ...7 Pod czanie worka na py 18 Regulacja si y ssania 18 Spos b u ycia 18 KONSERWACJA 18 Czyszczenie 18 Szczotki w glowe 18 WYKRYWANIE USTEREK 19 ENGLISH 20 SAFETY INSTRUCTIONS 20 Work area 20 Electrical...

Page 4: ...v l upplyst Belamrade och m rka utrymmen kar risken f r skador Anv nd inte elverktyg i explosiv milj exempelvis i n rheten av br nnbara v tskor gaser eller damm Elverktyg genererar gnistor som kan an...

Page 5: ...ingar g rs tillbeh r byts ut eller elverktyg st lls undan S dana f rebyggande s kerhets tg rder minskar risken f r att elverktyget startas oavsiktligt Elverktyg som inte anv nds ska f rvaras utom r ck...

Page 6: ...n till dammsugare St ng av verktyget och dra ut sladden innan justeringar g rs eller tillbeh r byts ut Elverktyget f r endast repareras av kvalificerad personal eller beh rig servicerepresentant TEKNI...

Page 7: ...en V lj l mpligt varvtal f r det material som ska slipas Byte av slipdyna 1 Lossa insexskruven som h ller fast slipdynan 2 Avl gsna slipdynan 3 Montera den nya slipdynan och dra t skruven OBS Anv nd b...

Page 8: ...te starka reng ringsmedel eller l sningsmedel de kan skada verktygets plastdelar Se till att inte vatten tr nger in i verktyget Kolborstar Kolborstarna ska bytas d de r slitna FELS KNING Problem Orsak...

Page 9: ...opplyst Uoversiktlige og m rke rom ker faren for skader Ikke bruk el verkt y i eksplosive milj er for eksempel i n rheten av brannfarlig v ske gass eller st v El verkt y skaper gnister som kan antenne...

Page 10: ...el verkt yet startes utilsiktet El verkt y som ikke er i bruk skal oppbevares utilgjengelig for barn Ikke la barn eller personer som er ukjent med el verkt yet eller som ikke har lest disse anvisning...

Page 11: ...t personale eller autorisert servicerepresentant TEKNISKE DATA Merkespenning 230 V 50 Hz Effekt 1220 W Tomgangsturtall 1500 2100 o min Slipepute 215 mm Slipepapir 225 mm Utsugsr r 32 mm Beskyttelseskl...

Page 12: ...ringen Velg egnet turtall for materialet som skal slipes Bytte slipepute 1 L sne sekskantskruen som holder slipeputen fast 2 Fjern slipeputen 3 Monter den nye slipeputen og trekk til skruen OBS Verkt...

Page 13: ...erke rengj ringsmidler eller l semidler de kan skade verkt yets plastdeler Pass p at det ikke trenger vann inn i verkt yet Kullb rster Kullb rstene skal byttes n r de er slitte FEILS KING Problem rsak...

Page 14: ...odleg o ci Brak koncentracji mo e spowodowa utrat kontroli nad narz dziem Bezpiecze stwo elektryczne Wtyczka elektronarz dzia musi pasowa do gniazdka sieciowego Nigdy nie dokonuj adnych zmian we wtycz...

Page 15: ...niejszaj ryzyko niezamierzonego uruchomienia elektronarz dzia Przechowuj elektronarz dzia z kt rych nie korzystasz w miejscu niedost pnym dla dzieci Elektronarz dzie przechowuj poza zasi giem dzieci i...

Page 16: ...a krawat w szali itp kt re mog zosta wci gni te przez ruchome elementy narz dzia We pod uwag ryzyko wyst pienia odbicia Korzystaj z maski przeciwpy owej P2 i pod cz odsysacz py u do otworu odci gu py...

Page 17: ...naci nij prze cznik co spowoduje zwolnienie przycisku blokady a nast pnie pu prze cznik Regulator pr dko ci obrot w Pr dko obrotow mo na ustawi w zakresie pomi dzy 1500 a 2100 obr min za pomoc regula...

Page 18: ...wy docisk zapewnia lepsz efektywno U ywaj odpowiedniego materia u ciernego dla uzyskania najlepszych efekt w KONSERWACJA Zawsze wyci gaj wtyczk przed przyst pieniem do regulacji i konserwacji Narz dzi...

Page 19: ...ilnika spadaj na skutek przeci enia Zmniejsz obci enie Silnik si przegrzewa Obce przedmioty w silniku Usu obce przedmioty Brak rodka smaruj cego lub zanieczyszczenie rodka smaruj cego Uzupe nij lub wy...

Page 20: ...rk areas increase the risk of accidents and injuries Do not use power tools in explosive environments such as in the vicinity of flammable liquids gases or dust Power tools produce sparks that can ign...

Page 21: ...remove the battery before making any adjustments changing accessories or putting the power tool away These safety precautions reduce the risk of accidently starting the power tool Store power tools ou...

Page 22: ...m cleaner Switch off the tool and unplug the power cord before making adjustments or replacing accessories The power tool must only be repaired by qualified personnel or an authorised service centre T...

Page 23: ...Select a suitable speed for the material to be sanded Replacing the sanding pad 1 Undo the cap screws holding the sanding pad in place 2 Remove the sanding pad 3 Fit the new sanding pad and tighten t...

Page 24: ...er use strong detergents or solvents they could damage the plastic parts on the tool Never allow water to enter the tool Carbon brushes The carbon brushes must be replaced when they become worn out TR...

Page 25: ......

Reviews: