


– 55 –
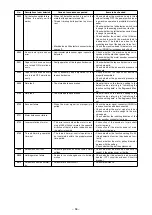
No.
Description of error detected
cause of occurrence expected
Items to be checked
E000
Executon of data ntalza-
ton (Ths s not the error.)
• When the machne head s changed.
• When the ntalzaton operaton s execut-
ed.
E003
Dsconnecton of synchro-
nzer connector
• When poston detecton sgnal s not nput
from the sewng machne head synchro-
nzer.
• When the synchronzer has broken.
• Belt s loose.
• Machne head s not proper.
• Motor pulley s not proper.
• Check the synchronzer connector (CN33)
for loose connecton and dsconnecton.
• Check whether the synchronzer cord has
broken snce the cord s caught n the ma-
chne head.
• Check the belt tenson.
• Check the settng of the machne head.
• Check the settng of the motor pulley.
E004
Synchronzer lower poston
sensor falure
E005
Synchronzer upper poston
sensor falure
E007
Overload of motor
• When the machne head s locked.
• When sewng extra-heavy materal beyond
the guarantee of the machne head.
• When the motor does not run.
• Motor or drver s broken.
• Check whether the thread has been entan-
gled n the motor pulley.
• Check the motor output connector (4P) for
loose connecton and dsconnecton.
• Check whether there s any holdup when
turnng the motor by hand.
E070
Slp of belt
• When the machne head s locked.
• Belt s loose.
• Check whether there s any holdup when
turnng the motor by hand.
• Check the belt tenson.
E07
Dsconnecton of motor out-
put connector
• Dsconnecton of motor connector.
• Check the motor output connector for loose
connecton and dsconnecton.
E072
Overload of motor at the tme
of thread trmmng moton
• Same as E007.
• Same as E007.
E079
Automatc operaton over-
load error
• Not used
• Not used
E220
Grease-up warnng
• When the predetermned number of
sttches has been reached.
• Replenish the specified places with grease
and reset.
(For the detals, refer to the data of the ma-
chne head.)
E22
Grease-up error
• When the predetermned number of
sttches has been reached and the sewng
s not possble.
• Replenish the specified places with grease
and reset.
(For the detals, refer to the data of the ma-
chne head.)
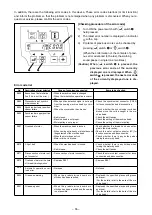
In addton, there are the followng error codes n ths devce. These error codes nterlock (or lmt functon)
and nform the problem so that the problem s not enlarged when any problem s dscovered. When you re-
quest our service, please confirm the error codes.
Error code list
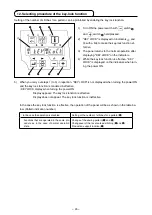
[checking procedure of the error code]
) Turn ON the power swtch wth
swtch
3
held pressed.
2) The latest error number s dsplayed on ndcator
B
wth a blp.
3) Contents of prevous errors can be checked by
pressng
swtch
3
or
swtch
4
.
(When the confirmation of the contents of previ
-
ous error advanced to the last, the warnng
sound peeps n sngle tone two tmes.)
(caution) When
switch
3
is pressed, the
previous error code of the currently
displayed one is displayed. When
switch
4
is pressed, the next error code
of the currently displayed one is dis-
played.
4
3
B


