background image


48


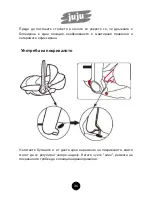
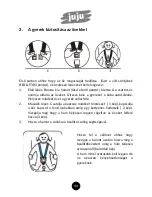
Bizonyosodjon  meg  arról  hogy  a  fogantyú  rögzítve  van  egy  helyzetben,  a 
szallagok helyesen vannak felszerelve és a a csattok helyesen vannak rögzítve 
mielőtt beszerelné a gépkocsiban.   


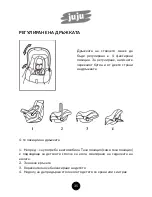
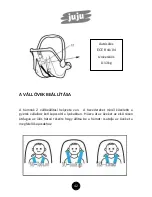
 A huzat használata 


Nyomja meg a huzat keretének mindkét oldalán található gombokat így fel-le 
állíthatja.   Amikor egy kattintás hallatszik a huzat kerete a helyes helyzetben 
kéne legyen.  


Summary of Contents for Baby Boo

Page 1: ...Baby Boo Child Car Seat Group 0 User Manual EN RO BG HU PL...

Page 2: ...ccepting this Universal child restraint for this group 3 This child restraint has been declared Universal under more strict conditions than those applied to earlier designs which do not carry this not...

Page 3: ...ference in its life period Applicability The baby car seat is suitable for weight categories 0 No older than approx 15 months WARNING DO NOT place rear facing child seat on front seats with airbags 1...

Page 4: ...firmly 7 Do not modify this product in any way Not to use any load bearing contact points other than those described in the instructions and marked in the child car seat 8 The handle of the baby car s...

Page 5: ...t the buckle is not fully tamperproof and therefore your child should be persuaded never to play with the buckle 17 Do not continue to use the baby car seat if parts have become damaged or have loosen...

Page 6: ...the slots at or the nearest slots above the height of the child s shoulders Remove straps by passing them through the slots from the front to the back of the seat to adjust the harness re route the st...

Page 7: ...est pad and the slots on the cover and the shell then thread them into the corresponding belt slots Ensure that both of the shoulder belts go through slots at the same height and not twisted 1 Looseni...

Page 8: ...tep2 Put the two metal sections of the buckle connectors together fig 1 Slot the two buckle connectors into the slot in the top of the buckle until they click into place fig 2 Check the harness is cor...

Page 9: ...oint vehicle belt The baby car seat must be installed rearwards facing in the direction opposite the one in which you are traveling Step 1 Adjust the handle to the forward position Fig 1 Put the seat...

Page 10: ...ctory position of the adult safety belt buckle car seat relative to the child is as the Fig 5 You can contact the child car seat manufacturer if in doubt about this point Fig 4 5 Make sure all the bel...

Page 11: ...th sides at the same time Now it can be rotated The carry handle has four positions 1 Forward facing when installed in the car This position only this position is suitable for the baby car seat instal...

Page 12: ...ness is correctly fitted and the buckle fastened before carrying your car seat CANOPY USE Depend on the elastic deformation insert keys on both ends of canopy frame can be up down adjusted When you he...

Page 13: ...rness and loose the shoulder straps to release buckles then remove the cover to wash in warm water Follow reverse of the above to replace the cover CLEANING THE CAR SEAT The harness and plastic parts...

Page 14: ...niversal pentru aceasta grupa de varsta 3 Acest scaun auto a fost clasificat ca fiind unul universal sub mai multe conditii riguroase decat celelalte din clasa lui care nu sunt insotite de acesasta no...

Page 15: ...masina pentru copii ca referin n perioada de utilizare Aplicabilitate Scaunul auto pentru copii este potrivit pentru categoriile de greutate 0 pana la aproximativ 15 luni ATENTIE nu puneti scaunul de...

Page 16: ...rebuie instalat ferm 7 Nu modifica i acest produs n nici un fel Nu folosi i puncte de contact portante in alt fel decat este descris n instruc iuni 8 Manerul scaunului auto de copii trebuie strans in...

Page 17: ...l dumneavoastr ar trebui s fie convins s nu se joace cu catarama 17 Nu continua i s folosi i scaunul auto pentru copii dac p r ile au devenit deteriorate sau s au sl bit dup un accident 18 Dup un acci...

Page 18: ...ngile ar trebui s mearg n cele mai apropiate sloturi de deasupra umerilor copilului Scoate i curelele prin trecerea lor prin fantele din fa la partea din spate a scaunului pentru a regla hamul bagati...

Page 19: ...rage i prinderile cataramei prin lacasurile de pe spatarul cosului auto apoi trece i le n sloturile corespunz toare Asigura i v c ambele centuri de um r trec prin fante la aceea i n l ime i nu r sucit...

Page 20: ...rii copilului Pasul 2 Puneti cele dou sec iuni metalice ale conectorilor de la catarama fig 1 prindeti cei doi conectori n slotul din partea de sus a cataramei p n c nd se aude clic fig 2 Verifica i d...

Page 21: ...pentru copii poate fi instalat doar cu ajutorul unei centuri auto n trei puncte Scaunul auto pentru copii trebuie s fie instalat cu fa a n spate n direc ia opus celei n care mergeti Pasul 1 Regla i ma...

Page 22: ...sf c toare a centurii de siguran in vehicol n raport cu copilul este ca in figura 5 Puteti contacta distribuitorul local n cazul n care ave i ndoieli despre acest punct Fig 4 5 Asigura i v c pozi ia t...

Page 23: ...erului Cele 4 pozitii ale manerului 1 Inainte pentru utilizare in masina Aceast pozi ie numai aceast pozi ie este potrivita pentru scaunul de masina pentru copii instalat pe bancheta vehiculului 2 Dre...

Page 24: ...este corect montat i catarama fixata nainte de a pune scaunul in masina UTILIZARE COPERTINA Apasati butoanele de pe ambele capete ale cadrului copertinei care pot fi ajustate sus jos C nd a auziti cl...

Page 25: ...ala in apa la temperatura de 30 Nu se usuca prin centrifugare si niciodata nu se usuca la uscatorul electric de rufe ci numai la aer Hamul si partile de plastic pot fi sterse cu o laveta inmuiata in a...

Page 26: ...26 BG 15 13 1 ECE R44 04 2 3 4 3 3 16...

Page 27: ...27 1 0 15 1...

Page 28: ...28 1 2 3 4 5 6 7 8 9 10 11 12 13 14...

Page 29: ...29 15 16 17 18 1 7 2 Press 8 3 9 4 10 5 11 6 12 ECE...

Page 30: ...30 2 ECE R 44 04 0 13...

Page 31: ...31 1 2 lacasurile 1 PRESS...

Page 32: ...32 2 1 2 1 2 3 3...

Page 33: ...33 3 1 1 2 3 2 2...

Page 34: ...34 3 3 3 4 3 4 5 5 4 5...

Page 35: ...35 4 4 1 2 3 4...

Page 36: ...36...

Page 37: ...37 30...

Page 38: ...z az aut l s univerz lisnak van min s tve t bb szigor felt tel szerint sszehasonl tva ennek a csoportnak megfelel m s aut s l ssel melyek nem tartalmazz k ezt a megjegyz st 4 Abban az esetben ha k rd...

Page 39: ...ati utas t sokat az aut s l ssel egy tt t rolhatja a haszn lati id alatt Alkalmaz s A baba aut s l s alkalmas 0 tests ly kateg ri knak k r l be l 15 h napos korig Figyelem NE helyezze a baba aut s l s...

Page 40: ...ontokat m sk ppen mint ahogy ez le van rva jelen haszn lati utas t sban 8 A baba aut s l s foganty j t az l s h ts oldal hoz szorosan kell r gz teni Ha sz ks ges az aut l s fejt masz t be kell ll tani...

Page 41: ...j tszani 17 Ne haszn lja az l st ha r szei megrong l dtak vagy ha meglazultak baleset ut n 18 Baleset ut n a baba aut s l st ki kell cser ni Bels alkatr szek s berendez sek 1 Piros gomb be ll t fogan...

Page 42: ...helyzete van A hevedereket min l k zelebb a gyerek v llaihoz kell kapcsolni a lyukakban H zza t az veket az els r sen tdugva az l s h ts r sz re hogy ll tsa be a h mot csatolja az veket a megfelel ka...

Page 43: ...p s H zza ki a csattkapcsokat a g pkocsi l s nek h tt ml j nak r sein kereszt l s r gz tse a megfelel lyukakban Gy z dj n meg arr l hogy mindk t v ll v magass ga egyforma s nics elcsavarodva 1 A v ll...

Page 44: ...dk t vet a gyerek v llai f l 2 M sodik l p s Csatolja a kapcsok mindk t f mr sz t 1 k p kapcsolja a k t kapcsot a fenti lyukakban am g egy kettyen s hallatszik 2 k p Vizsg lja meg hogy a h m helyesen...

Page 45: ...et a g pkocsiban r gz teni A baba aut s l st h ttal kell beszerelni h ttal a menetir nynak Els l p s ll tsa be a foganty t el rehajl ir nyba 1 k p Tegye az l st a hely re Az elhelyez s szoros kell leg...

Page 46: ...pkocsiban a biztons gi v kiel g t helyzete az 5 s k pben bemutatott helyzet Felveheti a kapcsolatot a helyi forgalmaz val abban az esetben ha k telkedik jelen pontban Fig 4 5 Bizinyosodjon meg hogy mi...

Page 47: ...k t oldal n tal lhat piros gombot egyszerre A foganty 4 helyzete 1 El re hajolva g pkocsi haszn latra Ez a helyzet csak ez a helyzet megfelel a baba aut s l snek amikor a g pkocsiba be van szerelve 2...

Page 48: ...helyesen vannak felszerelve s a a csattok helyesen vannak r gz tve miel tt beszereln a g pkocsiban A huzat haszn lata Nyomja meg a huzat keret nek mindk t oldal n tal lhat gombokat gy fel le ll thatj...

Page 49: ...zel 30 fokon Nem sz r that centrifug l ssal s soha ne sz r tsa elektromos ruhasz r t val csak leveg n A h mot s a m anyag r szeket szappanyosv zben m rtott ronggyal lehet let r lni Ne haszn ljon mos p...

Page 50: ...o Uniwersalnych fotelik w dzieci cych tej grupy 3 Fotelik ten jest okre lony jako Uniwersalny na ci lej okre lonych warunkach ni te zastosowane do wcze niejszych modeli kt re nie posiada y tej adnotac...

Page 51: ...wanie Dzieci cy fotelik samochodowy jest odpowiedni dla kategorii wagowej 0 dla dzieci do ok 15 miesi cy OSTRZE ENIE NIGDY nie montuj fotelika ty em do kierunku jazdy na przednim siedzeniu wyposa onym...

Page 52: ...tkowych element w poza opisanymi w instrukcji 8 R czka fotelika powinna opiera si o oparcie siedzenia Je eli to konieczne wyreguluj ustawienie zag wka samochodowego 9 Fotelika nie wolno u ywa bez pokr...

Page 53: ...ie bawi o si nim 17 Nie u ywaj fotelika je eli jego cz ci zosta y uszkodzone lub poluzowane w wyniku wypadku 18 Po wypadku fotelik powinien zosta wymieniony CZ CI I WYPOSA ENIE 1 2 Czerwony przycisk d...

Page 54: ...zycje Szelki naramienne powinny przechodzi przez naci cia po o one najbli ej ramion dziecka W celu optymalnego dopasowania nale y wysun szelki z otwor w i wsun ponownie w otwory po o one bli ej ramion...

Page 55: ...atk piersiow i z otwor w prze j do odpowiednich otwor w Upewnij si e obydwa pasy naramienne przechodz przez otwory znajduj ce si na tej samej wysoko ci i s skr cone 1 Luzowanie pas w naramiennych Krok...

Page 56: ...lamr i u je g r do do u W dziecko do fotelika Na pasy naramienne na ramiona dziecka 2 Krok 2 Z cz dwie metalowe cz ci klamry rys 1 w je w szczelin na g rze klamry a us yszysz klikni cie rys 2 Sprawd c...

Page 57: ...i tylko do pojazdu wyposa onego w 3 punktowy pas bezpiecze stwa Fotelik musi by zamontowany ty em do kierunku jazdy rys 1 Krok 1 Ustaw r czk z przodu fotelika rys 1 Ustaw fotelik na siedzeniu samochod...

Page 58: ...powiedni spos b zapi cia pasa bezpiecze stwa pokazuje rys 5 W przypadku w tpliwo ci nale y skontaktowa si z producentem fotelika rys 4 5 Upewnij si e pas znajduje si w odpowiedniej pozycji i nie jest...

Page 59: ...stronach Teraz mo esz wyregulowa pozycj r czki R czka do przenoszenia ma 4 pozycje 1 Na przodzie gdy fotelik jest zainstalowany w samochodzie Ta pozycja tylko ta pozycja jest odpowiednia gdy fotelik...

Page 60: ...czka jest zablokowana w wybranej pozycji szelki prawid owo przylegaj a klamra jest zapi ta U YCIE BUDKI W zale no ci od odkszta cenia kluczyki po obu stronach ramy budki powinny zosta odpowiednio dopa...

Page 61: ...pasy naramienne i klamr nast pnie zdejmij tapicerk i wypierz j w ciep ej wodzie Post puj odwrotnie aby na o y ponownie tapicerk CZYSZCZENIE FOTELIKA Szelki i plastikowe cz ci mog by czyszczone bardzo...

Page 62: ...ulation No 44 The Technical Construction File required by this Directive is maintained at the corporate headquarters of Dot Com Investment S R L Date of issue 01 02 2015 Place of issue Bucharest ROMAN...

Reviews: