background image

ġ

2-8


d)  Grounding and corrosion-resistant measures   


x


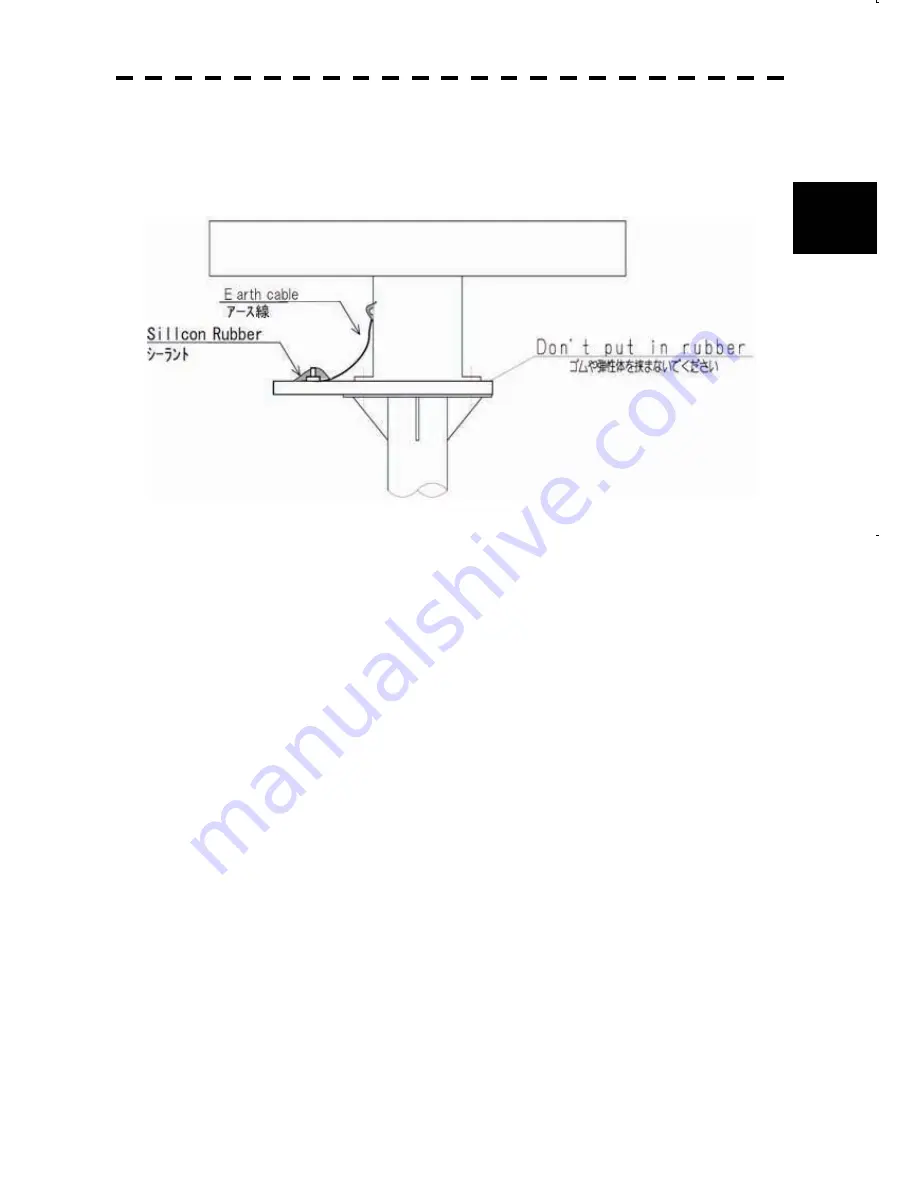
Ground the antenna chassis and the installation surface (hull) by using an earth line.   
Apply sealant to the connection portion of the earth line to prevent corrosion and 
damage by vibration (Fig. 10).   


Fig. 10    Grounding and corrosion-resistant measures   


Summary of Contents for JMA-5212-4

Page 1: ...MARINE RADAR MARINE RADAR EQUIPMENT EQUIPMENT INSTALLATION INSTALLATION MANUAL MANUAL JMA 5212 4 6 JMA 5212 4 6 JMA 5222 7 9 JMA 5222 7 9 JMA 5212 4HS 6HS JMA 5212 4HS 6HS ...

Page 2: ......

Page 3: ...IVER 3 10 3 7 CONNECTING TO THE GPS COMPASS 3 15 3 8 CONNECTING TO NMEA HEADING OUTPUT DEVICE 3 23 3 9 CONNECTING TO THE GYRO AND ELECTROMAGNETIC LOG NSK UNIT SETTING OPTION 3 25 3 10 CONNECTING TO THE PC PLOTTER 3 31 3 11 CONNECTING TO OTHER NMEA DEVICES 3 32 3 12 CONNECTION WITH OTHER DEVICES SUB INDICATOR OUTPUT AND SLAVE INPUT 3 34 3 13 POWER SUPPLY NBA 5111 OPTION 3 38 3 14 TARGET TRACKING NC...

Page 4: ... BLANK 4 19 4 11 SETTING OF PULSE OUTPUT SELECTION BEARING PULSES FROM ANTENNA 4 20 4 12 LANGUAGE SETTING LANGUAGE 4 21 4 13 DATE TIME SETTING 4 22 4 14 MAIN BANG SUPPRESSION ADJUSTMENT MBS 4 23 4 15 ADJUSTMENT OF PERFORMANCE MONITOR MON 4 25 4 16 MAGNET COMPASS SETTING 4 27 4 17 GPS RECEIVER SETTING 4 28 4 18 DGPS RECEIVER SETTING 4 37 4 19 SBAS RECEIVER SETTING 4 41 4 20 DISPLAYING GPS RECEPTION...

Page 5: ...AWING FIG 8 NBA 5111 OUTSIDE DRAWING FIG 9 GENERAL SYSTEM DIAGRAM OF RADAR TYPE JMA 5212 4 6 FIG 10 GENERAL SYSTEM DIAGRAM OF RADAR TYPE JMA 5222 7 9 FIG 11 JMA 5212 4 6 JMA 5222 7 9 POWER SYSTEM DIAGRAM FIG 12 NDC 1460 INTERNAL CONNECTION DIAGRAM OF RADAR PROCESS UNIT FIG 13 NCE 7699A INTERNAL CONNECTION DIAGRAM OF KEY BOARD UNIT FIG 14 NKE 2103 SCANNER UNIT INTERCONNECTION DIAGRAM FIG 15 NKE 225...

Page 6: ...ġ ...

Page 7: ... 1 6 APPENDIX 1 OVERVIEW 2 INSTALLATION OF THE SCANNER 3 INSTALLATION OF THE DISPLAY UNIT 4 INITIAL SETTING 5 MEASURES AGAINST NOISE INTERFERENCE IN THE RADIO EQUIPMENT 6 INSPECTION AFTER INSTALLATION APPENDIX ...

Page 8: ...ġ ...

Page 9: ...SECTION 1 OVERVIEW ...

Page 10: ...nstall the display unit in the wheel house to facilitate observations 3 Available cable lengths for installing the radar JMA 5200MK2 are as shown in the table below Request an appropriate cable from JRC beforehand A cable longer than the sufficient length may degrade radar performance so give it careful consideration when planning the installation Code No Cable length number of cores CFQ6912 10 10...

Page 11: ... 2 INSTALLATION OF THE SCANNER 2 1 SELECTING THE INSTALLATION POSITION 2 1 2 2 INSTALLATION PROCEDURE 2 5 2 3 CONNECTING THE INSTALLATION CABLE NKE 2103 2 9 2 4 CONNECTING THE INSTALLATION CABLE NKE 2254 2 11 ...

Page 12: ...e antenna from vibration and impact at the installation position x To avoid the radiating section coming in contact with other installed objects while it is rotating ensure that there is at least 200 millimeters from the swing circle turning radius to other installed objects Fig 1 The swing circle of the JMA 5200MK2 radar s antenna is as shown in Table 1 Antenna model length ᴾ Swing circleᴾ ᵬᵩᵣᵋᵐᵏ...

Page 13: ...a s vertical beam width the point 3dB from the peak of the main lobe As a result it is difficult to detect a close in target Sea clutter also increases Determine the installation height by taking into consideration the weight maximum length of the cable and maintenance after installation x If the installation height of the antenna is low it is difficult to detect a long distance target The ship s ...

Page 14: ...o take care of installation maintenance adjustment and repair of the antenna by providing adequate footholds to the mounting rack and the radar mast Fig 3 Mounting rack and mast for the antenna x When installing the antenna select a location where there are the fewest structural objects in the surrounding area so that false images which interfere with target detection will not be generated by sign...

Page 15: ... equip the structural objects with a radio wave absorber There are two types of absorbers broadband type having no specific resonant frequency and narrowband type which can absorb a band with a specific frequency Use those where applicable Furthermore it is effective to install a metal reflector which reflects radio waves upwardly between the antenna and a structural object so that the radar s rad...

Page 16: ...ply rope to the antenna in the way that squeezes or deforms the radiating section x When hoisting the antenna by a crane do not hoist it by attaching a belt or a rope only to the antenna s radiating section as shown in Fig 6 x For the X band wrap a cloth around the antenna s support section located at the bottom of the radiating section and then attach a belt or rope to it to hoist the antenna Fig...

Page 17: ... or resin is inserted the amplitude of vibration increases resulting in the possibility of damage to the antenna Furthermore if installation bolts become loose due to deterioration of rubber or resin the antenna may be damaged or fall from its mount 3 Installation and clamping method a Installation direction x Installation should be done so that the cable gland is oriented toward the stern b Bolts...

Page 18: ...h fits the bolt and at the location where the nut comes in contact with the plain washer insert a spring washer and then securely tighten the nuts Fig 9 x To prevent corrosion due to the contacts between different metals such as the antenna chassis legs installation surface bolts nuts etc cover the bolt s head and nuts with sealant Fig 9 Fig 9 Use of washer and corrosion resistant measures ...

Page 19: ...ures x Ground the antenna chassis and the installation surface hull by using an earth line Apply sealant to the connection portion of the earth line to prevent corrosion and damage by vibration Fig 10 Fig 10 Grounding and corrosion resistant measures ...

Page 20: ...2 9 2 3 CONNECTING THE INSTALLATION CABLE NKE 2103 ...

Page 21: ...ġ 2 10 2 ...

Page 22: ...2 11 2 4 CONNECTING THE INSTALLATION CABLE NKE 2254 ...

Page 23: ...ġ 2 12 2 ...

Page 24: ...2 13 ...

Page 25: ...ING TO THE GYRO AND ELECTROMAGNETIC LOG NSK UNIT SETTING OPTION 3 25 3 10 CONNECTING TO THE PC PLOTTER 3 31 3 11 CONNECTING TO OTHER NMEA DEVICES 3 32 3 12 CONNECTION WITH OTHER DEVICES SUB INDICATOR OUTPUT AND SLAVE INPUT 3 34 3 13 POWER SUPPLY NBA 5111 OPTION 3 38 3 14 TARGET TRACKING NCA 877A OPTION 3 39 3 15 PLOTTER CIRCUIT NDB 44 OPTION 3 41 3 16 CONNECTING TO AIS NQA 2155 OPTION 3 43 3 17 CO...

Page 26: ...n one meter away from the compass 3 Take precautions to prevent water from splashing through the window or door of the bridge onto the display unit 4 Install the display unit by considering convenience of maintenance If the display unit is adjacent to machinery or walls on the right left above or behind allow enough slack in the installation cable so that the display unit can be pulled forward for...

Page 27: ... the LCD panel to find the target direction 2 Select locations where there is least vibration 3 It is necessary to allow space for a bend in the installation cable at the rear of the equipment 2 Connecting the LCD monitor cable Connect two cables One cable is a video cable and the other is a power cable As shown in the photograph below plug the power cable at the rear of the display unit rotate th...

Page 28: ... which VIDEO is engraved at the rear of the radar process unit cabinet Turn the control attached to the connector until it cannot be turned any further 2 The power for the display unit is not supplied from the indicator Use a dedicated cable that is included in the package of the display unit for the power supply to the display unit To the LCD monitor RGB signal NMEA AUX VIDEO AIS NMEA GYRO COMPAS...

Page 29: ...ss unit The operation unit is connected to the radar process unit with one cable The cable is integrated into the operation unit Connect the cable extending from the operation unit to the connector for which KEY BOARD is engraved at the rear of the radar process unit cabinet Turn the plug attached to the connector until it cannot be turned any further To the keyboard unit NMEA AUX VIDEO AIS NMEA G...

Page 30: ... 5 m long cables with a connector Wiring table of the cable CFQ 5436 Color Number of wires diameter mm Cross sectional area mm Polarity Red 50 0 18 1 25 Red 50 0 18 1 25 Red 50 0 18 1 25 Black 50 0 18 1 25 㧙 Black 50 0 18 1 25 㧙 Black 50 0 18 1 25 㧙 CFQ 5436 5 cable Cable length 5m ...

Page 31: ... causes system failure or accident 2 Connecting the cable to the radar process unit Connect the CFQ 6911 connector to the connector for which POWER is engraved at the rear of the radar process unit cabinet Turn the plug attached to the connector until it cannot be turned any further The CFQ 5436 is connected here NMEA AUX VIDEO AIS NMEA GYRO COMPASS GPS KEY BOARD E POWER SCANNER F3 F1 F2 Cable pro...

Page 32: ...g at its full capacity Use the following guideline for selecting a power cable a Take the voltage fluctuation rate into consideration when determining a voltage Vs value of the ship s power supply b Use the following formula for calculating a voltage drop V V 2LRKI L Cable length R Direct current resistance at 20 C m K Conductor resistance temperature counting 1 22 I Maximum peak current A c Vario...

Page 33: ...e radar process unit to the scanner For this radar equipment use the following cables having a connector Cable length JRC code Remarks 10m CFQ 6912 10 Option 15m CFQ 6912 15 Option 20m CFQ 6912 20 Option 30m CFQ 6912 30 Option 40m CFQ 6912 40 Option 50m CFQ 6912 50 Option 65m CFQ 6912 65 Option Cable CFQ 6912 Connector on both sides ...

Page 34: ...e AWG24 twist pair COM 14 Drain line shield Drain line coaxial shield meshwork AWG24 TIE 15 Shield line core AWG24 TI 16 Orange medium AWG22 BP Cover Shield meshwork Drain line coaxial drain line shield Outer diameter of the cable 14 mmr0 5 mm Although a cable is not connected to PIN No 8 12 V voltage is outputted to the radar process unit side Power for the external simulator is supplied by this ...

Page 35: ... connector until it cannot be turned any further The JRC s GPS receiver is connected here NMEA AUX VIDEO AIS NMEA GYRO COMPASS GPS KEY BOARD E POWER SCANNER F3 F1 F2 2 Setting of the GPS receiver of JRC No setting is required 3 Setting the JMA 5200MK2 Basically no setting is required No special setting is required for the use However to change the setting for selecting or restricting the sentences...

Page 36: ...l lines to the attached NMEA data connector P3 for J3 LTWBD06BFFA LL7001 using the following diagram as the reference JMA 5200MK2 side GPS receiver side 3 NAVCOM Data return 4 NAVRX Data output from the receiver GPS connector J3 To GPS or NMEA equipment 1 12V Power for GPS receiver 2 GND Power GND for GPS receiver 3 NAVCOM Signal GND 4 NAVRX Input from receiving signals from GPS 5 NAVTX Output of ...

Page 37: ...3 12 3 Method of assembling and connecting P3 LTWBD06BFFA LL7001 and P5 LTWBD08BFFA LL7001 that are attached ...

Page 38: ...ut sentence GPGGA Global positioning system GPS fix data GPGLL Geographic position latitude longitude GPRMC Recommended minimum specific GNSS data GPVTG Course over ground and ground speed RAAIS AIS Data RAALR Set alarm state RAAPB QT GPAPB Heading Track controller autopilot sentence B RABOD QT GPBOD Bearing origin to destination RABWC QT GPBWC Bearing and distance to waypoint RAHDT QT GPHDT Headi...

Page 39: ...cording to the setting on the GPS side as described in 3 In the standard state the baud rate of the JMA 5200MK2 is set to 4800bps In the initial state all the sentences can be received When the restriction on the sentences to be received by the JMA 5200MK2 is not set the device can be used as it is However to change the setting for selecting or restricting the sentences to be received change the s...

Page 40: ...raft 20 deg sec 3 7 1 JLR 10 Connection to JRC s GPS compass JLR 10 is possible 1 Connection 1 1 When using JRC s cable CFQ 6934 Using JRC s dedicated cable CFQ 6934 makes it possible to easily connect to JLR 10 Using the cable also makes it possible to receive bearing signals from JLR 10 as well as receive latitude and longitude information as NMEA data Photograph 1 JLR 10 NSK unit dedicated conn...

Page 41: ...uch as position information from the GPS equipment of JRC or other maker s GPS equipment by acquiring azimuth data only from JLR 10 connect azimuth data only using the dedicated CFQ 6934 cable that is shown in the above diagram For the position information connect the GPS equipment as described in Section 3 6 without using the cable from JLR 10 labeled with GPS IND Photograph 2 Insert the 8 pin co...

Page 42: ...als from NSK 4 NSKRX Input of receiving signals from NSK 5 GND Power GND for NSK 6 ALM Dry contact output 1 7 ALM Dry contact output 2 8 5V Power for NSK 5V The above mentioned connections are available only for receiving bearing data from JLR 10 About how to receive position information refer to section 3 6 2 Setting the GPS Compass JLR 10 Set the following information with the GPS compass Data o...

Page 43: ...to receive bearing signals from JLR 20 30 as well as receive latitude and longitude information as NMEA data Connecting the JLR 20 30 Connecting the JMA 5200MK2 Connect the CFQ 5469 6 PIN connector having the GPS IND label NMEA AUX VIDEO AIS NMEA GYRO COMPASS GPS KEY BOARD E POWER SCANNER F3 F1 F2 Connect the CFQ 5469 8 PIN connector having the GYRO COMPASS IND label Insert the connector of CFQ 54...

Page 44: ...mpass data input Disconnected Disconnected Compass data input Disconnected Disconnected Compass data output Sensor throw SD A 3 NSKRX Compass data output Sensor throw SD B 4 NSKRX GND Disconnected Disconnected Connector for GPS compass NSK equipment J5 To GPS compass or NSK unit 1 NSKTX Output of receiving signals from NSK 2 NSKTX Output of receiving signals from NSK 3 NSKRX Input of receiving sig...

Page 45: ... CODE INPUT Menu will appear 2 Enter 0 and press the ENT key The Adjust Menu will appear 3 Press 6 key Press 2 key The Heading Equipment Setting Menu will appear 4 1 Set the gyro 3 2 Baud Rate Setting When setting the gyro in 3 1 Heading Equipment Setting the setting of the baud rate is not required ...

Page 46: ...D Power GND for NSK 6 ALM Dry contact output 1 7 ALM Dry contact output 2 8 5V Power for NSK 5V 2 Setting Other Electromagnetic Compasses Set the following information in the electromagnetic compass Data output format NMEA V2 0 OR LATER VERSION Output sentence THS HDT HDG HDM Data transmission cycle Must be 50ms or less 20ms or less recommended Baud Rate 38400bps 4800bps The shorter the data trans...

Page 47: ...0 and press the ENT key The Adjust Menu will appear 3 Press 5 key Press 1 key The Baud Rate Setting Menu will appear 4 5 Set the compass 5 As the baud rate changes between 38400bps and 4800bps whenever the COM5 compass is pressed set the baud rate to that of the electromagnetic compass to be connected ...

Page 48: ...he NMEA heading output device Connector for GPS compass NSK equipment J5 To GPS compass or NSK unit 1 NSKTX Output of receiving signals from NSK 2 NSKTX Output of receiving signals from NSK 3 NSKRX Input of receiving signals from NSK 4 NSKRX Input of receiving signals from NSK 5 GND Power GND for NSK 6 ALM Dry contact output 1 7 ALM Dry contact output 2 8 5V Power for NSK 5V 2 Setting the NMEA azi...

Page 49: ...ing Menu will appear 4 2 Set the compass 3 2 Baud Rate Setting 1 Press and hold RADAR MENU key The CODE INPUT Menu will appear 2 Enter 0 and press the ENT key The Adjust Menu will appear 3 Press 5 key Press 1 key The Baud Rate Setting Menu will appear 4 5 Set the compass 5 As the baud rate changes between 38400bps and 4800bps whenever the COM5 compass is pressed set the baud rate to that of the NM...

Page 50: ...tment after installing the unit 1 Installing the NSK unit To connect the gyro and the electromagnetic log use the NSK unit NCT 4106A that is available as an option Use the dedicated cable of JRC CFQ 6998 which is included in the package for the connection This cable enables easy connection between the NCT 4106A and the processing unit The NCT 4106A includes a large capacity external buzzer contact...

Page 51: ...d it is compatible with the step type gyro compass Check the type of the gyro compass used in own ship and make settings according to the procedures below 1 Set the switches of the NSK unit PC4201 before turning on the radar equipment S1 OFF S2 S3 The output of the gyro compass is either step signal or synchro signal Carefully check own ship s gyro compass and adjust settings for S2 and S3 Synchro...

Page 52: ...ke settings according to the gyration ratio 360X 180X 90X 36X S5 2 OFF ON OFF ON S5 3 OFF OFF ON ON S5 4 Set the gyration direction Normal clockwise OFF Reverse counterclockwise ON S5 5 Set the log type Pulse signal OFF Synchro signal ON S5 6 Not in use S5 7 8 Set the log ratio Pulse NM pulse signal 800 400 200 100 Gyration NM synchro signal 360X 180X 90X 30X S5 7 OFF ON OFF ON S5 8 OFF OFF ON ON ...

Page 53: ...㪫㪟㪪㪀 㪞㪰㪩㪦㩷㪪㪠㪞㪥㪘㪣 㪦㪫㪟㪜㪩㩷㪪㪜㪫㪫㪠㪥㪞 㪣㪦㪞㩷㪘㪣㪘㪩㪤 㪞㪰㪩㪦㩷㪪㪠㪤㪬㪣㪘㪫㪦㪩 㪣㪦㪞㩷㪪㪠㪤㪬㪣㪘㪫㪦㪩 㪥㪅㪚㪅 㪛㫆㫅㩾㫋㩷㪺㪸㫉㪼 㪞㪰㪩㪦㩷㪘㪣㪘㪩㪤 㪫㪠㪤㪜 㪥㪤㪜㪘㩷㪙㪘㪬㪛㪩㪘㪫㪜 㪪㪜㪫㪫㪠㪥㪞 㪌㫊 㪇㪅㪌㫊 㪋㪏㪇㪇 㪐㪍㪇㪇 㪈㪐㪉㪇㪇 㪊㪏㪋㪇㪇 S5 SETTING TABLE 㪈 㪉 㪊 㪋 㪌 㪍 㪎 㪏 㪪㪫㪜㪧 㪦㪥 㪪㪰㪥㪚 㪦㪝㪝 㪦㪥 㪦㪥 㪦㪝㪝 㪦㪥 㪦㪥 㪦㪝㪝 㪦㪝㪝 㪦㪝㪝 㪦㪥 㪦㪝㪝 㪦㪥 㪦㪝㪝 㪥㪅㪚㪅 㪸㫅㫐 㪦㪥 㪦㪥 㪦㪝㪝 㪦㪥 㪦㪥 㪦㪝㪝 㪦㪝㪝 㪦㪝㪝 㪉㪇㪇㪧㪆㪐㪇㬍 㪋㪇㪇㪧㪆㪈㪏㪇㬍 㪏㪇㪇㪧㪆㪊㪍㪇㬍 㪥㪦㪩 㪩㪘㪫㪠㪦 㪊㪍㬍 㪐㪇㬍 㪈㪏㪇㬍 㪊㪍㪇㬍 㪛㪠㪩㪜㪚㪫㪠㪦㪥 㪩㪜㪭 㪞㪰㪩㪦䇭㪪㪠㪞 㪣㪦㪞䇭㪪㪠㪞 㪫㪰㪧㪜 㪫㪰㪧㪜 㪪㪰㪥㪚 㪧㪬㪣㪪㪜 㪛㫆㫅㩾㫋㩷㪺㪸...

Page 54: ...ro 3 2 Baud Rate Setting When setting the gyro in 3 1 Heading Equipment Setting the setting of the baud rate is not required 4 Connections to an external buzzer When connecting an external buzzer to the NSK unit read the following guideline TB40 of the built in PCB CSC 631 has a dry contact output so that if the connection TB 40 Power Supply Positive terminal of the buzzer Negative terminal of the...

Page 55: ...3 30 3 Caution The maximum contact capacity is 10A 250VAC 10A 30VDC Make sure that this capacity is not exceeded ...

Page 56: ...hen connecting the PC plotter using RS232C set jumper TB4 in RS232C as shown below 2 Setting the PC plotter Set the PC plotter according to your utilization environment Set according to the information that is received from JMA 5200MK2 3 Setting the JMA 5200MK2 Set the communication port of JMA 5200MK2 according to the data transmitted to the PC plotter to be connected Refer to 4 8 COMMUNICATION P...

Page 57: ...owing diagram as the reference JMA 5200MK2 side NMEA device side 1 NMEA RXD Data output from the NMEA device 2 NMEA RXD Data output from the NMEA device 3 NMEA TXD Data input to the NMEA device 4 NMEA TXD Data input to the NMEA device Connector for AIS compass or NMEA equipment J6 RS 422 To AIS or other NMEA device 1 NMEA RXD㧗 㧦NMEA input 㧗 2 NMEA RXD㧙 㧦NMEA input 㧙 3 NMEA TXD㧗 㧦NMEA output 㧗 4 NM...

Page 58: ...itive receive signal from the RS232C device ԟRS232C TXD㧗 Positive transmit signal from the RS232C device ԠRS232C TXD㧙 Negative transmit signal from the RS232C device ԡ Ԣ ԣ Ԥ ԥ 2 Setting for the NMEA data output device Set the NMEA data output device in such a manner that it will output the data to be received by the JMA 5200MK2 For the data that can be received by the JMA 5200MK2 see 2 NMEA0183 st...

Page 59: ...ay unit for other radar equipment Use the following optional cables for the installation The option requires inter connection cable CFQ5351 and inter unit cable CFQ 5251 CFQ 5351 CFQ 5251 Simplified inter switch installation procedures 1 Remove the processing unit cabinet cover form the unit cabinet 2 Connect CFQ 5351 to the J5008 on the CBD 1702A 3 Attach 14 pin circular connector of the CFQ 5351...

Page 60: ...ignal output ԘEVDO Radar video output ԙEVDOE Return ԚFG Frame GND ԛETRGO Trigger ԜEBPO Azimuth pulse output ԝEBZO Azimuth reference pulse output ԞETRGOE GND ԟEVDI Radar video input ԠEVDIE Return ԡETRGI Trigger input Ԣ 12V 12V ԣEBPI Azimuth pulse input ԤEBZI Azimuth reference pulse input ԥETRGIE GND Optional inter connection cable CFQ 5351 required Inter unit cable CFQ 5251 5m is available It inclu...

Page 61: ...nect the trigger signal line to the following terminals located on the terminal board J9 4 ETRGO TTL output J9 7 ETRGOE return The trigger signal is a positive signal and it takes approximately 6P seconds from the startup to the video signal 8 x Rotation signal Connect the rotation signal line to the following terminals located on the terminal board J9 5 EBPO J9 7 ETRGOE return Connect the rotatio...

Page 62: ...ws J9 8 EVDI J9 9 EVDIE x Trigger signal Connect the trigger signal input line to the terminal located on the terminal board as follows J9 10 ETRGI J9 14 ETRGIE x Rotation signal input already pulled up at 470 ohm Connect the rotation signal line to the following terminals located on the terminal board J9 12 EBPI J9 14 ETRGIE Since the radar JMA 5200MK2 does not detect the rotation direction only ...

Page 63: ... supply The power supply can be used for both 100 110 115 VAC and 200 220 230 240 VAC of the ship s mains but the input connector and the connecting bar must be changed Input connector Connecting bar INPUT VOLTAGE CN105 CN104 1 2 2 3 4 5 AC100V AC105V㨪110V AC115V㨪120V AC200V AC210V㨪220V AC230V㨪240V ...

Page 64: ...connection 1 Remove the processing unit cabinet cover 2 Connect the target tracking unit s connector to a connector shown in the following photograph 3 Fasten four screws shown in the following photograph to securely fix the target tracking unit 4 Attach the processing unit cabinet cover and complete the installation of the target tracking unit ...

Page 65: ...3 40 3 2 Setting The target tracking function can be used simply by connecting it No setting is required ...

Page 66: ... 1 Equipment connection 1 Remove the processing unit cabinet cover 2 Connect the P4901 side of the cable H 7ZCRD0934 attached to the plotter circuit to the plotter circuit s connector J4901 3 Connect the P4407 side of the cable H 7ZCRD0934 attached to the plotter circuit to the processing unit s radar processing board J4407 ...

Page 67: ...he location in the cabinet as shown in the following photograph 5 Attach the processing unit cabinet cover and complete the installation of the plotter circuit 2 Setting The plotter option can be used simply by connecting it No setting is required ...

Page 68: ...not installed in the radar process unit install it according to the procedures below 1 Set the jumper plugs and the switches as shown in the figure At installation in the processor the jumper is installed at the bottom 2 Remove the processor unit cabinet cover 3 Set the jumper of the power supply unit Set TB3J 2 TB3J3 DIRECT ...

Page 69: ... H 7ZCRD0908 attached to the AIS interface circuit to the AIS interface circuit s connectors as shown in the following table Cable side AIS interface side P1 J1 P400 J400 P510 J510 6 Securely fix the AIS interface circuit at the location in the processing unit a shown in the following photograph ...

Page 70: ...for J6 LTWBD7BFFA LL7001 using the following diagram as the reference JMA 5200MK2 side AIS device side 1 NMEA RXD Data output from the AIS 2 NMEA RXD Data output from the AIS 3 NMEA TXD Data input to the AIS 4 NMEA TXD Data input to the AIS Connector for AIS compass or NMEA equipment J6 RS 422 To AIS or other NMEA device 1 NMEA RXD㧗 㧦NMEA input 㧗 2 NMEA RXD㧙 㧦NMEA input 㧙 3 NMEA TXD㧗 㧦NMEA output ...

Page 71: ...ting menu appears 4 Press 1 key The Baud Rate Menu will appear 5 Press 3 key The pull down menu is displayed at COM3 NAV1 6 From the pull down menu select the 38400bps 3 2 Setting of AIS 1 Press and hold RADAR MENU key The Ten Key Pad screen will appear 2 Enter 0 and press the ENT key The Adjust Menu will appear 3 Press 3 key 4 Press 1 key 5 1 Select to use in the AIS processing unit menu The AIS ...

Page 72: ...tall the coastline ROM card and the memory card according to the procedures below 1 Remove the rubber packing located at the frontside of the processing unit cabinet as shown in the following photograph and expose the card slot Rubber packing Card slot ...

Page 73: ...rding to the following table Card type Insertion slot No JRC card Either one ERC card Either one C Map NT detail card Either one Memory card Either one Note The Background of C Map has been built in don t insert C Map NT background card If the background card is inserted the system will malfunction Slot No 1 Slot No 2 ...

Page 74: ...ed in the following photograph 4 Insert the card until the card slot s eject button protrudes and complete the installation of the coastline ROM card Insert the card in the direction indicated by the arrow Insert the card until this button protrudes ...

Page 75: ...0 is necessary Install the optional cable CFQ 5350 in the processing unit according to the following procedure 1 Connection 1 Remove the processing unit cabinet cover form the unit cabinet 2 Connect CFQ 5350 to J4406 on CDC 1350 and attach the cable on unit cabinet 3 Fix D sub connector of the CFQ 5350 to the chassis ...

Page 76: ...3 51 4 Fix t the video cable to the D sub connector 2 Setting the JMA 5200MK2 No special setting is required for the connection with the slave monitor VDR ...

Page 77: ...nter connection cable CFQ5351 and inter unit cable CFQ 5251 CFQ 5351 CFQ 5251 1 Connection Simplified inter switch installation procedures 1 Remove the processing unit cabinet cover form the unit cabinet 2 Connect CFQ 5351 to the J5008 on the CBD 1702A 3 Attach 14 pin circular connector of the CFQ 5351 to the cabinet as shown above Two identical 14 pin connectors are on CBD 1702A side by side and ...

Page 78: ... 5200 J9 AUX JMA 5300 terminal TB 4301 Remarks J9 1 TB 4301 6 Radar signal output J9 2 TB 4301 5 Radar signal output J9 3 TB 4301 Frame GND J9 4 TB 4301 10 Radar signal output J9 5 TB 4301 14 Radar signal output J9 6 TB 4301 18 Radar signal output J9 7 TB 4301 9 Radar signal output J9 8 TB 4301 8 Radar signal input J9 9 TB 4301 7 Radar signal input J9 10 TB 4301 12 Radar signal input J9 11 12V J9 ...

Page 79: ...f the optional key board are required CFQ 5351 NCE 7699A 1 Connection Sub key board installation procedures 1 Remove the processing unit cabinet cover form the unit cabinet 2 Connect CFQ 5351 to the J5007 on the CBD 1702A 3 Attach 14 pin circular connector of the CFQ 5351 to the cabinet as shown above Two identical 14 pin connectors are on CBD 1702A side by side and the J5007 is one on the right ...

Page 80: ...f the system is powered on by the breaker 2 Setting No special setting is required for using the sub key board After the power is turned on the sub key board can be used Note As the main key board and the main key board can be used concurrently the radar utilization status may have been changed through the operation of the other key board When using two key boards by connecting a sub key board kee...

Page 81: ...ing an extremely dangerous condition 1 Connection When connecting an external buzzer to this radar connect the necessary signal line to the attached NMEA data connector P5 for J5 LTWBD08BFFA LL7001 using the following diagram as the reference JMA 5200MK2 side External buzzer side 6 ALM Dry contact output 1 7 ALM Dry contact output 2 Connector for GPS compass NSK equipment J5 To GPS compass or NSK ...

Page 82: ...t by connecting with an external device and the other method is to notify an alarm status by emitting a buzzer by connecting an external buzzer This section describes the setting when using an external buzzer 1 Press and hold RADAR MENU key The CODE INPUT Menu will appear 2 Enter 0 and press the ENT key The Adjust Menu will appear 3 Press 9 key Press 1 key The Alarm Outputs Setting Menu will appea...

Page 83: ...al buzzer to this radar connect the necessary signal line to the attached NMEA data connector P5 for J5 LTWBD08BFFA LL7001 using the following diagram as the reference JMA 5200MK2 side External buzzer side 6 ALM Dry contact output 1 7 ALM Dry contact output 2 Connector for GPS compass NSK equipment J5 To GPS compass or NSK unit 1 NSKTX Output of receiving signals from NSK 2 NSKTX Output of receivi...

Page 84: ...an alarm status by emitting a buzzer by connecting an external buzzer This section describes the setting when notifying an alarm status as contact output 1 Press and hold RADAR MENU key The CODE INPUT Menu will appear 2 Enter 0 and press the ENT key The Adjust Menu will appear 3 Press 9 key Press 1 key The Alarm Outputs Setting Menu will appear 4 3 Set Relay Contact Mode to Alarm Condition When an...

Page 85: ...T SETTING 4 11 4 9 SECTOR BLANK SETTING SECTOR BLANK 4 17 4 10 TNI BLANK SETTING TNI BLANK 4 19 4 11 SETTING OF PULSE OUTPUT SELECTION BEARING PULSES FROM ANTENNA 4 20 4 12 LANGUAGE SETTING LANGUAGE 4 21 4 13 DATE TIME SETTING 4 22 4 14 MAIN BANG SUPPRESSION ADJUSTMENT MBS 4 23 4 15 ADJUSTMENT OF PERFORMANCE MONITOR MON 4 25 4 16 MAGNET COMPASS SETTING 4 27 4 17 GPS RECEIVER SETTING 4 28 4 18 DGPS...

Page 86: ...cedures 1 Continue to press RADAR MENU key The Code Input Menu will appear 2 Input the code 3 Move the cursor onto the ENT button in the Code Input menu and press ENT key The Adjust Menu will appear 4 Press 1 key The Equipment Setup Menu will appear ...

Page 87: ... 4 Place the cursor over the ENT button of the numeric keypad and press ENT key Adjust Menu opens 5 Press 1 key Equipment Setup menu opens 6 Press 3 key A numeric keypad screen for Tune Adjustment opens 7 Adjust the value until the tuning state gauge reaches maximum by inputting a value with the number keys or by turning the multi dial to change the value 8 When the adjustment is complete place th...

Page 88: ...he Tune Indicator Adjustment numeric keypad screen opens 7 Adjust the value until the tune indicator bar at the top left corner of the screen reads 80 to 90 by inputting a value with the number keys or by turning the multi dial to change the value 8 Place the cursor over the ENT button and press ENT key The tune level value is memorized and the level adjustment is complete Note Do not let the tune...

Page 89: ...ak Adjustment numeric keypad screen opens 7 Adjust the tune peak value until the tune indicator bar at the top left corner of the screen reaches maximum by inputting a value with the number keys or by turning the multi dial to change the value 8 Place the cursor over the ENT button and press ENT key The tune peak value is memorized and the peak adjustment is complete Note Always set the tune peak ...

Page 90: ...ware button ԛ located at the bottom left corner of the radar display described in Section 2 3 2 2 Measure the bearing of an adequate target for example a ship at anchor a breakwater or a buoy relative to own ship s heading 3 Open the Equipment Setup Menu 4 Press 1 key The Code Input Menu will appear 5 Using numeric key enter the value and then press ENT button and press EXIT button to determine th...

Page 91: ...s already known 2 Open the Equipment Setup Menu 3 Press 2 key The Code Input Menu will appear 4 Using numeric pad enter the value and then press ENT button and press EXIT button to determine the value The multi function control can also be used to enter the value 5 Repeat step 4 and adjust until the target range measured in step 1 and the range on the radar display become identical ...

Page 92: ...ain Menu will appear 2 Press 7 key The NAV Equipment Setting Menu will appear 3 Press 1 key The Code Input Menu will appear 4 Adjust true bearing value Adjust the bearing that the bearing angle of the radar is the same as that of the gyro The multi function control can also be used to enter the value After having entered the value press ENT The alternative procedure for steps above 1 Hold down RAD...

Page 93: ...es 1 Measure the height from the sea level to the antenna in advance 2 Open the Adjust Menu 3 Press 4 key The TXRX Setting Menu will appear 4 Press 1 key The Antenna Height Set Value window will appear 5 Select the antenna height measured in step 1 from the pull down menu by pressing the numeric key 1 to 4 The antenna height will be determined ...

Page 94: ...in the Beam field at the top right corner of the CCRP Setting screen 5 Move the cursor to the X and Y values of CCRP1 Press the ENT key and input the CCRP1 position CCRP is on the starboard side of the ship when X 0 and is on the port side of the ship when X 0 6 In the same manner input the GPS antenna and radar antenna positions Similarly input the third and subsequent CCRPs 7 Press 0 key and exi...

Page 95: ...e display area CCRP2 antenna position becomes the CCRP CCRP is changed on the condition as following The scanner position is outside of the off center limit The CCRP position is outside of PPI This condition occurs with for example off center true motion turn of own ship etc ...

Page 96: ...The Baud Rate Setting Menu will appear 4 Select the port number you want to set pressing the numeric keys 1 to 5 The Baud Rate Selection menu will appear 5 In the selection menu select the baud rate you want to set pressing the numeric key Selection value 1 COM1 GPS 㧦 1200 4800 38400 9600 bps 2 COM2 PC 㧦 1200 4800 38400 115200 9600 bps 3 COM3 NAV1 㧦1200 4800 38400 9600 bps 4 COM4 NAV2 㧦1200 4800 3...

Page 97: ...to COM3 Use a port other than COM3 when connecting a device other than an AIS unit An external device can be connected to COM3 when an AIS unit is not used When a baud rate of 1200 bps is selected a 1200 bps JRC format is used ...

Page 98: ...Menu will appear 3 Press 4 key The RX Port Menu will appear 4 Select the signal you want to set pressing the numeric keys 1 to 6 The Reception Port Setting Menu for each signal will appear Settable signals 1 GPS 2 DLOG 3 Depth 4 Temperature 5 Wind 6 Current 7 Rate of Turn 8 Rudder 5 Select which port you want to use for output Types of ports to be used 1 AUTO 2 COM1 GPS 3 COM2 PC 4 COM3 NAV1 5 COM...

Page 99: ... use sentence for the signal Types of sentences to be used 1 GPS LL COG SOG GGA RMC RMA GNS GLL VTG 2 GPS WPT RMB BWC BWR 3 Depth DPT DBK DBT DBS 4 Wind MWV MWD 5 Current CUR After having selected a signal choose the number of the sentence for which you want to set whether or not it is used pressing the numeric key As concerns current set data set number and layer number of CUR sentence Data Set N...

Page 100: ...l you want to set pressing the numeric keys 1 to 9 The Output Port Setting Menu for each signal will appear Settable sentences 1 TTM TT Target 2 TLL TT Target 3 TTD TT Target 4 TLB TT Target 5 TTM AIS Target 6 TLL AIS Target 7 TTD AIS Target 8 TLB AIS Target 1 2 3 OSD 4 RSD 5 ALR 6 ACK 7 8 1 Remote Maintenance 2 NMEA0183 Output Format 3 NMEA0183 Talker 4 NMEA0183 TX Interval 5 APB 6 BOD 7 GGA 8 GL...

Page 101: ... APB BOD RMB XTE BWC HDT THS Selection Value Standard The talker is RA GP The talker is GP For TTM TLL TTD TLB OSD RSD ALR and AIS the talker is always RA For GGA GLL RMC and VTG the talker is always GP x NMEA0183 TX Interval Signal names APB BOD GGA GLL RMC RMB VTG XTE BWC HDT THS Selection Value Set an interval in the range 1 to 9 seconds Note When multiple output sentences are selected data may...

Page 102: ...ng with the bow I Sector Blank Function On Off Sectors 1 2 and 3 Procedures 1 Open the Adjust Menu 2 Press 4 key Press 6 key The Sector Blank Menu will appear 3 Select the number you want to executed sector blank pressing the numeric keys 1 to 3 The system allows the use of up to three sector blank areas Set each sector blank area to on or off On The sector blank function is operated Off The secto...

Page 103: ...umber you want to make sector blank pressing the numeric keys 4 to 6 The sector blank for the numeric key pressed will be made 5 Set the start point of the sector blank by operating the EBL dial and then press ENT The start angle of the sector blank will be set 6 Set the end point of the sector blank by operating the EBL dial and then press ENT The end angle of the sector blank will be set ...

Page 104: ...g with the bow as the benchmark I TNI Blank Function On Off Sector Procedures 1 Open Adjust Menu 2 Press the following keys 4 TXRX Setting 9 TNI Blank 1 TNI Blank On The TNI blank function is operated Off The TNI blank function is stopped II TNI Blank Area Creation Make Sector Procedures 1 Transmit the radar 2 Open Adjust Menu 3 Press the following keys 4 TXRX Setting 9 TNI Blank 2 Make Sector 4 S...

Page 105: ...tput value of bearing pulses from the antenna The system can set 2048 pulses or 4096 pulses This setting is enabled only when an antenna of 25 or 30 kW is used Procedures 1 Open the Adjust Menu 2 Press 4 key The TXRX Setting Menu will appear 3 Press 7 key 4 Select a set value to be used ...

Page 106: ...ction window will appear 3 Select the language you want to display pressing the numeric keys 1 to 3 1 English 2 Japanese 3 Other Other in 3 is a language corresponding to characters created in overseas agents To confirm whether or not your language is supported contact overseas agents or our sales department To make the set language effective turn off the power supply and then restart ...

Page 107: ...ss 1 to switch the time mode between UTC Universal Time Coordinate LMT Local Time 2 LMT Date Input the date in local time Press 2 key and call up the numeric keypad Input the date using the numeric keypad or the multi dial Then press ENT button 3 LMT Time Input the time in local time Input the time using the numeric keypad or the multi dial Then press ENT button 4 Time Zone Input the time zone dif...

Page 108: ... ENH x Set the correlation processing function PROC to OFF x Rotate AUTO RAIN control to the minimum position counterclockwise fully x Rotate GAIN PL control to the maximum position clockwise fully x Rotate the AUTO SEA control to achieve the strength with which main bang can be judged 2 Display the Adjust Menu 3 Display the 8 RADAR TT INIT Setup Menu 4 Press 3 key The MBS Menu will appear 5 Press...

Page 109: ...h the multi dial Press ENT key after inputting the value 9 Press 2 key The numeric keypad to be used in MBS Area menu opens 10 Input an MBS area setting value such that the suppression area and the main bang image completely overlap with each other The value can also be entered with the multi dial Press ENT key after inputting the value ...

Page 110: ...formance monitor x Antenna unit I Transmission Monitor Adjustment MON Adjustment Adjust the circuit for monitoring the transmission performance of the radar equipment Procedures 1 Open Adjust Menu 4 TXRX Setting 4 MON 2 MON Adjustment 2 Increase or decrease the adjustment value so that the farthest point of the performance monitor pattern touches the 18 0 nm line Adjustment menu ...

Page 111: ...Menu 4 TXRX Setting 4 MON 3 MON Indicator Adjustment 2 Increase or decrease the adjustment value so that the performance monitor level indicator will be adjusted to 8 3 Press the EXIT button to close the adjustment menu Note During performance monitor adjustment all acquisitions by the target tracking function are released The released target acquisitions are not recovered ...

Page 112: ...Select ENT and then determine the value The correction direction and angle will be set On the screen press to make correction in the eastern direction and press to make correction in the western direction Also enter a correction angle pressing the numeric key The multi function control is also available for the entry To do so enter the correction direction press the multi function control enter th...

Page 113: ...GPS Setting screen will appear 4 Press 1 key The GPS Process Setting screen will appear 5 Press 1 key The Ten Key Pad screen will appear Enter values sequentially from latitude ENT longitude and ENT Corrections in the eastern direction are made by using the button on the screen and corrections in the western direction are made by using the button When the MULTI control is used rotation is change o...

Page 114: ...creen will appear 3 Press 7 key The GPS Setting screen will appear 4 Press 1 key The GPS Process Setting screen will appear 5 Press 2 key The Ten Key Pad screen will appear Enter the satellite exclusion number The MULTI control can be used to enter the value 6 After the entry has been completed press 9 key to send the settings to the GPS receiver ...

Page 115: ... 3 Press 7 key The GPS Setting screen will appear 4 Press 1 key The GPS Process Setting screen will appear 5 Press 3 key The Ten Key Pad screen will appear Enter the geodetic system according to the table on the following page The MULTI control can be used to enter the value 6 After the entry has been completed press 9 key to send the settings to the GPS receiver ...

Page 116: ...ew Zealand 23 GUAM 1963 Guam 24 HAYFORD 1910 Finland 25 HJORSEY 1955 Iceland 26 INDIAN India Nepal 27 IRELAND1965 Ireland 28 KERTAU 1948 West Malaysia 29 L C 5 ASTRO Cayman Brac Island 30 LIBERIA 1964 Liberia 31 LUZON Philippines 32 MERCHICH Morocco 33 MINNA Nigeria 34 NAHRWAN Oman 35 NAPARIMA BWI Trinidad Tobago 36 OLD EGYPTIAN Egypt 37 OLD HAWAIIAN Hawaii 38 PICO DE LAS NIEVES Canary Islands 39 ...

Page 117: ...ing screen will appear 3 Press 7 key The GPS Setting screen will appear 4 Press 1 key The GPS Process Setting screen will appear 5 Press 4 key The Ten Key Pad screen will appear Enter own ship s antenna height The MULTI control can be used to enter the value 6 After the entry has been completed press 9 key to send the settings to the GPS receiver ...

Page 118: ...s Setting screen will appear 5 Press 5 key From the pull down menu the following modes can be selected 2D Two dimensional position fixing mode Height cannot be acquired 3D Three dimensional position fixing mode Height can be acquired AUTO Either two dimensional or three dimensional optimum position fixing mode can be automatically selected 6 After the entry has been completed press 9 key to send t...

Page 119: ...ar 3 Press 7 key The GPS Setting screen will appear 4 Press 1 key The GPS Process Setting screen will appear 5 Press 5 key Any level listed on the pull down menu can be selected The smaller the value the higher the accuracy although fixing a position becomes difficult 6 After the entry has been completed press 9 key to send the settings to the GPS receiver ...

Page 120: ...n will appear 4 Press 1 key The GPS Process Setting screen will appear 5 Press 7 key From the pull down menu select Long Standard or None The averaging level declines sequentially from Long to Standard to None As the averaging level becomes low position information update speed increases although dispersion becomes large 6 After the entry has been completed press 9 key to send the settings to the ...

Page 121: ...nt Setting screen will appear 3 Press 7 key The GPS Setting screen will appear 4 Press 1 key The GPS Process Setting screen will appear 5 Press 8 key Pressing 8 key will toggle between On and Off Select On for reset transmission 6 After the entry has been completed press 9 key to send the settings to the GPS receiver ...

Page 122: ...tting Mode Procedures 1 Press RADA MENU key The Main Menu will appear 2 Press 7 key The NAV Equipment Setting screen will appear 3 Press 7 key The GPS Setting screen will appear 4 Press 2 key The GPS Setting screen will appear 5 Press 1 key Pressing 1 key will toggle between AUTO and Manual 6 After the entry has been completed press 5 key to send the settings to the DGPS receiver ...

Page 123: ... key The NAV Equipment Setting screen will appear 3 Press 7 key The GPS Setting screen will appear 4 Press 2 key The GPS Setting screen will appear 5 Press 2 key The Ten Key Pad screen will appear Enter the frequency used for the beacon station The MULTI control can be used to enter the value 6 After the entry has been completed press 5 key to send the settings to the DGPS receiver ...

Page 124: ...y The NAV Equipment Setting screen will appear 3 Press 7 key The GPS Setting screen will appear 4 Press 2 key The GPS Setting screen will appear 5 Press 3 key From the pull down menu the following communication speeds can be selected 50bps 100bps 200bps Set the desirable communication speed 6 After the entry has been completed press 5 key to send the settings to the DGPS receiver ...

Page 125: ...s same as GPS Procedures 1 Press RADA MENU key The Main Menu will appear 2 Press 7 key The NAV Equipment Setting screen will appear 3 Press 7 key The GPS Setting screen will appear 4 Press 2 key The GPS Setting screen will appear 5 Press 4 key Pressing 4 key will toggle between On and Off 6 After the entry has been completed press 5 key to send the settings to the DGPS receiver ...

Page 126: ... differential information is used Procedures 1 Press RADA MENU key The Main Menu will appear 2 Press 7 key The NAV Equipment Setting screen will appear 3 Press 7 key The GPS Setting screen will appear 4 Press 3 key The SBAS Setting screen will appear 5 Press 1 key to select the satellite or the beacon whose differential information is used Beacon SBAS receiver use the information from beacon SBAS ...

Page 127: ...ppear 2 Press 7 key The NAV Equipment Setting screen will appear 3 Press 7 key The GPS Setting screen will appear 4 Press 3 key The SBAS Setting screen will appear 5 Press 2 key to select the SBAS satellite to be used or not to be used On SBAS satellite is used Off SBAS satellite is not used 6 Press the 6 key to send the setting value to SBAS receiver ...

Page 128: ...nt Setting screen will appear 3 Press 7 key The GPS Setting screen will appear 4 Press 3 key The SBAS Setting screen will appear 5 Press 3 key to select the information from prohibitive SBAS satellite to be used or not to be used Use The information from prohibitive SBAS satellite is used Unused The information from prohibitive SBAS satellite is not used 6 Press the 6 key to send the setting value...

Page 129: ...Press 7 key The NAV Equipment Setting screen will appear 3 Press 7 key The GPS Setting screen will appear 4 Press 3 key The SBAS Setting screen will appear 5 Press 4 key to select the satellite number select mode Manual SBAS satellite number is set manually AUTO SBAS satellite number is set automatically 6 Press the 6 key to send the setting value to SBAS receiver ...

Page 130: ... Procedures 1 Press RADA MENU key The Main Menu will appear 2 Press 7 key The NAV Equipment Setting screen will appear 3 Press 7 key The GPS Setting screen will appear 4 Press 3 key The SBAS Setting screen will appear 5 Enter the satellite number Enter the number from 120 to 138 6 Press the 6 key to send the setting value to SBAS receiver ...

Page 131: ...ures 1 Press RADAR MENU key The Radar Menu will appear 2 Press 7 key NAV Equipment Setting Menu will appear 3 Press 7 key GPS Setting Menu will appear 4 Press 4 key GPS Status Menu will appear The alternative procedure for steps above 1 Hold down RADAR MENU key The Code Input Menu will appear 2 Press 0 key 3 Move the cursor onto the ENT button in the Code Input menu and press ENT key The Adjust Me...

Page 132: ...d this is initial value Accuracy Small number is high accuracy Satellite number Used satellite Azimuth of satellite Elevate of satellite Received signal level Status of satellite S Search T Tracking D Data detection complete Received Signal Strength Indicator ...

Page 133: ...wn RADAR MENU key 2 Press 0 key 3 Move the cursor onto the ENT button in the Code Input menu and press ENT key The Adjust Menu will appear 4 Press 4 key TXRX Setting menu will appear 5 Press 8 key Inter Switch menu opens II Configure the function about INTER SWITCH Procedures 1 Press the 1 key when the INTER SWITCH menu is opened 2 Select one of the following items OFF Does not use INTER SWITCH SI...

Page 134: ...ition 3 Press 3 key The condition is switched between Only Master and Always On Only Master The display unit supplies the power to its scanner in the master mode only Always On The display unit supplies the power to its scanner IV Switch echo by INTER SWITCH x Input video signals from other systems and echoes of the two systems can be displayed selectively Procedures 1 Press the button on the uppe...

Page 135: ...SECTION 5 MEASURES AGAINST NOISE INTERFERENCE IN THE RADIO EQUIPMENT 5 1 SHIELD OF DEVICES 5 1 5 2 INTER UNIT CABLES 5 1 5 3 INSTALLATION LOCATION 5 1 5 4 GROUNDING 5 1 ...

Page 136: ...S Be sure to use designated cable between the units Pay careful attention to cable connections and the treating condition of cable ends especially shield meshwork 5 3 INSTALLATION LOCATION Although devices have been sufficiently shielded the shielding of some may not be perfect For example the display unit s LCD panel surface and the processing unit s fuse holder emit a slight amount of noise Ther...

Page 137: ...SECTION 6 INSPECTION AFTER INSTALLATION 6 1 INSPECTION AFTER INSTALLATION 6 1 6 2 OPERATION INSPECTION 6 1 ...

Page 138: ...ter the replacement has been completed make sure that screws have been tightly fastened and all of the connectors have been connected and then turn on the power and conduct inspection Inspection Checklist No Items Contents OK or NG 1 Tune adjustment Manual tune mode and automatic tune mode is normal operated 2 Bearing adjustment Within r1q of the true value 3 Range adjustment Displays the true val...

Page 139: ...APPENDIX ...

Page 140: ...Fig 1 NKE 2103 4 Outside Drawing ...

Page 141: ...Fig 2 NKE 2103 6 Outside Drawing ...

Page 142: ...Fig 3 NKE 2254 7 Outside Drawing ...

Page 143: ...Fig 4 NKE 2254 9 Outside Drawing ...

Page 144: ...Fig 5 NWZ 164 Outside Drawing ...

Page 145: ...Fig 6 NDC 1460 Outside Drawing ...

Page 146: ...Fig 7 NCE 7699A Outside Drawing ...

Page 147: ...Fig 8 NBA 5111 Outside Drawing ...

Page 148: ... PC Plotter J7 J4 J6 J8 J1 J2 AUX J5 J9 GPS GPS COMPASS Gyro Compass sync step Log pulse J10 DC24V Ship s Main J11 JLR 10 CFQ 6934 Option JLR 20 30 CFQ 5469 Option AC100 110 115V 50 60Hz AC200 220 230V 50 60Hz NMEA input DLog etc 250V TTYCS 1 250V TTYCS 1 250V TTYCS 4 Fig 9 GENERAL SYSTEM DIAGRAM OF RADAR TYPE JMA 5212 4 6 ...

Page 149: ...Fig 10 GENERAL SYSTEM DIAGRAM OF RADAR TYPE JMA 5222 7 9 ...

Page 150: ...R SENSE P12V 12V AVR PWR CNT Relay 5V AVR 3 3V Poly sw Poly sw Filter Filter Motor Motor Control AVR System Power Supply Scanner Unit NKE 2103 2254 NSK UNIT NCT 4106A option Power SW Keyboard Unit NCE 7699A 15 inch LCD NWZ 164 To GPS 6W 0 5A 0 5A Logic Logic 4A 2A Analog Analog PWR O 12V 1 0A 12V 0 2A F3 F2 ...

Page 151: ...473 W405 H 7ZCRD1168 J5001 4P J5001 6P K2 1 2 3 4 1 2 3 4 5 NO COM 1 2 3 4 SPA 2 51 10A DC50V F2 5 A10A F3 10A W406 H 7ZCRD1521 J1 7P J2 16P J3 5P J4 14P J5 8P J6 7P J7 15P J8 9P CBD 1702A POWER SUPPLY TERMINAL BOARD CCT PC501 J5007 14P J5008 14P NDC 1460 PROCESSING UNIT POWER CABLE CFQ 5436 5 5m INTERUNIT CABLE CFQ 6912 5 10 15 20 30 40 50 65 5m 10m 15m 20m 30m 40m 50m 65m SCANNTER W601 H 7ZCRD14...

Page 152: ...1 H 7ZCRD1481 W604 H 7ZCRD1474 W602 H 7ZCRD1482 Processing Unit NDC 1460 SPEAKER MM283IN8 06 TRD 101S BK N1 P J6003 B6B PH P J6004 S2B PH P J6001 B14B PH P J6002 B6B PH Keyboard Circuit CCK 979 PC600 SP601 1 2 A B 1 2 3 4 5 B601 Fig 13 NCE 7699A Internal connection Diagram of Key board Unit ...

Page 153: ...㪛 㪈㪅㪜㪫㪠㪰 㪉㪅㪘㪞㪥㪛 㪊㪅㪜㪯㪙㪧 㪌㪅䌅䌘䌂䌚 㪡㪊㪇㪈 㪈㪌㪅㪥㪚 㪋㪅㪧㪮㪈 㪌㪅㪤㪚㪫 㪍㪅㪤㪙㪢 㪎㪅㪂㪈㪌㪭 㪏㪅㪘㪞㪥㪛 㪐㪅㪄㪎㪭 㪈㪇㪅㪙㪧 㪈㪈㪅㪟㪪㪧 㪈㪅㪤㪧㪪 㪉㪅㪧㪮㪊 㪊㪅㪧㪮㪉 㪈㪉㪅㪫㪠 㪈㪊㪅㪂㪏㪭 㪈㪋㪅㪤㪦㪛㩷㪠㪛 㪡㪊㪇㪉 㪋㪅㪟㪫㪜㪩 㪈㪅㪫㪠㪰 㪉㪅㪘㪞㪥㪛 㪊㪅㪤㪘㪞㪅㪠 㪌㪅㪟㪭㪜㪩 㪍㪅㪚㪉 㪎㪅㪙㪱 㪡㪊㪇㪊 㪋㪅㪧㪤㪪 㪈㪅㪧㪫㪠 㪉㪅㪧㪫㪜 㪊㪅㪣㪭㪩 㪌㪅㪞㪥㪛 㪍㪅㪫㪯㪠 㪎㪅㪫㪯㪜 㪋㪅㪚㪦㪤㪄 㪈㪅㪭㪛 㪉㪅㪭㪛㪜 㪊㪅㪚㪦㪤㪂 㪡㪉 㪡㪈㪏 㪈㪅㪟㪤㪚㪥㪫 㪉㪅㪂㪈㪌㪭 㪊㪅㪞㪥㪛 㪎㪱㪚㪩㪛㪈㪉㪏㪇㶎 㪈㪅㪤㪧㪪 㪉㪅㪤㪚㪫 㪡㪈㪌㪇㪈 㪊㪅㪤㪙㪢 㪈㪅㪤㪧㪪 㪉㪅㪤㪚㪫 㪡㪉㪇㪐 㪊㪅㪤㪙㪢 㪈㪅㪚㪉㪞 㪉㪅㪚㪉 㪡㪉㪈㪇 㪛㪅㪣 㪜㪥㪚㪦㪛㪜㪩 㪚㪟㪫㪄㪎㪈㪘 Fig 14 NKE 2103 Scanner...

Page 154: ...㪉 㪈 㪋 㪊 㪌 㪍 㪝㪠㪣㪫㪜㪩 㪈㪅㪪㪟㪦㪩㪫 㪉㪅㪤㪘㪞㪠 㪊㪅㪯㪈 㪋㪅㪯㪉 㪌㪅㪫㪠 㪍㪅㪫㪠㪜 㪎㪅㪂㪈㪌㪭 㽲 㽳 㽴 㽲 㽳 㽴 䍮䍢䍼䍶 䍕 㪇㪅㪇㪈㪬㪝㩷㪈㪢㪭 㪇㪅㪉㪉㪬㪝㩷㪉㪇㪇㪭 㩷㪉㪅㪎㪢㱅 㪈㪆㪉㪮 㪇㪅㪉㪉㪬㪝 㪉㪇㪇㪭 㪈㪌㪇㱅 㪏㪮 㪟㪄㪎㪣㪧㪩㪛㪇㪈㪉㪉 㪤㪛㪄㪈㪉㪥㪈㪤㪛㪄㪈㪉㪥㪈 㪤㪈㪌㪍㪏㪙㪪 㪛㪬㪤㪤㪰 㪈㪅㪂㪈㪉㪭 㪉㪅㪞㪥㪛 㪊㪅㪝㪘㪥㪶㪜㪩㪩㪉 㪈㪅㪂㪈㪉㪭 㪉㪅㪚㪉 㪈㪅㱢㪱 㪉㪅㱢㪱㪜 㪊㪅㱢㪘 㪋㪅㱢㪙 㪌㪅㪂㪈㪉㪭 㪍㪅㪞㪥㪛 㪩㪜㪛 㪮㪟㪫 㪏㪅㪞㪥㪛 㪈㪅㪤㪂 㪉㪅㪤㪄 㪐㪅㪥㪚 㪈㪇㪅㪥㪚 㪪㪅㪞㪅 㪪㪅㪞㪅 㪪㪅㪞㪅 㪏㪅㪞㪥㪛 㪈 㪉 㪊 㪋 㪌 㪍 㪎 㪏 㪐 㪈㪇 㪈 㪉 㪊 㪋 㪌 㪍 㪎 㪏 㪐 㪈㪇 㪮㪟㪫 㪙㪣㪢 㪙㪣㪬 㪮㪟㪫 㪙㪣㪢 㪙㪣㪬 㪈 㪉 㪊 㪋 㪈 㪉 㪊 㪋 㪌 㪍 㪌 㪍 㪎 㪏 㪎 㪏...

Page 155: ...LK BLK SHIPS MAINS DC24V 300Wmax CFQ 5436 5 5m JRC SUPPLY 1 RED J4406 2 GRN 3 BLU 4 NC 5 NC 6 RED GND 7 GRN GND 8 BLU GND 9 NC 10 HSYNC GND 11 VSYNC GND 12 NC 13 HSYNC 14 VSYNC 15 NC SLAVE RGB OUTPUT 1 M J2 SUB KEY BOARD 2 M 3 M 4 M 5 2A 6 GND 7 VDE 8 12V 9 1A 10 VD 11 MTR 12 BZ 13 MTR 14 TRGE 15 TRG 16 BP BLU T GRY T PUR T BRN T WHT T ORN T RED T GRN T BLK T SKY T BLK YEL T PNK T YEL GRN WHT ORN ...

Page 156: ...5 5m JRC SUPPLY 1 RED 2 GRN 3 BLU 4 NC 5 NC 6 RED GND 7 GRN GND 8 BLU GND 9 NC 10 HSYNC GND 11 VSYNC GND 12 NC 13 HSYNC 14 VSYNC 15 NC SLAVE RGB OUTPUT 1 M J2 SUB KEY BOARD 2 M 3 M 4 M 5 2A 6 GND 7 VDE 8 12V 9 1A 10 VD 11 MTR 12 BZ 13 MTR 14 TRGE 15 TRG 16 BP BLU T GRY T PUR T BRN T WHT T ORN T RED T GRN T BLK T SKY T BLK YEL T PNK T YEL GRN WHT ORN 1 EVDO 2 EVDOE 3 FG 4 ETRGO 5 EBPO 6 EBZO 7 ETRG...

Reviews: