background image

Date:
Manual:
Rev:

2020-02-04
M395
F2

JOWA Ag-S
Silver Ion Water Treatment System
Standard

7/32

4.0

Installation

4.1

Mounting

The JOWA Ag-S consists of a standard cabinet with all the electronics, an electrode
chamber made with high grade electro-polished stainless steel, shut off valve, flow
setting valve with flow indicator, flow switch, and two ball valves to isolate the
chamber.

Additional parts (optional):
Shut off valve for bunker line
Shut off valve for production line (watermaker)
Flowmeter for production line and/or bunker line (PN 92000-00023)

All parts are mounted on a common polished stainless steel plate ready to be
installed on a bulkhead. (Flow switch FS01, Flow regulator and the valve V01 are
supplied loose. Attach as shown below and per mechanical drawing in Section 9.)
To save space the unit can be removed from the plate and individual items mounted.

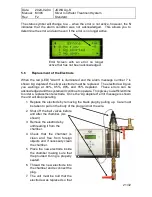
To gain access to the inside of the
enclosure remove the two screw
covers on either side of the unit. A
flat head screw driver can be used
to help pry these off (perpendicular
to the display face). Four Phillips
screws will then be visible that
allow the cover to open. The cover
swings open with a simple left side
hinge.

4.2

Piping Connections

The connections are female DN15 BSP for the input (bottom) and DN10 BSP for the
outlet (top right). An optional conversion kit (PN 2117200) is available that converts
this to NPT male fittings for connection to NPT piping.

Summary of Contents for Ag-S

Page 1: ...Ag S Manual Silver Ion Water Treatment System M395 February 4 2020 ...

Page 2: ......

Page 3: ... 5 3 Operating Modes 12 5 4 The Menu Structure 13 5 4 1 Water System Tank Size Entry 16 5 4 2 Watermaker Flow Rate Entry Optional when using a watermaker 16 5 4 3 Setting Final Silver Dosage Level 17 5 4 4 Set Volume for Flowmeter pulse Optional when using flowmeter 17 5 4 5 Flush water through system when solenoid valve installed 17 5 4 6 Setup Relays Optional when using outputs 18 5 4 7 Select D...

Page 4: ...ps have installed it The process by which the bacteria and algae are killed is called oligodynamical sterilization The silver ions are released by electrolysis from two silver plates within a special electrode unit when a controlled current DC is driven through them The JOWA Ag S electrode unit consists of two high purity 99 99 silver plates The water passes through the center of the electrode and...

Page 5: ...ds on the ruling administration The electronics automatically adjusts the silver output dependent upon volume of water selected the flow rate of the watermaker or automatically when an optional flowmeter is used An alarm is activated when the electrode is consumed or any other system problem is detected An optional audible visible alarm can also be fitted in the main control room to indicate any m...

Page 6: ...this manual The correct function of the equipment cannot be guaranteed if the user fails to follow these instructions Before installation and start up read this manual carefully Supplier and manufacturer JOWA USA Inc 59 Porter Road Littleton MA 01460 USA Phone 001 978 486 9800 Fax 001 978 486 0170 Email info jowa usa com www jowa usa com JOWA USA Inc is part of the JOWA companies with the head off...

Page 7: ...rs by 4 Lines LCD with backlight Relays Outputs 3 Dry Contacts NC C NO that can be set for Power Alarm or Pump On 5 A max 250 VAC Inputs 4 User Configurable Switch Inputs Flowmeters Remote Start Water On Ratings VOC 4 6 VDC ISC 2 mA Dimensions Unit See Mechanical Drawings Section 9 Chamber Test Pressure 9 bar 130 psi Dimension inlet DN15 BSPP Female G Optional NPT Dimension outlet DN10 BSPP Female...

Page 8: ... hydrophore tank in a branch line from the main water supply line Pressure for the Ag S is provided by the hydrophore pump The Ag S unit doses silver into the branch line This branch line is then directed back to the ship s storage tank where the silver ions can treat the entire ship s fresh water supply See figure 3 1 The silver concentration in this branch line from the Ag S to the storage tank ...

Page 9: ...s a reduced flow and PPB range See Fig 5 1 2 Note that a 4 hour contact time is still required for the Silver Ions to be effective 3 3 Options A flowmeter can be installed in the water production plant line The Ag S will determine the correct dose of silver based on the flow signal from the meter A second flowmeter can also be installed if you want to monitor both bunker and production water lines...

Page 10: ...ate ready to be installed on a bulkhead Flow switch FS01 Flow regulator and the valve V01 are supplied loose Attach as shown below and per mechanical drawing in Section 9 To save space the unit can be removed from the plate and individual items mounted To gain access to the inside of the enclosure remove the two screw covers on either side of the unit A flat head screw driver can be used to help p...

Page 11: ...amber Chamber Flow In Positive terminal input for the flow switch for the chamber Chamber Flow In Negative terminal input for the flow switch for the chamber In 1 Positive terminal input typically for optional flowmeter 1 In 1 Negative terminal input typically for optional flowmeter 1 In 2 Positive terminal input typically for optional flowmeter 2 In 2 Negative terminal input typically for optiona...

Page 12: ...mp is used for water flow through the Ag S chamber the bypass is not connected to a pressurized line c Alarm If an Alarm condition is active the Relay will close d Power When the Ag S is ready to operate the Relay will close Input Options a Unused Select when the input is not used b Fixed flow to tank A watermaker or other signal is used to signal water flowing into the storage tank Tank recircula...

Page 13: ...arly See Setup Menu section 5 4 2 4 Enter the desired final silver dosage level 0 025 mg l 25 ppb 0 1 mg l 100 ppb typically it will be either 0 04 mg l 40 ppb or 0 1 mg l 100 ppb and this depends on the ruling administration See Setup Menu section 5 4 3 5 Optional Enter the volume of water for each pulse when using a flowmeter See Setup Menu section 5 4 4 5 1 2 Direct Flow Mode See section 3 2 on...

Page 14: ...al equipment connected to the system then it will prompt you to connect to a particular unit Pick the serial number of the unit you want to control or display The serial number is located under the left side screw cover See section 4 1 for instructions on how to remove the side screw covers On the display the main menu will be shown This menu consists of a number of screens that allow you to adjus...

Page 15: ...the new amount to the existing amount See line 3 above 10 You can Show the amount left to be treated 11 You can Reset the amount back to zero You will be asked to confirm that you want to stop water treatment Either Cancel or Confirm Auto Mode When connected to either a flowmeter or the watermaker run signal with water recirculating to a tank Tank recirculate Mode 1 When connected to a flowmeter t...

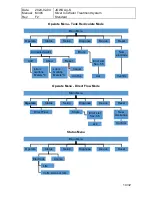
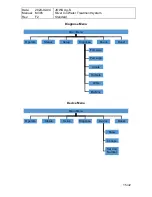
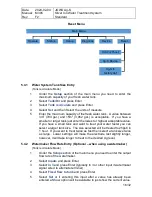
Page 16: ...This is the possible choice that is selected When the desired menu item has been chosen then pressing the center button will select that item and the sub menu items will then be available When you have a solid left triangle in the upper left corner pressing the left arrow will bring you back to the previous menu In the figures below you can see the menu structure Setup Menu Main Menu Operate Statu...

Page 17: ...Status Setup Diagnose Device Reset Electrode Life Uptime Volts Amps Ohms Main Menu Operate Status Setup Diagnose Device Reset Untreated water Errors Add Liters Gallons Meters 3 Show Liters Gallons Meters 3 Reset Cancel Confirm Error List Sec 5 5 Ack New electrode s Confirm Main Menu Operate Status Setup Diagnose Device Reset Direct Flow Errors Error List Sec 5 5 Ack New electrodes Confirm ...

Page 18: ...er Ion Water Treatment System Standard 15 32 Main Menu Operate Status Setup Diagnose Device Reset Firmware Pwr supp Inputs LEDs Outputs Buttons Diagnose Menu Device Menu Main Menu Operate Status Setup Diagnose Device Reset Choose Show Set Unit Number ...

Page 19: ...arger tank size The size selected will be treated to 25ppb in 1 hour If you want to treat twice as fast then select a tank size twice as large Lower settings will make the electrode last slightly longer however it will take longer to treat to the desired Ag level 5 4 2 Watermaker Flow Rate Entry Optional when using a watermaker Tank recirculate Mode 1 Under the Setup section of the main menu you n...

Page 20: ... Select Flowmeter pulses and press Enter 5 Select Set or if entering this input with the same input choice a Show option will be available to just show the current value 6 Select the units of measure and press Enter 7 Input the Volume per pulse from the flowmeter and press enter 8 Select the flowmeter Polarity Closed On is normal and press enter 5 4 5 Flush water through system when solenoid valve...

Page 21: ... Typically Relay 2 steady Power Activates the relay when power is connected to the Ag S Typically Relay 3 5 If Pump or Power are selected then the menu will return to the previous screen If Alarm is selected then you need to select Solid or Flashing If Flashing is selected then the number of times per second the relay will be closed will also need to be selected Acknowledging the alarm deactivates...

Page 22: ...epleted Electrode has been consumed 8 Ag comm err Communication between system processors stopped 9 Flow not off Flow detected when flow should be off Errors 10 15 Not used This indicates that the error will cause the unit to halt operation until the error is corrected Errors 0 1 2 7 When an error is detected the red Alarm LED on the front panel will illuminate If a relay has been configured to be...

Page 23: ...tive error The status symbol will change to a when the error is active An N will also be shown when the alarm has not been acknowledged The status symbol will remain a as long as the error is active After the alarm has been acknowledged the N will change to an A Error Screen without any active errors Error Screen with an active error without Acknowledgement Error Screen with an active error that h...

Page 24: ... operate This gives you sufficient time to order a replacement electrode Once the Ag depleted error message is shown the unit will stop operating 1 Replace the electrode by removing the black plug by pulling up Care must be taken to pull on the body of the plug and not the wire 2 Shut off the ball valves before and after the chamber As shown 3 Remove the electrode by unthreading it from the chambe...

Page 25: ...s not leak out of the chamber The Ag S is now ready for operation 5 7 Maintenance Very little maintenance is required as high quality materials are used The electrode chamber as well as the common base plate are made of polished stainless steel and need no maintenance The JOWA Ag S uses 99 99 pure silver in both of the electrodes and also shifts the current direction once every ten minutes so ther...

Page 26: ...ck the water flow in the chamber Flow regulator should be set for 3 l min Check the adjustment see Section 11 PN 9801010 Replace flow switch if defective Red Alarm LED is illuminated or flashing Error 1 is shown If display is blank press the On Off button to show the error screen Contamination between the electrode plates Electrodes were damaged Wires to electrodes shorted Run Flush under the Setu...

Page 27: ... the status or on the display by selecting Diagnose Inputs Check connection to terminal Check SETUP INPUTS to see if Direct flow is set for terminal Ag S is not recognizing the pulses from flow transmitter There are no pulses coming from flow transmitter The input terminal was not set to Flowmeter The volume per pulse was not set properly in the setup Check pulses from transmitter Menu Diagnose In...

Page 28: ...d and that display is not working correctly It restarts only the display board that is connected directly to the panel being operated No setup data is lost during this reset Ag S device This choice will reset the main board and will reset the display board that is directly connected to it If no remote display is used this will be the panel that is being operated No setup data is lost during this r...

Page 29: ...e 9801010 Flow switch DN10 G 2 l min 9801007 Solenoid Valve G 24VDC 9400105 Ball Valve DN10 male male 2165804 Main Board PCB Assembly 2165821 Display Board PCB Assembly 2165801 Membrane Switch 9170302 Fuse Cartridge 250V 1 5A Slow Blow Optional Parts 92000 00023 Flowmeter G1 union connection nominal 6 m3 h rate 10 L Pulse Silver electrode is the only recommended spare part for 2 years operation Co...

Page 30: ...Date Manual Rev 2020 02 04 M395 F2 JOWA Ag S Silver Ion Water Treatment System Standard 27 32 8 0 Flow Diagrams Tank Recirculate Mode ...

Page 31: ...Date Manual Rev 2020 02 04 M395 F2 JOWA Ag S Silver Ion Water Treatment System Standard 28 32 Direct Flow Mode ...

Page 32: ...Date Manual Rev 2020 02 04 M395 F2 JOWA Ag S Silver Ion Water Treatment System Standard 29 32 9 0 Mechanical Drawings ...

Page 33: ... Water Treatment System Standard 30 32 10 0 Electrical Drawings Below is the PCB layout for the main board The area most important for the user is the terminal connections at the bottom of the board Section 4 3 gives a description of each of the connections ...

Page 34: ...or accurate operation Type of control Pilot operated Metallic internals Brass and stainless steel AISI430F Construction Diaphragm design Sealing NBR Connection G1 2 DIN ISO228 Installation Actuator in any position preferable upright Pressure 0 3 20 bar Supply voltage DC 24 Medium neutral gaseous and liquid Voltage tolerance 10 10 Viscosity 22mm s Power consumption 6 8 Watt Medium temp 10 up to 80 ...

Page 35: ... Moving the contact unit in the direction of flow will activate the switch at lower flow rates The front edge of the locking washer serves as the adjustment mark Note Use the Flush feature under the Setup menu to control the solenoid valve to turn the flow on and off This screen will also show you the status of the flow switch Make sure that the flow input is on during flow and off without flow Te...

Page 36: ......
Reviews: