JOINT MAKING OPERATIONS
A miter spline is a reinforcement for a mitered corner joint. The weakness in a mitered edge joint is the
relatively small glue area. To overcome this, a spline is often inserted along the length of and centered
in the mitered joint. Decorative miter reinforcing splines are installed perpendicular to the joint and will
be exposed to view.
It is often preferable to have a mitered joint on a project for appearance to hide end grain and make
finishing easier. If the piece has molded or unusual shapes it may be necessary to use a mitered
corner.
The spline can be very decorative, requiring only a little imagination. The spline can be a dovetail that
takes on the appearance of a butterfly joint at the corner. Use contrasting colors of wood for the
maximum decorative effect. Double-dovetail splines can be made by installing a dovetail spline and
cutting another dovetail within that spline and installing another spline of contrasting wood.
The spline can be cut with a straight bit to resemble a box joint. There can be as many splines as you
want on the corner as long as you maintain the strength of the original miter. The spline can be as
wide or as narrow as you like and can be spaced by using any of the CLINCHER templates or random
spaced.
Construct your project (box) with mitered corners. The corners can be mitered on a table saw using the
miter guage set at 90 degrees and the blade angled 45 degrees, on the router table with a 45 degree
chamfer bit or on the saw table using the Jointech Sliding Crosscut Table and Vertical Miter Fixture.
Plans for constructing these useful shop tools can be found in Jointech’s Woodworker’s Notebook
(Product No. WN-12).
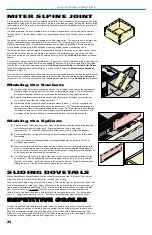
Once the box is constructed you will need a device that will position your box to make the spline socket.
The cut must be made exactly perpendicular to the miter joint. You can use the Jointech Spline Jig
(Product No. SJ-1) or construct your own by following plans also found in the Woodworker’s Notebook.
M ITER S LPI N E JOI NT
(1) Install a router bit for the chosen spline shape. The bit height can be set to the approximate
standard height for that particular bit as found on template plan pages. The height may be
set deeper if desired, however, do not exceed the maximum cutting height for the bit.
(2) Select a template for spacing or make your own. Center your workpiece for symmetry as
you would for any other joint cutting operation.
(3) Install the box into the Miter Spline Fixture and clamp in place. Cut all the sockets in one
corner at a time then reposition the box to the next corner. Don’t force the box through the
cutter too fast, Make a nice smooth slide past the cutter. Do not pull the work back through
the cutter for the next cut. Push the workpiece past the cutter and shut off the router. Lift
workpiece off the fixture, pull back, and reposition the fence to make the next pass.
Making the Sockets
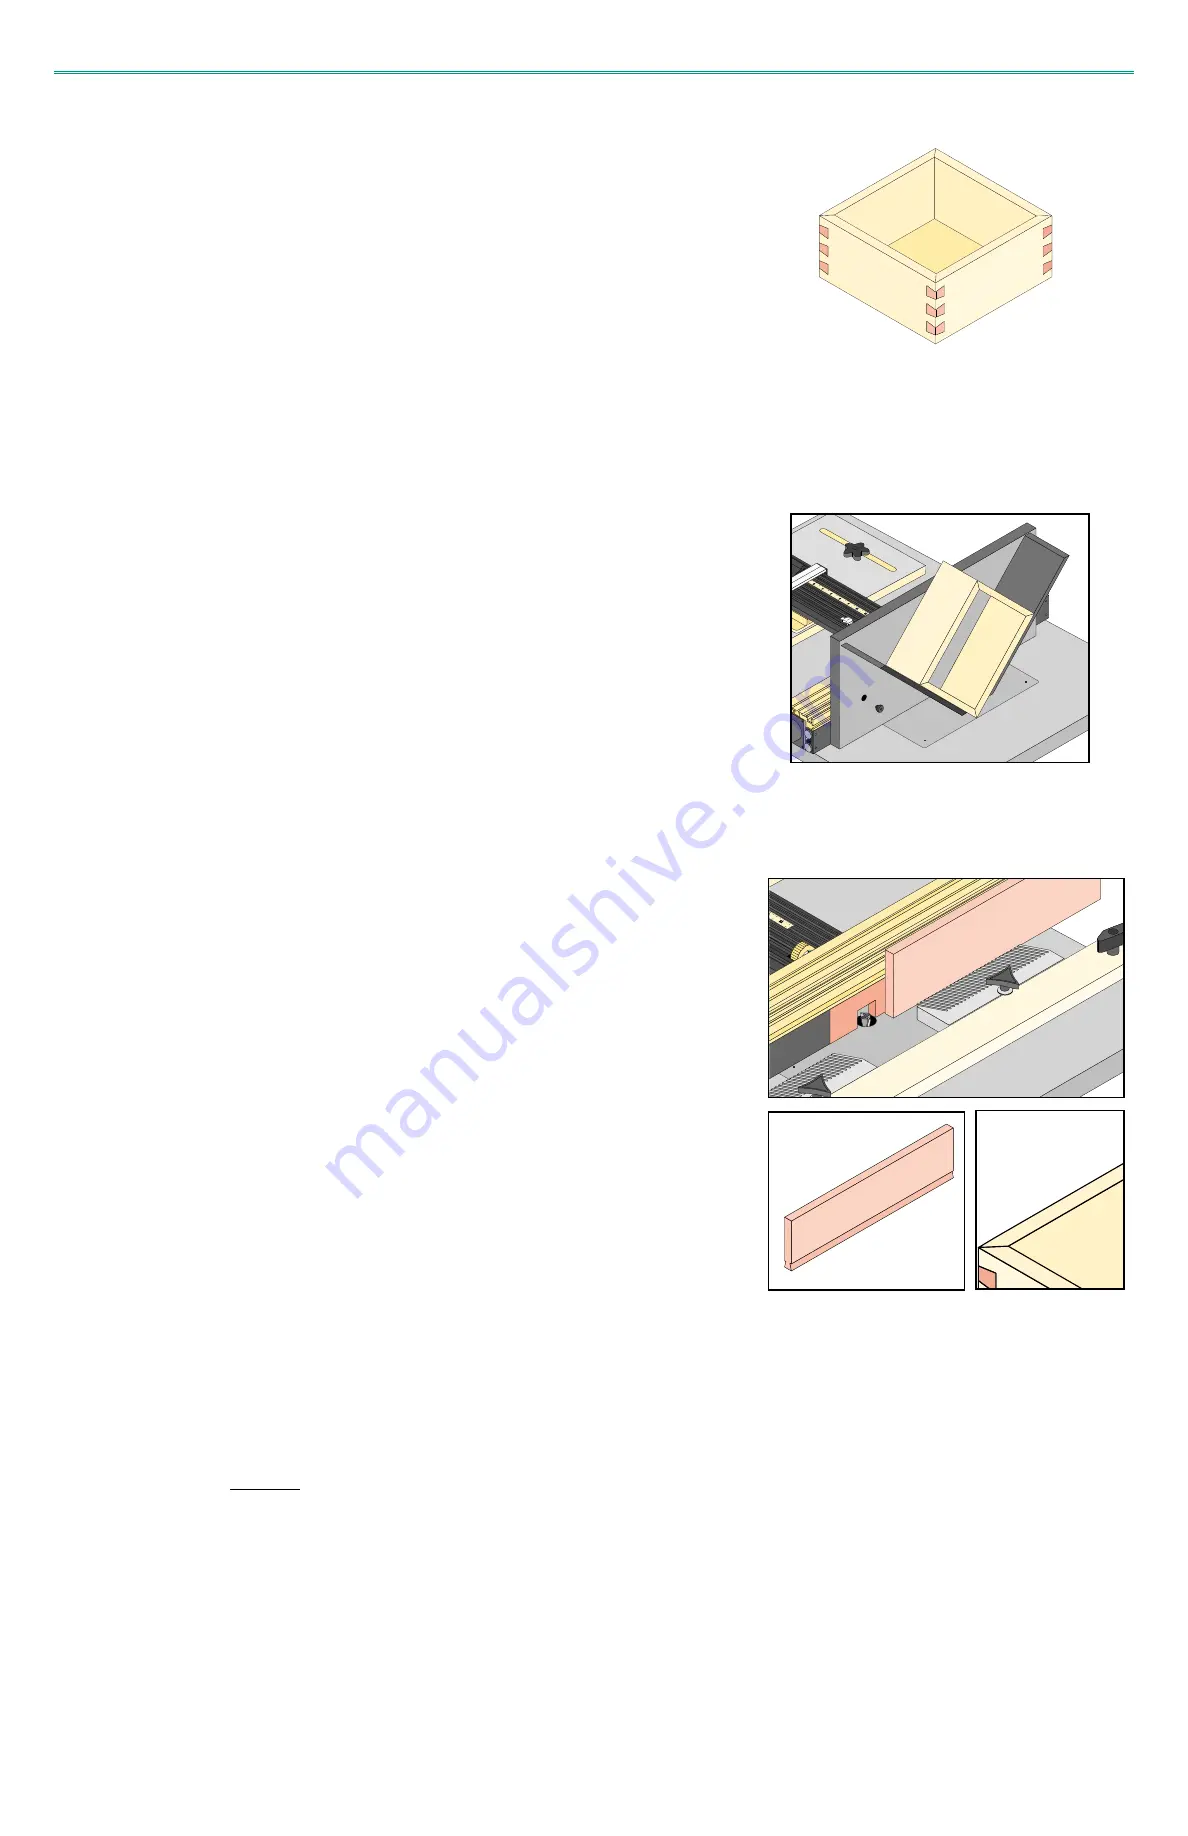
(1) Select a piece of stock long enough to make all the splines and wide enough to grasp and
run vertically up against router fence. Plane its thickness to be a little wider
(approximately
1
/
16”
) than the widest portion of the socket (your dovetail bit diameter).
(2) For dovetail splines use the same cutting bit set at the same height as was used to make
the sockets.
(3) Set up your fence with horizontal, table mounted featherboards as shown to hold your
workpiece against fence.
(4) Take very shallow cuts from both sides of the workpiece until you have cut the full dovetail
profile. Continue taking small cuts from both sides of the board using the thumbwheel to
move the fence. After each cut make a trial fit to the socket. Using this method an exact fit
of the spline into the socket can be accomplished.
(5) On a table saw rip the dovetail pin off the edge of your board retaining a small part of the
uncut portion. Cut the splines into the correct lengths to cover the joint (cut into straight
lengths - not mitered). Install the splines in the sockets with glue. Clamp if necessary and
allow glue to dry. Trim the spline ends to match the box and sand.
Making the Splines
Sliding Dovetails are constructed exactly like a blind dovetail except the fit is looser. The fit must
allow the pieces to move smoothly but not so loose as to be sloppy.
Take care when cutting a long dovetail in hard woods. The inverse angle of the groove does not cre-
ate an ideal situation for clearing of chips. With chips in the groove the router bit is repeatedly cut-
ting the same material and generating a lot of heat which is the primary cause for router bit break-
age. For this reason it is necessary to cut the groove in two passes, first with a straight bit to
remove most of the waste, and then with a dovetail bit to complete the groove. For the first pass,
use a
1
/
4”
straight bit centered to your cut. Install your dovetail bit and make the second pass.
S LI DI NG DOVETAI LS
Jointech Repetitive Scale Templates are useful when you need to cut a series of equally spaced
grooves, multiple thin strips on the table saw, or a series of holes at the drill press, to name a few.
Each Scale Template contains two numbered series of cuts, each with a different spacing. Red
marks are for one series and Black marks for the other to make it easy to tell them apart. There are
18 different series of cutting intervals and range from
1
/
8”
up to
7
/
8”
.
R
RE
EP
PE
ET
TI
IT
TI
IV
VE
E
S
SC
CA
AL
LE
ES
S
O
U
T
O
U
T
24

