background image


- 19 – 


wwww.johnnyvac.com 

of maintenance.   


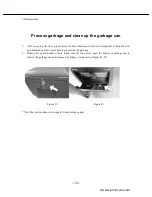
Process garbage and clean up the garbage can 

 
1.


After sweeping the floor, please press the dust vibrating switch on control panel to drop the dust 
accumulated on filter screen before processing the garbage. 

2.


Please  pull  up  the  handle  of  side  brush,  turn  off  the  power,  open  the  buckle  of  garbage  can  to 
remove the garbage can and dispose all garbage. (As shown in Figure 22-23) 


Figure 22                                                        Figure 23 

 
* The filter can be taken out in regular time to dispose dust.   


Summary of Contents for JVC40SWEEP

Page 1: ...JVC40SWEEP www johnnyvac com...

Page 2: ...maintenance instruction Maintain the machine by using the accessories provided JOHNNY VAC Usage With mini profile wide sweeping width excellent maneuvering capability and enough power this machine is...

Page 3: ...g and delivery machine 25 Symbols on control panel 8 Machine storage 26 Working principle of machine 9 LED indicator of charger 27 Accessory installation 10 11 Specification 28 Machine operation 12 18...

Page 4: ...blast Flammable liquid is not allowed to be used Do not operate machine in the site near or in the place of flammable liquid gas or dust Flame proof motor is not equipped with this machine During the...

Page 5: ...ire do not clean it For the sake of safety Please carefully read operation manual before the formal use of equipment especially safety information 1 Do not operate machine in case of following situati...

Page 6: ...n of machine 6 When transfer machine by truck or trailer Empty the garbage before shipment Use suggested apron for loading and unloading machine from truck or trailer Take battery out before transferr...

Page 7: ...rol panel 4 Water tank 5 Driven pedal 6 Side brush 7 Rolling brush 8 Rear wheel 9 Battery position 10 Sealing strip pedal 11 Rolling brush vacuum motor 12 Reset insurance 13 Battery charge interface 1...

Page 8: ...side brush rolling brush and dust vibration 6 Speed control switch 3 Failure indicator 7 Horn button 4 Battery power meter 8 Overload circuit breaker Control panel symbol Main power switch Side brush...

Page 9: ...ed into garbage can after pressing vibration button Finally take the garbage can out and empty the garbage at designated place Sweep parts a garbage can a rolling brush and two side brushes The button...

Page 10: ...ground horizontally and make it vertical to the four holes of buckle Figure 1 2 Install rolling brush 1 Park machine on a stable ground 2 Turn off the key switch of machine For the sake of safety Ple...

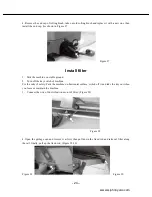
Page 11: ...ark machine on horizontal surface power off the machine and take the key out when you leave or maintain the machine 3 Open the garbage can and remove it throw down fixed rod and take filter out along...

Page 12: ...se take out large chippings and other things that may wrapped on brush at first such as metal wire coil string and so on Cleaning method shall be made in advance please try to make a long term arrange...

Page 13: ...fault indicator on control panel flash three times first and then flash twice Pull the electromagnetic brake handle backward once then the automatic brake will be recovered and the machine can work no...

Page 14: ...lling brush is able to work at proper height Please observe the height of rolling brush by referring the circular symbol on baffle Figure 12 13 Figure 12 Figure 13 Adjustable seat After sitting on the...

Page 15: ...ey 2 The indicator is normally on 3 Set direction switch according to the direction of moving machine forward or backward Note 1 Turn the forward and backward switch on the direction of Forward Figure...

Page 16: ...backward switch on the direction of Backward Figure 19 when reverse the machine the alarm of reverse ring is used for warning at this time pull up lift handle of side brush and step on driving pedal A...

Page 17: ...of machine carefully Sweeping method Adjust the height of side brush and rolling brush to sweep floor according to the field situation Please pay attention to the indicator of battery level in order t...

Page 18: ...may shorten the lifetime of battery do not charge the battery until it is reminded by left indicators The battery consumption indicator will stop flashing after the battery is fully charged Overload...

Page 19: ...itch on control panel to drop the dust accumulated on filter screen before processing the garbage 2 Please pull up the handle of side brush turn off the power open the buckle of garbage can to remove...

Page 20: ...indicator is flashing and see if 3 2 frequency flash is occurred please shift the electromagnetic brake shift on precursor motor to the side Make sure the driving pedal has not been stepped during the...

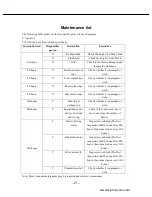
Page 21: ...worn 50 hours O Side sealant tape Check whether it is damaged or worn 100 hours T Seal ring of garbage can Check whether it is damaged or worn 200 hours T Maintenance free battery electrode and wirin...

Page 22: ...lly according to the drawing do not place it upside down The clearance between two adjacent batteries shall be more than 5 mm at least After installation please check the requirement on installation d...

Page 23: ...chine 3 Put hands into brush plate then the side brush can be disassembled after pressing the dark button Figure 25 Figure 25 Replace rolling brush 1 Park the machine on flat surface and make sure the...

Page 24: ...und 2 Turn off the key switch of machine For the sake of safety Park the machine on horizontal surface switch off it and take the key out when you leave or maintain the machine 3 Connect the wire of d...

Page 25: ...if the machine is transported by truck or trailer 1 Lift rolling brush component For the sake of safety Empty garbage can first before loading the machine to truck or trailer or unload it from truck o...

Page 26: ...ken to store machine for a long time 1 Clean filter screen and garbage can Open the garbage can for good ventilation 2 Park the machine under cool and dry area Do not let the machine under rain Keep i...

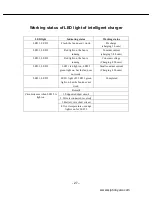
Page 27: ...LED 1 LED 2 Red light on the fan is running Constant voltage Charging 4 5 hours LED 1 LED 2 LED 1 red light on LED 2 green light on but the fan does not work Small constant current Charging 4 5 hours...

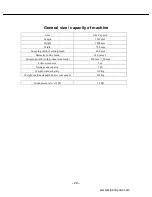
Page 28: ...mm Width 790 mm Sweeping width of rolling brush 600 mm Diameter of side brush 380 mm x 2 Sweeping width with without side brush 950 mm 700 mm Filter screen area 3m2 Garbage can capacity 50L Weight wi...

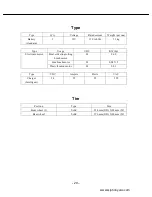
Page 29: ...r 53 kg Type Usage VDC KW hp Electronic motor Dust collecting rolling brush motor 24 0 60 Side brush motor 24 0 08 X 2 Dust vibration motor 24 0 03 Type VDC Ampere Hertz VAC Charger Intelligent 24 25...

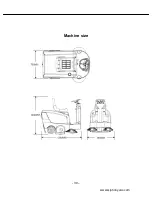
Page 30: ...30 wwww johnnyvac com Machine size...

Page 31: ...31 wwww johnnyvac com INSPECTION CERTIFICATE Model Part No Side disk motor Driving motor Dust collecting rolling brush motor Dust vibration motor Housing Inspector Date...

Page 32: ...32 wwww johnnyvac com www johnnyvac com...

Reviews: