


• Turn the control knob to " " position.
PORTABLE BUTANE GAS STOVE
Clean the burner head with a brush.
Check the igniter tip to see if it has been bent too far away
from the burner cap for a spark to be produced.
Check that the Control Knob is in the OFF position.
Make sure the notch on the canister is lined up with the
safety guide.
Check if the gas canister was inserted and locked in properly.
Check if the gas canister is empty.
Check if the temperature is above 32F.
No Gas Comes Out
No Ignition
Can not lock in
The fuel canister
You smell gas
Check with soapy water for any gas leaks where the canister
and regulator meet If there is a leak and you have inserted
the canister properly, contact customer service.
Do not use.
Problem
Possible Solutions
CAUTION: Butane is heavier than air and will seek the lowest point in a room. Ventilate the
room and do not turn on any source of ignition, such as lights or appliance until room has
been well ventilated. If gas odor is strong, evacuate the building and seek professional
assistance.
TROUBLE SHOOTING
SPECIFICATIONS
2572201
Piezo-Electric
3.1 lbs (1.4 kg)
Butane
253 g/h
11,500 Btu/Hr
227 Grams (8 Oz.) DOT-2P/2Q (RVR)
Model Number
Type of lgnition
Dimension
Weight
Fuel canister/Nt. Wt
Type of gas
Fuel consumption
Input rating
13.0” x 11.5” x 3.6”
For additional diagrams and FAQs, visit: www.eurekacamping.com
This product is covered by a 1 year limited warranty.
Visit www.eurekacamping.com for additional information.
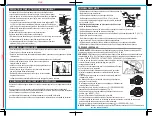
The appliance is equipped with a safety device which stops the flow of gas if the pressure in the
canister, e.g. because of overheating, becomes too high.
To continue usage...
• Follow the procedure for "SETTING UP THE STOVE" with a cooled canister.
HANDLING SAFETY DEVICE
• Return the canister lever to " " position and take the canister out.
(Fig.8)
(Fig.7)
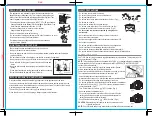
LIGHTING THE STOVE
The stove must not be exposed to flammable vapors or liquids during lighting.
(Fig.5)
(Fig.6)
NOTE: Close the Canister Cover before lighting. Not closing the Cover properly may cause canister
to overheat.
Failure to follow these procedures to properly install the canister and close the door can
result in a gas leak.
• After three failed attempts, turn the gas supply off by turning the Control
Knob clock wise to " " position and return the Canister lever to " " position.
• If the stove does not light, turn the Control Knob back to " " position
and repeat previous step. (Fig.3)
• Push and turn the Control Knob counter clock wise until you hear a click
indicating that a spark has been produced. (Fig.5)
• Open canister cover, remove canister and shake to verify that it is not empty.
• If empty, replace canister following the " Setting up the stove " section.
• CAUTION: When canister needs to be replaced: if stove in use, do not touch
the hot stove or any items that are on stove until they have cooled.
• If canister is not empty, contact Customer Service.
Match Light:
• Turn Control knob clockwise to " " position. (Fig.3)
• Push down the canister lever to " " position. (Fig.4)
• Hold lighted match next to Burner and turn Control Knob counter clockwise slowly.
• Adjust flame to desired heat lever. (Fig.6)
• Flame should be blue with hint of yellow tip.
• If burner does not light and Control / Ignition Knob is not completely in " " position, gas is
escaping and could cause an accident.
• Check Lever on stove to be sure it is in the " " position.
• Turn Control Knob clockwise to " " (AUTO-EJECT) position.
• Alternatively, turn Control Knob clockwise to " " position and return
lever to the " " position. (Fig. 7 & Fig. 8)
• Remove butane canister.
• Store butane canister consistent with instructions and warnings on
the canister.
• Use a soft cloth and clean greasy parts of the stove with soap and water
or a nonabrasive detergent.
• Fuel canister must be disconnected when the stove is in storage.
• Store stove in a cool, dry and well-ventilated area, out of the reach of children.
• Allow stove to cool for 10-15 minutes.
TURNING OFF AND STORING THE STOVE
• Adjust flame with Control Knob to desired heat.
Reference " " (HIGH) and " " (LOW) flame indicators. (Fig. 6)
210MM
142MM


