


SUPPly waTeR
Plumb the humidifier to cold, hard or softened water .
Do not use hot water because unheated supply water is used to cool water
drained from the humidifier.
Do not use demineralized or reverse osmosis water . For proper operation, supply water pressure must be between
25 psi and 120 psi .
Supply water piping must be free of oils, lubricants, solder flux and other contaminants, which can cause foaming in the canister that can lead to
water sputtering from the dispersion tube into the duct .
Install the saddle valve according to the instructions printed on the bag . Run 1/4” copper tubing from the saddle valve to the humidifier . Connect
it to the fill valve . Double wrench to prevent leaking and damage to valve .
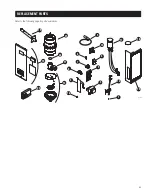
PRePaRe HUMIDIfIeR foR MoUnTInG
Unpack carton . Open front panel by removing screw and lifting panel up and away from humidifier . Disconnect three wires from top of canister
by pulling straight up . The two large wires are the electrode conductors . The smaller wire is connected to the high water level sensor . Remove
canister by pulling it up and out of drain assembly . Remove two screws on right side of humidifier and lift side panel off housing to expose
electrical compartment .
MoUnT HUMIDIfIeR
Secure humidifier to sturdy wall using screws provided, or to sheet metal duct . Humidifier weighs 23 lbs . with full canister . Make sure mounting
system will support weight . If mounting to stud frame wall, install two spanner boards to studs and fasten humidifier to spanner boards . Make
sure humidifier is mounted plumb .
Verify that the O-ring is in place in the slot in the drain assembly . Dampen the O-ring with water, then reinsert canister . (Do not use oil, grease or
any lubricant besides water .) Rotate the canister so the caution label is visible . Reattach the electrode conductors (interchangeable) and the high
water level sensor wire .
InSTall STeaM DISPeRSIon TUbe
note:
If humidifier will deliver steam via a Fan Pack instead of the dispersion tube, follow instructions included with Fan Pack .
Make sure steam dispersion tube is mounted higher than the humidifier so that condensate that forms in the tube runs back into the canister .
If the dispersion tube cannot be mounted higher than the humidifier or if the steam hose must extend up from the humidifier then down to the
dispersion tube due to an obstruction, a drip tee and drain trap system must be installed as shown in
figure 4
.
Drill a 1-1/4” diameter hole in a vertical surface of the duct at the location chosen for the dispersion tube . Position the tube so it is angled up,
regardless of airflow direction . Secure with four sheet metal screws provided .
InSTallaTIon InSTRUCTIonS
(ConTInUeD)
Six feet of steam hose is provided with the humidifier . If the steam hose must be cut, use a hacksaw . If additional length is required, use
1” O .D . metal or copper pipe .
Do not use PVC pipe for steam line.
Insulate pipe with 1” thick fiberglass to reduce steam loss . See
Table 3
for
humidifier capacity at various lengths of steam hose and pipe .
Use the steam hose provided . Other hoses may have impurities which can cause foaming in the canister . Foaming can cause water level
inaccuracies and reduced steam production . When using pipe, remove all traces of residual materials used to connect the pipe to prevent foaming .
Attach steam hose to dispersion tube and then to top of canister using hose clamps provided . Use heavy wire clamp to secure hose to canister .
Make sure steam hose has a constant slope of at least 2” per foot between the dispersion tube and the humidifier . Any and every low spot in the
steam hose or pipe must have a drip tee and drain trap . Fill drain trap with water before making final connections .
InSTall STeaM HoSe
8


