background image

— 2 —

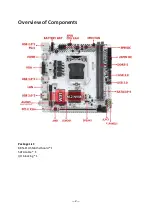
Overview of Components

Package List:

B85I-PLUS Motherboard * 1
SATA cable * 1
I/O blocking * 1

Summary of Contents for B85I-PLUS

Page 1: ...B85I PLUS User Manual http www jginyue com ...

Page 2: ...SB 3 0 Port 5 VGA Port 5 HDMI Port 6 RJ45 LAN Port 6 Audio Port 6 PS 2 Port 6 Internal Connectors 7 F_PANEL1 Connector 7 SPEAK1 Connector 7 JAUD1 Connector 7 SATA1 4 SATA 3 0 Connectors 8 M 2 Slot 8 WLAN 1 Slot 8 JCMOS1 CMOS Discharge 9 JUSB2 USB 2 0 Connector 10 FUSB3 USB 3 0 Connector 10 BIOS Setup 11 BIOS Setup 11 Enter BIOS Setup 12 Reset BIOS 12 ...

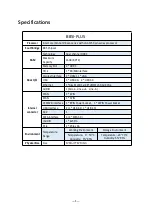
Page 3: ... 4 USB 2 0 2 USB3 0 Ethernet 1 Gigabit LAN Card RTL8111E LAN Card Chip AUDIO 1 Mic in Line out Line in Internal connector CFAN 1 4PIN SFAN 1 3PIN ATXPWR Interface 1 8PIN Power Socket 1 24PIN Power Socket USB Interface 2 1 USB 3 0 1 USB 2 0 M 2 1 SATA Interface 4 4 SATA3 0 JAUDIO 1 2x5Pin PCIe 1 PCIe x16 Environment Temperature Range Working Environment Storage Environment Temperature 0 50 C Humidi...

Page 4: ... 2 Overview of Components Package List B85I PLUS Motherboard 1 SATA cable 1 I O blocking 1 ...

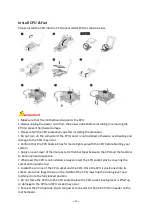
Page 5: ...the CPU before booting your system Apply an even layer of thermal paste or thermal tape between the CPU and the heatsink to enhance heat dissipation Whenever the CPU is not installed always protect the CPU socket pins by covering the socket with a plastic cap Locate the pin one of the CPU socket and the CPU Once the CPU is positioned into its socket place one finger down on the middle of the CPU l...

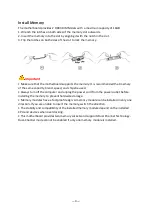
Page 6: ...apacity brand speed and chips be used Always turn off the computer and unplug the power cord from the power outlet before installing the memory to prevent hardware damage Memory modules have a foolproof design A memory module can be installed in only one direction If you are unable to insert the memory switch the direction The stability and compatibility of the installed memory module depend on th...

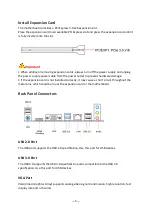
Page 7: ...o prevent hardware damage If the expansion card is not installed correctly it may cause a short circuit throughout the metal pins which could burn out the expansion card or the motherboard Back Panel Connectors USB 2 0 Port The USB port supports the USB 2 0 specification Use this port for USB devices USB 3 0 Port The USB 3 0 supports the USB 3 0 specification and is compatible to the USB 2 0 speci...

Page 8: ...provides Internet connection at up to 1000Mbps s data rate The following describes the states of the LAN port LEDs Audio Port Line in Port The line in jack Use this audio jack for line in devices such as an optical drive walkman etc Line out Port The line out jack Mic in Port The Mic in jack PS 2 Port This PS 2 port can be connected to a keyboard or mouse ...

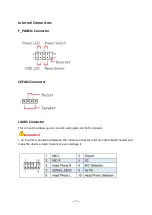
Page 9: ...SPEAK1 Connector JAUD1 Connector This connector allows you to connect audio jacks on the front panel Important An incorrect connection between the module connector and the motherboard header will make the device unable to work or even damage it ...

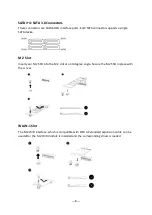
Page 10: ...ingle SATA device M 2 Slot Insert your M 2 SSD into the M 2 slot at a 30 degree angle Secure the M 2 SSD in place with the scr ew WLAN 1 Slot The M 2 WiFi interface which is compatible with WiFi AC standard expansion cards can be used after the M 2 WiFi module is installed and the corresponding driver is loaded ...

Page 11: ... provide enough stable power to all the components on the motherboard Before connecting the power connector make sure the power supply is turned off and all devices are properly installed Important It is recommended that a power supply that can withstand high power consumption be used at least 500W If a power supply is used that does not provide the required power the result can lead to an unstabl...

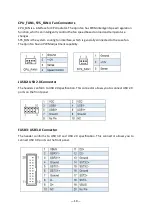
Page 12: ...YS_FAN is the system cooling fan interface which is generally connected to the case fan The 3pin fan has no PWM adjustment capability JUSB2 USB 2 0 Connector The headers conform to USB 2 0 specification This connector allows you to connect USB 2 0 ports on the front panel FUSB3 USB 3 0 Connector The header conforms to USB 3 0 and USB 2 0 specification This connector allows you to connect USB 3 0 p...

Page 13: ...ower to the CMOS to keep the configuration values in the CMOS Important Because BIOS flashing is potentially risky if you do not encounter problems using the current version of BIOS it is recommended that you not flash the BIOS To flash the BIOS do it with caution Inadequate BIOS flashing may result in system malfunction BIOS Setup The default settings offer the optimal performance for system stab...

Page 14: ...press Reset on the case to restart your computer You can also press Ctrl Alt Delete at the same time to restart your computer Important Functions may vary depending on the product you have Reset BIOS When you need to restore the default BIOS settings to resolve certain issues there are several ways to reset the BIOS Go to BIOS and press F6 to load optimized defaults Short the Clear CMOS jumper on ...

Reviews: