Jet JWBS-9 Operating Instructions Manual Download Page 3


Acoustic power level 
(according to EN ISO 3746): 
Idling 

LwA  78,5 dB(A) 

Operating 

LwA  89,6 dB(A) 

Acoustic pressure level  
(according to EN ISO 11202): 
Idling 

LpA  70,7 dB(A) 

Operating 

LpA  83,2 dB(A) 

The specified values are emission 
levels and are not necessarily to be 
seen as safe operating levels. This 
information is intended to allow the 
user to make a better estimation of 
the hazards and risks involved. 


4.3 Content of delivery 

Machine table 
Fence 
Mitre gauge 
Machine lamp 
Assembly bag 
Saw blade 6mm 
Operating manual 
Spare parts list 


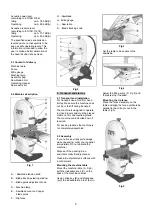
4.4 Machine description 
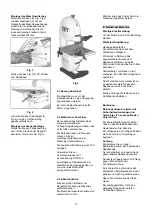
 

Fig 1 


A…...Sawblade tension knob 

B…..Blade tracking viewing window 

C…..Blade guide adjustment knob 

D…..Machine lamp 

E…..Sawblade cover and upper 

blade guide 

F…..Rip fence 

G….Sawblade 

H….Mitre gauge 

J…..Saw table 

K…..Blade tracking knob 


Fig 2 

5.  Transport and start up 

5.1 Transport and installation 

For transport use a forklift or hand 
trolley. Make sure the machine does 
not tip or fall off during transport. 

The machine is designed to operate 
in closed rooms and must be placed 
stable on firm and levelled ground. 
The machine can be bolted down if 
required. 

For packing reasons the machine is 
not completely assembled. 


5.2 Assembly 

If you notice any transport damage 
while unpacking, notify your supplier 
immediately. Do not operate the 
machine! 

Dispose of the packing in an 
environmentally friendly manner. 

Clean all rust protected surfaces with 
a mild solvent. 

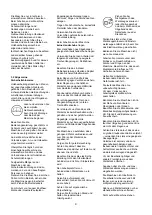
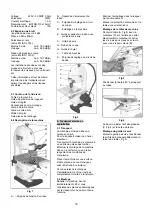
Mounting the machine table 

Mount the machine table (A, Fig 3) 
with the indexable knob (C) on the 
back of the machine cabinet. 

Use an allen key (B) and disengage 
(pull) the indexable knob to screw in. 


Fig 3 

Set the table to be square to the 
sawblade. 


Fig 4 

Adjust the tilting scale (C, Fig 4) and 
the table stop if needed. 

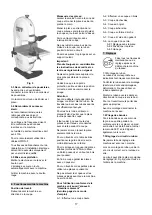
Mounting the rip fence 

Place the fence assembly on the 
table and align the fence profile to be 
parallel to the mitre groove in the 
table (Fig 5). 


Fig 5 


Summary of Contents for JWBS-9

Page 1: ...concerning warranties The warranty period is valid for eight hours of daily use If this is exceeded the warranty period shall be reduced in proportion to the excess use but to no less than three mont...

Page 2: ...running down Never leave a running machine unattended Before you leave the workplace switch off the machine Do not operate the electric tool near inflammable liquids or gases Observe the fire fighting...

Page 3: ...tallation For transport use a forklift or hand trolley Make sure the machine does not tip or fall off during transport The machine is designed to operate in closed rooms and must be placed stable on f...

Page 4: ...it on the bottom side only When ripping narrow workpieces width less than 120mm use a push stick of push wood Near the cutting area use a push stick to feed Use a feeding template to safely guide sma...

Page 5: ...and maintenance work Defective safety devices must be replaced immediately Wheels The rubber tyre of the wheels must be cleaned regularly The upper wheel support must be lubricated regularly Table in...

Page 6: ...tie trifft nicht auf jene Defekte zu welche auf direkten oder indirekten nicht fachgerechten Gebrauch Unachtsamkeit Unfallschaden Reparatur mangelhafte Wartung bzw Reinigung sowie normalen Verschlei z...

Page 7: ...glichst nahe an das Werkst ck absenken Bei schr ggestelltem Tisch den L ngsanschlag an der unteren Tischh lfte ansetzen Es ist darauf zu achten dass alle Werkst cke beim Bearbeiten sicher gehalten und...

Page 8: ...halogen 12V 21W 4 2 Schallemission Messunsicherheitsfaktor 4 dB Werkst ck Buche 20mm Schalleistungspegel nach EN ISO 3746 Leerlauf LwA 78 5 dB A Bearbeitung LwA 89 6 dB A Schalldruckpegel nach EN ISO...

Page 9: ...artet werden Die Maschinenleuchte schaltete sich automatisch mit ein Mit dem roten Aus Taster kann die Maschine stillgesetzt werden 6 Betrieb der Maschine Richtige Arbeitsstellung Vor der Maschinen in...

Page 10: ...es Einstellung nie bei laufender Maschine vornehmen Achten Sie bei der Montage des S gebandes auf den korrekten Lauf auf den Bands gerollen Mit dem Bandlauf Einstellgriff B Fig 6 an der Maschinenr cks...

Page 11: ...ntrollieren Sie regelm ig die Bandspannung und entspannen Sie das S geband bei l ngeren Arbeitspausen Kontrollieren sie regelm ig die korrekte Einstellung der Bandf hrung 9 St rungsabhilfe Motor start...

Page 12: ...e dans les 12 mois suivant la date de la vente date de la facture Toute autre pr tention est exclue La pr sente garantie comprend toutes les obligations de garantie incombant au vendeur et remplace to...

Page 13: ...tretien ainsi que lors du changement des lames Avant de mettre la machine en marche s assurer que les outils de r glage et les cl s sont loign s de la zone de travail Ne jamais utiliser la machine si...

Page 14: ...e machine K Poign e de r glage du circuit de bande Fig 2 5 Transport et mise en exploitation 5 1 Transport La machine est livr e dans une caisse en carton Pour le transport utiliser un chariot l vateu...

Page 15: ...viter que la pi ce tourne pendant la coupe Il faut veiller ce que toutes les pi ces soient tenues et conduites avec s ret pendant la coupe Ne jamais scier en tenant la pi ce seulement dans la main Pou...

Page 16: ...avec prudence 8 Entretien et inspection Faire tous les travaux de maintenance r glage ou nettoyage apr s avoir d branch la machine du r seau Tous les travaux de branchement et de r paration sur l ins...

Page 17: ...s un centre sp cialis de recyclage des appareils lectriques 11 Accessoires Pour diverses lames voir liste de prix JET 12 Travailler s rement Voir annexe A derni re page de ce mode d emploi A 1 Effectu...

Reviews: