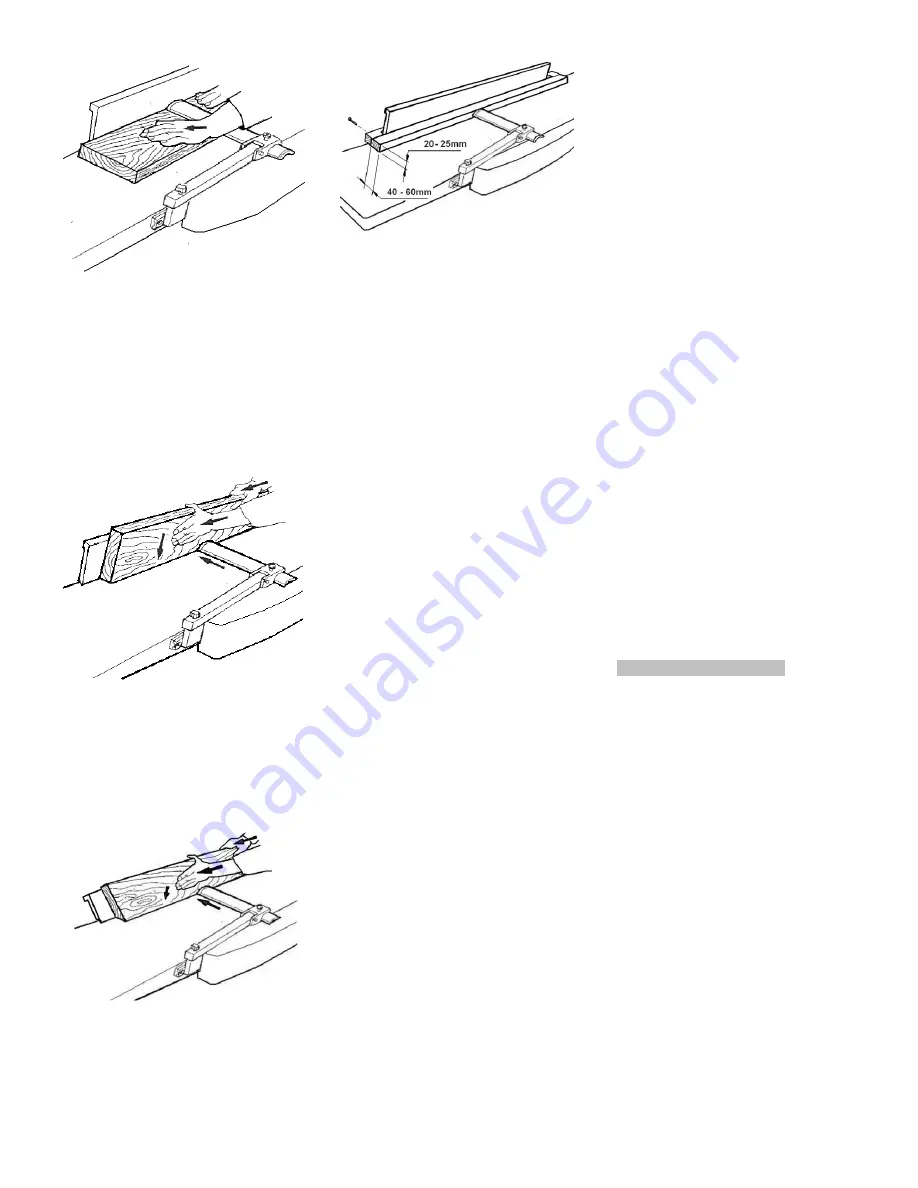
Fig 6
Planing the edge of a work piece
(jointing) or planning work pieces
more than 75mm thick:
Place the work piece against the
jointer fence.
Adapt the cutter block guard to the
width of the work piece (Fig 7).
Fig 7
Chamfering a work piece:
Place the work piece against the
jointer fence.
Adapt the cutter block guard to the
width of the work piece (Fig 8).
Fig 8
Planing of narrow work pieces:
Add an auxiliary fence to safely guide
narrow workpieces (see Fig 9).
Fig 9
Operating notes:
The planer tables are precisely aligned
ex. works. They may only be loaded
when the table-cabinet locks are
engaged, otherwise they may be
damaged or precision of machine be
lost.
Always use sharp cutter knives!
Check work piece for foreign objects
(nails, screws) and for loose knots.
Feed with thicker work piece end at
the front, hollow side downward.
Plane the stock with the grain, if
possible.
You get a better surface when planing
several passes with less chip removal.
Switch machine off if no further
planing is to be done immediately
afterwards. Cover the cutter block with
the cutter block guard.
Jointing and planing of short
workpieces may only be performed
with the help of tailor made push
woods and templates.
For the authorized use of the
machine observe the appendix A
“safe operation“
(on the last pages of this operating
manual)
A1: Planing, stock thickness below
75mm
A2: Edge jointing
A3: Planing of narrow gibs
A4: Planing of short stock with push
wood.
6.2 Thicknessing
Correct operating position:
To feed the work piece into the
machine, position yourselves offset to
one side of the feed opening.
Work piece handling
Adjust the planer table to the work
piece thickness.
Feed work piece slowly and straight
into the thicknesser. It will then be
automatically fed through the
thicknesser.
Guide work piece straight through the
thicknesser.
To remove the work piece from the
machine, position yourselves offset to
one side of the outfeed opening.
Support long work pieces with helping
roller stands.
Operating notes:
Always use sharp cutter knives!
Feed with thicker work piece end at
the front, hollow side downward.
Max. 4,5 mm depth of cut. If a work
piece gets stuck lower the planer table
by app. 1mm (1/4 crank turn).
Plane the stock with the grain, if
possible.
You get a better surface when planing
several passes with less chip removal.
Switch machine off if no further
planning is to be done immediately
afterwards.
Work pieces shorter than 150mm may
not be processed.
Machine max. 2 work pieces at one
time. Feed on both outer sides.
7. Setup and adjustments
General note:
Setup and adjustment work may only
be carried out after the machine is
protected against accidental starting.
Push the E-stop button
Pull the mains plug!
7.1 Changing or rotating knive
inserts
Warning
:
Knife inserts are extremely sharp. Use
caution when working with or around
the cutterhead.
Insert Rotation:
The knife inserts are four-sided.
When dull, simply remove each insert,
rotate it 90° for a fresh edge, and re-
install it.
Use the provided Torx screwdrivers to
remove the knife insert screw (Fig 10).
Summary of Contents for JPT-310HH
Page 26: ...26 A1 A2 A3 A4 ...
Page 28: ...JPT 310HH Cutter Block Guard and Outfeed Assembly ...
Page 30: ...JPT 310HH Cutter Block assembly ...
Page 32: ...JPT 310HH Base Assembly ...
Page 34: ...JPT 310HH Infeed Table Assembly ...
Page 35: ......
Page 37: ...JPT 310HH Drive and Motor Assembly ...
Page 39: ...JPT 310HH Thickness Table Assembly ...
Page 41: ...JPT 310HH Working Fence Assembly ...
Page 42: ......


