12
Canister Filter (optional accessory)
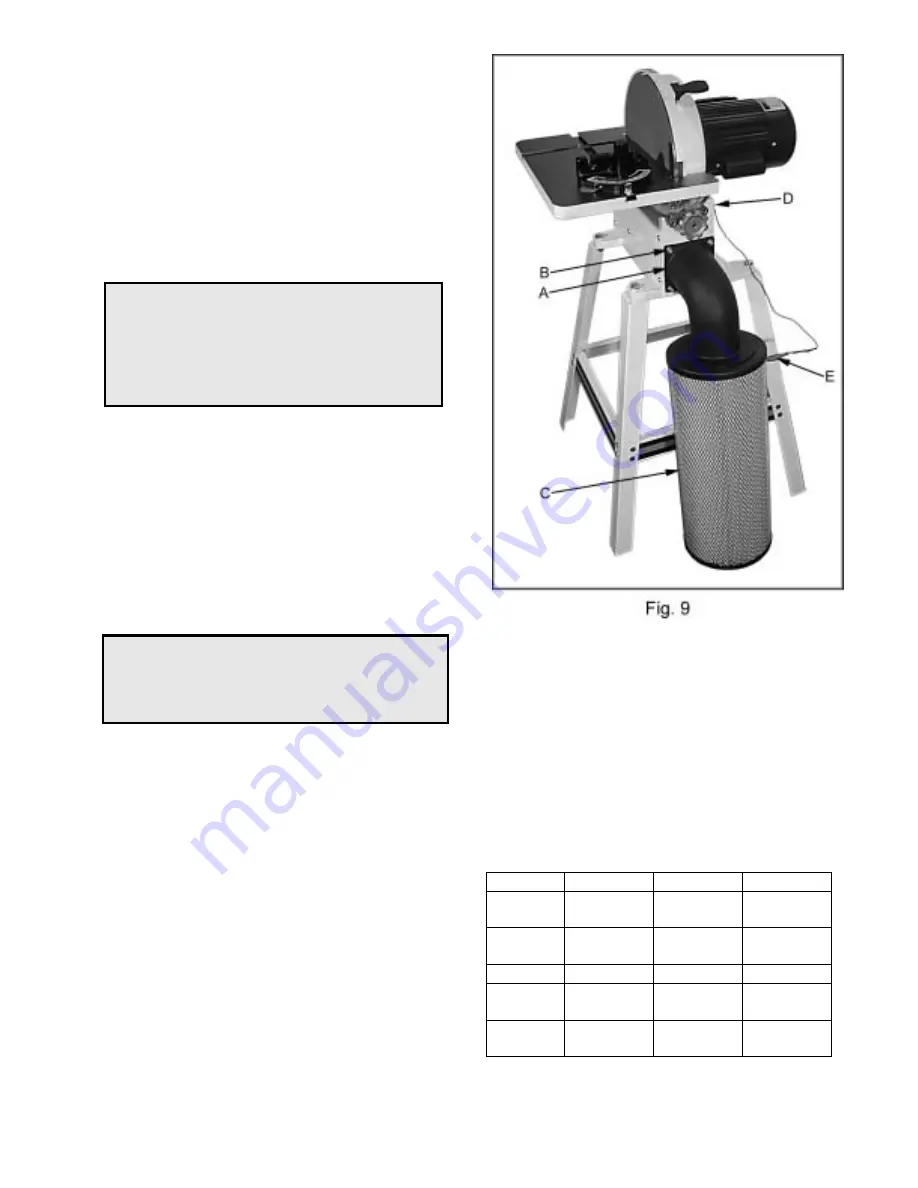
1. Remove the inlet port that came with the
sander.
2. Mount the plastic elbow (A, Fig. 9) to the
sander using the same hardware (B, Fig. 9)
from the inlet port.
3. Connect the filter (C, Fig. 9) to the elbow
and turn counter-clockwise so that it locks in
place.
WARNING
Static electricity will build up in the filter
during operation. The filter ground must be
attached to the machine ground, and to the
filter. Failure to comply may result in
fire/loss of property, or personal injury!
4. Remove the screw (D, Fig. 9) from the
sander base. Attach the end of the
grounding wire to the screw and thread back
in to the base.
5. Attach the grounding clip (E, Fig. 9) to the
metal part of the filter. This will prevent
static electricity from building up in the filter.
Cleaning the Filter
CAUTION
Wearing a particle mask/respirator for
protection against fine dust particles during
cleaning is highly recommended.
Clean the canister filter frequently to keep the
sander’s performance at its optimum. To clean:
1. Disconnect the machine from the power
source.
2. Take off the grounding clip and remove the
filter (C, Fig. 9) by turning clockwise.
3. Empty the contents into an appropriate
container.
4. The filter can be cleaned with a low
pressure air hose. Blow from the outside of
the filter to clean the dust particles. For
best results check and empty the filter
frequently.
5. Install the filter and reattach the grounding
clip.
Optional Accessories
708438: Open Stand
708434: Canister Filter
57620025: JET Stik Abrasive Belt and Disc
Cleaner.
Dust Collectors and Accessories see a JET
Distributor.
JDS-12B Sanding Disc PSA Aluminum Oxide
“J” Weight Cloth Back.
12”
36 Grit
50 Grit
60 Grit
Stock
Number
57698525 57698650 57698750
Master
Carton
25 50 50
12”
80 Grit
100 Grit
120 Grit
Stock
Number
57698850 57698950 57699050
Master
Carton
50 50 50
Summary of Contents for JDS-12B
Page 14: ...14 Disc Sander Breakdown ...
Page 18: ...18 Wiring Diagram ...


