4
JCP Series Cable Pullers
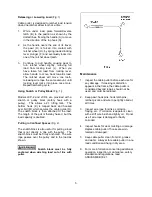
Fig. 1
A – Handle
B – Forward/Reverse Latch
C – Spring
D – Pawl
E – Wire Rope
F – Locking Lever Plunger
G – Locking Lever Spring
H – Ratchet Wheel
J – Locking Lever
K – Bottom Hook
L – Snatch Block (models JCP-2, JCP-4 only)
M – Wire Rope Guide Bolt
N – Top Hook
O – Wire Rope Guide
Operation
Hook Positioning with No Load (Freewheel)
(Fig. 1)
1. With no load on cable puller, position
forward/reverse latch (B) as shown on
dotted lines, to hold pawl (D) off ratchet
wheel (H).
2. Hold puller firmly with handle in uppermost
position, and press locking lever (J) to
disengage locking lever from ratchet wheel.
3. Have an assistant, also wearing gloves, pull
wire rope out; or, anchor the bottom hook
(K) to the load and walk backward with the
puller to the anchor point, freewheeling the
wire rope behind you.
Always keep at least three
wraps of rope on the hub when puller is under
load.
4. Release locking lever, and re-set
forward/reverse latch to engage pawl with
ratchet wheel and begin "winching in."
Pulling or Lifting Load
(Fig. 1)
1. Place forward/reverse latch (B) to position
as shown by solid lines. This enables pawl
(D) to engage ratchet wheel (H) with spring
(C) assistance.
2. Load is held and locked in position by
locking lever (J) and pawl engaging ratchet
wheel firmly.
3. Move handle (A) towards load, and ratchet
handle back and forth.
4. When pressure on handle is relieved at the
end of its travel, locking lever (J) engages
ratchet wheel and locks the load. Repeat
ratcheting cycle.


