


VR182
9
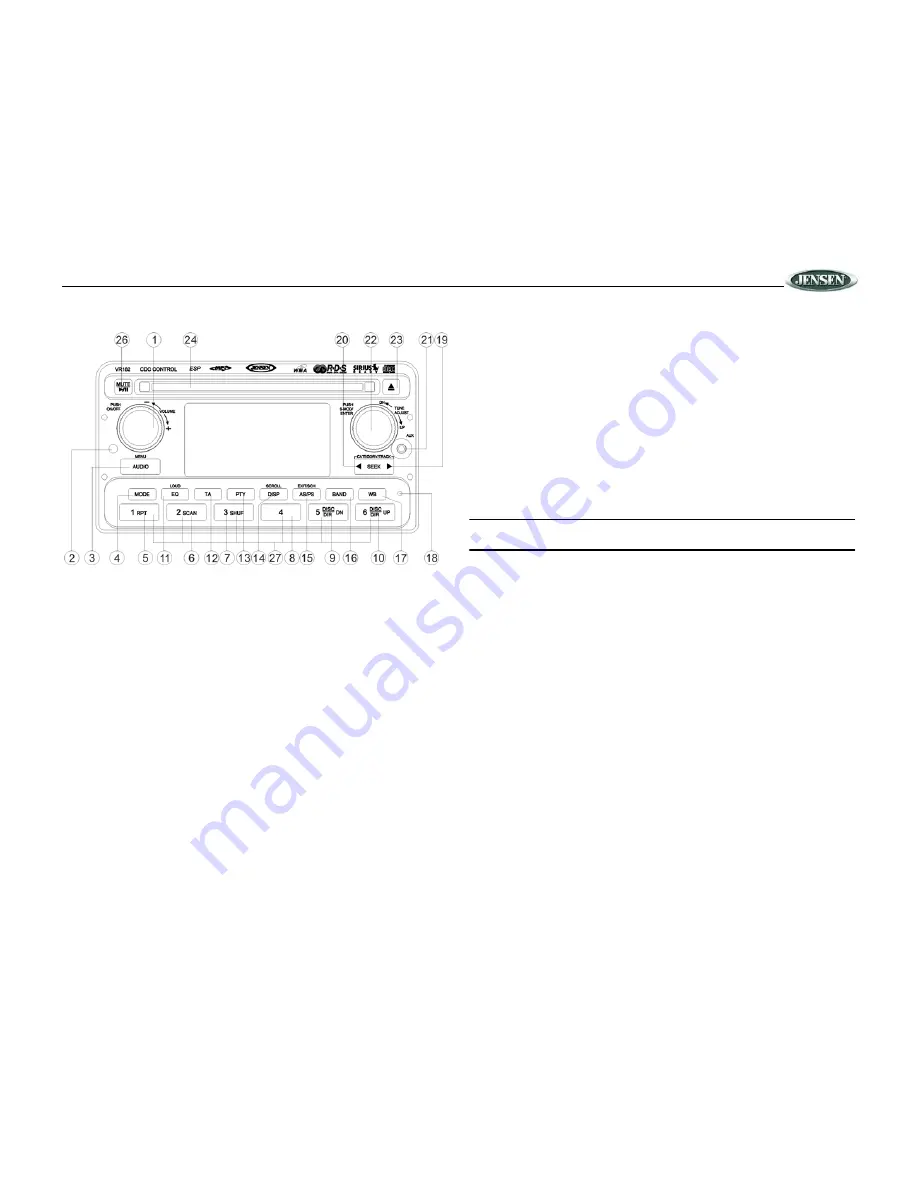
TUNER OPERATION
Select a Band
Press the
BAND
button
(16) on the control panel to change between two FM bands and one
AM band. In WB, CD, CDC, AUX IN or IPOD mode, press the
BAND
button to automatically
switch to radio mode.
Tuning
Rotate the
TUNE ADJUST
knob (22) clockwise or counter-clockwise to tune up or down in one
step increments. Press the
SEEK >
(19) or
SEEK <
button (20) to seek the next strong station.
Preset Stations
Six numbered preset buttons store and recall stations for each band (FM1, FM2, AM).
Store a Station
Tune radio to desired station.
Press and hold
a preset button (27) for three seconds. A beep
tone will confirm the stored station and the preset number will appear in the display.
Recall a Station
Select a band (if needed). Press a preset button (27) to select the corresponding stored
station.
Automatic Store / Preset Scan (AS/PS)
Automatic Store
Select a band (if needed).
Press and hold
the
AS/PS
(15) button for more than three seconds
to automatically select six strong stations and store them in the current band. New stations
replace any stations already stored in that band. After stations have been stored, the radio will
enter Preset Scan and preview each stored station.
Preset Scan
Select a band (if needed). Press
AS/PS
(15) to scan stations stored in the current band. The
unit will pause for ten seconds at each preset station. Press
AS/PS
again to stop scanning
when the desired station is reached.
Weather Band Selection
In any mode, press the
WB
button (17) to access the weather band (NOAA seven frequency
broadcast). In weather band mode, the tuner will automatically seek the active weather band
automatically and stop.
Rotate the
TUNE ADJUST
knob (22) clockwise or counter-clockwise to choose a channel from
CH1 – CH7. You can also press the six preset buttons (27) to select CH1 – CH6 directly.
Press the
SEEK
< / >
buttons (20/19) to seek the stations down/up.
Press the
BAND
(16) or
MODE
(4) button to exit weather band mode.
NOTE: The weather band channel frequency is fixed in preset memory and cannot be
changed.
RDBS Operation
While in FM Radio mode, press the
TA
button (12) to start search of a Traffic Announcement in
your area. If no TA information is being broadcast, the radio will display “NO TA” and return to
the previously tuned station.
In any mode, press the
TA
button to access Traffic Announcement mode. If a TA is being
broadcast, playback of the current mode will be interrupted and the radio will switch to the FM
station issuing the TA. Press the
TA
button again to exit TA mode.
In FM radio mode, press the
PTY
button (13) to list the following search options: ANY / News /
Information / Sports / Talk / Rock / Classic Rock / Adult Hits / Soft Rock / Top 40 / Country /
Oldies / Soft / Nostalgia / Jazz / Classical / Rhythm and Blues / Soft R&B / Language /
Religious Music / Religious Talk / Personality / Public / College / Weather / Emergency Test /
Emergency.
Use the
TUNE ADJUST
knob (22) to select an item from the list, then press
SEEK
<
/
>
(20/
19) to search the corresponding program. “PTY SEARCH' will be displayed in the upper right
corner of the LCD. If a corresponding program is found, the unit will play the program. If there
is no corresponding program, “PTY NOT FOUND” will be displayed on the LCD.
Stereo (ST)
The unit will automatically pick up an FM stereo signal, when available. When in stereo mode,
the “ST” icon appears in the display. When no stereo signal is available, the unit will
automatically revert to mono operation, and no icon will be displayed.


