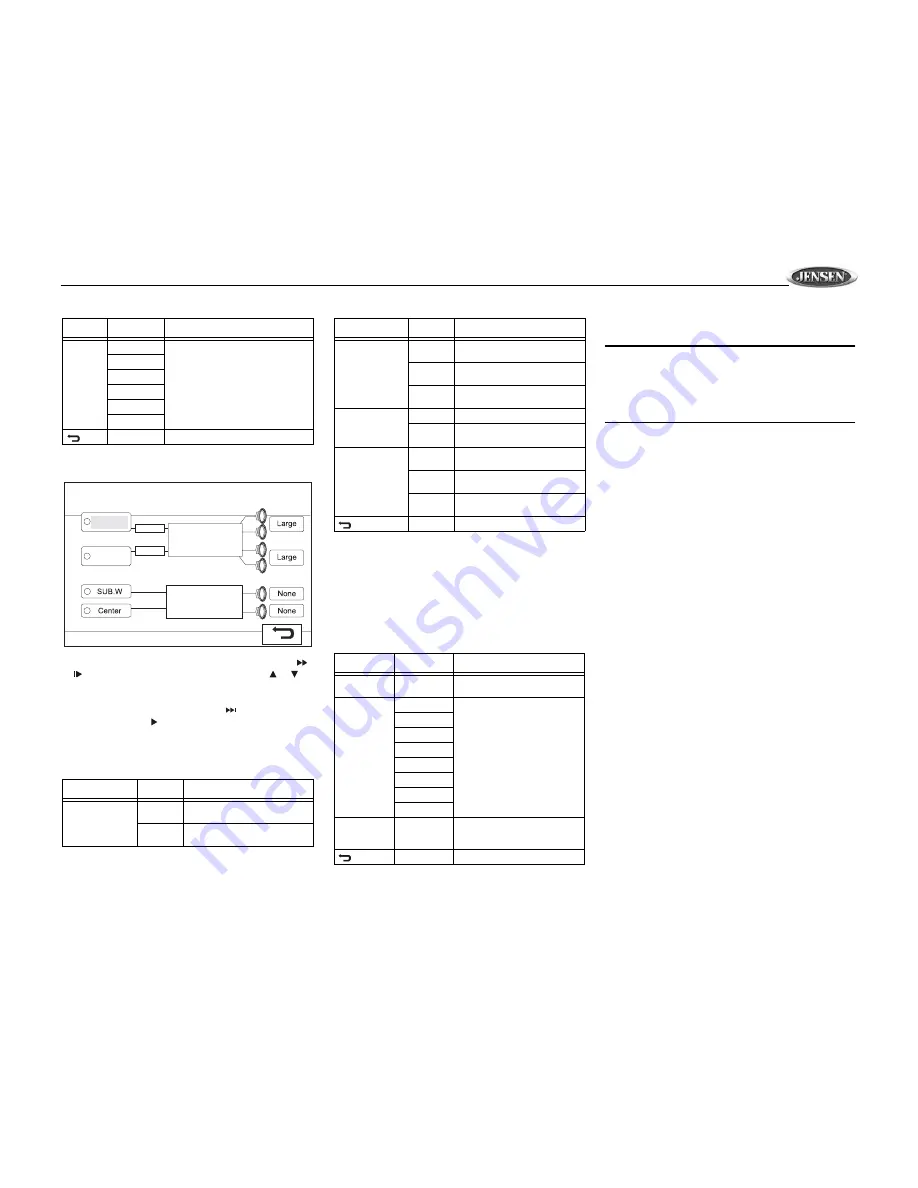
Jensen Mobile Multimedia AM/FM/DVD Receiver VM9410 Owner'S Manual Download Page 21

VM9410

19

SURROUND SETUP Menu

To change speaker settings for 2-channel mode, use the 


or 

 buttons (14, 22) on the remote control or the   or   

buttons (18, 19) on the joystick to select “Stereo”. To change 
speaker settings for 6-channel mode, select “Multi-CH”.


After 

selecting 2 or 6-channel mode, use the 

 button (19) on 

remote control or the   button on the joystick (17) to move to 
the speaker settings on the right. Refer to Table 15 when 
selecting speaker options for each mode.


RATING (Parental Lock) Menu

The DVD system has a built-in parental lock feature to 
prevent unauthorized persons from viewing restricted disc     
content. By default, the rating system is unlocked. Once 
setup, the parental lock is released only by entering the 
correct password. Once the password is entered, rating is 
available for setup.

To reset the password, enter the “RATING” menu and enter 
the current password. Once the correct password is entered, 
you can access the “Password” field and enter a new one.

NOTE: Record the password and keep it in a safe place 
for future reference. The rating for each disc is marked 
on the disc, disc packing, or documentation. If the rating 
is not available on the disc, the parental lock feature is 
unavailable. Some discs restrict only portions of the disc 
and the appropriate content will play. For details, please 
refer to the disc description.

REAR 
CTRL

15ms

Adjust the time difference between the 
rear and front speakers to create a 
time delay between 3 and 15 millisec-
onds, producing a more accurate audio 
effect.

12ms

9ms

6ms

3ms

0ms

Return to previous menu

Table 15: SURROUND SETUP Menu Features

Setting

Options

Function

FL (Front Left) /
FR (Front Right)

Large

Use when front speakers have 
good bass output

Small

Use when speakers do not have 
good bass output

Table 14: AUDIO Menu Features

Setting

Options

Function

DSP

ASP

SUB

CTR

RR

RL

FR

FL

SURROUND SETUP

Multi-CH

Stereo

LR (Left Rear) /
RR (Right Rear)

Large

Use when rear speakers have 
good bass output

Small

Use when rear speakers do not 
have good bass output

None

Use when rear speakers are not 
present

SUB (Subwoofer)

Present

Use when subwoofer is present

None

Use when subwoofer is not 
present

CTR (Center)

Large

Use when center speaker has 
good bass output

Small

Use when center speaker does 
not have good bass output

None

Use when center speaker is not 
present

Return to previous menu

Table 16: RATING Menu Features

Setting

Options

Function

Password

_ _ _ _

Enter a 4-digit password to acti-
vate the “Rating” feature

Rating

1. Kid Safe

Select the appropriate rating level 
for the intended audience

You may override higher ratings 
by using your password

2. G

3. PG

4. PG-13

5. PG-R

6. R

7. NC-17

8. Adult

Load Factory

Reset

Select “Reset” to restore the fac-
tory default settings for the 

Rating 

system only

Return to previous menu

Table 15: SURROUND SETUP Menu Features

Setting

Options

Function

Summary of Contents for Mobile Multimedia AM/FM/DVD Receiver VM9410

Page 1: ...SRC PWR VM9410 VM9410 ENTER Push AV AUX IN 7 INCH TFT OPEN DVD R LO DX 2 6CH VM9410 Owner s Manual...

Page 2: ...eset 11 Line Mute 11 System Setup Menu 12 General Setup Menu 12 ASP Audio Sound Processing Config Menu 12 Exiting the System Setup Menu 13 Tuner Operation 14 Tuner TFT Display 14 Tuner LCD Display 14...

Page 3: ...ion IR remote controls one for the front zone the other for the rear zone without interference 23 Voltage overload and underloaded protection The operating voltage of this unit is between 10 5V and 16...

Page 4: ...ion switch and proceed with final mounting of the chassis 1 Connect wiring adapter to existing wiring harness 2 Connect antenna lead 3 Carefully slide the radio into the half sleeve making sure it is...

Page 5: ...EEN BLACK RED WHITE WHITE YELLOW YELLOW YELLOW YELLOW RED WHITE GREEN PURPLE PURPLE BLACK GREY BLACK GREY FRONT L FRONT L FRONT R FRONT R REAR R REAR R REAR L REAR L Car Antenna FUSE 10A Battery Ignit...

Page 6: ...n set up 6 SEL LOC DX Rotate the SEL LOC DX knob 6 to adjust the volume Press and release to enter and or confirm audio settings Press and hold to activate the Local LOC setting 7 POWER MUTE Press the...

Page 7: ...R Mode Press once to auto search for the previous available radio station Press and hold to decrease the tuning frequency step by step MENU Mode Press once to move the cursor to the left 17 DVD Mode P...

Page 8: ...tion is activated 4 Main Display The main display is an 8 digit 14 segment LCD which displays the time tuning frequency and other text information 5 Channel Disc Display The channel disc display is a...

Page 9: ...ays back Picture CD with different angle of picture displayed Plays back disc in dif ferent angle for a scene 14 Fast forwards the disc content Fast forwards the disc content Fast forwards the disc co...

Page 10: ...E NORMAL or FULL Selects display mode WIDE NORMAL or FULL Selects display mode WIDE NORMAL or FULL Selects display mode WIDE NORMAL or FULL 0 1 2 3 4 5 6 7 8 9 0 Numeric Keypad 29 Directly accesses ch...

Page 11: ...rear zone SUBTITLE 9 Language selection for subtitle 14 Fast forwards the disc content Fast forwards the disc content 17 Selects the previous track chapter for playback Selects the previous track cha...

Page 12: ...rameter Adjustment Procedure 1 Enter Picture Quality Setting mode Press the PIC button 24 on the remote or press and hold the WIDE PICTURE button 2 on the monitor panel 2 Select Item to Set Press the...

Page 13: ...new system be sure to adjust the settings for the speakers as well Proper setting of the Fader and Balance boosts the effects of the cabin equalizer Accessing the Audio Control Menu Press the VOL LOC...

Page 14: ...or buttons 17 19 on the remote control or the or buttons 16 17 on the joystick to adjust the hour or minutes 4 Press the button 14 on the remote control to confirm setup Method 2 TFT screen closed 1 P...

Page 15: ...Function Bass Center Freq 60Hz According to the audio source select the Bass Center Frequency to achieve the best Bass effect 80Hz 100Hz 130Hz 150Hz 200Hz Treble Center Freq 10KHz According to the au...

Page 16: ...ress the button 17 on the remote control or the button on the joystick 16 to seek the next station lower Manual Tuning Press the or buttons 14 22 on the remote control or the or buttons 18 19 on the j...

Page 17: ...ress the 4 REP button 11 on front panel or the REPT button 7 on remote control to alter repeat mode according to the following DVD Repeat Title Repeat Chapter Repeat Off VCD PBC Off Repeat Single Repe...

Page 18: ...tton 9 on the remote control to choose the language in which you would like the subtitles to appear NOTE During VCD playback press the AUDIO button 5 on the remote control to choose between Left Chann...

Page 19: ...neral Disc Information DVD AUX IN MPEG DSP Table 10 Disc Properties Symbol 12cm Disc Properties Max Play Time Single side single layer DVD 5 Single side double layer DVD 9 Double side single layer DVD...

Page 20: ...menu settings VIDEO Menu NOTE For standard discs not formatted for widescreen use of the 16 9 aspect ratio will result in image distortion AUDIO Menu The VM9410 has a built in Pink Noise generator to...

Page 21: ...isc description REAR CTRL 15ms Adjust the time difference between the rear and front speakers to create a time delay between 3 and 15 millisec onds producing a more accurate audio effect 12ms 9ms 6ms...

Page 22: ...ote control or the button on the joystick 17 to enter playback mode PLAY MOD 3 Press the or buttons 18 17 19 on the remote control or the or button 16 17 on the joystick to choose from the following p...

Page 23: ...te malfunction MUTE wire is grounded Check that MUTE connection is not grounded and that it s properly insulated Unit resets itself when engine is off Incorrect connection between ACC and positive bat...

Page 24: ...isc does not play back Disc is warped or scratched Use disc in good condition Disc is dirty or wet Clean disc with soft cloth Laser pickup is dirty Clean laser pickup with cleaning disc Incompatible d...

Page 25: ...charge for parts and repair labor To obtain repair or replacement within the terms of this Warranty the product is to be delivered with proof of warranty coverage e g dated bill of sale specification...

Reviews: