


JRV210
14
iPod OPERATION
This unit is equipped with an iPod ready function that will allow you to control your iPod (if
compatible) using the control panel control buttons. The following iPod versions are supported:
•
iPod Nano (1G, 2G, 3G, 4G and 5G)
•
iPod 5G
•
iPod Classic
•
iPhone, iPhone 3G, iPhone 3GS
•
iPod Touch
•
iPod Touch 2G
NOTE: iPod and iPod Cable sold separately.
Accessing iPod Mode
If AUTO IPOD “ON” is selected in the system menu,
your iPod will play automatically when connected to
the unit. “iPod” will appear in the upper left corner of
the display.
If AUTO IPOD “OFF” is selected in the system menu,
your iPod will not play automatically when connected.
In this case, press the
MODE
button (4) to change to
IPOD mode.
If you press the
BAND
,
WB
or
MODE
button during
iPod playback, the iPod will resume playback when
you return to IPOD mode.
Turning the iPod On/Off
The iPod power turns on automatically when an iPod is connected to 30-pin iPod cable, as
long as the vehicle ignition is turned on. You can turn the iPod off by disconnecting it from the
cable or by turning the ignition off. When the ignition is turned off, the iPod will pause and then
enter sleep mode after 2 minutes. While the iPod is connected, the power cannot be turned on
or off from the iPod itself.
NOTE: The iPod will continuously recharge when connected to the unit, as long as the
vehicle ignition is turned on.
Selecting a Playlist
1.
When an iPod is playing, press the
PTY/CAT/MENU
button (13) to display the playlists on
the LCD.
2.
Turn the
TUNE/ENTER
control (22) to change the playlist between Artist / Album /Genre /
Song / Audiobook / Podcast.
3.
Press the
TUNE/ENTER
control to confirm the selected playlist.
4.
While searching a playlist, press the
PTY/CAT/MENU
button (13) to navigate back
through the list.
Controlling Playback
Play/Pause
Press the
>/||
button (26) to suspend playback. Press the
>/||
button again to resume playback.
Selecting Tracks
During playback, press the
SEEK \/ / /\
button (19, 20) to play the previous or next track in the
current category. Press the
SEEK /\
button (20) once to play the song from the start position or
press
SEEK \/
twice to play the previous track.
Press and hold
the
SEEK \/ / /\
button (19, 20) to fast reverse/forward the song. iPod playback
will continue when the button is released.
The track information display can be changed to emphasize either artist or song title by
pressing the
INFO/DISP
button (14).
Repeat Play
Press the
RPT
button (5) to repeat play the current song. Press
RPT
again to stop repeat play.
Previewing Tracks
Press the
INT
button (6) on the control panel to play the first 10 seconds of each file in the
current folder sequentially. Press
INT
again to stop Intro Scan and resume normal playback of
the current file.
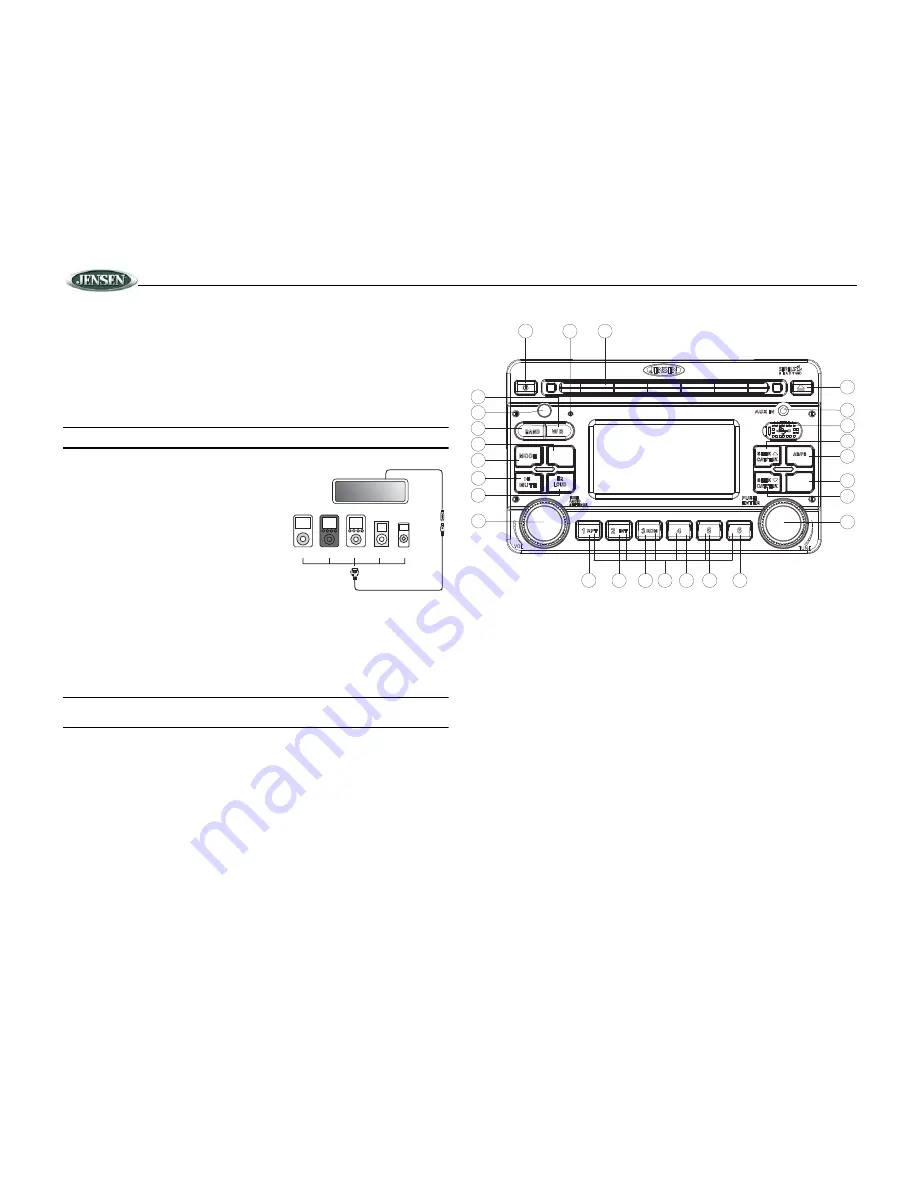
iPod
photo
iPod
iPod
mini
iPod
nano
HEAD UNIT
Jensen iPod Ready Cable
Optional iPod Adaptor
iPod
Video
3
2
4
5
11
6
12
7
13
8
14
15
9
16
10
17
18
19
26
1
24
20
22
23
21
27
JRV210
FAV
PTY/CAT
MENU
PTY/CAT
MENU
INFO
DISP
INFO
DISP


