background image

JRV210

11

USB OPERATION

Inserting and Removing a USB Device

Inserting a USB Device

Insert the USB device into the USB jack (12) and the unit will read the files on the USB device 
automatically. 

Removing a USB Device

Press the 

MODE

WB

, or 

BAND

 button, insert a CD, or connect an iPod to change to another 

mode and then remove the USB device from the USB connector. 

Accessing USB Mode

Press the 

MODE

 button (4) to access the USB device from any other mode.

NOTE: After loading a USB device, files and folders are accessed in the order in which 
they were written to the device. Therefore, the playing order may not be the same as the 
order in which they are expected to played.

Controlling Song File Playback

Selecting Tracks

Press the 

SEEK


\/

 (19) or 

SEEK


/\

 button (20) to advance to the next file. The selected file 

name will appear on the display. 

Press and hold

 the 

SEEK


\/

 (19) or 

SEEK


/\

 button (20) to fast 

forward or fast reverse through the current file. Playback begins when the button is released.

Browse Files/Folders

Press the 

PTY/CAT/MENU

 button (13) to view a list of all files/folders. Rotate the 

TUNE/

ENTER

 control (22) to move through the list. Press the 

TUNE/ENTER

 control select the 

highlighted file/folder.

Press the 

PTY/CAT/MENU

 button to reverse navigate and return to the root level directory.

Play/Pause Disc Playback 

Press the 

>/||

 button (26) to suspend playback. Press the 

>/||

 button again to resume playback.

Previewing Tracks

Press the 

INT

 button (6) on the control panel to play the first 10 seconds of each file in the 

current folder sequentially. Press 

INT

 again to stop Intro Scan and resume normal playback of 

the current file.

Repeat Play

Press the 

RPT

 button (5) during disc play to repeat the current file. Press 

RPT

 again to stop 

repeat play.

Random Play 

Press the 

RDM

 button (7) to play all files in the current folder in random, shuffled order. Press 

RDM

 again to stop random play.

NOTE: USB port will not work with iPod. USB port will not charge all devices.
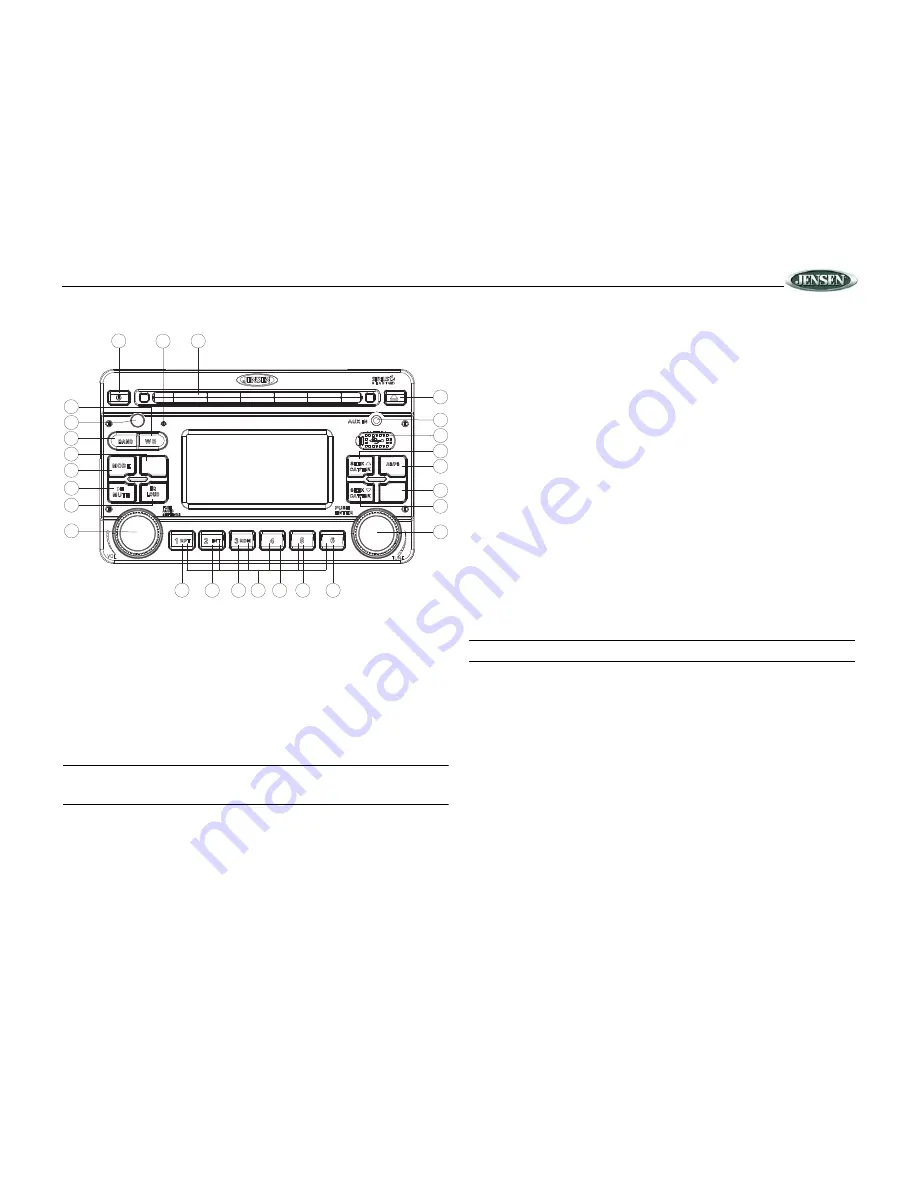
3

2

4

5

11

6

12

7

13

8

14

15

9

16

10

17

18

19

26

1

24

20

22

23

21

27

JRV210

FAV

PTY/CAT

MENU

PTY/CAT

MENU

INFO
DISP

INFO
DISP

Summary of Contents for JRV210

Page 1: ...JRV210 Installation and Operation Manual MOBILE AUDIO SYSTEM JRV210 FAV PTY CAT MENU PTY CAT MENU INFO DISP INFO DISP...

Page 2: ...em Protect the Disc Mechanism Avoid inserting any foreign objects into the disc slot Misuse may cause malfunction or permanent damage due to the precise mechanism of this unit CAUTION THIS MOBILE CD P...

Page 3: ...quids or any other solvent Be sure to use only round CDs for this unit and do not use any special shape CDs Use of special shape CDs may cause the unit to malfunction Do not stick paper or tape on the...

Page 4: ...the opening or cause it to bend or bow Check that there will be sufficient space behind the dashboard for the radio chassis 3 Locate the series of bend tabs along the top bottom and sides of the moun...

Page 5: ...power source that is always live The radio will not work if this wire is not connected 12 VDC ACCESSORY IGNITION Connect to existing radio accessory fuse or 12 VDC switched power source DETAIL A Wire...

Page 6: ...of the unit when all wiring is completed function buttons do not operate error symbol on the display Audio Menu Press the VOL AUDIO SETTINGS control 1 on the control panel to access the Audio Menu You...

Page 7: ...Enter Enter to view options ENTER for Yes MENU for No iPod Auto Select On Off Choose On to automatically detect and playback iPod when connected or Off to use the MODE button 4 to select the iPod sou...

Page 8: ...again to stop scanning when the desired station is reached RBDS Operation This unit is equipped to display RBDS Radio Broadcast Data Service information when broadcast by the radio station NOTE Radio...

Page 9: ...io to turn on automatically when a weather alert is detected adding an additional level of user safety When the weather alert level is set to All Warnings or Watches the weather alert function automat...

Page 10: ...isc The selected track number will appear on the display Press and hold the SEEK 19 or SEEK button 20 to fast forward or fast reverse through the disc Playback begins when the button is released Brows...

Page 11: ...Playback begins when the button is released Browse Files Folders Press the PTY CAT MENU button 13 to view a list of all files folders Rotate the TUNE ENTER control 22 to move through the list Press th...

Page 12: ...lowing order SIR1 SIR2 SIR3 Tuning a Channel Rotate the TUNE ENTER control 22 clockwise or counter clockwise to tune up or down in one step increments The channel information display can be changed to...

Page 13: ...ontrol 22 to select a number for the hundreds digit position 3 Press the TUNE ENTER control to confirm entry of the hundreds digit The tens digit will flash on off 4 Turn the TUNE ENTER control to sel...

Page 14: ...is turned on Selecting a Playlist 1 When an iPod is playing press the PTY CAT MENU button 13 to display the playlists on the LCD 2 Turn the TUNE ENTER control 22 to change the playlist between Artist...

Page 15: ...ndom Play During playback press the RDM button 7 to play all songs in the current category in random order Random play will begin once the current song has finished playing Press RDM again to stop ran...

Page 16: ...in all modes WB Directly accesses weatherband BAND Sequences bands preset banks FM1 FM2 FM3 AM1 AM2 in Radio mode Sequences preset banks SR1 SR2 SR3 in satellite mode AS PS MENU Scans all stored pres...

Page 17: ...atively close to the ignition system engine This type of noise can be easily detected because it will vary in intensity of pitch with the speed of the engine Usually the ignition noise can be suppress...

Page 18: ...settings Wiring is not properly con nected Check wiring connections The operation keys do not work The built in microcomputer is not operating properly due to noise Press the RESET button Sound skips...

Page 19: ...y S N 30dB 4 V Image Rejection 45 dB Stereo Separation 25 dB AM MW Frequency Range USA 530 1710KHz Frequency Range Europe 522 1620KHz Sensitivity S N 20dB 36 dB General Operating Voltage DC 12 Volts G...

Page 20: ...ASA Electronics Corporation www asaelectronics com www jensenrvdirect com 2010 ASA Electronics Corporation v 022610...

Reviews: