background image

4. 

e + or Volume – Button. 

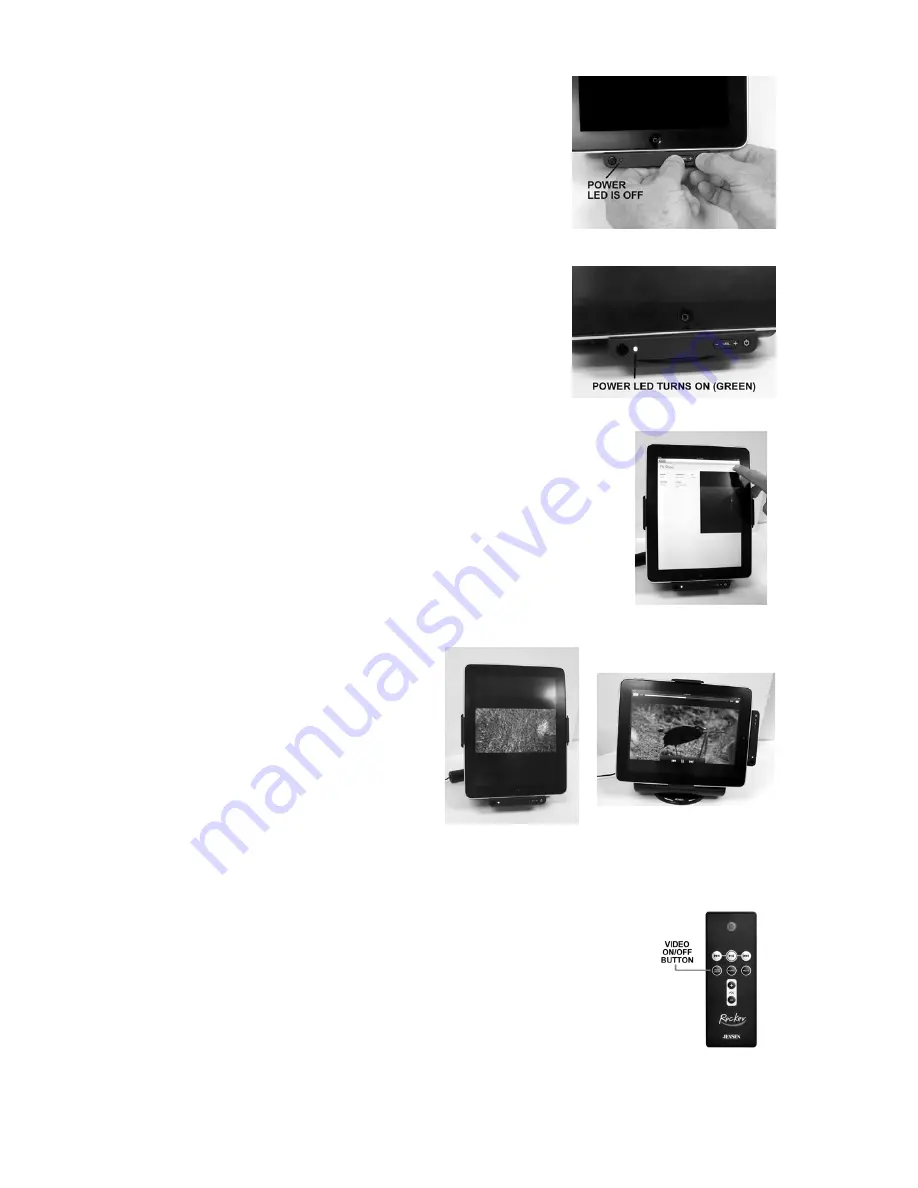
.   Now press the Power Button as shown in Figure 3. 


Once you release the buttons, the JiPS-250i will power up and 

the Green Power LED will light as shown in Figure 4. 


.  Select the movie you want to watch and press the Play Button   

 as shown in Figure 5.   


.  The video will begin playing on the screen 

of the iPad as shown in Figure 6. 

0.  The dock can also be rotated to view the 

/Of

Video On/Off Button, when th

ds the IR 

Sensor on the base, will change how the video is d

The video can be switched between the Video-out (default) and the screen of 

ushing this button. 


Figure 3 

Press and hold either the Volum


5


6. 


Figure 4 


7


Figure 5 


9


1

video in landscape mode as shown in   

 Figure 

7. 


Figure 7 

f" Button as shown in Figure 8.

e remote is pointing towar

Figure 6


WITH THE REMOTE 

1.    The remote control features a “Video On

Figure 8

2. 

Pressing the 

isplayed. 

3

your iPad when p


7

Summary of Contents for JiPS-250i

Page 1: ...G SPEAKER STATION for iPad iPod and iPhone JiPS 250i USER MANUAL iPod iPhone iPad not Included PLEASE READ THIS USER MANUAL COMPLETELY BEFORE OPERATING THIS UNIT AND RETAIN THIS BOOKLET FOR FUTURE REF...

Page 2: ...installation and use and keep these instructions handy for future reference Take special note of all warnings listed in these instructions and on the unit 1 Read these instructions All the safety and...

Page 3: ...r relocate the receiving antenna Increase the separation between the equipment and receiver Connect the equipment into an outlet on a circuit different from that to which the receiver is connected Con...

Page 4: ...n the unit to normal status in case it exhibits abnormality during operation 10 Video Out Jack Connect the composite input jack of your TV set to this terminal for viewing movies videos or Youtube vid...

Page 5: ...e base unit and the remote will continue to work when using the optional Rocker Application GETTING STARTED POWER SUPPLY SOURCES This Docking Speaker System operates using the included AC Adaptor with...

Page 6: ...the Base Hinge until the iPad Support Arm locks in the up 3 Adjust the viewing angle by tilting the iPad Dock forward or back Portrait Mode ING THE iPad ONSCREEN KEYBOA Dock your iPad and rota counter...

Page 7: ...gh quality audio output from e built in stereo speakers 2 If you are using the iPod nano iPod classic or iPod video you need to turn on the T manually from the video setting menu of your iPod 3 For th...

Page 8: ...gure 6 0 The dock can also be rotated to view the Of Video On Off Button when th ds the IR Sensor on the base will change how the video is d The video can be switched between the Video out default and...

Page 9: ...g speakers 1 Use an audio cable not included with one 3 5 mm stereo plug on both ends 2 Plug one end of the cable into the AUX IN Jack on the back of the main unit and the other end into the Line out...

Page 10: ...gently to avoid damaging the internal mechanical parts and hinges TROUBLESHOOTING GUIDE Symptom Possible Problem Solution AC Adaptor is not plugged into a wall outlet or the connector is not plugged...

Page 11: ...and maintain the environment through responsible recycling Please visit us at for more information on or to find a recycler in your area Spectra s green initiatives 90 DAY LIMITED WARRANTY AND SERVIC...

Page 12: ...urchase dated cash register receipt so that we may lish your eligibility for warranty service and repair of the unit without cost Also include a note with a ription explaining how the unit is defectiv...

Reviews: