background image

11

DV352

1.

Press the 

TITLE

 button (32) on the remote control during playback to display the title menu.

2.

Select the preferred title using the remote control arrow keys (29) and confirm by pressing the 

OK

 (30) button.

Viewing an Alternate Picture Angle (DVD Only)

Some DVDs contain scenes that have been shot simultaneously from different angles. For discs 
recorded with multiple angles, press the 

ANGLE

 button (23) on the remote control to toggle 

available angles of the on-screen image. If no other angles are recorded, 

 is displayed in the top 

left corner of the screen.

Setup Menu

To access the Setup menu, perform the following steps:

1.

Press the 

SETUP

 button (25) on the remote control to display the “SETUP MENU - - MAIN 

PAGE” screen.

2.

Select the preferred item using the  /  buttons (29).

3.

Press the 

OK

 button (30) on the remote control to display the selected submenu.

From any submenu, select “MAIN PAGE” to return to the “SETUP MENU - - MAIN PAGE” screen. 
Select “EXIT SETUP” to close the SETUP MENU.
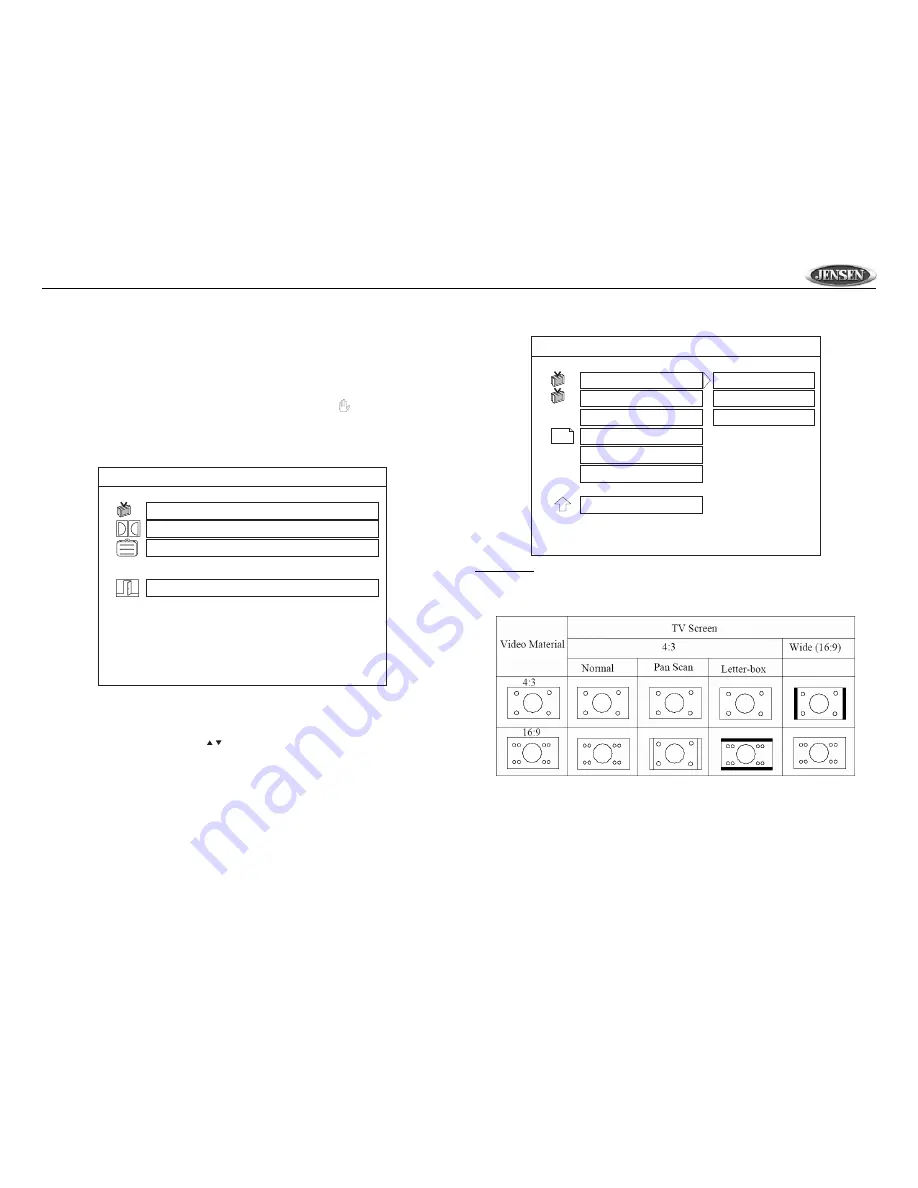
General Setup

Aspect Ratio

Select the “TV DISPLAY” menu option to select the “NORMAL/PS”, “NORMAL/LB” or “WIDE” 
aspect ratio.

Normal/PS (For 4:3 TV): Image is played back in the PAN SCAN style. (If connected to a 
wide-screen TV, the left and right edges are cut off.)

Normal/LB (For 4:3 TV): Image is played back in letter box style. (If connected to a wide-
screen TV, black bands appear at the top and bottom of the screen.)

SETUP MENU - - MAIN PAGE

GENERAL SETUP

AUDIO SETUP
PREFERENCES

EXIT SETUP

GOTO GENERAL SETUP PAGE

SETUP MENU - - MAIN PAGE

GENERAL SETUP

AUDIO SETUP
PREFERENCES

EXIT SETUP

GOTO GENERAL SETUP PAGE

- - GENERAL PAGE - -

TV DISPLAY

PIC MODE
ANGLE MARK

CAPTIONS

GENERAL SETUP

OSD LANG

MAIN PAGE

SCREEN SAVER

NORMAL/PS

NORMAL/LB
WIDE

T

T

Summary of Contents for DV352

Page 1: ...to follow If you take a few minutes to look through it you ll learn how to use all of the features of your new JENSEN DV352 Mobile Multimedia DVD CD MP3 Player for maximum enjoyment Introduction 2 Preparation 2 Installation 3 Wiring 5 Controls and Indicators 6 Basic Operation 8 Disc Operation 8 Setup Menu 11 Disc Symbols and Properties 13 Troubleshooting 14 Specifications 15 Warranty 15 www ASAEle...

Page 2: ...SHOCK AND ANNOYING INTERFER ENCE USE ONLY THE RECOMMENDED ACCESSORIES CAUTION This mobile DVD player is a Class I laser product that uses a visible invisible laser beam which could cause hazardous radiation exposure if improperly directed Be sure to operate the mobile DVD player as instructed Use of controls or adjustments or performance of procedures other than those specified herein may result i...

Page 3: ...s corrected Once the unit is properly operating turn off the ignition switch and proceed with final mounting of the chassis 7 Carefully slide the DVD player into the half sleeve making sure it is right side up until it is fully seated and the spring clips lock it into place NOTE For proper operation of the CD DVD player the chassis must be mounted within 30 of horizontal Make sure the unit is moun...

Page 4: ...side 3 Reinstall the dash panel Reconnecting the Battery When wiring is complete reconnect the battery negative terminal Removing the Unit 1 Make sure the ignition is turned off then disconnect the cable from the vehicle battery s negative terminal 2 Remove the metal strap attached the back of the unit if attached 3 Lift the top of the outer trim ring then pull it out to remove it 4 Insert both of...

Page 5: ...onnect to a 12 volt circuit that is only live when the ignition is on The best connection point is at the car s fuse block at the RADIO or ACCESSORY identified terminals Audio Video Connections NOTE When replacing a fuse be sure to use correct type and amperage to avoid damaging the DVD player The DV352 uses one 3 amp and one 0 5 amp ACG fuse located in the black filter boxes in line with the powe...

Page 6: ...In 15 Right Audio In 16 Reset Remote Control Operation Using the Remote Control Point the remote control towards the player front face remote sensor IR 2 The operation angle is approximately 30 degrees in each direction of the front of the remote sensor DVD CD MP3 PLAYER MUTE IR VIDEO IN 2 L AUDIO IN 2 R VOL SEL MODE 3 8 1 13 2 10 12 16 11 9 6 7 4 5 14 15 DISPLAY PROGRAM MUTE EJECT MODE SHUFFLE RE...

Page 7: ... 18 PROGRAM Play tracks in programed order MP3 CD 19 SHUFFLE Play tracks in random order NOT for DVD 20 REPEAT Repeat current track chapter 21 A B Repeat selected passage continuously 22 SUBTITLE Change the SUBTITLE language on multi subtitle language DVD discs 23 ANGLE Change the viewing angle on multi angle DVD discs 24 MENU Display the root menu stored on DVD discs 25 SETUP Display the SETUP me...

Page 8: ...ress the RESET button AV In Operation You can connect another audio video system to the unit through the AV IN terminals on the back AV1 INPUT or front panel AV2 INPUT of the unit Once the device is connected press the MODE button 11 on the front panel or remote control to select AV IN1 or AV IN2 mode Disc Operation Stopping Play Press the stop button 5 on the front panel or remote control to stop...

Page 9: ...PT of the repeated section Press the A B button again once you reach the desired end point BRPT of the repeated section The selected portion of the DVD will now repeat continuously Press the A B button again to cancel the A B section setting and stop repeat play Goto Search During DVD or VCD playback perform the following steps to use the GOTO feature to access a specific location on a disc Title ...

Page 10: ...2 Press DISPLAY for the second time CHAPTER REMAIN 00 04 25 3 Press DISPLAY for the third time to display OFF then clear the message on the screen OFF Multi Language Discs DVD Only Changing Audio Language If you are watching a disc recorded in multiple languages press the AUDIO button 31 on the remote control to choose a language If no other languages are recorded is displayed in the top left corn...

Page 11: ...em using the buttons 29 3 Press the OK button 30 on the remote control to display the selected submenu From any submenu select MAIN PAGE to return to the SETUP MENU MAIN PAGE screen Select EXIT SETUP to close the SETUP MENU General Setup Aspect Ratio Select the TV DISPLAY menu option to select the NORMAL PS NORMAL LB or WIDE aspect ratio Normal PS For 4 3 TV Image is played back in the PAN SCAN st...

Page 12: ...erred OSD On Screen Display language using the buttons 29 Audio Setup LPCM OUTPUT Set the LPCM Line Pulse Code Modulation OUTPUT to LPCM 48K or LPCM 96K The higher the sampling frequency is the better the output audio quality Preferences TV TYPE Setup This player can play discs recorded in either PAL or NTSC format Select NTSC when the unit is connected to an NTSC TV Select PAL when the unit is co...

Page 13: ...player NOTE The logo must be in the JPEG format 2 Select the desired picture press the button 6 then press the TITLE button 32 The current picture is stored in the unit and LOGO IS COPIED appears on the screen Select ORIG LOGO to return the default image Disc Symbols and Properties NOTE The following types of discs will not play in this unit DVD ROM DVD RAM CDV CD G DVD R discs WILL play in this u...

Page 14: ...rly until the moisture has evaporated We suggest you use a cleaning disc in this unit more frequently than in the unit in your home due to the environmental conditions of the vehicle Problem Cause Corrective Action Unit will not power on Radio Fuse blown Install new fuse with correct rating Car battery fuse blown Install new fuse with correct rating Illegal operation Press the RESET button located...

Page 15: ...xtend to the elimination of externally generated static or noise to the correction of antenna problems to costs incurred for removal or reinstallation of the product or to damage to any tapes cd s dvd s speakers accessories or electrical systems This warranty does not apply to any product or part thereof which in the opinion of the Company has been damaged through alteration improper installation ...

Reviews: