Jensen DV2007 Installation And Operation Manual Download Page 2

2

DV2007

When Driving

Keep the volume level Iow enough to be aware of the road and traffic conditions.

When Car Washing

Do not expose the product to water or excessive moisture. This could cause electrical shorts, 
fire or other damage.

When Parked

Parking in direct sunlight can produce very high temperatures inside your vehicle. Give the 
interior a chance to cool down before starting playback.

Use the Proper Power Supply

This product is designed to operate with a 12 volt DC, negative ground battery system (the 
regular system in a North American car).

Protect the Disc Mechanism

Avoid inserting any foreign objects into the slot of this player. Failure to follow this may cause
malfunction or permanent damage due to the precise mechanism of this unit.

1. SAFETY INFORMATION

CAUTION:

THIS  MOBILE  DVD  PLAYER  IS  A  CLASS  I  LASER  PRODUCT.  THIS  UNIT  USES  A 
VISIBLE/INVISIBLE  LASER  BEAM  WHICH  COULD  CAUSE  HAZARDOUS  RADIATION  IF 
EXPOSED  DIRECTLY  .  BE  SURE  TO  OPERATE  THE  MOBILE  DVD  PLAYER  CORRECTLY  AS 
INSTRUCTED.
USE OF CONTROLS OR ADJUSTMENTS OR PERFORMANCE OR PROCEDURES OTHER THAN 
THOSE SPECIFIED HEREIN MAY RESULT IN HAZARDOUS RADIATION EXPOSURE.
DO NOT OPEN COVERS AND DO NOT REPAIR BY YOURSELF PLEASE REFER SERVICING TO A  
QUALIFIED  TECHNICIAN.

WARNING:

     TO REDUCE THE RISK OF FIRE OR ELECTRIC SHOCK, DO NOT EXPOSE  THIS EQUIPMENT 

TO RAIN OR   MOISTURE.

     TO REDUCE THE RISK OF FIRE OR  ELECTRIC SHOCK, AND ANNOYING   INTERFERENCE, 

USE ONLY THE  RECOMMENDED ACCESSORIES. 

     THIS DEVICE IS INTENDED FOR CONTINUOUS OPERATION.

This product incorporates copyright protection technology that is protected by method claims of 
certain U.S. Patents and other intellectual property rights owned by Macrovision Corporation and 
other  rights  owners.  Use  of  this  copyright  protection  technology  must  be  authorized  by 
Macrovision Corporation, and is intended for home and other limited viewing uses only unless
otherwise  authorized  by  Macrovision  Corporation.  Reverse  engineering  or  disassembly  is 
prohibited.

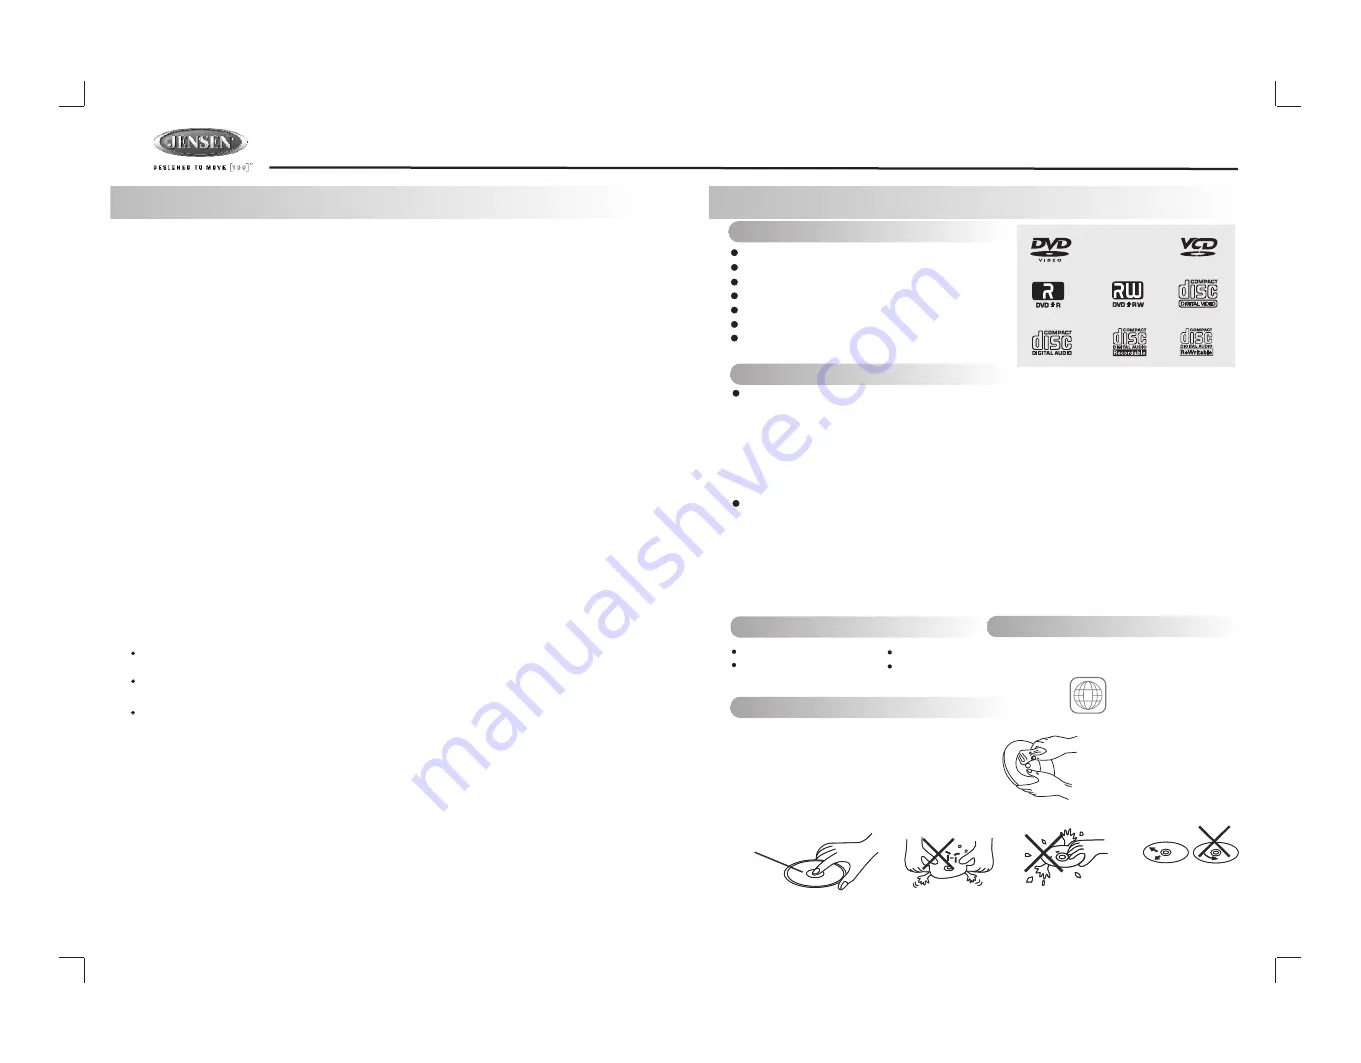
2. DISC AND FORMAT SUPPORTS

Do not bend

Before playing, wipe the disc using a clean cloth, working from the center hole 
towards the outside edge.

Never use benzene, thinners, cleaning fluids
 or anti-static liquids or any other solvent.

Label side
Up

Never touch
the under side
of a disc

Wipe the disc surface 

from the

center to the edge.

Note: 

A disc may become somewhat scratched (although not enough to make it unusable) depending on 

you handle it and conditions in the usage environment. Note these scratches are not an indication of any 

problem with the player.

8 cm disc
CDV, CDI, CDG,

LD
DVD RAM

DVD players and DVD Video discs have their 
own Region Code numbers. This unit can  
play the disc of all region code numbers.

ALL

A. DISCS CAN PLAY WITH THIS UNIT

C. DISCS WHICH CAN NOT BE PLAYED

D. NOTE ON REGION CODE

E. DISC MAINTENANCE

B. FORMAT CAN PLAY WITH THIS UNIT 

Digital Versatile Discs (DVDs)
Video CDs (VCDs)
Digital Versatile Discs Recordable(DVD+/-R)
Digital Versatile Discs Rewritable(DVD+/-RW)
Compact Discs (CDs)
CD Recordable (CD-R)
CD Rewritable (CD-RW)

AUDIO FORMAT

Playback  CD-DA  and  MP3  or  WMA  digital  music  file  on  CD-ROM  or  DVD-ROM  or  USB  or 
Memory  Card.

Note of MP3 and WMA: 

Supported Sampling frequencies; 32kHz, 44.1kHz, 48kHz.
Supported Bit-Rates: 32-256 kbps variable bit rate

Support Maximum 2000 files
Maximum 30 characters display

VIDEO FORMAT

Playback IMAGE JPEG,   DVD Video, MPEG4. on CD-ROM or DVD-ROM 
Card. 

Noted of MPEG4

Supported decoding MPEG-4 video defined by ISO 14496-2 Standard
a.   Simple Profile (SP) and
b.   Advance Simple Profile (ASP)
Supported file format: .mp4 and .m4a (audio only)

or USB or Memory 

Summary of Contents for DV2007

Page 1: ...Installation and Operation Manual DV2007 CD MP3 WMA DVD PLAYER RECEIVER B D A N M O D E DVD PLAYER RECEIVER REL ENU M DV2007 DVD MENU MUTE M ...

Page 2: ...ration and other rights owners Use of this copyright protection technology must be authorized by Macrovision Corporation and is intended for home and other limited viewing uses only unless otherwise authorized by Macrovision Corporation Reverse engineering or disassembly is prohibited 2 DISC AND FORMAT SUPPORTS Do not bend Before playing wipe the disc using a clean cloth working from the center ho...

Page 3: ...make certain all connections are secure and insulated with crimp connectors or electrical tape to ensure proper operation 7 After completing the wiring connections attach the front panel and turn the unit on to confirm operation vehicle ignition switch must be on If the unit does not operate 182 53 Dashboard Bend Tabs Screw Stud recheck all wiring until the problem is corrected Once proper operati...

Page 4: ...erminal Detachable Control Panel DCP Removing the Detachable Control Panel DCP 1 Turn the power off 2 Press the REL button 3 Remove the DCP Attaching the DCP 1 Attach the panel at the right side first with point B on the main unit touching point A on the DCP as shown in the diagram 2 Press the left side of the DCP onto the main unit until a click is heard CAUTION DO NOT insert the DCP from the lef...

Page 5: ...o will not work if this wire is not connected Accessory Ignition Connect to existing radio wire or radio fuse GREY FRONT CHANNEL REAR CHANNEL BLACK L CH R CH L CH WHITE AMP R CH RED WHITE RED RCA TO RCA CABLES Not supplied 20 PIN AUDIO POWER HARNESS POWER ANTENNA AMPLIFIER REMOTE GROUND 12 VOLTS CONSTANT 12 VOLTS SWITCHED iPod iPod ready cable WHITE EMPTY N A wired remote cable BLACK WIRED REMOTE ...

Page 6: ...3 30 34 35 32 19 20 22 25 23 40 12 8 2 4 11 14 17 16 18 37 31 26 21 38 24 39 36 27 33 7 28 29 MUTE Left Eject DVD KEY SYSTEM TUNER CD MP3 WMA 29 30 31 32 33 34 35 36 37 38 39 40 VCD PBC Set Up OSD Go To Subtitle Title DVD Audio Angle Zoom Set Up DISPLAY DVD DVD MENU MENU Repeat Track Repeat Disc Repeat Off Repeat Chapter Repeat Title Repeat Off OPERATIONS 27 28 Track NO Access Track NO Access File...

Page 7: ...rength of the signals at which the radio will stop during automatic tuning Distance is the default allowing the radio to stop at a broader range of signals To set the unit to select only strong local stations during automatic tuning press this button until Local appears in the display 9 LO DX BUTTON The unit is allowed to connect with external Audio Video system such like Digital Camera or DVD Con...

Page 8: ...ture allows the selection of an audible beep tone when a button is pressed BEEP TONE On is the default setting Use the volume up down button to select the BEEP TONE Off option 9 AUDIO OPERATION Short Press AUDIO button to access the Audio Menu User can navigate thru the Audio Menu items by pressing the AUDIO button repeatedly or by pressing the Tuning Up or Tuning Down Button Once the desired menu...

Page 9: ...owing iPod software version iPod 1G Not Supported iPod 2G Not Supported iPod 3G Firmware Version 2 2 iPod Mini All versions iPod 4G All versions iPod Photo All versions iPod Nano All versions iPod 5G Video All versions Connect the iPod to this unit About Video File This unit can support iPod Video display output feature however it is NOT ABLE to select any VIDEO FILE OR VIDEO ALBUM which contained...

Page 10: ... on repeat playing the current song until the REPEAT PLAY function is disabled To disable current song REPEAT PLAY press the M3 button less than 3 seconds Shuffle play Shuffle Album Long press the M4 button for more than 3 seconds during iPod playback mode to activate the SHUFFLE F function This function allows RANDOM playback of all the albums contained on the iPod To disable SHUFFLE F function l...

Page 11: ...ARD or 19 29 NUMERIC BUTTONS 1 When playback CD MP3 WMA use for track number or File number direct access and use when function need numeric Selection or Input like in the Goto function etc 2 Use when playback DVD which need numeric Selection or Input like in the Goto function etc The fast forward backward speed may differ depending upon the disc 32 REPEAT 10 13 UP DOWN LEFT RIGHT BUTTON Use to mo...

Page 12: ...e second to advance to the next track on the CD The selected track number will appear on the display Press and Hold TRACK UP or TRACK DOWN button for more than one second to fast forward or fast reverse through the disc Playback starts when the button is released FILE FOLDER SEARCHING When the MP3 WMA music file is playback the M5 16 an M 17 is used as UP DOWN cursor to navigate thru the Folder Fi...

Page 13: ...REPEAT VOLUME MODE AUDIO DISPLAY U EN M 10 GOTO MUTE 13 DVD OPERATION DVD Operation Remote control 9 15 13 3 30 34 35 32 40 12 8 2 11 14 17 16 18 37 31 38 24 39 36 27 33 19 29 10 13 7 10 13 UP DOWN LEFT RIGHT BUTTON Use these buttons to move cursor up down left right 16 OK Use this button to confirm the selection 19 29 NUMERIC BUTTONS 30A DVD MENU 1 Press DVD MENU to invoke the menu screen include...

Page 14: ...les or menu screens included on DVDs 36 SUBTITLE Press SUBTITLE during playback to turn on off subtitles and to change the subtitles DVD only The OSD indicates the current setting giving the subtitle track number and the language selected for example 37 TITLE 1 Press TITLE to bring up the Title Menu DVD only depending on the type of disc if title option is available or not 2 Press direction button...

Page 15: ...e disc and then the DVD MENU or ROOT or TITLE in the DVD disc will appear on the TFT monitor and ROOT will be displayed on the TFT of the unit 12 PLAY PAUSE 1 1 Press PAUSE to pause playback 2 Press PAUSE to single step forward to the next picture in the video DVD and VCD only 3 Press PLAY to resume normal playback 13 STOP 2 STOP 1 Press STOP to stop playback and show the logo screen The player me...

Page 16: ...G4 version file size and frame rate 11 Set up AS PS While the DVD disc is being played or under stop mode the SET UP AS PS button on the control panel serves the following function Long Press the SET UP AS PS button to bring up the System Setup Menu Please refer to the related description in system Set Up for details operation of Set Up After pressing the Set Up button the LCD will display Set Up ...

Page 17: ... Norwegian Portuguese Spanish and Swedish Include The System Menu allows the user to configure the player s behavior to work in harmony with components to which the player is connected Press SET UP on the remote control or Long press the AS PS button on the front panel to invoke the Setup Menu Pressing the System Menu button during the Setup Menu will be displayed and the setup menu will be turned...

Page 18: ...le options for each of the Video settings Selecting the TV Aspect setting allows the user to select the aspect ratio of the TV DVD and VCD only The following options are available 4 3 Aspect ratio of TV is 4 3 16 9 Aspect ratio of TV is 16 9 Both widescreen and 4 3 contents will fill the entire screen 5 6 TV Aspect Ratio Most widescreen DVDs will not allow pan scan conversion If 4 3 PS is selected...

Page 19: ...allowed to play PG 13 Only titles with a parental control setting of 4 or less are allowed to Play PG R Only titles with a parental control setting of 5 or less are allowed to play R Only titles with a parental control setting of 6 or less are allowed to play NC 17 Only titles with a parental control setting of 7 or less are allowed to play Adult Allow any title to play factory default Press Ok to...

Page 20: ...cy Response 20Hz to 20KHz 3dB Channel Separation 2 Channel Stereo 60dB 1KHz Video Color System NTSC PAL Video Output Composite 1 0 Vp p 0 2 75 ohm Video Input Composite 1 0 Vp p 0 2 75 ohm Audio Max Output Power 40W x 4 channels Load Impedance speakers 4 ohms Line Out Level Load 400mV 10k ohm load Line Out Impedance 200 ohm Auxiliary Input Frequency Response 20Hz to 20KHz 3dB Input Maximum Voltage...

Page 21: ...or so then try again No sound Volume is too low Adjust volume to audible level Wiring is not properly con nected Check wiring connections The operation keys do not work Control panel not properly installed Reinstall control panel The built in microcomputer is not operating properly due to noise Press the RESET button Sound skips The installation angle is more than 30 degrees Adjust the installatio...

Page 22: ...22 ...

Reviews: