Jensen DV2007 Installation And Operation Manual Download Page 10

10

DV2007

iPod information Display on the Head Unit LCD 

This unit can display the Song, Artist, Album name and Elapsed time on the LCD display, these 
information can be displayed by pressing the AS/PS button repeatedly while a iPod Song file is 
playing 

Searching a Desire Song

Under iPod playback mode, press BAND to enter into the iPod Searching Mode. Pressing BAND 
button repeatedly to accesses the different searching methods as below :

Switch to iPod Mode

When the Head unit is power on and iPod is connected to the 30 pin connector, press the 
mode button to change to iPod mode and t

he unit will display                          for a while then 

starts     

the music files contained in the iPod and the playback will automatically 

start. Press Mode button repeatedly to change to other modes or switch back to iPod mode.


1)     Playlist
2)

Artist

3)

Album 

4)

Song

5)

Genre

Once selected the desire searching method, within 10 second press the AUDIO button as 
confirm & access into the searching mode, then turn the rotate encode volume knob to 
navigate thru the Album or Artist or Song contained in the iPod. Press the AUDIO button to 
confirm & play the selected song.  During the searching mode, press AS/PS as quick move 
back to the last upper level of Album, Playlist, Genre, etc.

Song Select

Press the Track UP (      ) or Track DOWN (      ) button for less than one second to skip to the next 
or previous song. Press and Hold Track UP (      ) or Track DOWN (     ) button for more than 3 
seconds to fast forward or fast reverse of the current song.

Song Repeat / Repeat All play :

Long press the M3 button for more than 3 seconds during iPod playback mode for “REPEAT F”. 
All songs of the current album will be kept on repeat playing until the “REPEAT F” function is 
disabled.  To  disable  current  Album  “REPEAT  F”  function,  long  press  M3  button  more  than  3 
seconds.

Press the M3 button for less than 3 seconds to “REPEAT PLAY” the current song. And keep on 
repeat playing the current song until the “REPEAT PLAY” function is disabled. To disable current 
song “REPEAT PLAY”, press the M3 button less than 3 seconds

Shuffle play: / Shuffle Album

Long press the M4 button for more than 3 seconds during iPod playback mode to activate the 
“SHUFFLE F” function. This  function allows RANDOM playback of all the albums contained on 
the iPod. To disable “SHUFFLE F” function, long press M4 button for more than 3 seconds.

Press the M4 button for less than 3 seconds during iPod playback mode to activate “SHUFFLE 
PLAY”. This function allows the playback of all the songs in the iPod in random sequence.   To 
disable “SHUFFLE PLAY”, short press M4 button again for less than 3 seconds.

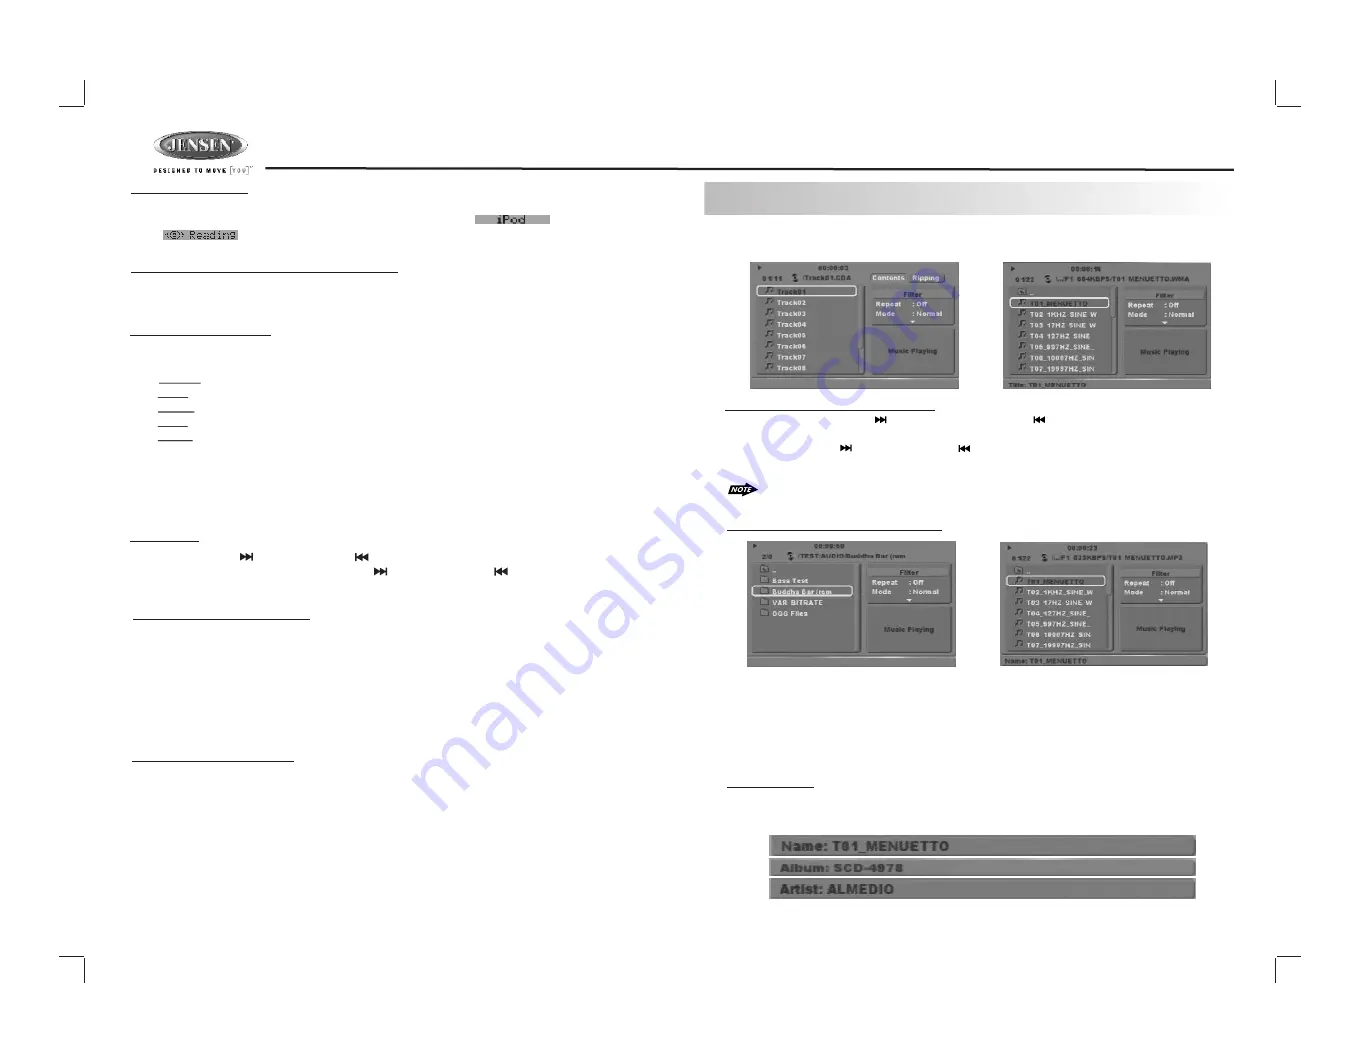
12. CD/MP3/WMA OPERATION

When a DISC or  is inserted into the player, the following picture will appear on the TFT monitor.

SELECTIING A TRACK / FILE TO PLAY

Press the TRACK/FILE UP (     ) or TRACK /FILE DOWN (    ) button for less than one second to 
advance to the next track on the CD, The selected track number will appear on the display. Press 
and Hold TRACK UP (     ) or TRACK DOWN (     ) button for more than one second to fast forward or 
fast backword through the disc. Playback starts when the button is released.

When the last track/file playback completed, the unit will automatically enter into ‘STOP’ 
mode. User can press play button to start the playback again when in the ‘STOP’ mode. 

MP3/WMA FILE /FOLDER SEARCHING

CD Audio Disc

MP3/WMA Music Files

When a DISC  is inserted into the player, The first music file contained on the device will 
automatically start playback.

1.

2.

Use the cursor ‘Up’ keys on the remote, to select a folder and press ‘OK’, the folder is 
opened and the content will be displayed.

ID3 Information

The player can display ID3 information (Name, Album, Artist, Copyright

).

If this information is 

not  available  then  display  company  information(i.e.  name  etc.)  Extended  information  will  be 
scrolling at the bottom of the TFT screen (only on the externally connected TFT screen).

3.

Use cursor ‘Up’ or ‘Down’ to navigate between the file list and press ‘OK’ to confirm to 
play the selected file.

Summary of Contents for DV2007

Page 1: ...Installation and Operation Manual DV2007 CD MP3 WMA DVD PLAYER RECEIVER B D A N M O D E DVD PLAYER RECEIVER REL ENU M DV2007 DVD MENU MUTE M ...

Page 2: ...ration and other rights owners Use of this copyright protection technology must be authorized by Macrovision Corporation and is intended for home and other limited viewing uses only unless otherwise authorized by Macrovision Corporation Reverse engineering or disassembly is prohibited 2 DISC AND FORMAT SUPPORTS Do not bend Before playing wipe the disc using a clean cloth working from the center ho...

Page 3: ...make certain all connections are secure and insulated with crimp connectors or electrical tape to ensure proper operation 7 After completing the wiring connections attach the front panel and turn the unit on to confirm operation vehicle ignition switch must be on If the unit does not operate 182 53 Dashboard Bend Tabs Screw Stud recheck all wiring until the problem is corrected Once proper operati...

Page 4: ...erminal Detachable Control Panel DCP Removing the Detachable Control Panel DCP 1 Turn the power off 2 Press the REL button 3 Remove the DCP Attaching the DCP 1 Attach the panel at the right side first with point B on the main unit touching point A on the DCP as shown in the diagram 2 Press the left side of the DCP onto the main unit until a click is heard CAUTION DO NOT insert the DCP from the lef...

Page 5: ...o will not work if this wire is not connected Accessory Ignition Connect to existing radio wire or radio fuse GREY FRONT CHANNEL REAR CHANNEL BLACK L CH R CH L CH WHITE AMP R CH RED WHITE RED RCA TO RCA CABLES Not supplied 20 PIN AUDIO POWER HARNESS POWER ANTENNA AMPLIFIER REMOTE GROUND 12 VOLTS CONSTANT 12 VOLTS SWITCHED iPod iPod ready cable WHITE EMPTY N A wired remote cable BLACK WIRED REMOTE ...

Page 6: ...3 30 34 35 32 19 20 22 25 23 40 12 8 2 4 11 14 17 16 18 37 31 26 21 38 24 39 36 27 33 7 28 29 MUTE Left Eject DVD KEY SYSTEM TUNER CD MP3 WMA 29 30 31 32 33 34 35 36 37 38 39 40 VCD PBC Set Up OSD Go To Subtitle Title DVD Audio Angle Zoom Set Up DISPLAY DVD DVD MENU MENU Repeat Track Repeat Disc Repeat Off Repeat Chapter Repeat Title Repeat Off OPERATIONS 27 28 Track NO Access Track NO Access File...

Page 7: ...rength of the signals at which the radio will stop during automatic tuning Distance is the default allowing the radio to stop at a broader range of signals To set the unit to select only strong local stations during automatic tuning press this button until Local appears in the display 9 LO DX BUTTON The unit is allowed to connect with external Audio Video system such like Digital Camera or DVD Con...

Page 8: ...ture allows the selection of an audible beep tone when a button is pressed BEEP TONE On is the default setting Use the volume up down button to select the BEEP TONE Off option 9 AUDIO OPERATION Short Press AUDIO button to access the Audio Menu User can navigate thru the Audio Menu items by pressing the AUDIO button repeatedly or by pressing the Tuning Up or Tuning Down Button Once the desired menu...

Page 9: ...owing iPod software version iPod 1G Not Supported iPod 2G Not Supported iPod 3G Firmware Version 2 2 iPod Mini All versions iPod 4G All versions iPod Photo All versions iPod Nano All versions iPod 5G Video All versions Connect the iPod to this unit About Video File This unit can support iPod Video display output feature however it is NOT ABLE to select any VIDEO FILE OR VIDEO ALBUM which contained...

Page 10: ... on repeat playing the current song until the REPEAT PLAY function is disabled To disable current song REPEAT PLAY press the M3 button less than 3 seconds Shuffle play Shuffle Album Long press the M4 button for more than 3 seconds during iPod playback mode to activate the SHUFFLE F function This function allows RANDOM playback of all the albums contained on the iPod To disable SHUFFLE F function l...

Page 11: ...ARD or 19 29 NUMERIC BUTTONS 1 When playback CD MP3 WMA use for track number or File number direct access and use when function need numeric Selection or Input like in the Goto function etc 2 Use when playback DVD which need numeric Selection or Input like in the Goto function etc The fast forward backward speed may differ depending upon the disc 32 REPEAT 10 13 UP DOWN LEFT RIGHT BUTTON Use to mo...

Page 12: ...e second to advance to the next track on the CD The selected track number will appear on the display Press and Hold TRACK UP or TRACK DOWN button for more than one second to fast forward or fast reverse through the disc Playback starts when the button is released FILE FOLDER SEARCHING When the MP3 WMA music file is playback the M5 16 an M 17 is used as UP DOWN cursor to navigate thru the Folder Fi...

Page 13: ...REPEAT VOLUME MODE AUDIO DISPLAY U EN M 10 GOTO MUTE 13 DVD OPERATION DVD Operation Remote control 9 15 13 3 30 34 35 32 40 12 8 2 11 14 17 16 18 37 31 38 24 39 36 27 33 19 29 10 13 7 10 13 UP DOWN LEFT RIGHT BUTTON Use these buttons to move cursor up down left right 16 OK Use this button to confirm the selection 19 29 NUMERIC BUTTONS 30A DVD MENU 1 Press DVD MENU to invoke the menu screen include...

Page 14: ...les or menu screens included on DVDs 36 SUBTITLE Press SUBTITLE during playback to turn on off subtitles and to change the subtitles DVD only The OSD indicates the current setting giving the subtitle track number and the language selected for example 37 TITLE 1 Press TITLE to bring up the Title Menu DVD only depending on the type of disc if title option is available or not 2 Press direction button...

Page 15: ...e disc and then the DVD MENU or ROOT or TITLE in the DVD disc will appear on the TFT monitor and ROOT will be displayed on the TFT of the unit 12 PLAY PAUSE 1 1 Press PAUSE to pause playback 2 Press PAUSE to single step forward to the next picture in the video DVD and VCD only 3 Press PLAY to resume normal playback 13 STOP 2 STOP 1 Press STOP to stop playback and show the logo screen The player me...

Page 16: ...G4 version file size and frame rate 11 Set up AS PS While the DVD disc is being played or under stop mode the SET UP AS PS button on the control panel serves the following function Long Press the SET UP AS PS button to bring up the System Setup Menu Please refer to the related description in system Set Up for details operation of Set Up After pressing the Set Up button the LCD will display Set Up ...

Page 17: ... Norwegian Portuguese Spanish and Swedish Include The System Menu allows the user to configure the player s behavior to work in harmony with components to which the player is connected Press SET UP on the remote control or Long press the AS PS button on the front panel to invoke the Setup Menu Pressing the System Menu button during the Setup Menu will be displayed and the setup menu will be turned...

Page 18: ...le options for each of the Video settings Selecting the TV Aspect setting allows the user to select the aspect ratio of the TV DVD and VCD only The following options are available 4 3 Aspect ratio of TV is 4 3 16 9 Aspect ratio of TV is 16 9 Both widescreen and 4 3 contents will fill the entire screen 5 6 TV Aspect Ratio Most widescreen DVDs will not allow pan scan conversion If 4 3 PS is selected...

Page 19: ...allowed to play PG 13 Only titles with a parental control setting of 4 or less are allowed to Play PG R Only titles with a parental control setting of 5 or less are allowed to play R Only titles with a parental control setting of 6 or less are allowed to play NC 17 Only titles with a parental control setting of 7 or less are allowed to play Adult Allow any title to play factory default Press Ok to...

Page 20: ...cy Response 20Hz to 20KHz 3dB Channel Separation 2 Channel Stereo 60dB 1KHz Video Color System NTSC PAL Video Output Composite 1 0 Vp p 0 2 75 ohm Video Input Composite 1 0 Vp p 0 2 75 ohm Audio Max Output Power 40W x 4 channels Load Impedance speakers 4 ohms Line Out Level Load 400mV 10k ohm load Line Out Impedance 200 ohm Auxiliary Input Frequency Response 20Hz to 20KHz 3dB Input Maximum Voltage...

Page 21: ...or so then try again No sound Volume is too low Adjust volume to audible level Wiring is not properly con nected Check wiring connections The operation keys do not work Control panel not properly installed Reinstall control panel The built in microcomputer is not operating properly due to noise Press the RESET button Sound skips The installation angle is more than 30 degrees Adjust the installatio...

Page 22: ...22 ...

Reviews: