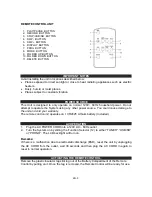
Jensen Audio JTA-460 User Manual Download Page 6


EN-5

REMOTE CONTROL UNIT 


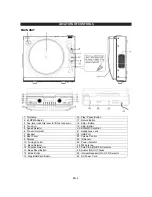
1.  PLAY/PAUSE  BUTTON                          
2. RECORD  BUTTON 
3.  STOP/USB/SD  BUTTON 
4. SKIP-  BUTTON 
5. SKIP+  BUTTON 
6. DISPLAY BUTTON 
7. PROG BUTTON 
8.  MODE  BUTTON                                                                                                                           
9. FOLDER UP BUTTON 
10. FOLDER  DOWN  BUTTON 
11. DELETE    BUTTON 


IMPORTANT NOTES 

Avoid installing the unit in locations described below: 

  Places exposed to direct sunlight or close to heat radiating appliances such as electric 

heaters. 

  Dusty, humid or moist places. 

  Places subject to constant vibration. 


POWER SOURCE 

This Unit is designed to only operate on normal 120V~ 60Hz household power. Do not 
attempt to operate the System using any other power source. You could cause damage to 
the unit and void your warranty.  
The remote control unit operates on 1 CR2025 Lithium battery (Included). 


AC OPERATION 

1.  Plug the AC POWER CORD into a 120V AC ~ 60Hz outlet. 
2.  Turn the System on by sliding the Function Selector (12) to either “TUNER”, “USB/SD” 

or “PHONO”. The LCD backlight will turn on. 

 
Remarks: 

If there is a malfunction due to electrostatic discharge (ESD), reset the unit by unplugging 
the AC CORD from the outlet, wait 30 seconds and then plug the AC CORD in again to 
reset to normal operation. 


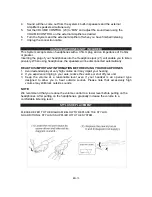
ACTIVATING THE REMOTE CONTROL 

Remove the plastic insulator tag sticking out of the Battery Compartment of the Remote 
Control by pulling on it. Once the tag is removed, the Remote Control will be ready for use. 


Summary of Contents for JTA-460

Page 1: ...MODEL JTA 460 3 SPEED STEREO TURNTABLE WITH MP3 ENCODING AND AM FM STEREO RADIO USER MANUAL PLEASE READ THIS OPERATING MANUAL COMPLETELY BEFORE OPERATING THIS UNIT AND RETAIN IT FOR FUTURE REFERENCE...

Page 2: ...has been designed and manufactured to assure personal safety Improper use can result in electric shock or fire hazard The safeguards incorporated in this unit will protect you if you observe the follo...

Page 3: ...r or sold with the apparatus When a cart is used use caution when moving the cart apparatus combination to avoid injury from tip over 13 Unplug this apparatus during lightning storms or when unused fo...

Page 4: ...d receiver Connect the equipment into an outlet on a circuit different from that to which the receiver is needed Consult the dealer or an experienced radio TV technician for help WARNING Changes or mo...

Page 5: ...d Selector 20 SD MMC Card Slot 6 Tone Arm Holder 21 Headphone Jack 7 Speaker 22 USB Port 8 Dust Cover 23 Volume Control 9 Display 24 IR Sensor 10 Tuning Control 25 Power Indicator 11 Band Selector 26...

Page 6: ...System using any other power source You could cause damage to the unit and void your warranty The remote control unit operates on 1 CR2025 Lithium battery Included AC OPERATION 1 Plug the AC POWER CO...

Page 7: ...stem The functions of the remote buttons are the same as the corresponding controls on the main unit The performance of the infrared SENSOR may be degraded causing unreliable operation if there is a s...

Page 8: ...center spindle when playing 45 rpm records 6 Move the Tone Arm to the beginning of the record or to the beginning of a particular track Gently lower the Tone Arm onto the record to start playing Adju...

Page 9: ...SD MMC card are inserted then Icon SEL will also appear and flash in the Display 3 You can use the Button or the Button to select what media you want to record to 4 Select the track to be encoded and...

Page 10: ...rands of USB flash drives are supported iii The Display will show NOF if there are no MP3 files on the USB or SD MMC card you inserted 4 To interrupt playback press the button 1 The track being played...

Page 11: ...MODE button 8 repeatedly until all the repeat indicator disappear in the Display INTRO PLAY This function enables the first 10 seconds of each track to be played 1 During playback press the MODE butto...

Page 12: ...es or select TUNER PHONO function or turn the System off COPYING FILES BETWEEN USB AND CARD The files stored on your USB flash drive or on the SD MMC card can be copied to each other Please follow the...

Page 13: ...blink in the Display to prompt for confirmation In case you want to cancel the delete function just briefly press the STOP Button 3 To confirm briefly press the RECORD button 2 once DEL will appear st...

Page 14: ...headphones the speakers will be disconnected automatically READ THIS IMPORTANT INFORMATION BEFORE USING YOUR HEADPHONES 1 Avoid extended play at very high volume as it may impair your hearing 2 If yo...

Page 15: ...er Service PROBLEM POSSIBLE CAUSE REMEDY The unit is disconnected from the AC outlet Connect to an outlet The unit will not play The AC outlet has no power Try the unit on another outlet Poor AM or FM...

Page 16: ...ailure to provide reasonable care and necessary maintenance as outlined in the user manual 3 Warranty of all SPECTRA products applies to residential use only and is void when products are used in a no...

Reviews: